Description:
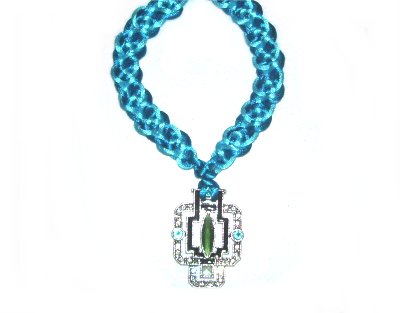
The Ripple Necklace is a Micro-Macrame
pattern featuring the Figure Eight Knot, which is
considered a Celtic knot design.
The knots are arranged horizontally, and are
linked together. There is also a Button Knot in
the design, just above the pendant.
The closure for this Macrame necklace is a
standard metal hook and loop. You can change the
type of clasp if necessary.
The material shown in the example is Satin
cord. Since it's delicate, remember to use
the Cross-Pin technique
for securing the cords. You can
also lean
the pinsover the cords.
You may find it easier to construct the knots
without pins.
Cut two cords (two different colors), each the
size shown in the chart below.
For sizes between those shown, reduce or increase
in 18-inch increments.
Size
of Necklace
Length
of Each Cord
18
inches or less
4 yards
22 inches
5
yards
26
inches
6 yards
30 inches
7 yards
For a Ripple Necklace
over
30 inches, multiply the size you need x 8
to get the length of the cords in inches.
Divide by 36 to get the yards (or meters).
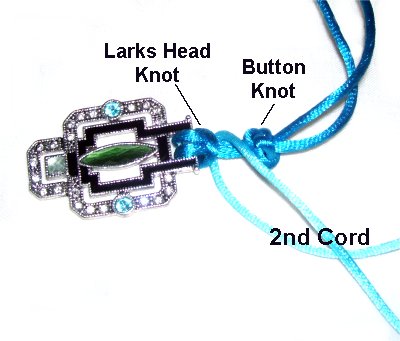
Celtic Button Knot
Fold one cord in half (Color
A). Tie a Larks
Head knot to attach the cord to the loop
on the pendan, and tighten it firmly.
Secure the pendant to your board, so the cords are
horizontal. The working cord is the portion
closest to you. The other half is the
holding cord.
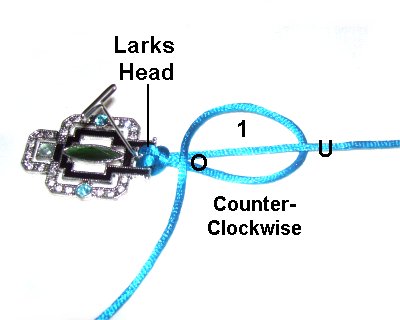
To start the Button Knot for your Ripple
Necklace, move the working cord under
the holding cord. Make the firstcounter-clockwise
loop.
As you bring it back down, it should pass
over the holding cord, close to
the pendant.
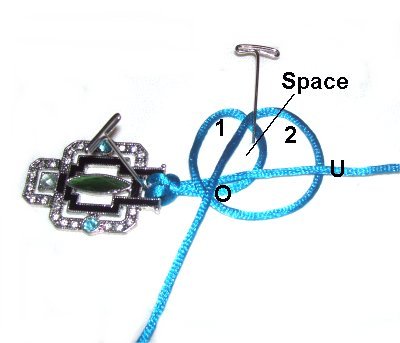
Pass the
working cord under
the holding cord, and then tie the second
loop. Make sure it rests on
top and to the right of loop 1,
creating a small space.
Placing a pin in the space makes it easy
to identify. Lean it backward over the
cord.
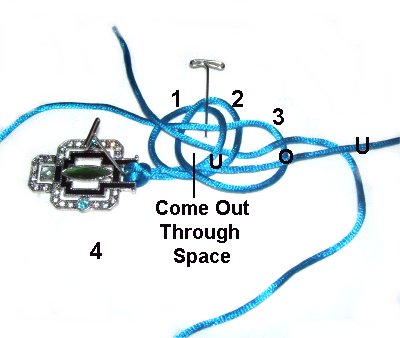
Pass the
working cord under
the holding cord.
Make the third
loop by weaving it through the first two
loops over
- under - over - under.
The end comes out through the middle
space.
Pass the
working cord under
the holding cord to begin the fourth
loop.
Pass it over
the right edge of the 3rd loop, under
two segments, and out through the space
where the pin is located.
Tighten the
knotin
theorder
the loops were made.
Start with loop
2, which tightens loop 1. The final
step is to pull on the end.
Design
Tip: Celtic Button knots are easy
to construct but difficult to tighten (unless
you've had experience with them). It's
purpose is to to prevent the cords from twisting
next to the pendant.
You can use a different knot for this portion of
the Ripple Necklace, if this one proves too
challenging to tighten.
Wrap the
second cord (color
B) around the segment between the
Larks head knot and the button knot.
Center it by matching the ends.
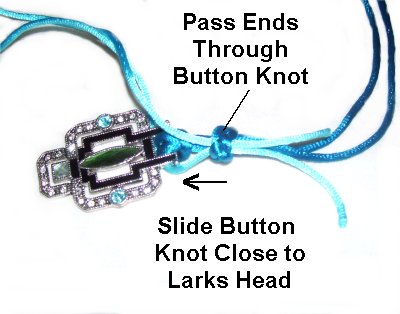
Pass the ends
of Color
Bthrough
the button knot, using your tweezers.
Pull the ends to remove the slack, and
then push the Button Knot close to the
Larks Head knot.
Figure Eight Design
The first Figure 8 knot for the Ripple Necklace
is made a little differently than the others, to
keep it stable.
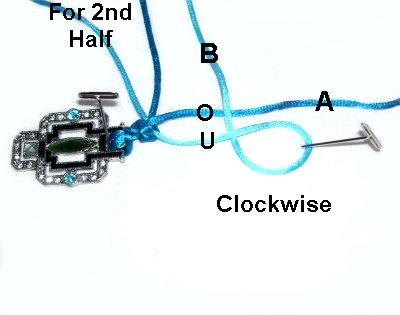
Arrange the cords horizontally. Use
one cord of each color for the first half
of the necklace design.
Color A
= Dark Turquoise Color
B = Light Turquoise
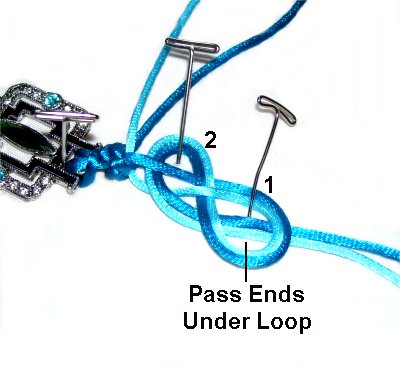
Step
1: Make a clockwise
loop with the Color
B cord, which should be the one
closest to you.
Pass it under
to make the crossing point, and overthe
Color
A cord.
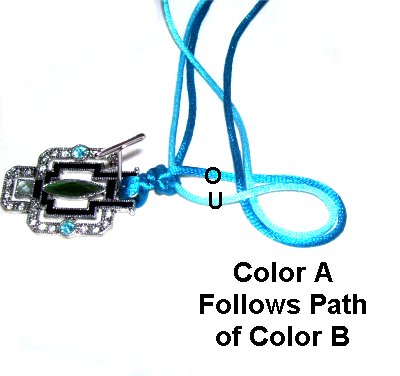
Step
2: Follow the same path
with the Color
A cord, fitting it around the outside
of the first loop.
Design
Tip:
Notice in the next image the first loop is
secured with a single pin, leaning over
the cord. Using as few pins as
possible is recommended.
Step
3: Use both cords
together, and rotate them counter-clockwise,
to the left
of the first loop (closer to the pendant).
Pass them under
- over the two segments.
Leave the figure eight design loose, so
there is plenty of space.
Step
4: Bring the two cords
down to Loop
1, and pass the ends under
it.
Step
5: Begin the next Figure 8
knot for your Ripple Necklace, by making a
clockwise
loop to the right
of the first.
Pass under
both cords to make the crossing
point.
This is
how all the remaining Figure 8 knots are
constructed.
Step
6: Link the two Figure 8
knots by passing both
cords through Loop 1 of the first
knot.
You do this by weaving over
- under - over the three
segments, rotating counter-clockwise.
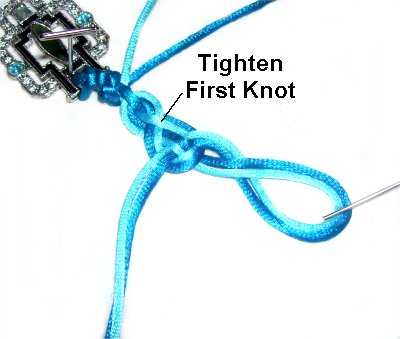
Step
7: This is the best place
to tighten the firstFigure
Eight knot.
It needs to be as small as possible, with
the cords next to each other without
crossing.
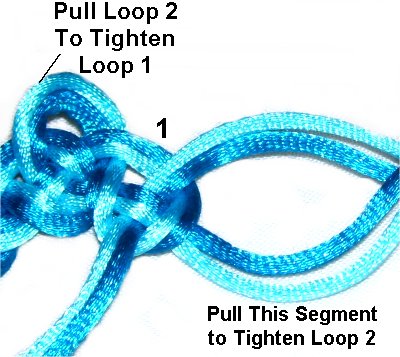
The instructions below explain the best
way to tighten each knot:
First, pull on
loop 2
to tighten loop 1 (both cords).
Next, pull on the lower
segment of the second
knot. That's the portion
to the right of the place where you linked
the two knots.
Make sure you
do not pull
on the ends.
Step
8:Repeat
steps 4 - 7, tying more Figure 8
knots, until this half of the Ripple
Necklace is the size you need.
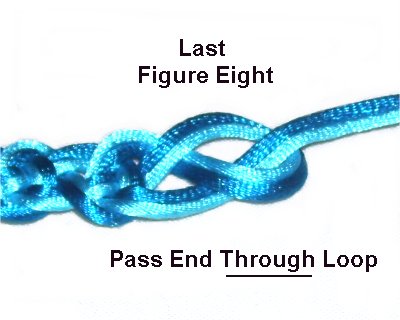
For the last Figure 8 knot, pass the end through
the right loop, rather than resting
beneath it. Pass through from the
bottom to the top.
Repeat steps 1 - 8to
make the second half of the Ripple Necklace.
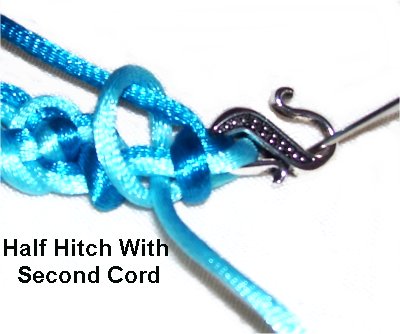
Finishing Touches
Step
9: Pass both ends through
the hook for the clasp, if you are using
this type of closure.
Tie a Half Hitch with one
end around the area between the
last Figure 8 and the hook. Make
sure it goes around the other end as
well.
Before tightening it, apply glue just
below the hook, so it will be on the inside
of the knot.
Step
10: Switch to the other
end, and tie a second Half Hitch the same
way, to the left of the first knot.
Add more glue to this knot (on the
inside). When it's completely dry,
cut off the excess material (both cords).
By
using any text or images on Free Macrame
Patterns, you are agreeing to ourTerms
of Use