Description:
Figure Eight Patterns are sometimes used to create
Celtic jewelry, Macrame belts, pet collars, and
similar items.
On this page are two designs where the Figure 8
knots create a sennit,
which is a series of knots. The knots are
linked together either vertically or horizontally.
The 8
shape is a historical Celtic symbol
representing unity, love, and eternity. The
cord twists and curves in both directions to form
a woven design that can appear endless.
Click on the link or image to practice
those designs, too.
Figure Eight Patterns - Vertical
Description:
This Figure Eight sennit features loops arranged
in the typical 8 shape, which is vertical.
The knots are connected moving left to right.
This design was changed slightly when the page was
updated. The linkage for the back loops is
the opposite
of the front loops. The sennit is now easier
to keep flat and the loops don't kink as much.
I encourage you to use this new technique
rather than the original.
You can tighten Figure Eight patterns so they are
loose with open spaces, or close together as shown
above. Keep in mind that putting space
between the knots will result in a design that
will STRETCH. The knots may change size
after they are stretched.
Should you decide to double the sennit to make it
thicker, you should construct it with both
cords from the start. Trying to
add the second cord after you make the sennit is
difficult.
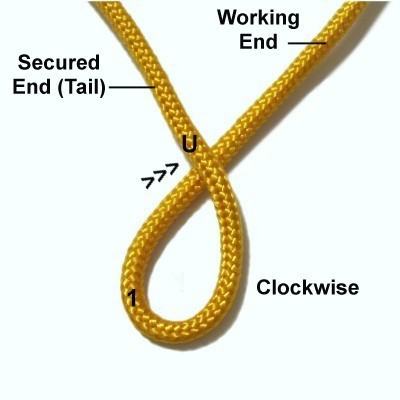
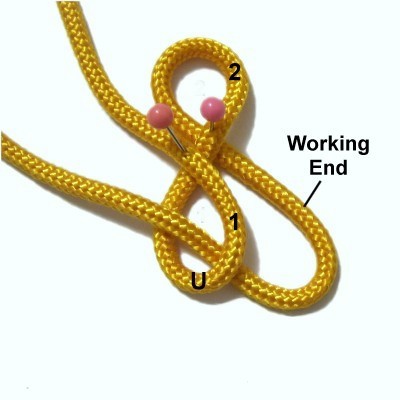
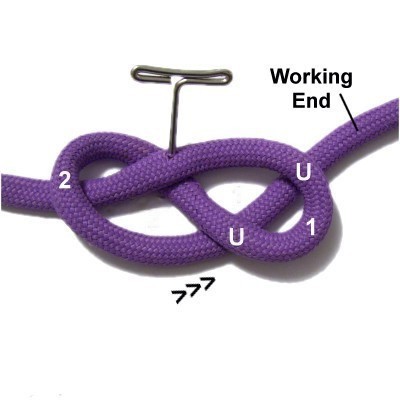
Step 1:
To practice this design, you need one cord at
least 45 inches long.
The cord should be at least 10
x the finished length you wish to make if
you are using 2mm - 3mm size material to create a
Macrame project.
For wider material (4mm or more), cut the cord 12 x
the finished length.
Secure one end
of the cord to your board on your left.
Move the working end clockwise
to make loop
1, passing it under
the secured end at the crossing point.
Secure the crossing point.
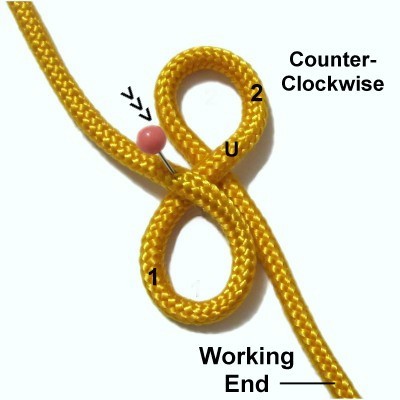
Make loop
2 with the working end, rotating
it to the right counter-clockwise.
Pass it under
the diagonal segment in the center of the
Figure Eight knot at the crossing point.
Adjust the size of both loops so they are
no more than 1-inch. Secure the
crossing point.
Designer's
Tip: You will have much better luck
tightening both Figure Eight patterns if you start
off with small loops. They only need to be
large enough for the working end to fit
through.
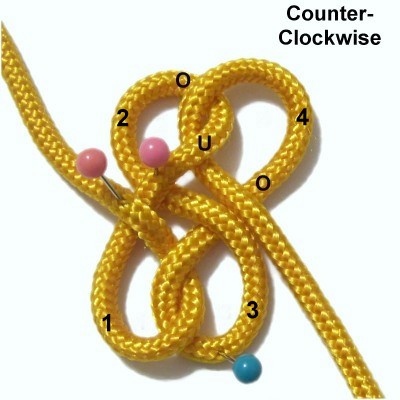
The next loop you make should be done in two
steps, so you can remove any twists or
kinks. This applies to all the forward loops
(odd numbered).
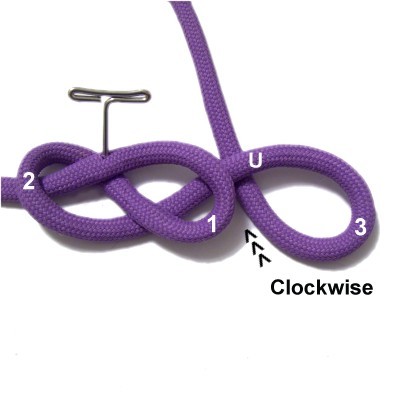
Step
2: Move the working end
through loop
1 heading left, passing it under
the area near the crook.
You can arrange it either diagonally or
vertically.
Make sure you work out any twists or kinks
before the next step.
Create loop 3
by moving the working end to the right,
rotating clockwise.
Pass it over
the right side of loop
1 and under
at the crossing point.
Arrange it vertically, heading
backward.
Designer's
Tip: Each time you make a loop for
Figure Eight patterns, you must CURVE the cord
rather than fold it. So the top
surface of the cord should always be face
up.
Twists or kinks will occur if you turn the cord
over, and the loops won't lie flat. So take
your time and carefully adjust the cord after each
step.
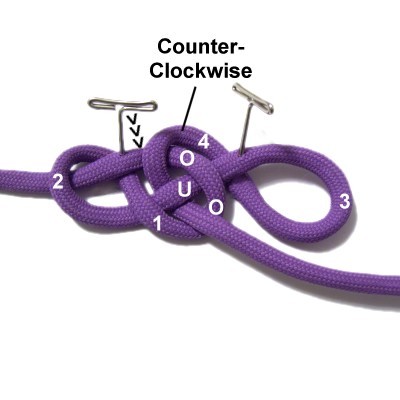
Step
3: Make loop
4counter-clockwise,
passing the working end through loop
2over
- under.
Move it over
the segment coming from the previous loop
(crossing point).
To stabilize
the first Figure Eight knot, pass the
SECURED end through loop
2.
Pass it over
the crossing point and under
the crook, heading backward.
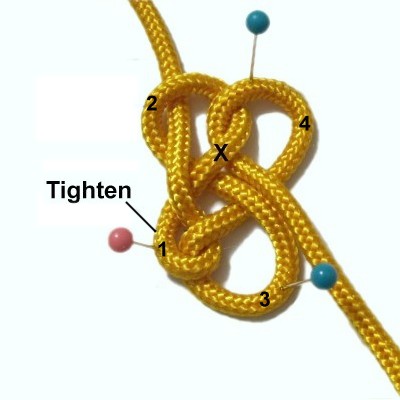
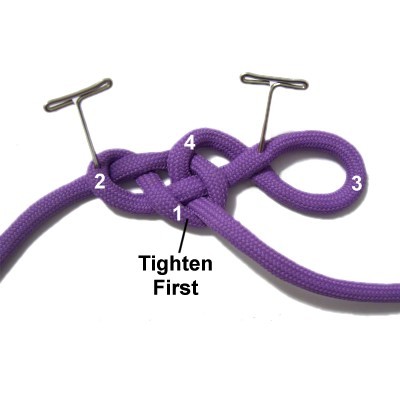
Step
4: Tighten loop
1 by pulling on loop
2 near the crossing point.
The area is marked with an X in this
image.
You can pull the secured end if you need a
little extra material to make a loop at
this end of the sennit.
Tighten loop
2 by pulling on loop
3 in the area to the right of the
first Figure Eight. It's marked with
an X in this image.
I recommend you make the first knot
tighter than the rest, so the loops grip
the secured end.
Adjust the
size of loops
3 and 4 and straighten them as
much as possible.
Tightening Figure Eight patterns takes
time and patience. In this design,
the segments in the center should be close
together.
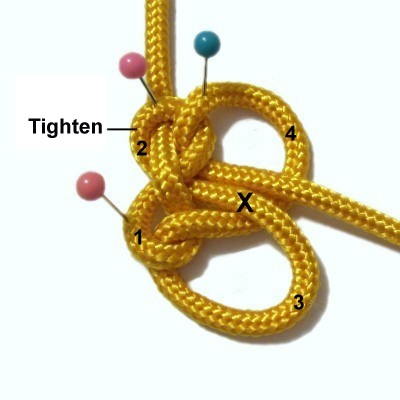
Step
5:Repeat
step 2 to create
loop 5, linking it to loop
3.
Remember to use the two-step process so
you can remove any kinks before completing
the loop.
Tighten loop
3 by pulling on loop
4 in the area marked with an X in
this image.
Loop 3 can be slightly larger than the
first Figure Eight, or the same size.
Designer's
Tip: Figure Eight patterns should
be tightened as you create new loops. In
this design, you tighten the loop the new one is
linked to.
When you tighten, pull on the loop you made in the
previous step. It will become larger, which tells
you the next loop you make will be linked with it.
Another option is to make BOTH loops of a new
Figure Eight knot, then tighten the previous knot.
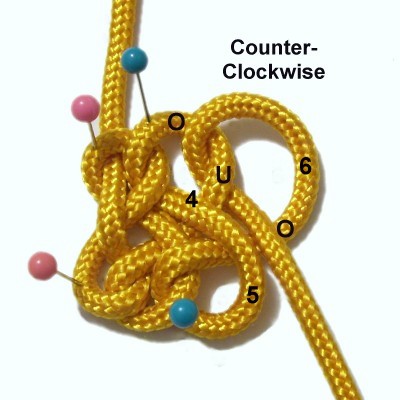
Step
6:Repeat
step 3 to create loop
6, linking it to loop
4.
Remember to pass it through loop 4 over
- under, then over
at the crossing point.
Tighten loop 4
by pulling on loop
5.
Reduce the size and balance loops
5 and 6.
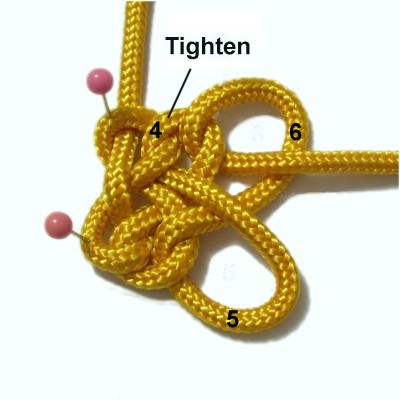
Step
7:Repeat
steps 5 and 6 (or 2 and 3)
several times, until the sennit is the
size you need.
Figure Eight Patterns look better if the
knots are the same size, so carefully
tighten each loop as you progress.
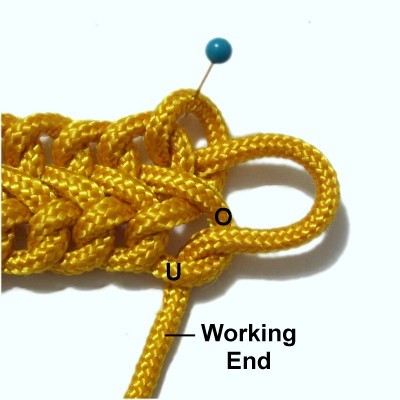
To finish the
sennit, pass the working end through the
loop directly across from it, similar to
what you did in step 3.
You can tighten the last Figure Eight knot
the same as the others, or make it smaller
so it grips the working end.
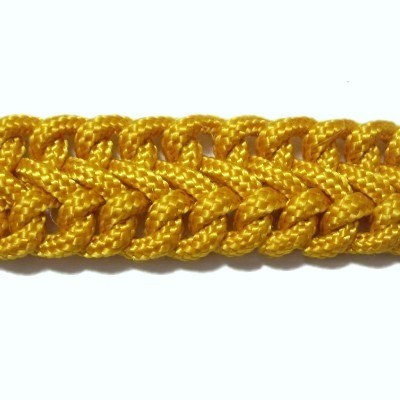
Figure Eight Patterns - Horizontal
Description:
The horizontal Figure Eight sennit features linked
knots arranged left to right. It's more
slender than the vertical design. Make it with
both cords from the start if you decide to double
it.
Like other Figure Eight patterns, the sennit can
be tightened completely or with open spaces.
It will stretch, but not as much as the vertical
design.
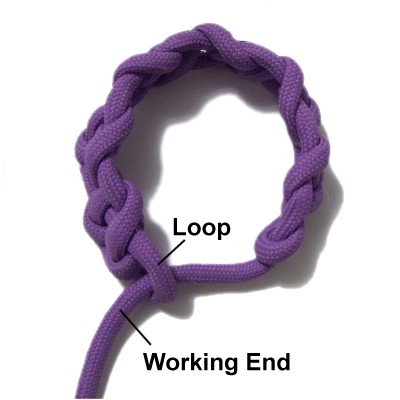
You can use this design for a belt or bracelet,
tying the ends together to close it.
You can also form a loop closure, which is
described in the instructions.
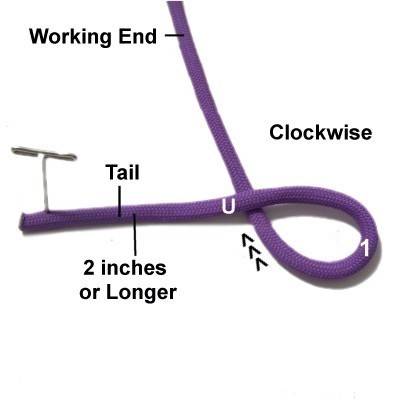
Step
1: You need one cord at least 36
inches long to practice this design.
For a Macrame project, the cord should be 4 x
the finished length you wish to
make. Increase the length if you plan to tie
the ends together for a closure, or if the
material is more than 4mm wide.
Secure one end
of the cord to your board on the left.
Make loop
1 in a clockwise
direction, passing the working end under
the secured end.
Adjust the loop so the TAIL is 2 inches or
longer, depending on how you plan to use
it.
Designer's
Tip: The tail should be at least 5 inches long
if you are using it for a bracelet closure where
you tie the ends together. Make the tail 2 inches
for a loop closure.
Increase the length to 8
inches or more if you are making a belt
with a tie closure, or 2 inches for a loop
closure.
To make loop 2,
rotate the working end counter-clockwise,
passing it over
the secured tail.
Make sure both loops are flat without
twisting or kinks. The most likely
place for that to happen is near the
crossing point.
Designer's
Tip: Since you rotate in both
directions to make Figure Eight patterns, you MUST
take the time to eliminate unwanted twists and
kinks.
This occurs most often with material that has a
flat profile, like the Paracord shown.
The top surface of the cord should always be face
up, with the bottom surface touching the board.
Step
2: Move the working end under
both parts of loop
1, heading left to right
diagonally.
Step
3: Make loop
3 to the right of loop
1, rotating clockwise.
Pass the working end under
at the crossing point.
Step
4: Rotate the working end counter-clockwise
to start loop
4.
Link it to loop
1 by passing it over
- under - over the three
segments.
Pull loop
2 to tighten loop
1. Then pull loop
3 to tighten loop
2.
Another option is to tighten loop 1 by
pulling the tail.
Keep in mind this will increase the length
of it.
Adjust the size of loops 3 and 4.
Designer's
Tip: Figure Eight patterns should
always be tightened the same amount all the way
through the sennit.
Make the loops as small as you can, but still have
room to make the link. Usually 1/2-inch to
1-inch is a good size.
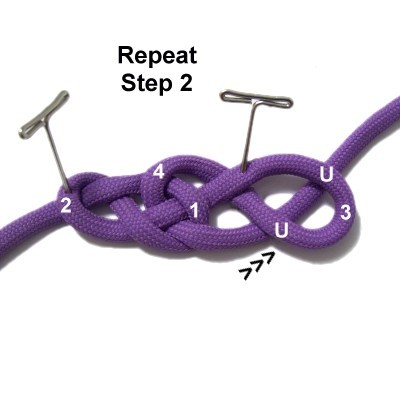
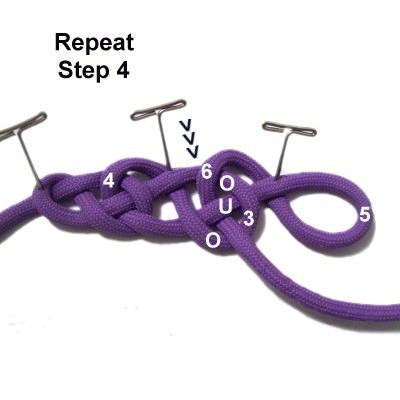
Step
5: Repeat
step 2, passing the
working end underloop
3.
Step
6: Repeat
step 3 to create loop 5.
Step
7: Repeat
step 4 to create loop 6
and link it to loop
3.
Tighten loops 3 and 4
(second knot).
Try to make it the same size as the first
Figure Eight Knot.
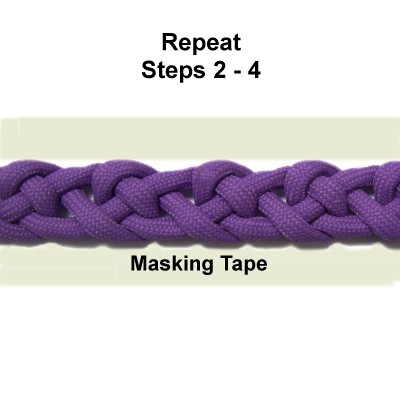
Repeatsteps
2 - 4 several times, until the
sennit is the size you want.
When you make Figure Eight patterns, try
to keep the edges straight. You can
use masking tape at each edge and line up
the knots against it.
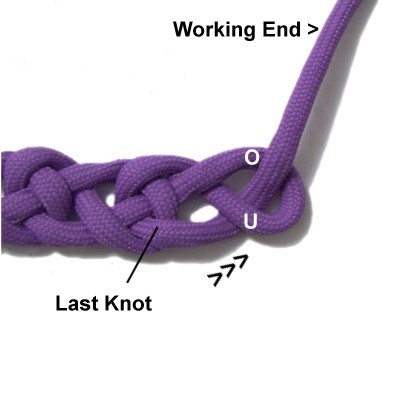
Step
8: When you tie the last
knot (both loops), pass the working end
through it under
- over.
Then tighten the last knot.
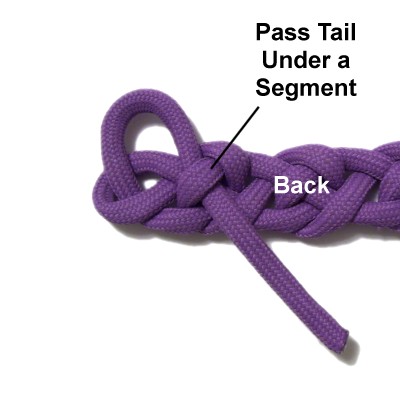
Step 9:
This step is optional.
It shows you how to use the first loop and the
working end to make a clasp.
Turn the
sennit upside down.
Pass the TAIL under one segment of the
cord in the back of the sennit.
Secure it with glue and cut off the
excess.
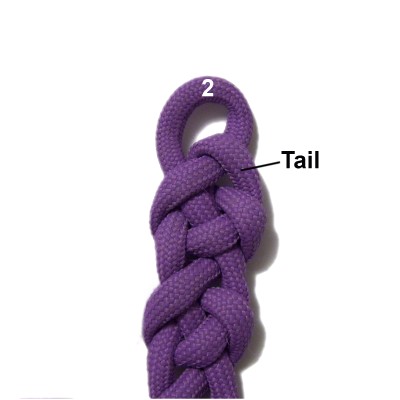
The loop used
for the clasp is loop 2, which is the one
the tail passed through.
Pull to enlarge it if you need to do
so. It should only be large enough
to pass a small knot through.
To secure the
clasp, you simply pass the working end
through the loop.
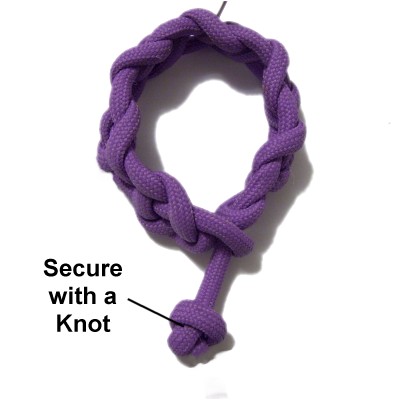
Tie a small
knot with the working end and use glue to
discourage loosening.
This image shows a simple Overhand Knot.
Make sure the knot can fit through the
loop, then cut off the excess material.
By
using any text or images on Free Macrame
Patterns, you are agreeing to ourTerms
of Use