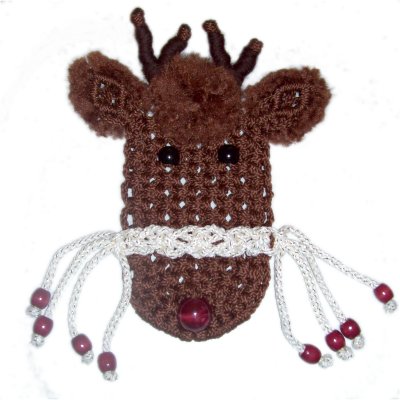
Description:
This Reindeer Decoration is a cute
Macrame Project to add holiday cheer. This
design is easy to make, but if you are a beginner,
practice all the knots listed below at least
once.
The features include small horns, a puff for the
mane, and fuzzy ears. The halter is made
with a Switch knot technique and beaded
fringe. The nose can be either brown or a
red color, if you want Rudolph.
The finished size is 12 inches from the top of the
horns to the nose. The width of the face is
5 inches, and it's 9 inches wide at the ears.
Supplies
Needed:
6mm brown or almond cord material (35 yards)
Thick dark colored yarn material for horns
Cord material for halter (6mm size is best)
Two 20mm black beads for eyes
One 30mm - 35mm round bead for nose (10mm
hole or larger)
Please
Note: The Reindeer Decoration is made
from the nose (bottom) towards the ears (top).
Nose, Face, Eyes
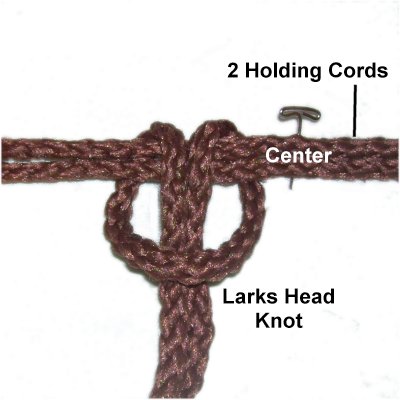
Step 1:Cut
10 cords of brown material, each 3 yards long.
Prepare them to prevent unraveling.
Arrange two cords on your board
horizontally. These will be holding cords,
so they should have tension. Mark
the center with a pin.
Mount 4 cords
to the left of the center with Larks Head
knots. Tighten firmly.
Mount the other 4 to the right of the
center.
Curve the row of knots slightly, with the
center as the high point (see image
below).
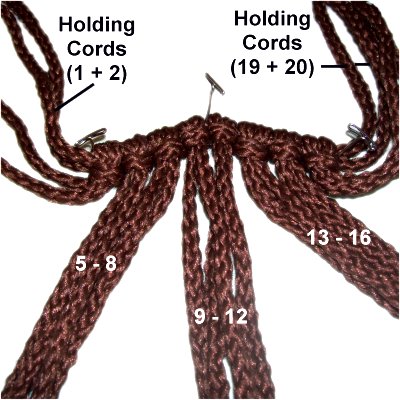
Step
2: Mentally number the cords 1 -
20. The two holding cords now become
working cords and should be numbered 1 - 2
on the left, and 19 - 20 on the right.
Tie a Square Knot with cords 5 - 8, and
another with cords 13 - 16.
Slide the
large bead for the nose onto cords
10 - 11.
Tie the second row of ASK using cords 3 -
6 for one knot, then 7 - 10, 11 - 14, and
15 - 18 for the others.
Tighten all knots firmly.
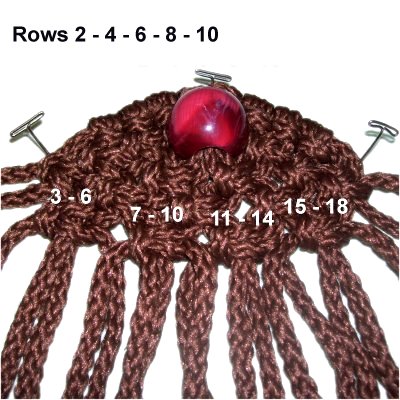
Step 3:Tie 10 more rows of Alternating
Square Knots, as follows:
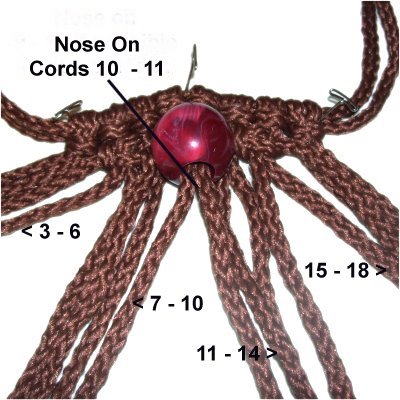
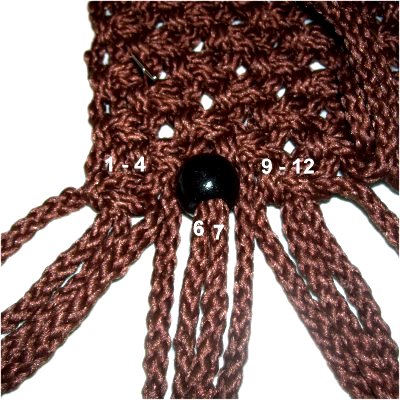
Step
4: Slide one 20mm bead for
the left eye onto cords 6 and 7.
Tie ASK with cords 1 - 4, and 9 - 12.
Slide the bead
for the right eye onto cords 14 and 15.
Tie ASK with cords 17 - 20.
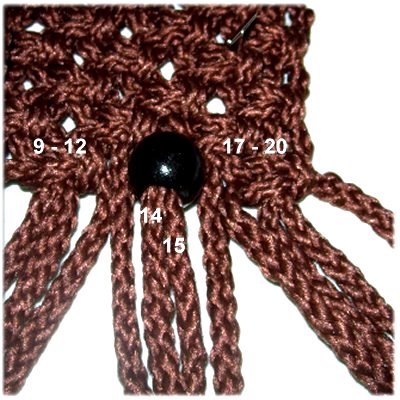
Step 5:
Tie 4 more rows of ASK to complete the face for
the Reindeer Decoration, as follows:
Rows
1 and 3: Use cords 3 - 6, 7 - 10,
11 - 14, and 15 - 18.
Rows
2 and 4: Use cords 1 - 4, 5 - 8, 9
- 12, 13 - 16, and 17 - 20.
Ears
The ears for the Reindeer Decoration are made
with cords 1 - 4 and 17 - 20. Push the
others aside for now.
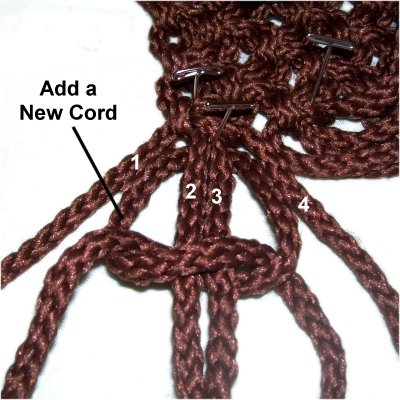
Step 6:
Cut one cord, 36 inches long.
Slide it under cords 2 and 3. Match
the ends so it's balanced. Tie
a Square Knot with the new
cord. The fillers are cords 2 and 3.
You now have 6 cords to make the first
ear. Mentally number the cords 1 -
6.
Step
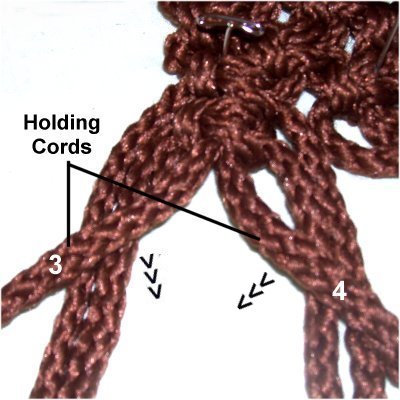
7: Re-position holding cords 3
and 4 to the right and left diagonally, on
top of the other cords.
Attach cords 2 and 1 to holding cord 3
with clockwise
Double Half Hitches (DHH).
Attach cords 5 and 6 to holding cord 4
with DHH, rotating counter-clockwise.
Notice
the Arrows? That's the direction
the working
cords should rest after the DHH are tied,
which is towards the inside
of the diamond.
For the lower portion, the cords are heading
outward (see next 2 photos).
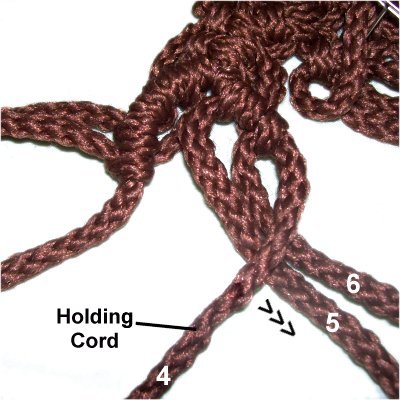
Step
8: To make the lower left
portion of the ear, move holding cord 3 to
the right.
Attach cords 1 and 2 to it with DHH,
rotating counter-clockwise.
ADD GLUE
BEFORE TIGHTENING THESE KNOTS.
To make the
lower right portion of the ear, move
holding cord 4 to the left.
Attach cords 6 and 5 to it with clockwise
DHH.
ADD GLUE
BEFORE TIGHTENING THESE KNOTS.
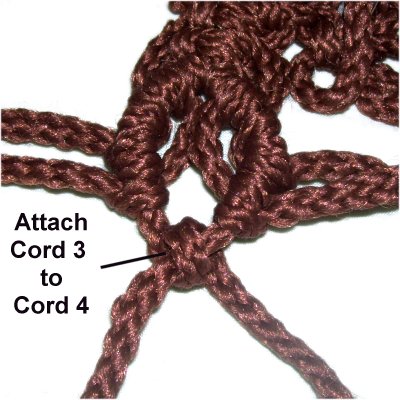
Step
9: Attach holding cord 3 to
holding cord 4 with a Double Half
Hitch.
ADD GLUE BEFORE TIGHTENING.
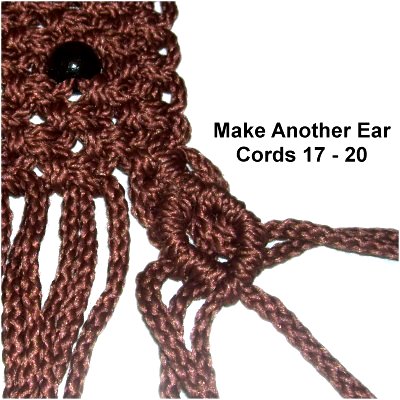
Step
10: Repeat
steps 6 - 9 to make the other ear
for your Reindeer Decoration, using cords
17 - 20.
Step
11: In the back
of each ear, slide 5-inch pieces
of material under the loops made by the
DHH, in as many areas as possible. Make
sure you don't untie any knots.
Unravel, trim and fluff the cords to form
a soft fringe along the edge of each ear.
Step
12: Move cords 9 - 12 back
towards the eyes, and secure
them. These will be used for
the hair, and are not needed right now.
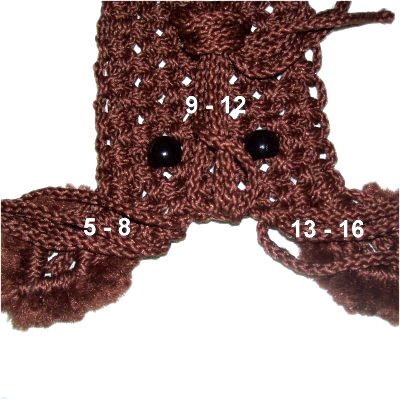
Cords 5 - 8 and 13 - 16 are used for the horns
of the Reindeer Decoration, which you will
make next.
Horns
Step 13: Cut one
piece of yarn, at least 36 inches long.
It will be used to make the first section of one
horn.
Apply tape at one end and an Overhand knot on the
other end, to prevent unraveling.
Arrange cords 13 - 16 neatly, and secure
the taped
end of the yarn on
the head, resting next to cord
13.
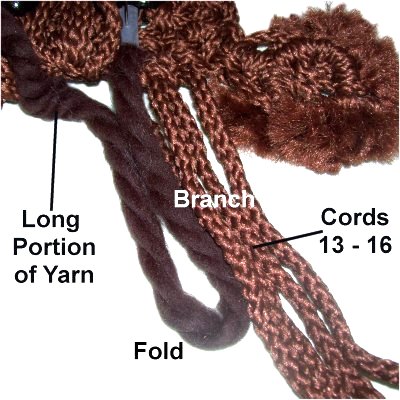
Fold the yarn 6
inches from the taped end, and
bring the long portion (with the Overhand
knot) back towards the head.
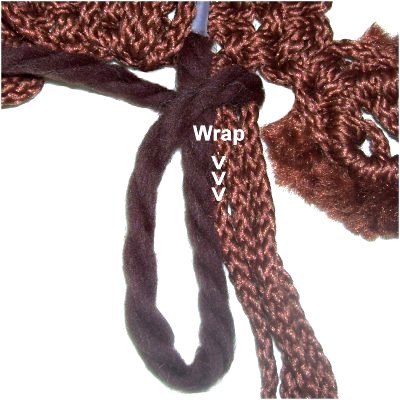
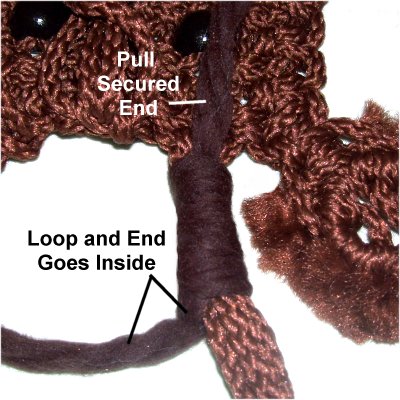
Step
14: Wrap the knotted portion
around the secured end of the yarn, as
well as cords 13 - 16. Start as
close to the SK (head) as possible.
Wrap firmly towards the folded area, until
the Wrapped knot is 5
inches long.
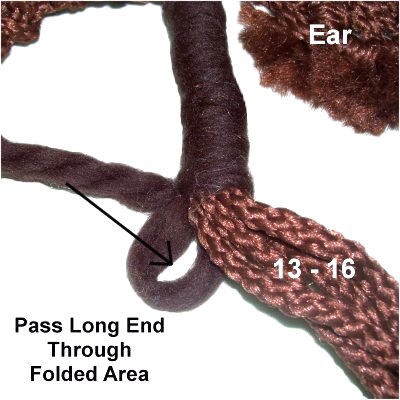
Step
15: Pass the knotted end of the
yarn through the folded area, which looks
like a loop.
Cut off the Overhand knot and shorten
what's left of that end to 2
inches.
Step
16: To complete the first Wrapped
Knot, pull on the
secured end, which has the tape.
The other end and the folded portion
(loop) will be pulled inside the wrapped
area. Make sure you pull it at least
2 inches.
Step 17:
Trim both ends of the yarn to 1/2-inch and push
the tips inside the wrapped area. Apply glue
as needed.
Step
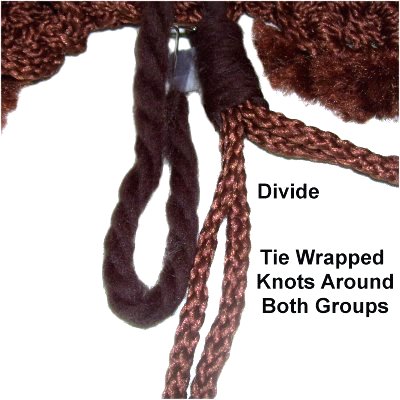
18: Divide cords 13 - 16
into two groups of two.
Repeat
steps 13 - 16, tying Wrapped
Knots around both groups. The knots
should start next to the lower edge of the
first Wrapped Knot (no gaps).
You can make these branches any length.
Step 18,
continued: Trim only the long
end of the yarn, which had the Overhand
knot, to 1/2-inch. Push it inside the wrapped
area.
Do this with both Wrapped Knots.
Step
19: In the BACK
of the Reindeer Decoration,
locate the two ends that were secured
(with the tape).
Cut off the tape, and tie the two ends
together with an Overhand knot. Apply glue
and cut off the excess material.
Design Tip:
You can divide the cords again, tying Wrapped
Knots around all 4 cords, if you want the horns to
be larger.
Step
20: Combine the two ends
(cord material) of one branch and tie an
Overhand knot. It should rest
against the end of the Wrapped Knot.
Apply glue before tightening.
Repeat with the other branch. Cut
off the excess when the glue is dry. Fuse
the tips with a flame if using
material that melts.
Step 21:
Repeat steps 13 -
20to make the second horn,
using cords 5 - 8.
Hair and Halter
The Hair for the Reindeer Decoration is made
with cords 9 - 12. You can create a short
puff or a longer lock of hair.
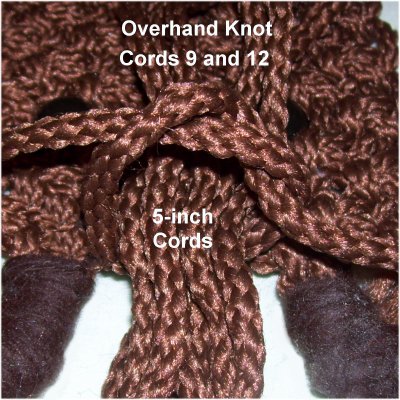
Cut
6 cords, each at least 5 inches long.
Step
22: In the back
of the deer, tie cords 9 and 12 together
with an Overhand knot.
Do not tighten it yet.
Slide the 5-inch cords through the knot
and then tighten it firmly. Balance
the cords so there is an equal amount on
each side of the knot.
Step
23: In the front
of the Reindeer Decoration, hold ALL the
cords for the hair together in your hand.
Cut them down to 2 inches while continuing
to hold them. Unravel each one and
trim the entire group again. Brush
the fibers until smooth.
This will create a short puff.
Step 23,
continued: To create a mane,
bring all the cords forward and trim them to the
size and shape you wish to make. Unravel and
brush.
Step 24:
The Halter for your Reindeer Decoration can be
made with several types of knots. The
instructions below are for a Switch Knot design,
which features the Square Knot.
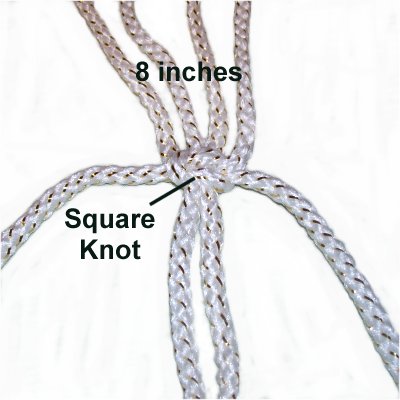
Using
the halter material, cut 4 cords, each at least
60 inches long. Prepare the
ends to prevent unraveling.
Secure the
cords to your board vertically. Move
down 8 inches from the end of the
cords, and mentally number the 4 cords.
Tie a Square Knot. The fillers are
cords 2 and 3 and the knot is tied with
cords 1 and 4.
Step
25: Move cords 1 and 4 over and
between cords 2 and 3.
Tie a Square Knot with cords 2 and 3, with
1 and 4 as the fillers.
There should 1-inch of space between this
knot and the previous one.
Step
26: For the third knot,
move cords 2 and 3 over and between cords
1 and 4.
Tie the SK with cords 1 and 4. Cords
2 and 3 are the fillers.
Step 27:Repeat
step 25 to make the 4th knot.
Try the halter on the Reindeer Decoration to see
if you need to make any adjustments. You can
untie the knots and change the spacing if it
doesn't fit.
Step
28: Place the halter on the front
of the face, lined up with spaces along
the right and left edges. Mentally
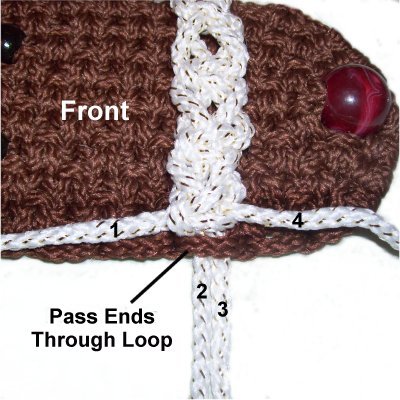
number the four cords on the halter.
On the left
side of the face, pass cords 2 -
3 through one of the spaces, front to
back.
Step
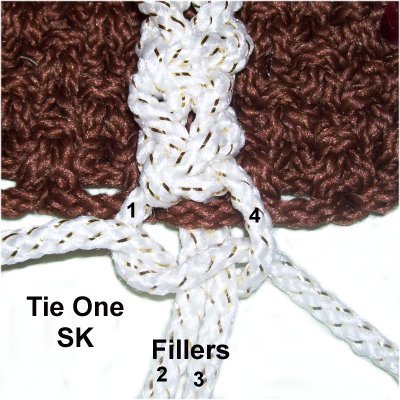
29: Secure the halter by
tying a left
SK with cords 1 and 4, around
cords 2 and 3.
Tighten it firmly and apply glue if you
wish.
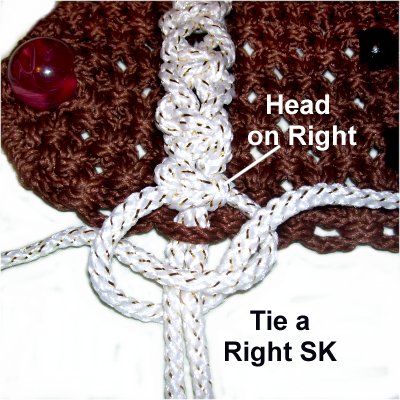
Step
30:Repeat
steps 28 and 29 to attach the
halter on the right side of the Reindeer
Decoration.
Since the knots are turned around, you
will need to tie a right
SK so it matches the others.
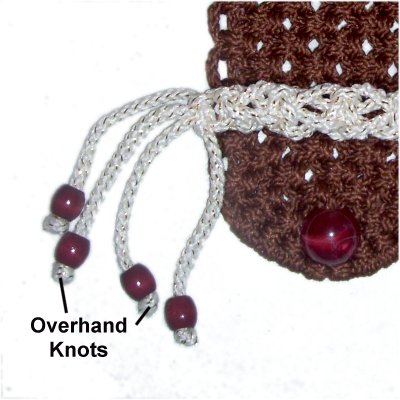
Step
31: Decorate the ends of
the halter cords with beads
(optional).
Tie Overhand knots after the beads are
applied. Apply glue before
tightening. Cut off the excess
material when the glue is dry.
By
using any text or images on Free Macrame
Patterns, you are agreeing to ourTerms
of Use