Description:
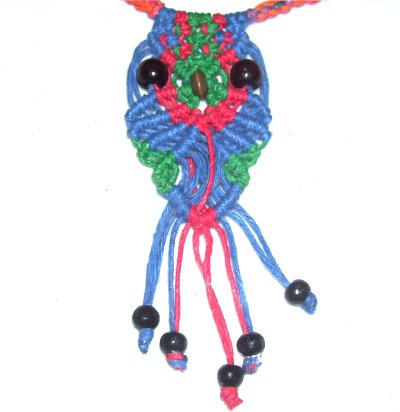
The Rainbow Owl is similar to the Owl
Pendant, also listed in the
Micro-Macrame section.
The primary difference is at the bottom, which
includes a diamond shape. The cords are finished
with beads rather than a stick.
This Macrame design features multiple colors to
produce a rainbow effect. You can use any
number of colors and arrange them how you
wish. 1mm size Hemp material was used in the
example shown.
Since only basic Macrame knots are used to make
this owl decoration, this is a good project for
beginners who have some experience.
Cutting
Instructions:Cut
two or more cords for the necklace, which the
Rainbow Owl will be attached to.
You can usually take your neck measurement and
multiply it by 4 to get the proper length.
For the owl, cut
a total of 8 cords, each 36 inches
long. Use any combination of colors.
In the example
shown, there are 4
blue cords,2green cords, 2 red cords.
Forehead
Area
Step
1: Secure the long necklace
cords horizontally, so they have
tension. All the cords for the
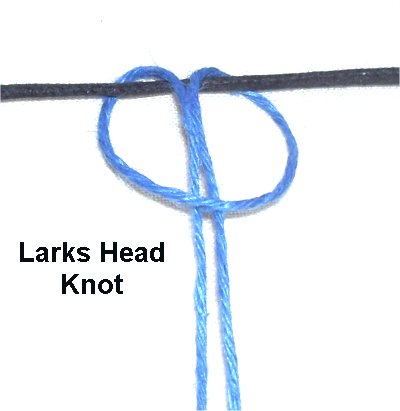
Rainbow Owl should be mounted with Larks
Head knots, as follows:
Fold the cord in half and place it under
the necklace cords, with the fold towards
you. Bring the ends over
the necklace cords and under
the folded area of the cord you are
mounting.
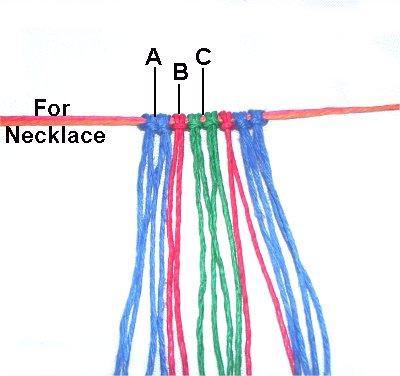
Arrange the
cords any way you wish, as you mount
them. Start at the center,
and work in both directions, so the cords
are balanced.
In the example shown, the arrangement is:
2 color A,
1 color
B, 2
color C, 1
color B, 2
color A
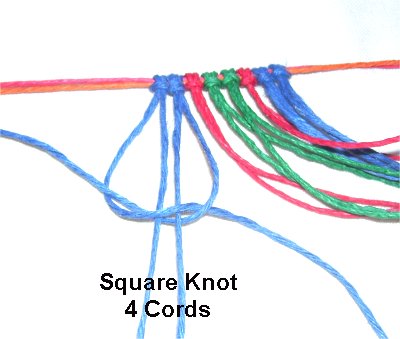
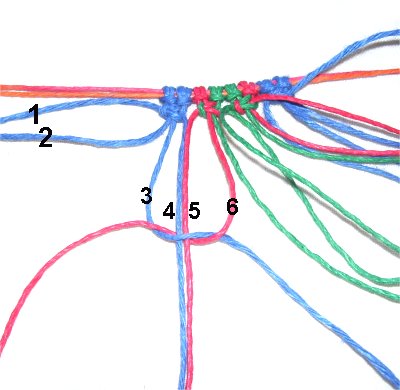
Step
2: Separate the 16 cords
into groups of 4, and mentally number
them.
Tie the first row of Square knots
using cords 1 - 4,
5 - 8, 9 - 12 and 13 - 16.
The SK should be tightened firmly, so they
rest against
the Larks Head Knots.
Step
3: Tie the next row of ASK
(V Pattern):
Knot 1 = Cords 3 - 6
Knot 2 = Cords 7 - 10
Knot 3 = Cords 11- 14
Do
not use cords 1, 2, 15 or 16 for this
row.
Step
4: For the next row of Square Knots, use
cords 5 - 8 and 9 - 12 only.
The last SK at the point of the V pattern is tied
with cords 7 - 10.
Mentally
re-number the cords.
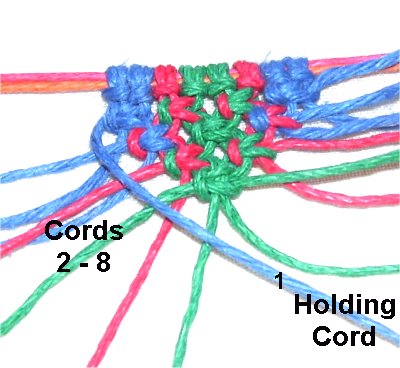
Step
5: Move cord
1 down the left
edge of the ASK and secure it
with tension, since it will be used as a
holding cord.
Attach cords 2 - 8 to it with Double Half
Hitches (DHH), rotating counter-clockwise.
(see image below)
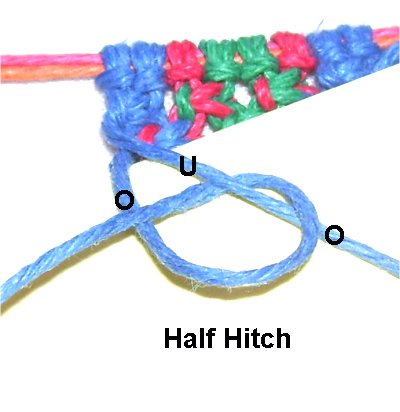
Instructions
for Double Half Hitches
A Half Hitch is tied by moving the working
cord over
and then under
the cord holding the knot.
Pass over
the working
cord as you pull it to the side.
Tie a second knot, to make a Double Half
Hitch.
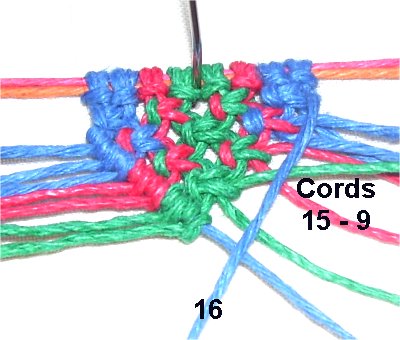
Step
6: Move cord
16 diagonally, along the right
edge of the ASK, and secure it with
tension.
Attach cords 15 - 9 to it with DHH (in
that order).
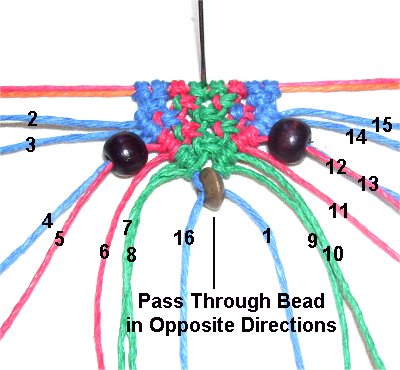
The Face
Step
7: Pass cords
1 and 16 through the narrow bead
for the beak,in opposite
directions. When
you are done, cord 1 will be on the right,
and cord 16 on the left.
Place the beads for the eyes on cords
4 - 5, and on cords
12 - 13.
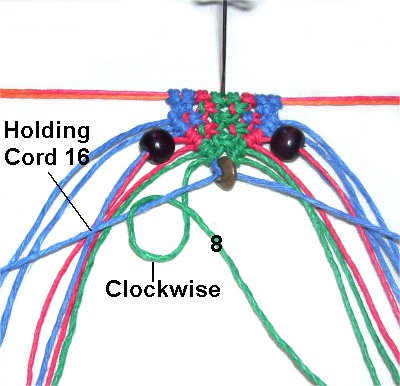
Step
8: Move holding
cord 16 to the left, so it passes
under the left eye on a slight angle.
Attach cords 8 - 2 to it with DHH, in that
order.
Rotate clockwise
as you tie the knots, pulling them tightly
so the eye rests against
the row of DHH when you are through.
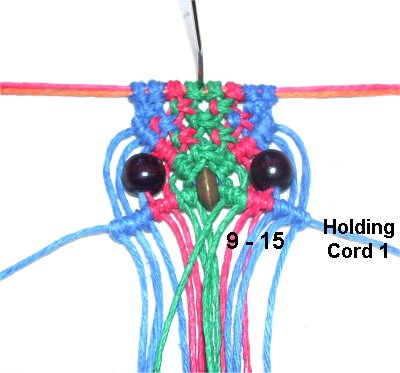
Move holding
cord 1 to the right,
so it passes under the right eye on a
slight angle.
Attach cords 9 - 15 to it with DHH,
rotating counter-clockwise.
The right eye should rest against the
knots when you are done with this area of
the Rainbow Owl.
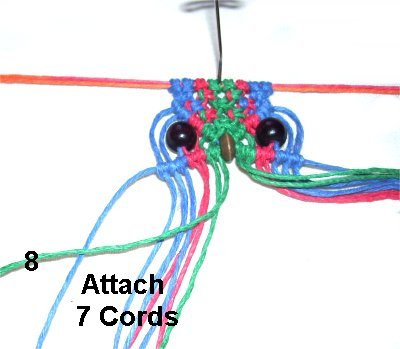
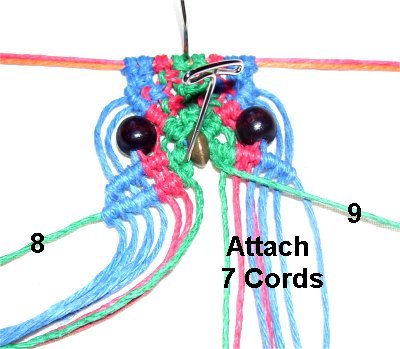
The Wings
Step
9: Locate cord
8, which is closest to the beak
of the Rainbow Owl (on the left).
Move it left, on an angle, since it will
be used as the next holding cord.
Attach 7 cords to it with DHH (cords 7 - 2
+ cord 16). Rotate clockwise
as you tie the knots.
Design
Tip: The rows of DHH for the wings
can be arranged on
any angle, and be either close together
or with space between them.
Do the same on
the left, using cord
9 to hold the knots. Attach
the remaining 7 cords to it with DHH
(cords 10 - 15 + cord 1).
The angle
for this row should match the row of DHH
on the left.
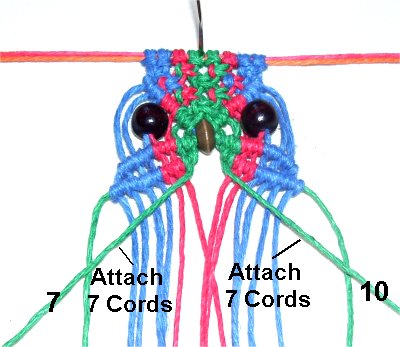
Step
10: To make the next set
of wings for the Rainbow Owl, use cords
7 and 10 as the holding cords.
Attach 7 cords to each of them with DHH,
on each side. Don't worry about the
numbering, it should be clear which ones
to attach, since the two groups are
separated.
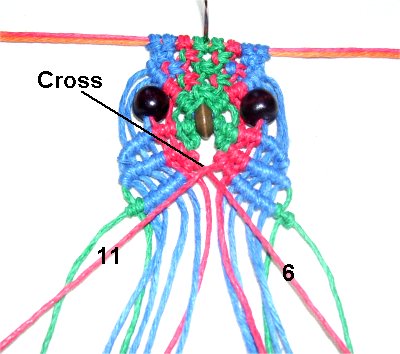
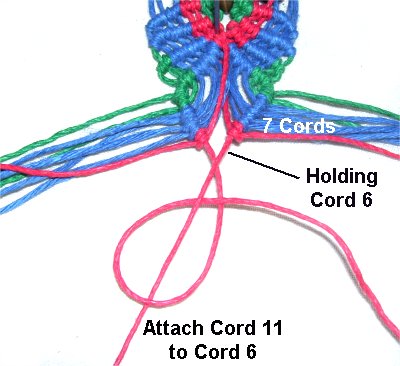
Step
11: Cross
cords 6 and 11 as shown,
and secure them with tension. They
will be the final set of holding cords.
Attach 7 cords to each one, as you did in
previous rows.
Lower Body
The upper portion of the diamond shape is the
area between the wings.
Now you will make the lower body area of the
Rainbow Owl, and
complete the diamond.
Design Option:
This is the time to decorate the inside
of the diamond with a Square knot or
bead.
Do
not use holding cords 6 or 11.
Select two other cords to tie the Square Knot
if you decide to use one. For beads,
attach small ones to each cord, or one large
bead to all of them.
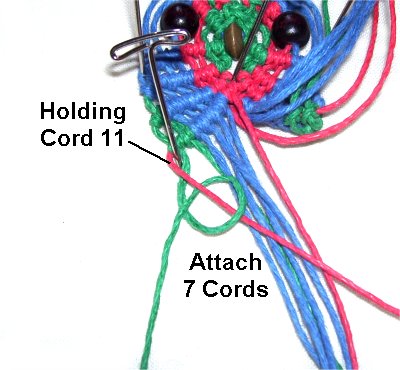
Step
12: Moveholding
cord 11 to the right,
towards the center of the Owl. Place
a pin at the corner on the left, to
support the angle.
Attach 7 cords to it with DHH, rotating
counter-clockwise. Start
with the cord closest to the pin.
Step
13: Move holding
cord 6 towards the center, and
attach the remaining 7 cords to it with clockwise
DHH.
Attach
holding cord 11 to it as well.
Finishing Touches
There are two ways you can finish the bottom of
the Rainbow Owl -- a regular fringe, or a beaded
one.
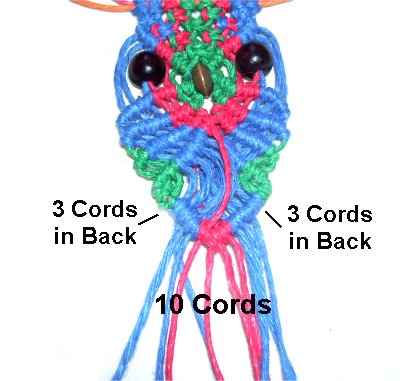
Step
14: Bring the first
and last 3 cords to the back of
the pendant, and apply glue to hold them
in place.
This leaves 10 cords for the fringe.
You
can use all 16 cords if you wish.
For a fringe that's not decorated, cut the cords
on the same angleas
the diamond.
Apply glue to the tips of the cord, or use
finishing knots.
Beaded
Fringe: Apply small beads
to the cords, in groups of two. Tie
an Overhand knot, applying glue inside as
you tighten it.
Add more glue to the outside. Cut off the
excess material when the glue is dry.
Step 15:
Make the necklace using the two long cords
that the Rainbow Owl is attached to at the
top. Try to place knots close to the edges
of the pendant, so it remains in the center.
See the Learn Macrame
section for suitable knots you can use.
By using any
text or images on Free Macrame Patterns, you are
agreeing to ourTerms of Use