|
|
| |
| |
|
|
Description:
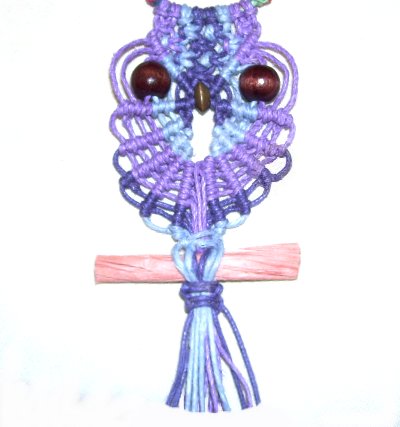
This Owl Pendant is a fun project
suitable for beginners who have
experience with the basic Macrame
knots.
Make sure you review the
instructions for ALL
the decorative knots listed below, so
you know what to expect.
To change the appearance
of this cute Micro-Macrame owl
decoration, simply use different colors
and beads than what was used in the
example.
Try using natural colors
such as black, white and brown to make a
more elegant pendant design.
|
|
| |
| |
Important:
The key to making the stripes as shown in the
example is to organize
the cords in each step, so you don't mix them
up.
It really helps to apply small pieces of tape
on each cord, with their numbers written on
the tape.
|
|
| |
| |
| Supplies
Needed: |
| |
- 1mm to 2mm cord material (in 3 different
colors)
- 2 Round Beads for eyes (with holes large
enough for 2 cords)
|
| |
| |
| Knots Used: |
| |
|
|
| |
|
|
Cutting and Mounting
|
|
| |
|
Step 1: Cut 1 or more
cords that will be used for the necklace that
the Owl Pendant will be attached to.
You can usually multiply your neck size by 4 to
get the proper length, unless you plan to use complex
knots. In that case, increase the length
of the cords.
Secure the necklace cords to your board
horizontally, and mark the center in
some manner.
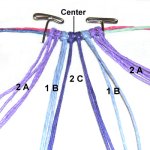
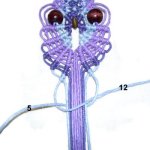
Color
A is purple, Color
B is light blue, and Color
C is dark blue, in the example shown.
|
|
|
| |
|
Cut the following cords, at least 32 inches
long:
|
|
|
|
|
Fold each cord
in half. Mount them to the holding
cords in the following arrangement, with
Larks Head knots:
2 color A,
1 color
B,
2 color
C, 1
color B, 2
color A
|
|
|
|
|

|
|
The Head
|
|
|
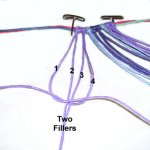
Step 2:
Organize the cords for the Owl Pendant into groups
of four, as in the image above. Mentally
number them 1 - 16, moving left to right.
In each group, cords
1 and 4 are the working cords, and the
two fillers are cords 2 and 3.
This applies to
all the Square Knots in the following steps. |
| |
|
|
Use cords
1 - 4 to
tie a Square Knot.
Important:
Make sure the fillers are not
crossed.
The color
pattern is dependent on the placement
of the cords. So keep the four
cords organized at all times.
|
|
|
|
| |
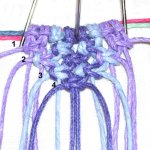
The
remaining 3 Square knots for the first
row are tied as follows:
- Knot 2:
Cords 5 - 8 (color B and C),
- Knot 3:
Cords 9 - 12 (color B and C)
- Knot 4:
Cords 13 - 16 (color A)
Make
sure the fillers are NOT
crossed when you tighten these
Square knots, as well as the following
ones.
Tighten
the knots firmly.
|
| |
|
|
|
|
Step 3:
The next 3
rows
of ASK are tied using groups of 4 cords,
as follows:
- Row 2: Use cords 3 - 6, 7 -
10, and 11 - 14
- Row 3: Use cords 5 - 8 and 9 -
12
|
|
|
|
|
Step 4: Move
cord
1 down to the right, against
the left
edge of
the V design.
Secure it with tension. |
|
|
| |
|
|
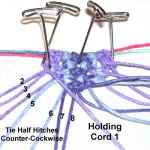
Organize
cords 2 - 8, so they
do not cross over each
other.
Cords 2 - 4 are color
A, followed by 5 and 6, which are
color
B. Cords 7 and 8 are color
C.
Attach each one to the holding cord, with
a Double Half Hitch (see below).
|
|
|
|
|
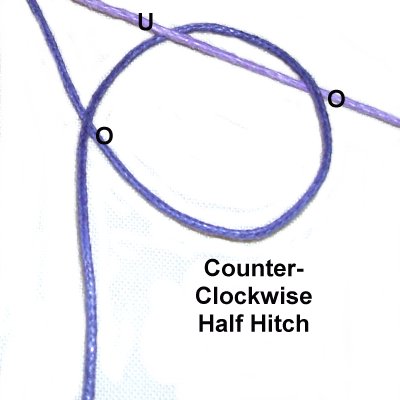
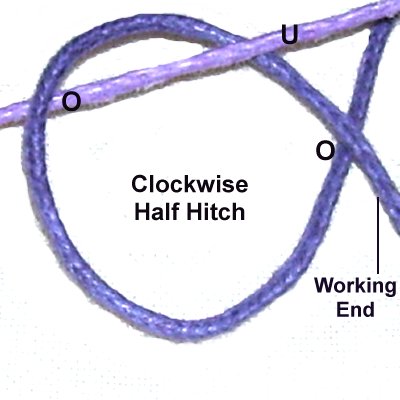
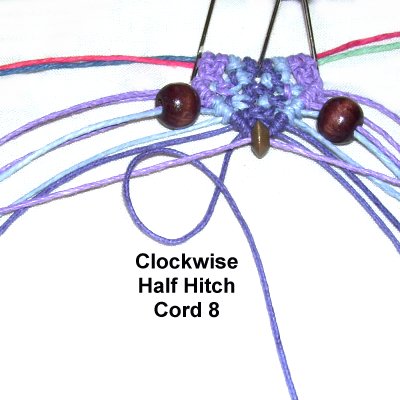
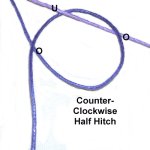
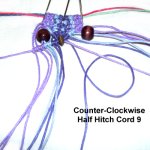
These
Half Hitches should be tied by
rotating counter-clockwise, as
follows:
Make a loop by passing the working cord over
the holding cord, and then under
it. Pull it down, passing over
the working cord. Tighten the knot
firmly.
Tie a second knot the same way, against
the first. |
|
|
|
|
|
|
|
|
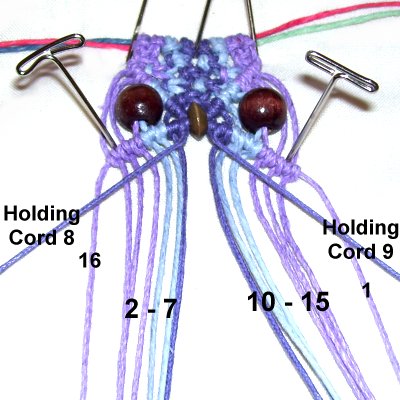
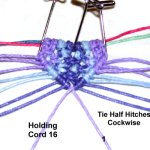
Step
5: Move holding
cord 16 along the
right edge of the V design.
Secure it with tension.
Organize
cords 15 - 9, so they don't
overlap. Attach them to the holding cord
with DHH (in that order).
The instructions are below:
|
|
|
|
These
Half Hitches need to be tied in a clockwise
direction, as follows:
Make a loop by passing the working cord over
the holding cord, and then under
it. Pull it down, passing over
the working cord. Tighten firmly.
Tie a second knot, so it rests against the
first. |
|

|
|
|

|
|
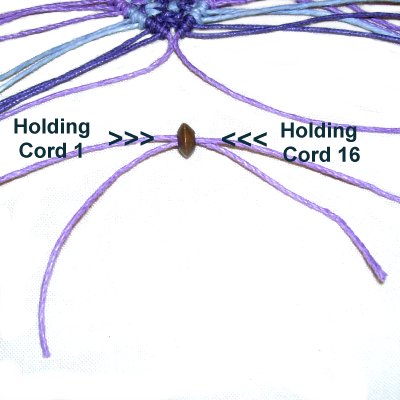
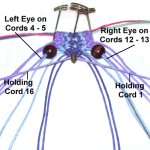
Step
6: To attach the beak for
your Owl Pendant, pass the holding
cords through the flat bead, in opposite
directions.
Holding cord 1 goes through the hole left
to right.
Holding cord 16 goes through right to left. |
|
|
|
|
|
|
Slide one
round bead onto cords
4 - 5 (left eye).
Slide another one onto cords
12 - 13 (right eye).
|
|
|
|
|
Step 6,
continued: Move holding
cord 16 to the left,
and secure it on a slight angle as shown in the
image above.
Holding
cord 1 should be secured on the right,
on the same angle.
It's very important that the lower half of the Owl
Pendant is the same on both sides.
So in each step, secure the holding cords
carefully, on the same angle. |
|
|
|
|
|
Step
7: Organize cords 8 - 2,
and attach them to holding cord 16, with clockwise
DHH (in that order).
Make very sure you attach the cords in the
proper order and do
not crisscross them.
This applies to the wings of the Owl
Pendant, too. |
|
|
|
|
|
|
Organize
cords 9 - 15, and attach them to
the other holding cord (1) with DHH.
These knots should be tied counter-clockwise. |
|
|
|
|
|
|
|
The Wings
|
|
|
The wings for the Owl Pendant are made with 4 diagonal rows
of Double Half Hitches, similar to what you just
did in step 7.
It's important to organize
the working cords each time, so you attach them in
order.
Otherwise, the striped color pattern won't work
out.
On the left, the DHH should be made rotating clockwise.
On the right, they are tied
counter-clockwise.
You should tighten all the knots firmly, so the
wings look neat.
After you complete one row, the holding cords will
become part of the next row, and are considered
working cords. |
|
|
|
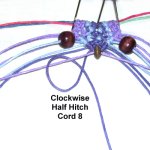
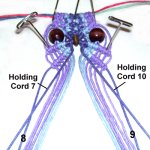
Step 8: For
the first row, the
holding cords are
8 and 9,
which are at the center, near the beak of the Owl
Pendant.
Secure cord 8 to the left, and cord 9 to the
right, so they have tension. |
|
|
|

|
|
Attach working
cords 7 and 6 to holding
cord 8 with DHH. Move the
holding cord slightly to the right,
to increase the angle. Attach cords 5 - 2
and 16.
Attach working cords 10 - 11 to holding
cord 9 with
DHH. Move the holding cord
slightly to the left,
and attach cords 12 - 15 and 1.
|
|
|
|
|
Row 2:
On the left, the next holding
cord is 7.
On the right, the holding
cord is 10.
Secure them on the same angle as the previous
row.
Important:
Always increase the angle of the
holding cords slightly after tying the first
two knots, so there is more space between the
rows near the edges
of the
pendant.
Move
the cords closer to the
center.
This applies for all the following rows.
|
|
|
|
|
|
Attach working cords 6 - 2 along with 16
and 8 (previous holding cords), to holding
cord 7.
Attach working cords 11 - 15, along with 1
and 9, to holding
cord 8.
|
|
|
| |
|
|
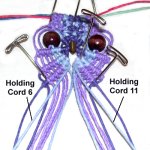
Row
3: The holding
cords are 6
and
11.
Attach cords 5 - 2, along with 16, 8, and
7, to holding cord 6 with DHH.
Attach cords 12 - 15, along with 1, 9, and
10, to holding cord 11.
|
|
|
|
|
|
|
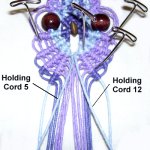
Step
9: The final row for the
wings of the Owl Pendant is tied with holding
cords 5 and 12.
Attach cords 4 - 2, as well as 16, 8, 7, 6
to holding cord 5. Attach cords 13 -
15, as well as 1, 9, 10, 11, to holding
cord 12.
Change the
angle as you progress,
so the holding cords are almost
vertical when you are finished.
|
|
|
|
|
|
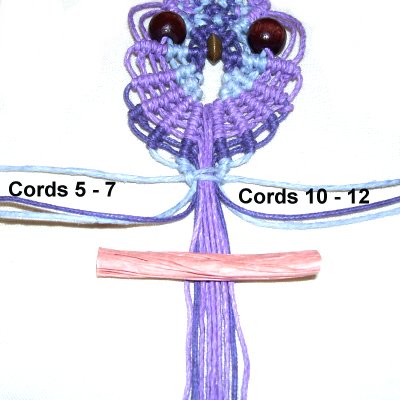
To complete
the wings for your Owl Pendant, use the
previous holding cords (5 and 12), to tie
a Square Knot.
The rest of the cords are the fillers, and
should be organized and straight. |
|
|
|
|
|
|
The Tail + Finishing
|
|
|
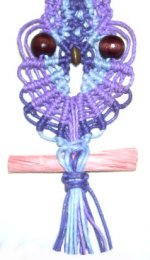
Step 10:
You have two finishing options:
Option 1:
You can stop here, and bring cords
5 and 12 to the back
of the Owl pendant. Tie a tight Overhand
knot with the two cords, similar to step 13 below.
Apply glue and tie another knot. When the
glue is dry, cut off the excess material.
The remaining cords should be trimmed to 1 - 2
inches, for the tail.
Option 2: To add a stick, follow
the instructions below: |
|
|
|

|
|
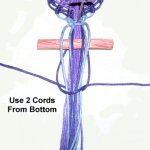
Step
11: Locate cords 5 - 7 on the
left, and 10 - 12 on the right.
Separate them from the others.
Place the stick on
top of the remaining cords.
Move the six cords you just selected on
top of the stick. |
|
|
|
|
|
Step
12: Select two cords from
the group at the bottom,
which rest under
the stick.
Use them to tie two very
tight Square Knots around ALL the
others, which are the fillers.
As you tighten, push the stick up close to
the SK tied in step 9. Apply glue
and let it dry completely before moving
on. |
|
|
| |
|
|
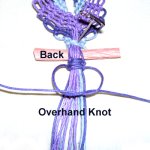
Step
13: Turn over the Owl
Pendant. Bring the two cords you
were just using to the back.
Tie a tight Overhand knot with the two
cords. Apply glue and tie another
one. When the glue is dry, cut off
the extra material. |
|
|
|
|
Step 14:
Trim the remaining cords to 1 - 2 inches, to form
the tail.
At the top of the Owl Pendant, use the two
necklace cords to make your favorite design.
Important:
Make sure the first knots are tied on either side
of the head, so it can't move. |
|
|
|
|
By
using any text or images on Free Macrame
Patterns, you are agreeing to our Terms
of Use
|
|
|
|
|
Have
any comments about the Owl Pendant? Contact
Me.
|
|
|
| |
|
|
|
| |