Description:
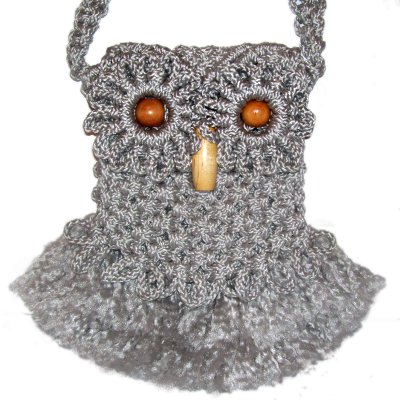
This Owl Purse features a zigzag design
in the strap, which is 36 inches long. The
feathers around the eyes and the lower edge of the
flap are made with Picots.
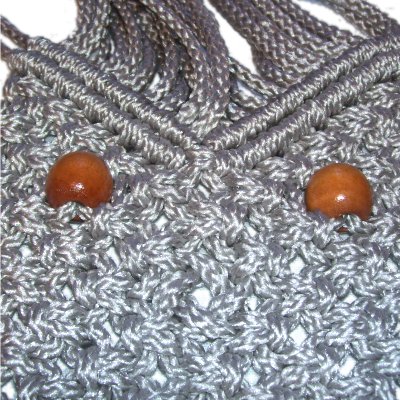
The flap forms the face of the owl, and the beak
is made with a bead that also functions as the
clasp.
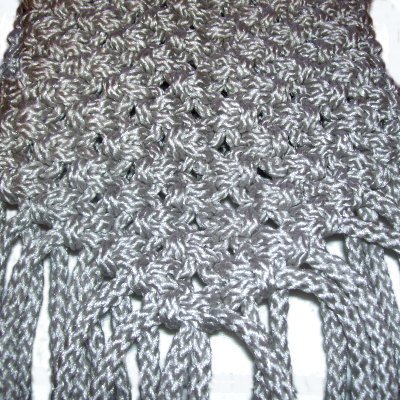
There is wavy layered fringe along the lower edge,
to represent tail feathers.
The total length from just above the eyes to the
tips of the fringe is 12 inches. You can
make the purse longer by adding more rows of knots
in the areas I will indicate in the
pattern.
The width is 8 inches, but you can add more cords
to create a wider purse.
This Macrame pattern is rated Moderate,
which means you need
experience with the knots to
successfully create this purse.
Supplies
Needed:
6mm Macrame Cord (102 yards for 8 x 12 size)
Eyes: Two 25mm beads
Beak Clasp: One oval or tube bead, at
least 32mm long
STRAP:
Cut 4 cords, each at least 6
yards long (36-inch strap). Cut the cords
longer if you plan to lengthen the strap.
Mark these cords with tape to make them easy to
identify.
FRONT: Cut 12 cords, each 2.5
yards long.
To make the Owl purse wider
than 8 inches, cut additional cords. The number of
cords must be a multiple of four (16, 20,
etc.)
**Remember
that the instructions below will need to be
changed in areas where mental numbering is
required, since you will have more cords.
To make the purse longer
than 12 inches, cut them 7.5
x the desired length.
FLAP + BACK: Cut the same
number of cords as the front, 4 yardslong.
When making the Owl Purse longer than 12 inches,
cut these cords longer.
You need 6.5 x
the desired length of both the back + the
flap
combined, since it's made in one
piece. The flap should be 2 inches shorter
than the back.
EYE FEATHERS: Cut 2 cords, each 3 yardslong.
Prepare
all the cords to prevent unraveling.
The Strap
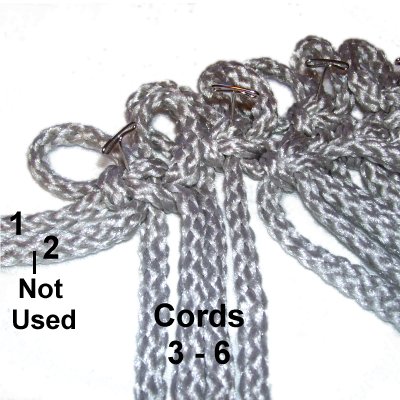
Step 1:
Secure the 4 cords for the strap (6-yard)
vertically to your board, at the center.
Mentally number them 1 - 4.
Move cord 4 to the side, and do not use it for the
first knot.
The first knot should rest next to the pins at the
center.
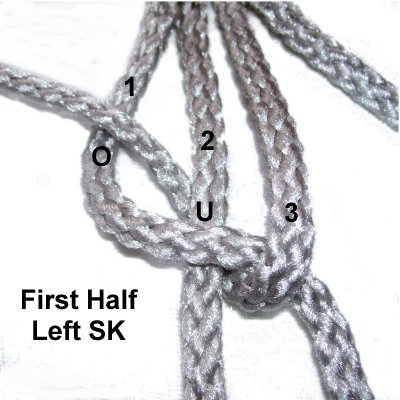
Tie
a LEFT Square knot, as
shown below:
Left SK: Steps 1 - 2
<
Move cord
1 left to right,over
cord 2 and under
cord 3.
Move cord
3under
cord 2 and over
cord 1, as you pull it left. >
To start the second half of the Square knot,
mentally re-number the cords where they are
now.
Left SK: Steps 3 - 4
<
Move cord
3 to the left, over
cord 2 and under
cord 1.
Move cord
1under
cord 2 and over
cord 3, as you pull it right. >
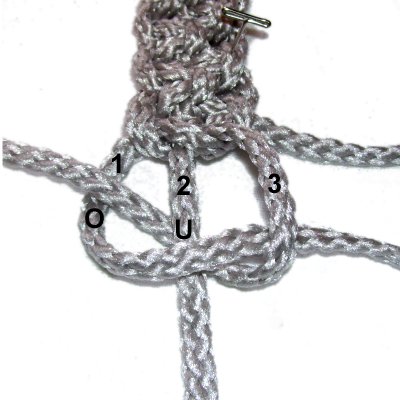
When working on other sections of the Owl Purse,
you can use the instructions above to help you tie
the left SK. The right SK are shown below.
The only change will be in the number of filler
cords (two instead of one).
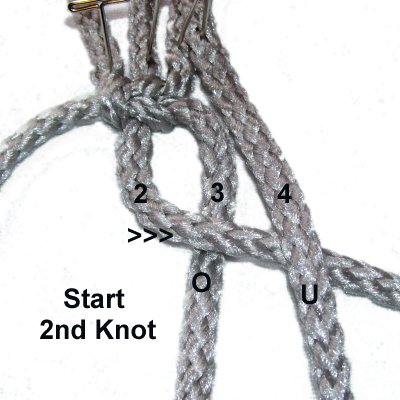
Tie a left
SK with cords
2 - 4. The filler is cord
3.
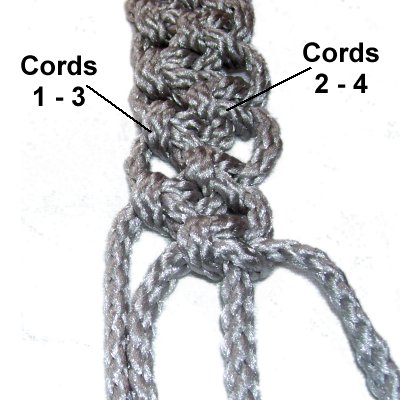
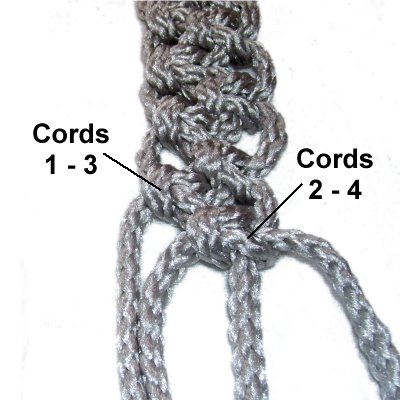
Continue tying
the strap for the Owl Purse, alternating
between cords 1 - 3 and cords 2 - 4, as
shown above.
Stop when the first half of the strap is 18
inches long.
Turn the strap around and go back to the center.
Make sure you do not
flip the strapupside
down.
You will now use the other half of the cords to
create the second half of the strap.
Note that the heads of the knots you just tied are
now facing right.
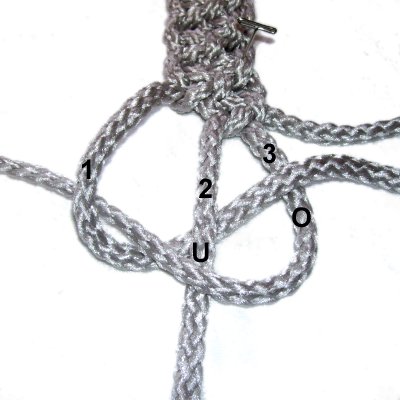
You need to tieright Square Knotsfor
the second half of the strap, so the two halves
match:
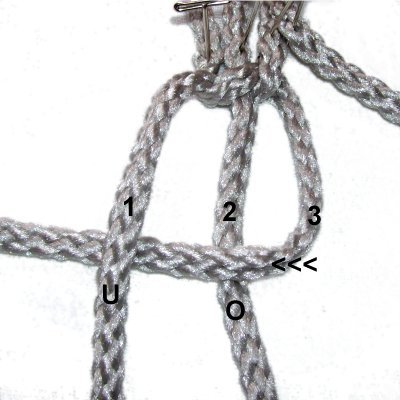
Right SK: Steps 1 - 2
<
Move cord
3 to the left, overcord
2 and under
cord 1.
Move cord
1under
cord 2 and over
cord 3, as you pull it right. >
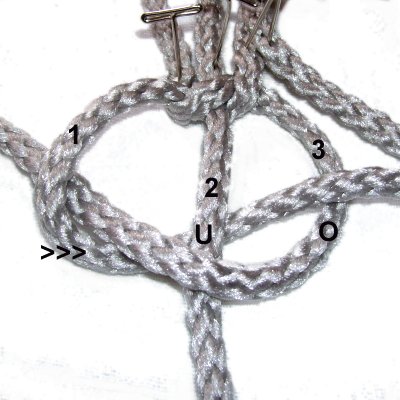
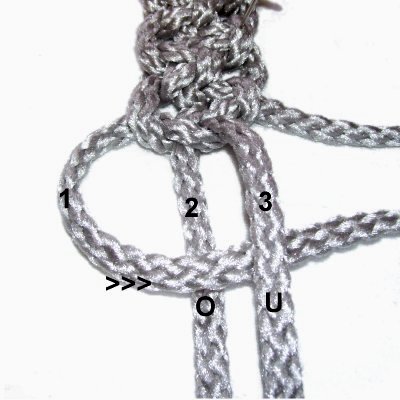
Mentally re-number the cords where they are now,
then make the second half of the right SK:
Right SK: Steps 3 - 4
<
Move cord
1 to the
right,over
cord 2 and under
cord 3.
Move cord
3under
cord 2 and over
cord 1, as you pull it left. >
Use cords
2 - 4 to tie the next SK.
Alternate between cords 1 - 3 and 2 - 4 to
tie the remainder of the strap for your
Owl Purse.
Stop when the entire
strap is 36
inches long.
Flap/Back of Purse
You will now be making the flap and back
portions of the Owl Purse.
The front edge is made with picot loops to
represent feathers, which you tie first.
Later you will create the face, and then the back
portion.
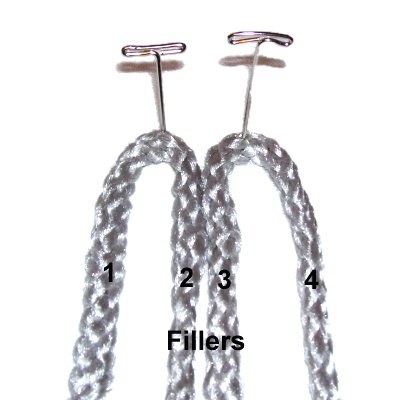
Step
2: Use two of the 4-yard
cords for the flap and fold them
in half.
Mentally number the four segments.
The portions numbered 2 and 3 will act as
fillers for the Square Knot.
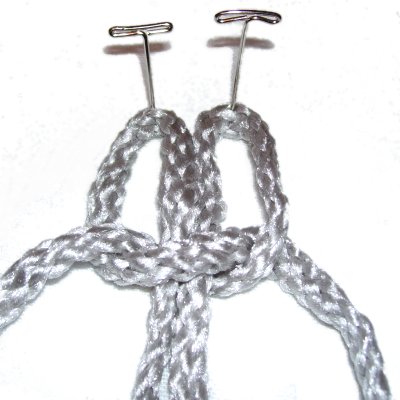
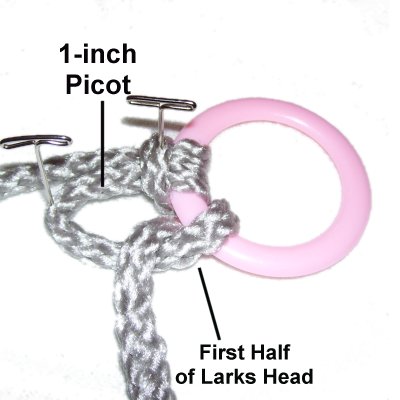
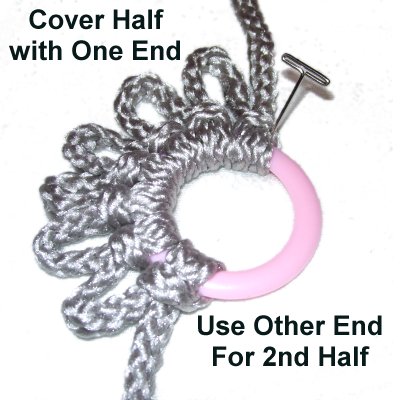
Tie a left
Square Knot with segments
1 and 4, around the
fillers. This image shows the first
half.
Tighten the knot 1-inch
below the fold.
Create 2 more picot designs in the same manner
(total of 3). Measure each one to make sure
the picots are the same size (1-inch).
Create 3 more picot designs, this time with RIGHTSK.
Create additional picots if you decided to widen
the Owl Purse, so you use all the cords cut for
the flap.
Make sure half of
them areright
SK.
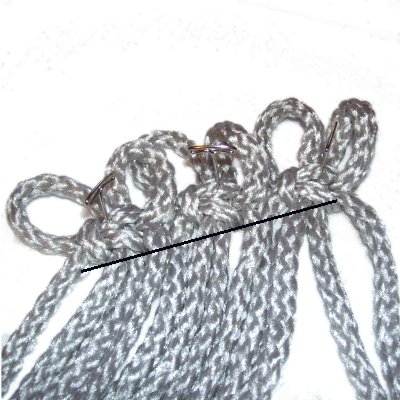
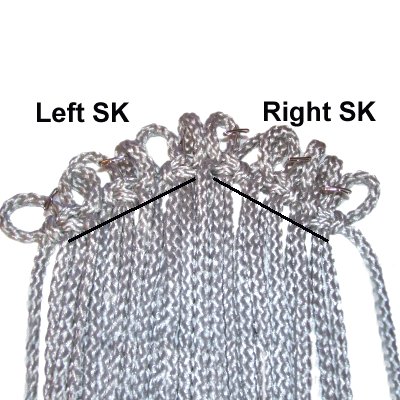
Arrange
the left
SK picot designs on your board, so they
form a diagonal
rowfrom
top right to lower left.
Arrange the right
picot designs to the right of the first
set. The first one should be lined
up with the first left SK design
(at the top).
Place the others lower down to the
right. Keep playing with the
position until you like the shape.
Then secure all the knots.
Please Note:
The numbering of the cords described below will be
different if you decided to widen the Owl Purse by
adding more cords.
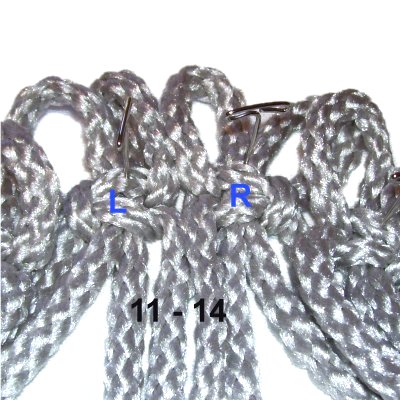
Step
3: Mentally number the
cords 1 - 24.
Locate cords
11 - 14, at the top "point" of
the flap design. You know it's the
right place if one SK is left and the
other right.
Tie a left
SK with cords 11 and 14, around
the other two, which are fillers.
Design
Tip: Notice how you are using two
cords coming from the SK on the left, along with
two from the right (first row).
This is how all Alternating Square Knot patterns
are tied for the Owl Purse.
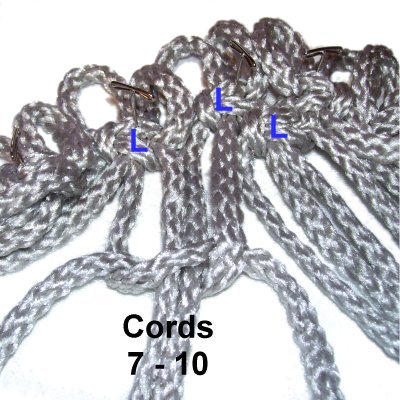
Tie a left
SK with cords
7 - 10.
It's important that you pay attention to
the direction of the knots, so the flap is
the same on both sides.
In this case, all the knots in the area
face left.
Tie a left
SK with cords
3 - 6.
Note that cords 1 and 2 are not used in
this row. This is another important
part of Alternating Square Knots.
In every other row, you do not use the
first and last two cords.
On the other side of the center point, tie a RIGHT
SK with cords
15 - 18.
Tie another with cords
19 - 22.
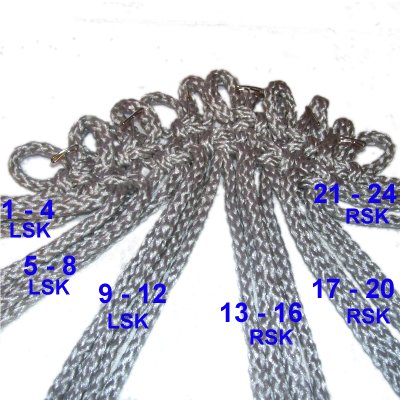
Step
4: For the 2nd row, alternate the
cords by tying left
SK with 1 - 4, 5 - 8, and 9 - 12.
Tie right
SK with 13 - 16, 17 - 20, and 21
- 24.
Tie several more rows of ASK as follows:
Row 3: Tie
Left
SK with 3 - 6, 7 - 10, 11 -
14.
Tie Right
SK with 15 - 18, 19 - 22.
Row 4: Tie Left
SK with 1 - 4, 5 - 8, and 9 - 12.
Tie Right
SK with 13 - 16, 17 - 20, and 21 - 24.
Row 5: Repeat
row 3.
Row 6: Repeat
row 4.
To make the flap longer if you decided to
enlarge the Owl Purse, tie additional rows in
this area.
I recommend you add
one row for every inch you want to
increase the length beyond 12 inches.So for a 14-inch purse, add two rows.
Important:
Make sure you end on a row that uses all the
cords (row 4).
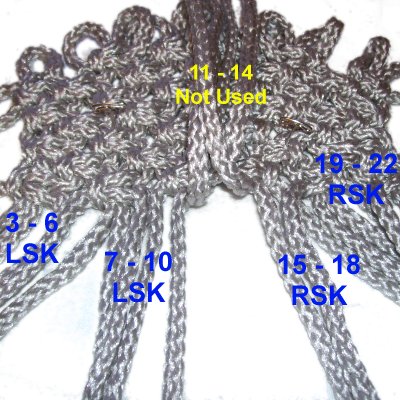
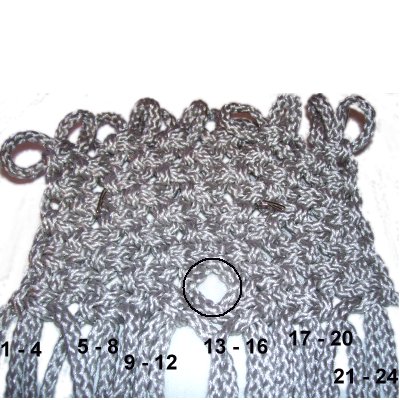
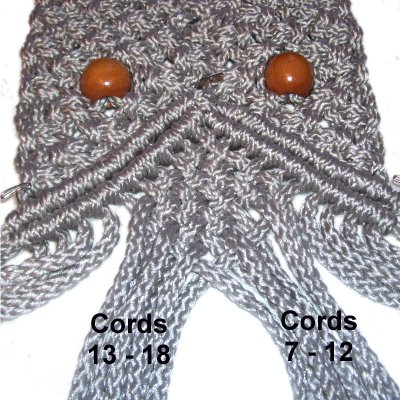
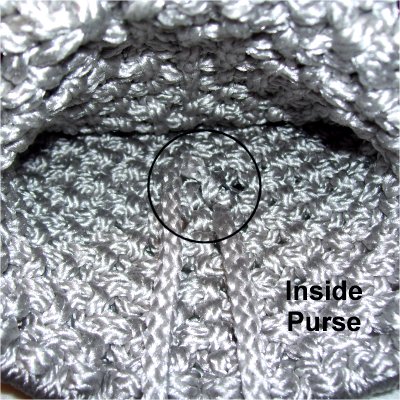
Step
5: To make an open area for the
beak to pass through, the next row needs
to be a little different:
Tie a left
SK with 3 - 6 and 7 - 10.
Tie a right
SK with 15 - 18 and 19 - 22.
Do not
use cords 11 - 14.
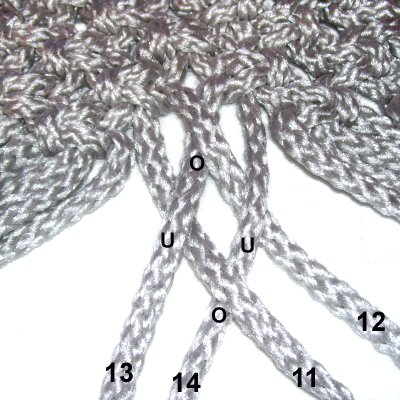
Move cords
13 and 14 towards the left.
Weave cord
12over
- under cords 13 and 14, heading
right.
Weave cord
11under
- over cords 13 and 14.
Without
disturbing the crossed cords, tie the next
row of ASK as follows:
Left
SK: Cords 1 - 4, 5 - 8, and
9 - 12
Right
SK: Cords 13 - 16, 17 - 20
and 21 - 24.
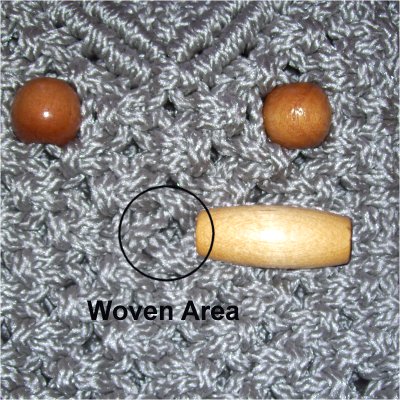
This will provide you with an open area
for the clasp (circled).
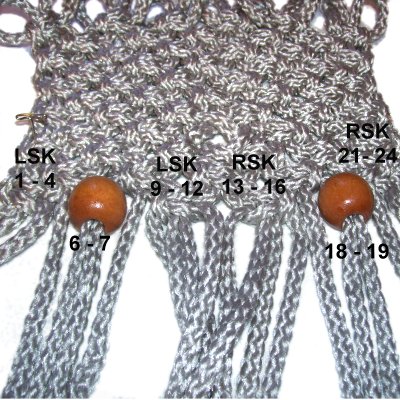
Step 6:
Tie the next row of ASK as follows:
Left SK:
Cords 3 - 6, 7 - 10, and 11 - 14.
Right
SK: Cords 15 - 18, and 19 - 22.
Slide a round
bead for the eyes onto cords
6 and 7, and another one onto cords 18 and
19.
Tie Left
SK with cords 1 - 4 and 9 - 12.
Tie Right
SK with cords 13 - 16 and 21 -
24.
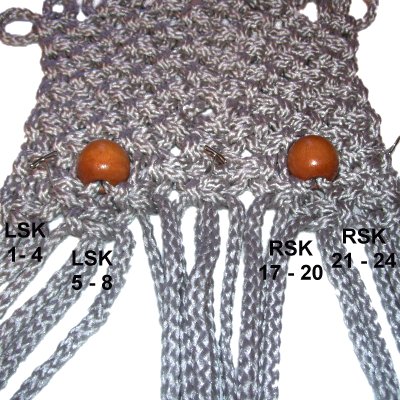
Tie the next row of ASK as follows:
Left SK:
Cords 3 - 6, 7 - 10, and 11 - 14.
Right
SK: Cords 15 - 18, and 19 - 22.
The remaining rows of ASK need to be done so a V
shape forms, to make the forehead area of the Owl
Purse.
Follow these instructions carefully:
Tie Left
SK with cords 1 - 4 and 5 - 8.
Tie Right
SK with cords 17 - 20 and 21 -
24.
Do not
use cords 9 - 12.
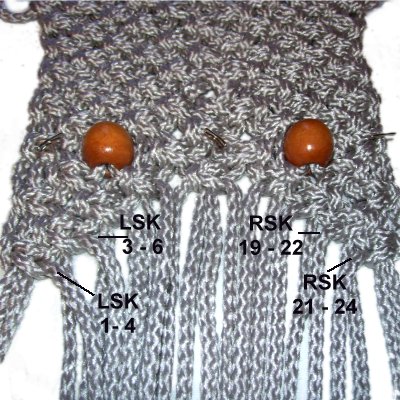
The last two
rows are tied as follows:
Left
SK with cords 3 - 6. Right
SK with 19 - 22.
Left
SKwith cords 1 - 4. Right
SK with 21 - 24.
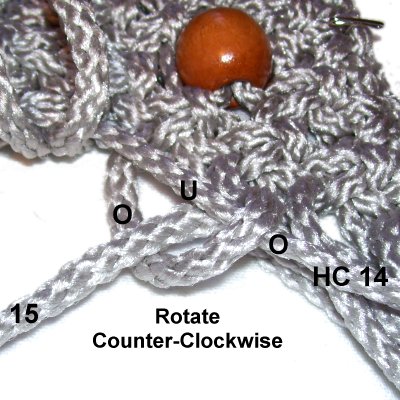
Step
7: Locate cords
11 and 14. These are the holding
cords for the first row of
Double Half Hitches.
Secure them so they are arranged against
the diagonal edge of the Square Knots,
heading left and right. They should rest
on top of the other cords as shown.
Attach cords
15 - 24 to holding
cord 14 with Double Half Hitches.
Rotate counter-clockwise,
and tighten each knot firmly.
Tie the first
half Hitch moving cord 15 over
- under the holding cord.
As you pull it left, it passes over
cord 15.
Tie a second knot in the same manner, to
make it a Double
Half Hitch.
Attach cords 10 - 1
to holding
cord 11, in that order.
The DHH should be tied in a clockwise
direction.
Step
8:Repeat
step 7, but use cord
12 for the left holding cord, and
cord 13
on the right.
Do
notattach the previous
holding cordswhen you get to the edges.
Make sure the knots are firmly
tightened so the two rows are close to
each other.
This
is what the forehead area should look like
when the flap is finished.
In the following steps, you will make the
back
of theOwl
Purse.
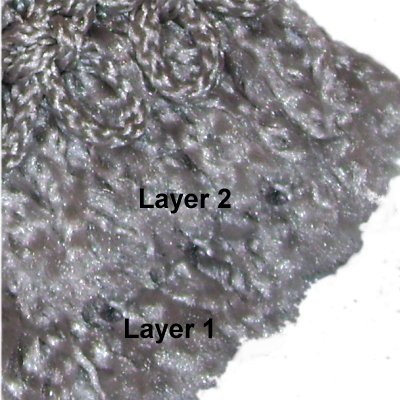
Step 9:
To make the upper
back portion of the Owl Purse, you will be create
a basic woven design. This allows the area
to stretch, so the flap can be folded more
easily.
Mentally re-number the cords 1 - 24. Cords 7 - 18
are used for the weaving. Move the others
aside for now.
Move cords 13 - 18 to the left, and organize them
so they're straight. You can secure them if
you wish.
Weave cord
12 through 13 - 18, heading
right. Begin by passing over
cord 13, then alternate over - under the
remainder.
Weave cord
11 next, by passing under
cord 13first.
This alternates the weaving.
Weave cord 10
as you did cord
12. Cord
9 is woven like cord
11.
Next is cord 8,
which follows the same weaving as cord
12. Cord
7 is woven like cord
11.
After the weaving is completed, temporarily secure
the cords.
Step 10:
You will again tie both left and right SK for the
remainder of the Owl Purse.
Tie one row now:
Left
SK:
Cords 1 - 4, 5 - 8, 9 - 12
Right
SK: Cords 13 - 16, 17 - 20
and 21 - 24.
Move this portion
of the purse aside while you start the front.
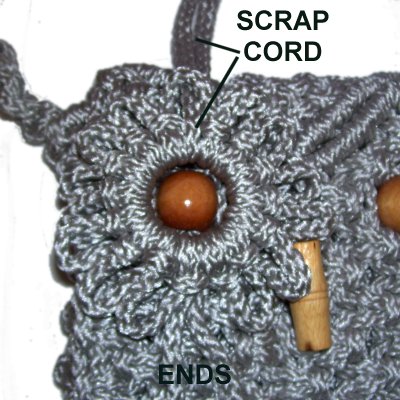
Front of Purse
The front of the Owl Purse begins by mounting
the 2.5
yard cords to a holding cord. You
can use a different knotting technique than what
is shown below.
Cut one holding
cord, 20
inches long. Secure it horizontally
to your board, and mark the center with a pin.
Step
11: Fold a 2.5-yard cord in half
and place it on top of the holding cord,
with the fold heading downward. It
should rest to the right of the center.
Move the ends under
the holding cord and over
the curved portion as you pull them
towards you.
Tie a Half
Hitch with each
end of the cord:
Pass the end over
- under the holding cord.
As you pull it downward, pass it over
the working cord.
Step 12:Repeat
step 11 with the remaining cords
for the front of the Owl Purse.
Half of them should rest to the left of the
center, and the remainder on the right.
Step 13:
Tie one row of Alternating Square knots, using 4
cords per knot.
The right/left pattern should be the same as the
last row you tied in the back portion of the Owl
Purse:
Left
SK:
Cords 1 - 4, 5 - 8, 9 - 12
Right
SK: Cords 13 - 16, 17 - 20
and 21 - 24.
After the row is completed, move the ends of the holding cord
out of the way, and don't include the ends in the
next step.
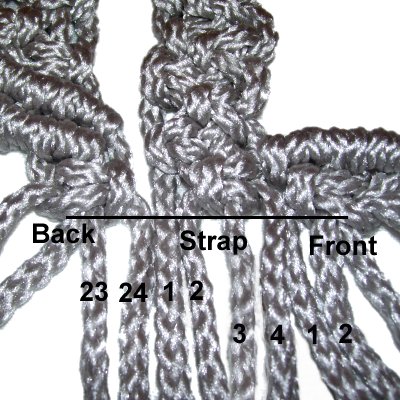
Step 14:
Place the back/flap
design on the left, and one end of the
strap next to it.
Place the front
of the Owl Purse on the right.
The ASK made with cords 21 - 23 in the
back (step 10) should line
up with the last knot in the
strap.
They should line up with the SK tied with
cords 1 - 4 in the front.
Tie a right
SK with cords
23 - 24 from the back,
combined with cords
1 - 2 from the strap.
Tie a left
SK with cords
3 - 4 from the strap,alongwith cords
1 - 2 from the front.
These knots are considered part of the 2nd
row, since one row has already been tied
in both the back and front.
For the other
side, you have to connect the three parts
in two
steps:
Make sure the strap is not
twisted. Place the right
end of the front
design to the left of the strap.
Tie a right
SK with cords
23 - 24 from the front,
combined with cords
1 - 2 from the strap.
Fold the Owl
Purse so that the back/flap design is next
to the strap. You may need to
position the front under the area where
you are working.
Tie a left
SK with cords
3 - 4 from the strap,
combined with cords
1 - 2 from the back.
Step 15:
Now that all three parts are connected, complete
the second row
of ASK using 4 cords per knot.
Start in the area you just completed, and tie the
next knot with cords 3 - 6 from the back/flap
design.
Go all the way around the Owl Purse, using the
cords from the back, strap and front areas.
Design Tip:
Change the direction of the knots in the center
area of both the back and front, so half
are right
SK and the other half are left
SK.
Before you move on, locate the ends of the holding cord
in the front
portion of the purse. Pull on them firmly,
so that the top edge of the mounting knots are as
straight as possible.
Weave them through the back of the knots in the
area where the straps are attached. Apply glue as
needed.
Step 16:
Tie 10 more rows of ASK, moving all the way around
the purse. It's best to start in the
same area each time, such as just below the
strap.
Important:
This area of the Owl Purse needs to be made longer
if you changed the length of the flap.
Fold the flap over the front to see how many extra
rows are needed. You still have 6 more rows to
tie, so keep that in mind.
When you are finished, divide the cords into two
groups (front and back).
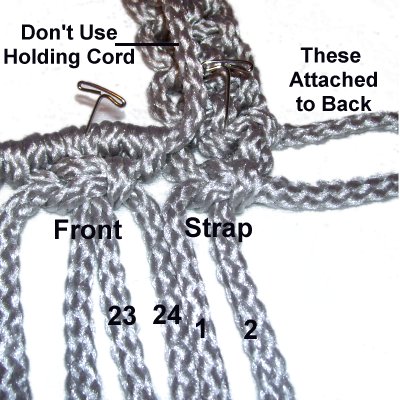
Locate the strap
cords, which are marked with tape.
Make sure two
cords from each end of the strap are
included in both the back and front groups (total
of 4 strap cords).
Step
17: The last 6 rows in the front
and back portions of the Owl Purse form a
V design. Mentally number the cords
in the back
portion 1 - 28.
Tie the ASK as described below.
Change the direction of the knots so they
match those above them.