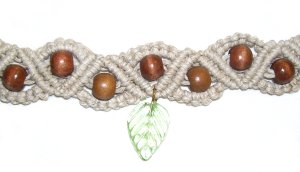
Natural Bracelet
Description: The Natural
Bracelet features triangular shaped areas
decorated by wood beads. A charm that represents
some aspect of nature is added to provide a
focal point to this Macrame bracelet (optional).
To complete the theme, this casual bracelet is
made with Hemp, which is a natural material made
from plants.
This Micro-Macrame project is rated moderate,
since you need to have previous experience with
the knots to successfully create it.
To view a similar design, see the Rainbow
Wave Bracelet.
Supplies Needed:
1mm Hemp or other material
8 - 10 Beads (hole size at least 2mm) --
optional
One charm or drop bead with a horizontal
hole -- optional
Knots Used:
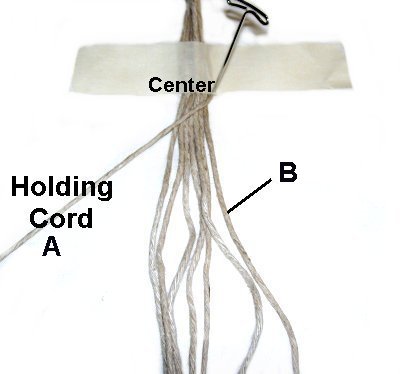
Step 1: Cut 8 cords, each at
least
60
inches long.
Prepare the ends with glue
to prevent unraveling.
Determine the overall length you need to make
the Natural Bracelet, by measuring around your
wrist (loosely).
Secure the center of the
cords to your project board vertically. Place a
piece of tape across the cords to mark
the center.
The first holding cord is furthest to
the right
(A) . Move it to the left
diagonally, and secure it so
it's taut.
Attach all the other cords to it with
Double Half Hitches (DHH),
progressing right to
left. Rotate clockwise
as you tie these knots.
Important:
When tying DHH in rows moving right
to left , rotate clockwise
to tie the DHH. left
to right , rotate counter-clockwise .
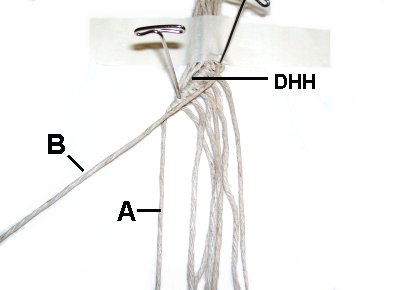
Step 2: The second holding
cord (B) is the one now furthest to the
right .
Move it to the left ,
placing it just below the first row of
DHH.
Attach ALL the remaining cords to it
with clockwise
DHH, including
holding cord A.
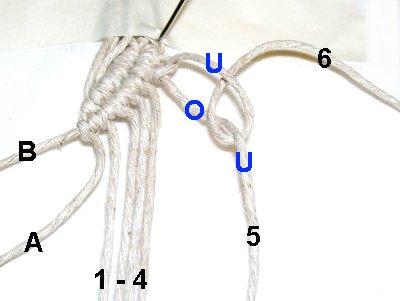
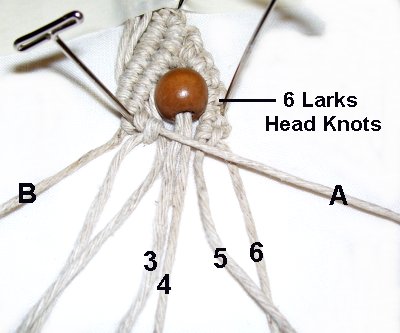
Step
3: Push both holding cords aside
for now. Mentally number the remaining cords 1 - 6 (left to
right).Important:
The number
of Larks Head knots you tie in step 4 is
determined by the angle of the first two rows of
DHH.holding
cord A to the right temporarily, so you
can visualize where the next row of DHH will rest
(step 5).
Step
4: Tie 6
- 10 Vertical Larks Head knots
with cord
6 , onto cord 5 (holding cord):
Pass cord 6 over
-under cord 5. Pass it over
cord 6 as you pull it to the right
To tie the second half of the Larks
Head knot, pass cord
6 under
- over cord 5.
Bring the end under
cord 6 as you pull it to the right.
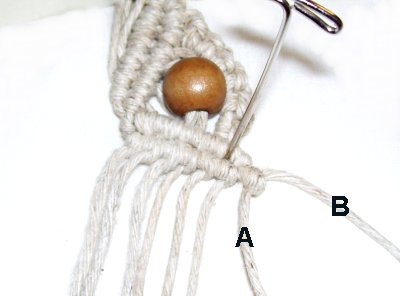
Step 5: Slide a bead
onto cords 3 and 4 (optional).
Move holding
cord A to the right ,
on the same angle as the first two rows
of DHH.
Attach cords 1 - 6 to it with DHH,
rotating counter-clockwise.
Step 6: Move holding
cord B to the right ,
resting below the previous row of DHH.
Attach all the remaining cords to it
with DHH, including
holding cord A.
Repeat
steps 3 - 6 .
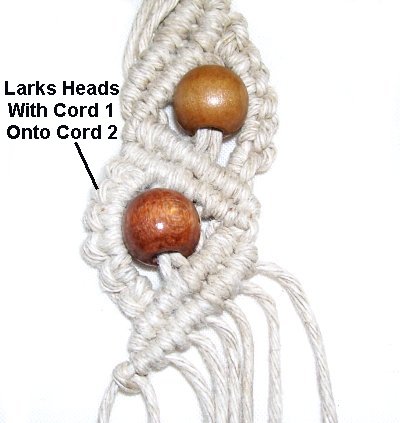
For the second design, you use cord
1 to tie the Larks Head knots
onto cord
2 .
The holding cords are then moved to the
left to make the next
two rows of DHH.
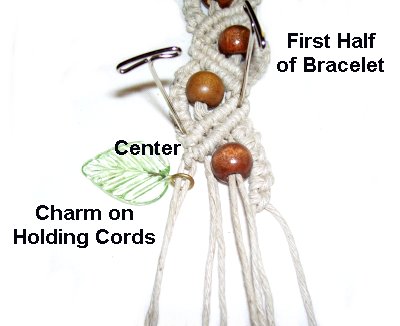
Measure the bracelet,
and stop when the first half of the Natural
Bracelet is half the size you
plan to make.
Step 7: Turn the
bracelet around, and add the charm to
the two holding
cords . (See
Design Tip below)
Repeat steps
3 - 6
Design
Tip:
The loop on the charm needs to be sideways ,
since the holding cords run through it
horizontally. Otherwise, the charm will twist.
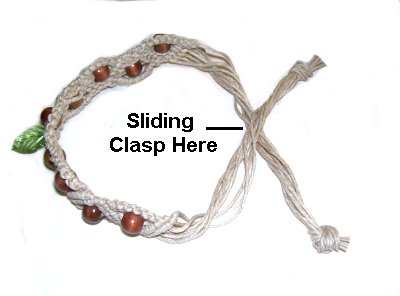
Step
8: Go to the page called Sliding
Clasps Wrapped Knot clasp .
Cross the ends of the bracelet cords,
and create the clasp following the
instructions on that page.
Use a separate cord,
at
least 20 inches long , to
make the Wrapped Knot.
Step 9: After the clasp is
complete, trim the ends so they are even. Close the
Natural Bracelet by pulling on the ends.
Move down at least 2 inches, and tie tight
Overhand or Barrel Knots. You should use
the cords together
in a group to
tie one
knot at each end.
Apply glue and cut off the excess material
close to the finishing knots.
By
using any text or images on Free Macrame
Patterns, you are agreeing to our Terms
of Use
Have
any comments about the Natural Bracelet? Contact Me .