|
|
| |
 |
|
| |
|
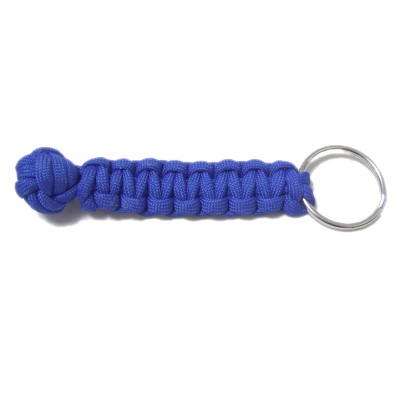
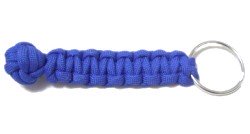
Description: This
Monkey Key Chain features a unique decorative
knot called the Monkey Fist, which looks like a
ball. Square knots are used to form a
strap between that knot and the ring.
This is a good Macrame project for
older children, teens and beginners, since few
knots are used in the design.
Tightening
the Monkey Fist knot is challenging,
so some children may need help from an adult.
Any material can be used, but the
nylon Parachute cord (Paracord) shown in the
example makes this key chain very strong.
It's also smooth and comfortable to hold.
|
| |
| |
| |
|
Supplies Needed:
- Large Jump
Ring designed for keys
|
| |
|
| |
|
Knots Used:
|
| |
|
|
| |
Preparation:
- Cut 1 cord, at least 70 inches long.
- Prepare both ends by placing tape
on the tips.
|
|
|
|
|
|
When using Paracord,
an Adult
should heat the ends to melt the outer
sleeve around the inner core yarns.
Visit Cord
Preparation for more
details by clicking on the link or
image. The Paracord Preparation is
near the bottom of that page. |
|
|
|
|
|

|
|
Monkey Fist Instructions
|
|
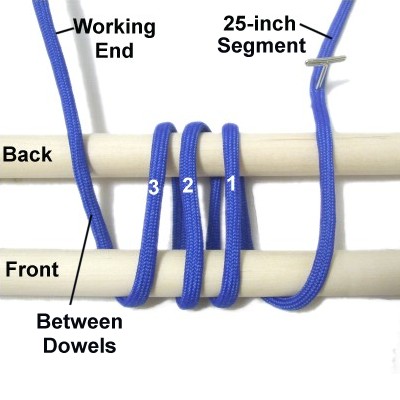
The instructions for the Monkey Key Chain
have been changed so you now make the knot around
two dowels, which is easier than fingers.
So secure them to your board horizontally.
Placing pins above and below them is usually
enough, but you can also use tape or rubber bands.
There should be between 1-inch to 1.5 inches
apart. Mentally label the two dowels (front
versus back). The front dowel is closer to the
front of your board. |
|
|
|
| |
|
|
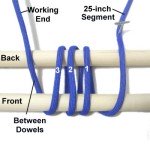
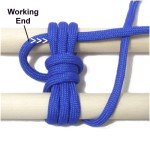
Step 1: Measure
25 inches from one end of the
cord. Secure that segment near
the back
dowel on your right.
Wrap the
remaining material (working end)
around both dowels three times, moving
right to left. When you are
through, bring it between
the two dowels.
|
|
| |
|
|
Designer's
Tip: Do not count the 25-inch
segment (secured end) as one of the wraps.
Move it off to the side if that helps.
It's important that there are exactly three
segments in each area of the Monkey Fist knot, so
it's balanced. |
|
|
| |

|
|
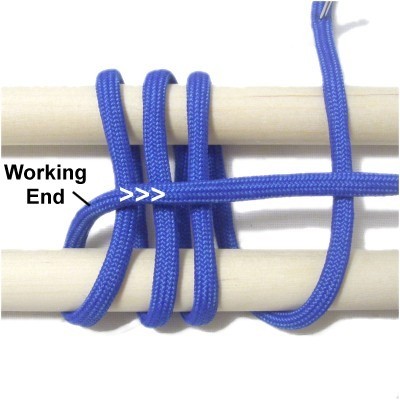
Step
2: Bring the working end
to the right, resting on top of the three
wrapped segments.
This should take place close to the front
dowel.
|
|
|
|
|
|
|
Bring the
working end to the left, passing under
the lower portion of the three wraps.
Do not wrap around the secured end. |
|
|
|
|
|
|
Repeat the
same process 2 more times, wrapping
towards the back dowel.
When you are finished, the working end
should be on the left. |
|
|
|
|
|
|
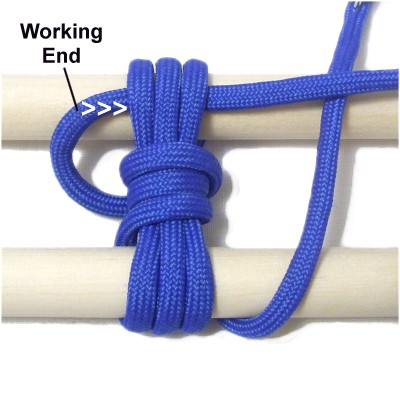
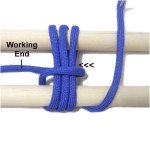
Step
3: Pass the working end under
the three segments that rest around the
BACK dowel, from left to right. |
|
|
|
|

|
|
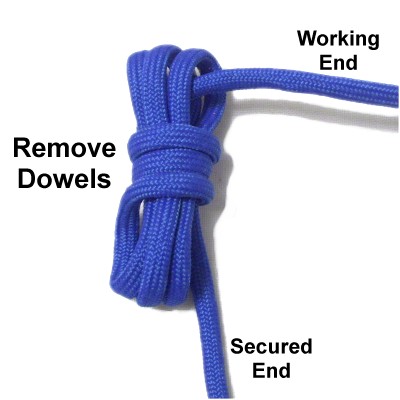
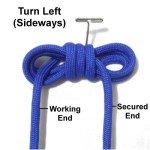
Step
4: Remove the dowels carefully.
Release the secured end, and position it
forward (towards you). |
|
|
|
|
|
|
Turn the knot
to the left sideways.
Both ends should be heading forward, with
the working end on the left. |
|
|
|
|
|
|
Step
5: Bring the working
end across the front of the wraps you made
in step 2, left to right.
Pass it under those segments as you bring
it back through the left space (not
shown). |
|
|
|

|
|
Wrap a total
of three times, heading forward, so the
last wrap is closest to you.
Make sure the working end is on the left
when you are through.
|
|
|
|

|
|
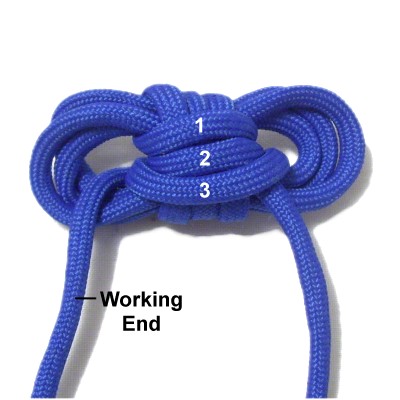
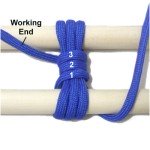
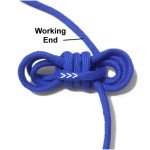
Step
6: Tightening this portion
of the Monkey Key Chain is the most
challenging step.
The numbers on this image indicate the
order in which the wraps were made.
They should be tightened in that order.
Be
sure to read the tips below BEFORE
getting started.
|
|
|
|
|
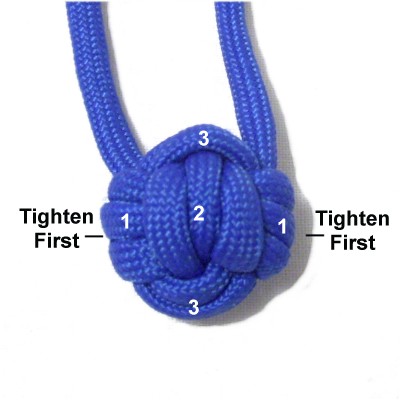
Tightening Process
|
|
- The first set of wraps are tightened first.
They are the loose ones on the right and left
(labeled 1 in the image above). Pull on
the secured
end to determine which loop to
tighten first.
- The best way to tighten is to start by
pulling gently
on the loose one. Observe the wraps directly
opposite to see which segment moves.
- Once you've found the correct segment, pull
it firmly
to tighten the loose one completely.
It's really hard to go back a second
time to remove slack from segments that were
not tightened enough.
- Gradually push the Monkey Fist into a round
shape, particularly when tightening the second
and third set of wraps.
|
|
|
|
|
The Strap
|
|
|
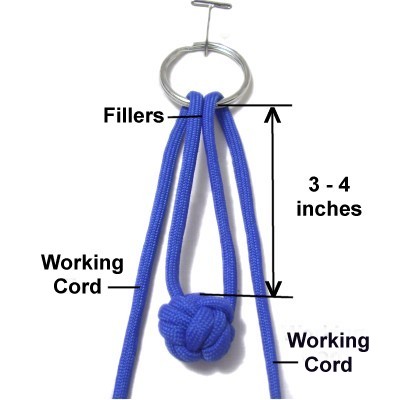
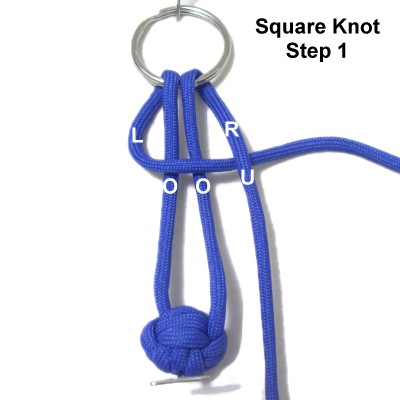
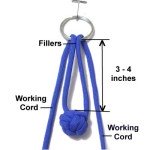
Step 7:
The
next part of the Monkey Key Chain is the strap.
Arrange the Monkey Fist close to the front
of your board, with the ends heading towards
the back, as in the image above and below.
Pass both ends through the ring, entering into it
from the top. Move them forward,
towards the Monkey Fist knot. |
|
|
|
|
The working
cords for the Square Knots are on
the outside. The portion between the
knot and the ring act as fillers.
Adjust the placement of the knot, so it
rests 3 - 4 inches from the ring.
Secure the knot and the ring. |
|
|
|
|

|
|
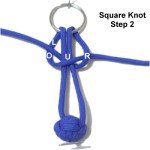
Step
8: Move the left
working
cord to the right, passing over
the fillers and under
the right working cord. |
|
|
|
|
|
|
Move the right
working cord to the left, passing
it under
the fillers and over
the left working cord.
Pull both cords to tighten the first half
of the Square Knot.
The working cords have now switched
places.
|
|
|
|
|

|
|
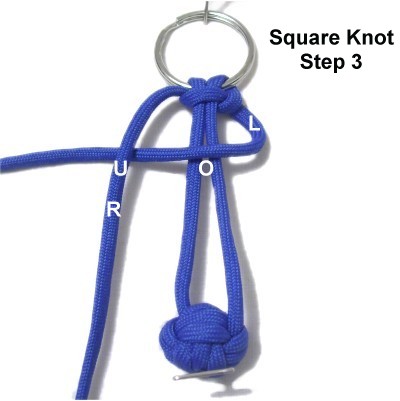
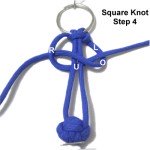
Step
9: Move the left
working
cord to the LEFT, passing over
the fillers and under
the right working cord. |
|
|
|
|
|
Move the right
working cord to the RIGHT,
passing it under
the fillers and over
the left working cord.
Pull both cords to tighten the first SK
for your Monkey Key Chain. |
|
| |
|
|
|
|
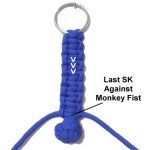
Step
10: Tie several more Square knots
to complete the strap for the Monkey Key
Chain. Push the knots close together
as you progress.
The last knot tied should rest against
the Monkey Fist knot. |
|
|
|
|
|
|
Finishing
|
|
|
|
|
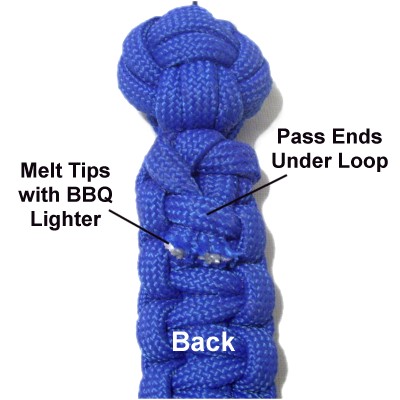
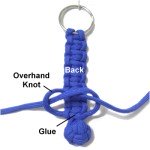
Step
11: Turn the Monkey Key
chain upside down so you work in the back
of the strap.
Tie a very
tight Overhand knot with the
ends.
As you tighten it, apply glue on the
inside, and on the last SK where it will
rest.
|
|
|
|
|
|
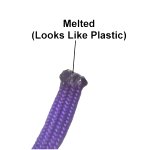
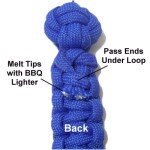
Step
12: Pass the ends under a
loop to hold them in place. Cut off
the excess material and apply more glue if
needed.
Melt the tips with a BBQ Lighter if using
Paracord (or other material that can be
melted). |
|
|
|
|
|
|
By
using any text or images on Free Macrame
Patterns, you are agreeing to our Terms
of Use
|
|
|
|
|
Have
any comments about the Monkey Key Chain? Contact
Me.
|
|
|
|
|
|
| |