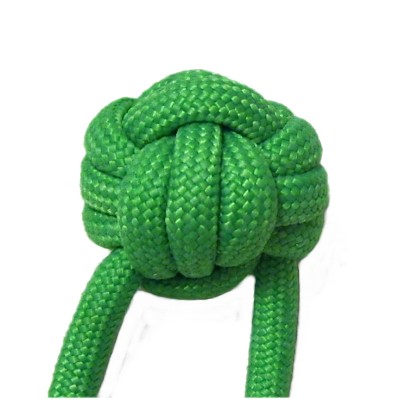
Description:
The Monkey Fist is an interesting
decorative knot seldom used in Macrame
patterns. It's easy to construct, but
challenging to tighten.
You could use this technique in combination with a
Buttonhole
Clasp to make a closure for a
belt or bracelet.
Try using this button knot as a pendant for a
necklace, or make it with rope for a pet
toy. It can also be used as the head
for an animal project.
Dowels were used in the example shown, but you can
tie it around two fingers if you wish.
The Monkey
Key Chain is an easy
Macrame project featuring this knot.
Click on the link or image to visit that
page.
Preparation:
Cut one cord, at least 36 inches
long.
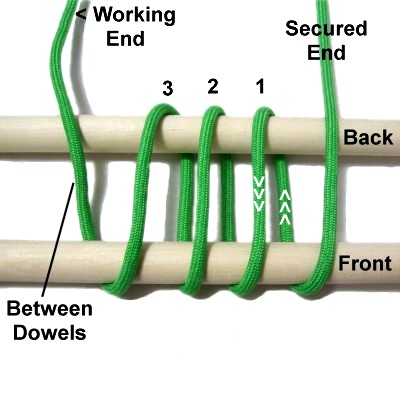
Arrange two dowels horizontally on you project
board. The one closest to you is considered
the front dowel, and the other is the back (see
image below).
Using dowels is the best way to practice the
Monkey Fist, especially if you are a
beginner. After you have practiced a few
times, you can wrap the cord around two fingers to
construct the first and second set of wraps.
Step
1: Secure the cord vertically
on the right.
Use the working end to make three vertical
wraps around both dowels, moving right to
left.
When you are finished, bring the working
end between
the two dowels (on the left).
Designer's
Tip: When you count the wraps,
don't include the secured end.
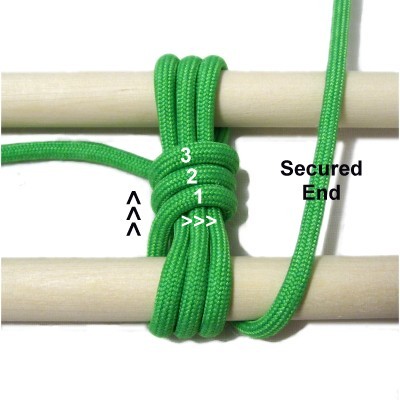
Step
2: Wrap the working
end around the previous wraps three times
(horizontally). Make sure you go around
both the top and bottom segments.
Start near the front dowel and move
towards the back dowel (black arrows).
Important:
Do not wrap around the secured end.
Step
3: Pass the working end under
the three segments that rest around the
BACK dowel, from left to right.
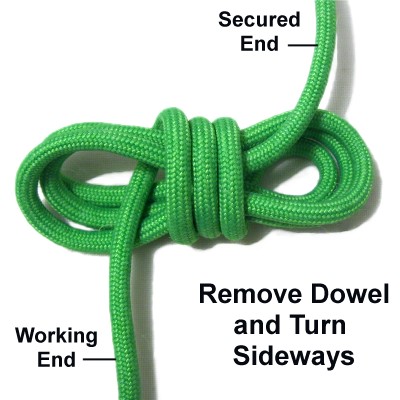
Step
4: Carefully remove both
dowels from the Monkey Fist knot.
Turn it sideways, so the working end is on
the left.
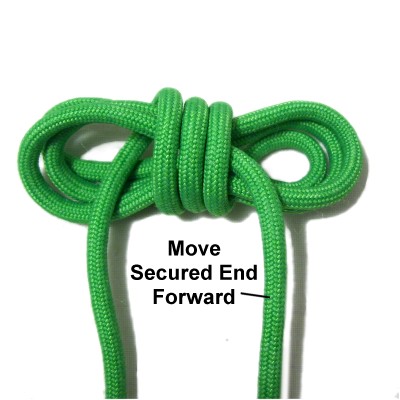
Step
5: Move the secured end so
it's heading forward.
This step is optional, but it gives you
both ends to tie additional knots.
No matter which direction you place the
secured end, do not wrap around it in the
next step.
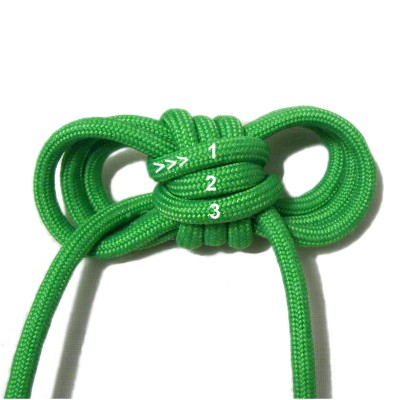
Step
6: Wrap the working end
around the second set of wraps three times
horizontally.
Start near the back of the knot, and move
forward (towards you).
The working end should come out from where
it started (left) when you are through.
Step
7: Starting at the secured end
(on the right), tighten each segment one
at a time.
Make sure the segments overlap as little
as possible, and that you tighten them
completely. The Monkey Fist is
supposed to be FIRM.
Tightening
Tips
The first set of wraps are the loose ones on
the right and left. You will tighten
them first, followed by the other areas.
Locate each segment by pulling gently
on the loose one you are tightening. Observe
the segments on the opposite side to see which
one moves. That's the next one you will
move.
Once you know you have the right segment,
pull it firmly
to tighten the loose one completely.
It's really hard to go back a second
time to remove slack from segments that were
not tightened enough.
Gradually push the Monkey Fist into a round
shape, particularly when tightening the second
and third set of wraps.
Finish off the ends in the manner most
appropriate for your project.
By
using any text or images on Free Macrame
Patterns, you are agreeing to ourTerms of Use