|
|
| |
|
|
Description:
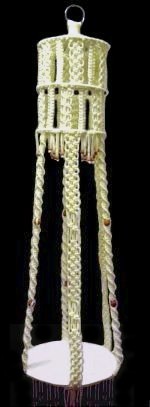
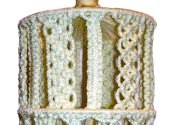
Macrame Splendor is a lovely Hanging
Table featuring beaded fringe at both
the top and bottom. A brushed
fringe is another option.
This Macrame Pattern is time
consuming, due to the fine tuning
necessary for the table top to be level.
The beaded fringe is optional, if you
prefer a brushed fringe or want to tie off
the cords.
The finished size is 60
inches, which includes the ring
at the top and the lower fringe.
Special thanks goes to Rocky Czekala,
who provided the inspiration for this
project.
|
|
|
|
|
|
|
|
|
|
| |
|
Supplies Needed:
- 6mm cord material (300 yards)
- Six Beads (with 10mm - 12mm holes)
- One piece of glass or finished wood, 16 inches
in diameter
- Optional: 12mm Beads with 6mm holes
(96 - 216 beads -- see
step 19)
|
| |
|
|
|
|
| Knots Used: |
|
|
|
|
|
|
|
|
|
|
|
|
|
|
|
|
|
|
|
|
| |
Preparation
|
| |
|
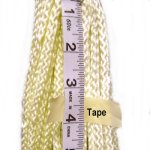
Cut
the cords as follows:
- 18 cords, each 11 yards long
- 12 cords, each 4 yards long
Prepare the tips with tape
to prevent unraveling while you work on the
Macrame Splendor Table.
|
|
|
|
|
|
|
|
|
|
|
|
|
| |
Mounting Process
|
|
|
|
|
|
|
|
|
|
Step 1: Fold the 11-yard cords
in half, and pass them through the 3-inch ring,
while holding it upright. (see image below)
Match the ends so equal amounts are on each
side of the ring.
Fold the 4-yard
cords in half, and place them on
top of the 11-yard
cords.
Organize all the cords into two separate
groups: Those in front
of the ring and the cords behind
the ring.
|
|
|
|
|
|
|
|
|
|
|
|
|
|
|
|

|
|
Use the
60-inch cord to tie a Wrapped knot around
the entire bundle. It should be
close to 2
inches long.
Wrap firmly, keeping the cord flat without
twisting, so Macrame Splendor is neat in
this area. |
|
|
|
|
|
|
|
|
|
|
|
|
| |
|
Step 2:
Pull down on each of the 4-yard
and 11-yard cords, to remove any slack.
Apply glue
to the outer portion of the knot, as well as
under the ends where they come out at the top
and bottom.
Push the ends inside
the knot after trimming them to
1/2-inch.
Roll up the two halves of each 11-yard
cord and secure them with rubber
bands.
This will make them easier to control while
you construct the Macrame Splendor table.
|
| |
|
|
|
|
|
|
|
|

|
|
|
|
| |
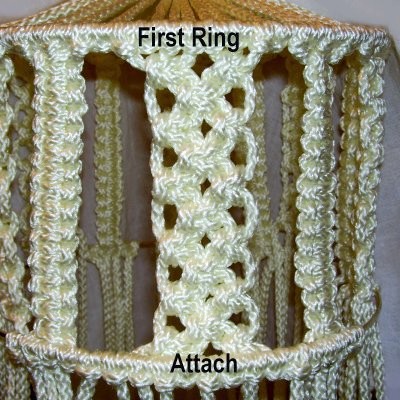
First Ring
|
| |
|
|
|
|
|
|
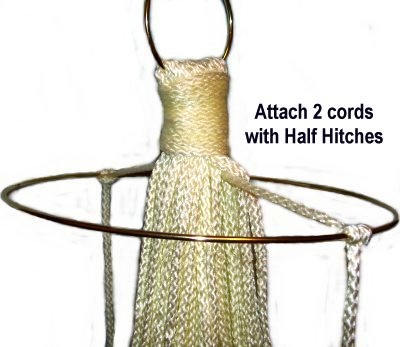
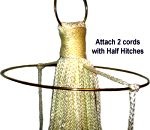
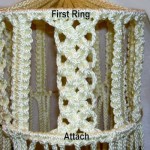
Step
3: Place all the cords inside
a 10-inch ring.
Temporary:
Attach 2 cords to the ring with Half
Hitches, to hold it level while you work
on the Macrame Splendor table. |
|
|
|
|
|
|
|
|
|
|
|
|
|
|
|
|
|
Step 4:
Move the 4-yard cords out of
the way. Divide the 11-yard
cords into six groups of 6
cords.
Three groups should be cords in the front
of the ring, and the same behind.
Mentally number one
group of cords 1- 6
(left to right)
|
|
|
|
|
|
|
|
|
|
|
|
|
|
|
|
|
|
Important:
Just before you attach each of
the cords in the next step,
measure them from the bottom
of the Wrapped Knot moving down 4
inches.
Mark the place with tape, so the
lower edge is at the 4-inch
mark. The ring should rest against the bottom
of the tape after the following knots
are tightened.
|
|
|
|
|
|
|
|
|
|
|
|
|
|
|
|
|
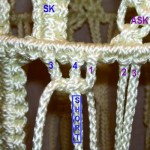
Step 4,
continued: Attach cords
6 - 1 to the ring with Larks Head knots,
in that
order,
as shown below:
|
|
|
|
|
|
|
|
|
|
|
|
|
|
|
|
|
|
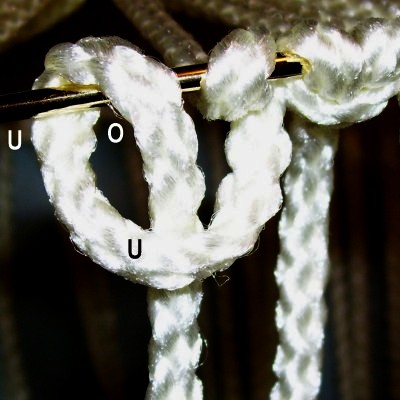
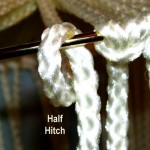
Part
1: Tie a Half Hitch by
passing one of the cords over
- under the ring, making a clockwise
loop.
Make sure the working end is to the
right
as shown.
|
|
|
|
|
|
|
|
|
|
|
|
|
|
|
|
|

|
|
Part
2: Bring the cord under
- over the ring, and under
the cord as you pull it down.
This loop rests to the left
of the first.
Parts
1 and 2 = one Larks Head Knot.
|
|
|
|
|
|
|
|
|
|
|
|
|
Important:
Measure
again, and make sure the ring rests against
the lower edge of the tape.
Step 4,
continued: Attach the remaining
groups of 11-yard
cords in the same manner.
Start with a group on the
other
side of the ring. This will
encourage the ring to stay level as you work on
this area of Macrame Splendor.
Leave space between each group for the 4-yard
cords.
Remove
the knots from the cords that were
temporarily attached with Half Hitches (step 3).
Step 5:
Repeat step 4, attaching the
4-yard cords
between
the other groups.
|
|
|
|
|
|
|
|
|
|
|
|
|
|
|
|
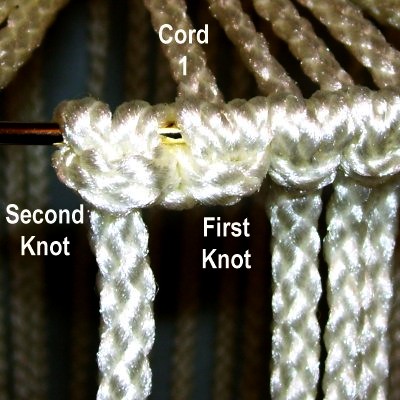
Important:
The ring for the Macrame Splendor design
probably needs extra knots to cover it completely.
When you tie the extras with cord
1, they are tied like the others, moving
left to right (clockwise).
When you tie the extras with cords
4 or 6, the first half of the knot is
tied so the end is pulled to the left
(counter-clockwise).
This way, when you tie the second half, it will
rest to the right
of the other knots.
|
|
|
|
|
|
|
|
|
|
|
|
|
|
|
|

|
|
For each
group of 11-yard
cords, tie one extra Larks Head
knot:
Cord
1: Place it to the left of
the other knots.
Cord 6: Place
it to the right of
the other knots.
|
|
|
|
|
|
|
|
|
|
|
|
|
|
|
|
|
Step 5,
continued: In each group of 4-yard
cords, tie the extra knots:
Cord 1:
Place it to the left
of the other knots.
Cord 4:
Place it to the right
of the other knots. |
|
|
|
|
|
|
|
|
|
|
|
|
|
|
|
|
|
|
|
|
|
|
|
|
|
|
|
|
|
|
|
Top
-- Section 1
|
|
|
|
|
|
|
|
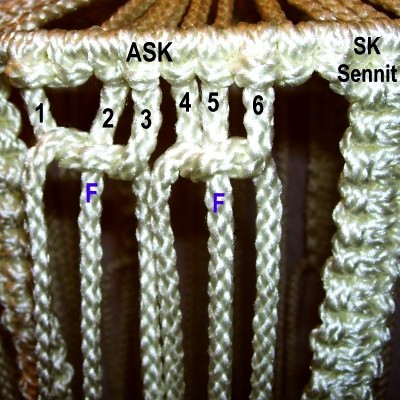
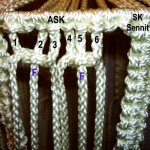
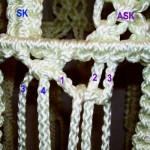
This section of the Macrame Splendor table is
made with two types of sennits.
One is a 4-cord
sennit made with Square Knots (SK
Sennit).
The other is a 6-cord
sennit, make with Alternating
Square Knots (ASK Sennit).
Make sure you know the difference, or the next
steps will be confusing to you.
|
|
|
|
|
|
|
|
|
|
|
|
|
|
|
|
|
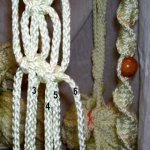
Step 6: 4-yard cords:
Mentally
number one
group of cords 1 - 4. The
working cords are 1 and 4.
Tie a 5.5-inch
sennit of Square
Knots (SK), pushing them close together as you
progress.
11-yard
cords: Mentally number one group
of cords
1 - 6.
Tie Alternating
Square Knots (ASK) as follows:
|
|
|
|
|
|
|
|
|
|
|
|
|
|
Tie one ASK
with cords 1 and 3, with cord 2
as the single
filler.
Tie another with cords 4 and 6 with cord 5
as the single
filler.
For the second row,
tie one ASK with cords
2 and 5,
with
3 and 4
as the two
fillers.
|
|
|
|
|
|
|
|
|
|
|
|
|
|
|
|
|
|
|
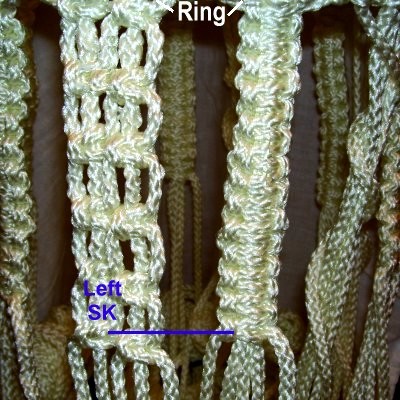
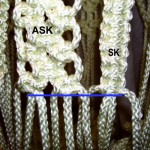
Repeat
the same process as described
above, until the sennit measures
5.5
inches.
The
bottom
of the last knots in each sennit should
line up (blue line). |
|
|
|
|
|
|
|
|
|
|
|
|
|
|
|
|
Important:
Make adjustments to this area of the Macrame
Splendor design by pushing the knots in the SK
sennits closer together (4-yard cords).
Measure carefully and
only add or subtract knots if absolutely
necessary.
|
|
|
|
|
|
|
|
|
|
|
|
|
|
|
|
Step 7:
Repeat
step 6 with all the other groups of
4-yard and 11-yard cords.
Measure carefully so that all the sennits are
exactly the same length.
|
|
|
|
|
|
|
|
|
|
|
|
|
|
|
|
|
|
Attach all the
cords to the second 10-inch ring with
Larks Head knots, repeating
steps
3 -
5.
Don't
forget to add the extra knots.
See
information below.
|
|
|
|
|
|
|
|
|
|
|
|
|
| |
|
Important:
The sennits for the Macrame Splendor
table should have tension.
To make sure the SK
sennits (4-yard cords) stay straight,
push the knots closer one more time.
Pull
firmly on each cord before attaching it
to the ring. The last knot should rest against the
ring.
The ASK
sennits can be stretched slightly as the
cords are attached to the ring. |
|
|
|
|
|
|
|
|
|
|
|
|
|
|
|
|
|
|
|
|

|
|
|
|
|
|
|
|
Top -- Section 2
|
|
|
|
|
|
|
|
|
|
|
|
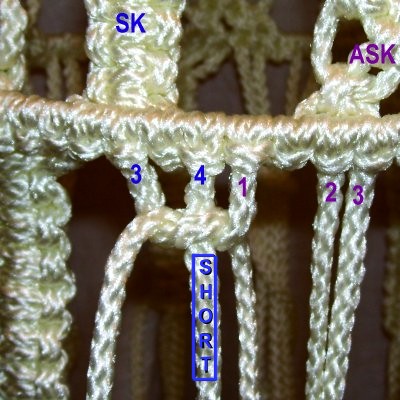
Step 8:
Locate cords
3 and 4 from one SK
sennit (4-yard cords).
Combine them with
cord 1
from the ASK
sennit to the right (11-yard
cords). |
|
|
|
|
|
|
|
|
|
|
|
|
|
Tie
one Square knot.
Important:
Cord
4 is the filler, and it is very short compared
to the others.
Make sure you don't accidentally use it as
a working cord.
|
|
|
|
|
|
|
|
|
|
|
|
|
|
|
|
|
|
|
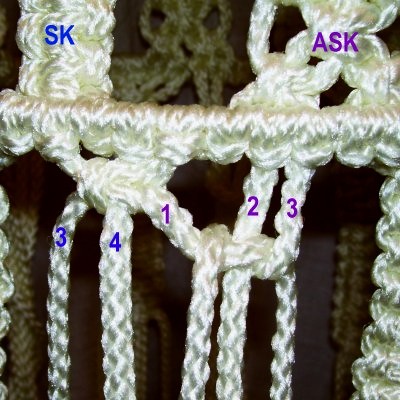
The second
knot is tied with cords
1 - 3 from the ASK sennit on the
right.
Cord 1
is part of both knots (shared).
Tighten this knot firmly, so it's as close
to the ring as possible. |
|
|
|
|
|
|
|
|
|
|
|
|
|
|
|
|
|
|
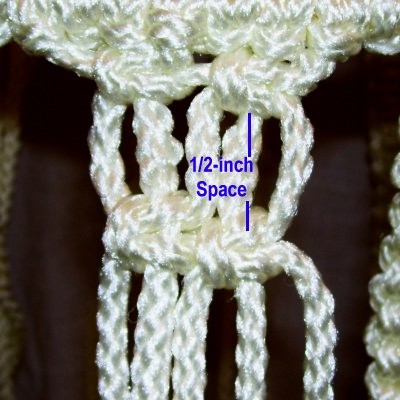
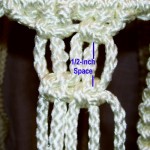
This area of
Macrame Splendor looks best with 1/2-inch
of space between each set of
knots.
So move down and tie the two knots as
described above, at
least 5 more times.
Measure from the ring down to the last
knot you tie.
Stop when the entire sennit is 5.5 inches
long. |
|
|
|
|
|
|
|
|
|
|
|
|
|
|
|
|
|
Step 8, continued: Locate cords
4 - 6 coming from the same ASK
sennit (11-yard cords).
Combine them with cords
1 and 2 from the next
group to the right (4-yard cords).
Use them to tie
a 5.5-inch
sennit of Square Knots, pushing the
knots close together.
These knots
have 3 fillers
(cords 5, 6, 1).
|
|
|
|
|
|
|
|
|
|
|
|
|
|
|
|
|
|
When both
sennits are finished, the left knot
on the ASK sennit should line up with the
knot at the bottom of the SK sennit.
Make adjustments to the SK
sennit as needed, so the Macrame
Splendor Table will be level. |
|
|
|
|
|
|
|
|
| |
|
Step 9:
Repeat step 8 with the
remaining groups of cords.
Important:
Make sure the shortest 4-yard
cords (1 and 4) are only used as
FILLERS, not working cords.
|
|
|
|
|
|
|
|
|
|
|
|
|
|
|
Attach all the
cords to the ring with Larks Head knots.
The
4-yard
cords should be next
to each other when you attach
them. Two will be from each
type of sennit.
Do not add
any extras with these cords.
Leave space
between cords
2 and 3.
|
|
|
|
|
|
|
|
|
|
|
|
|
|
|
|
|
Step 9,
continued: Attach all the 11-yard
cords to the ring, adding
an
extra knot
with the first and last cord in
each group.
This is similar to what you did in step
5 of the Macrame Splendor design. |
|
|
|
|
|
|
|
|
|
|
|
|
|
|
|
|
|
|
|
|
|
|
|
|
|
|
|
|
|
|
|
Top -- Fringe
|
|
|
|
|
|
|
|
|
|
|
|
|
|
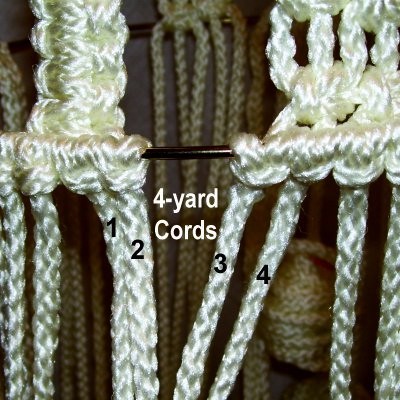
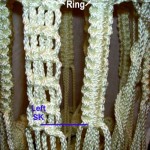
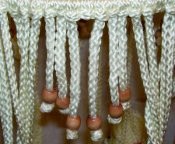
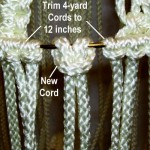
Step
10: The fringe for Macrame
Splendor is made with only the 4-yard
cords.
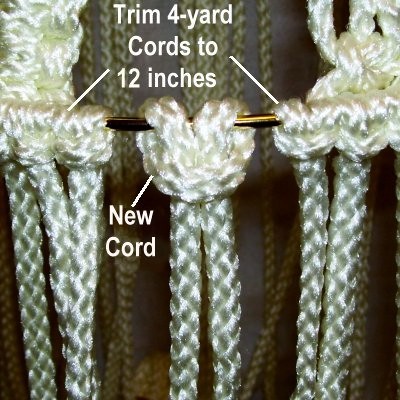
Trim them to 12
inches, and save
the scraps.
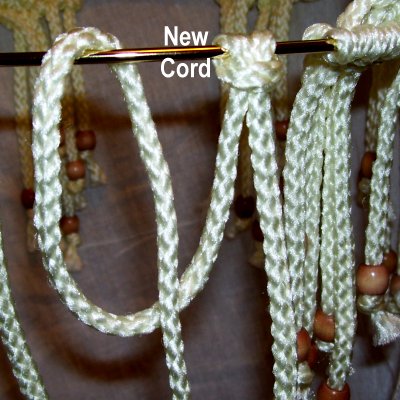
Fold a 60-inch
cord in half and attach it to the
ring with a Larks Head knot, in the space
you left (between cords 2 and 3). |
|
|
|
|
|
|
|
|
|
|
|
|
|
|
|
|

|
|
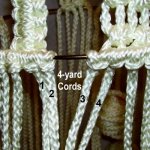
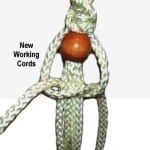
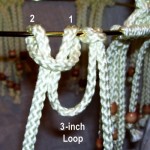
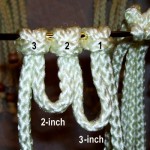
Use each
half of the new
cord to tie an extra Larks Head
knot on either side of the first.
This image shows the first half of the 3rd
knot being tied. |
|
|
|
|
|
|
|
|
|
|
|
|
For a brushed
fringe,
skip to step 12.
To make a beaded
fringe for Macrame Splendor,
complete the steps below.
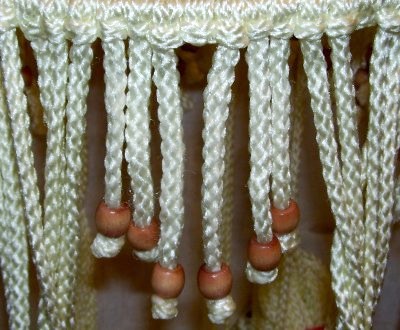
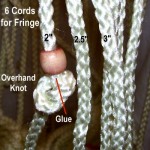
Mentally number the 6 cords. Attach
the beads as follows:
- Cords 1 and 6: Place the beads 2 inches
below the ring.
- Cords 2 and 5: Place the bead at 2.5-inch.
- Cords 3 and 4: Place the bead at 3-inch.
|
|
|
|
|
|
|
|
|
|
|
|
|
|
|
|
|
|
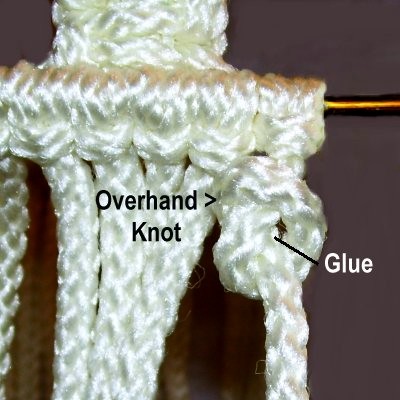
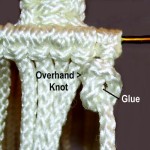
Tie an
Overhand knot below the beads, applying
glue to the inside
before tightening.
When the glue is completely dry, cut the
material off close to the knots. |
|
|
|
|
|
|
|
|
|
|
|
|
|
|
|
|
Step 11:
Repeat
step 10 with the other groups (4-yard
cords only).
|
|
|
|
|
|
|
|
|
|
|
|
| |
|
Step 12:
For a brushed
fringe, unravel the 4-yard
cords completely, into as many fibers as
possible. You can trim the cords and leave
the fringe wavy, or brush the fibers.
Optional:
You can gather the cords into small bundles,
which will look like tassels.
Use scraps to tie Wrapped Knots around the 6
ends, before
brushing.
|
| |
|
|
|
|
|
|
|
|
|
|
|
|
|
|
|
|
| |
Long
Sennits (Middle Section)
|
|
|
|
|
|
|
|
|
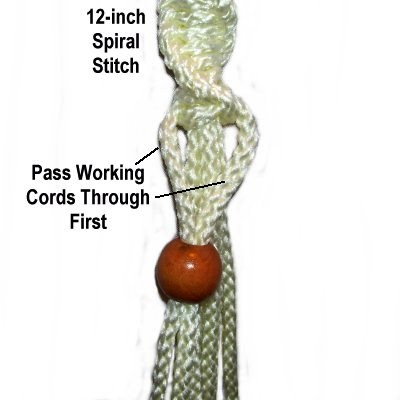
Step 13: Now you have
only the 11-yard
cords to make the middle section of the Macrame
Splendor table.
Mentally number the groups 1 - 6.
Groups
1, 3, 5: Tie a 12-inch
Spiral Stitch sennit, pushing the knots close
together as you progress. There are 4
fillers for these knots.
Important:
Measure from the ring to the bottom
of the last knot tied.
|
|
|
|
|
|
|
|
|
|
|
|
|
|
|
|
Spiral
Stitch Tip: To keep
the Spirals the same size, tie six (6) knots and
then give the sennit a half twist.
The working cords will switch places. Then you
just repeat the process. |
|
|
|
|
|
|
|
|
|
|
|
|
|
|
|

|
|
Add the first
bead by passing the working
cords through the hole. They
now become fillers.
Choose the two shortest
fillers and pass them through as well, behind
the working
cords.
|
|
|
|
|
|
|
|
|
|
|
|
|
|
|
|
|
|
|
The last two
cords are the new working
cords.
Bring them around the bead, and tie
another 12-inch Spiral
Stitch for the Macrame Splendor table. |
|
|
|
|
|
|
|
|
|
|
|
|
|
|
|
|
Step 13,
continued: Add another bead as
shown above.
For the final area, tie a 10-inch Spiral
Stitch.
Measure from the ring down to the bottom of the
sennit, as accurately as possible. It should be 34 -
36
inches long
(depending on the size of the beads).
Push
the knots together (or add/remove knots) as
needed.
|
|
|
|
|
|
|
|
|
|
|
|

|
|
Tie a 4-inch
sennit of Square Knots, pushing them close
together.
This area folds around the edge of the
glass and rests underneath
to support it.
Measure again, verifying that the sennit
is 38
inches.
|
|
|
|
|
|
|
|
|
|
|
|
|
|
|
|
|
Step 14:
Now
you will use
groups 2, 4, and 6 to make the ASK
sennits for the middle section of your
Macrame Splendor table.
Tie an 10.5-inch
sennit of ASK, following the instructions
below:
Important:
Always measure from the ring down to the bottom
of the last knot, so the Macrame Splendor table
will be level. |
|
|
|
|
|
|
|
|
|
|
|
|
|
|
|

|
|
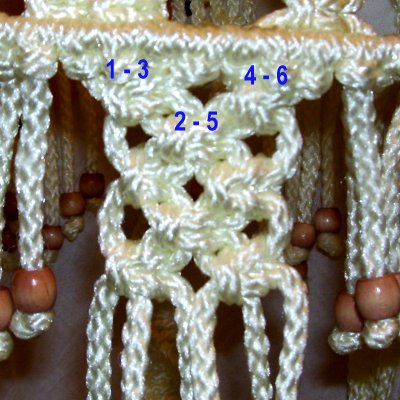
Tie a Square
Knot with cords
1 - 3, and another with cords
4 - 6
(one
filler).
For the next row, tie a Square knot with cords 2 - 5
(two
fillers).
As you continue, alternate between
the two rows. Make sure you
stop on a row with one knot. |
|
|
|
|
| |
|
|
|
|
|
|
|
|

|
|
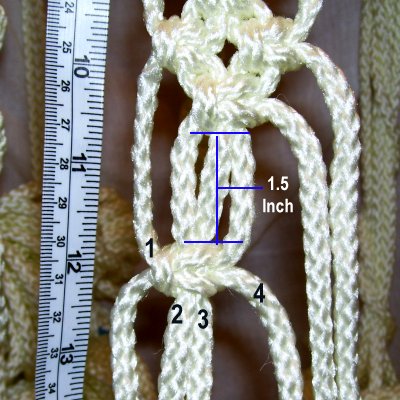
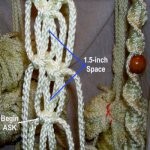
Step
15: Measure from the bottom of
the last knot, moving down 1.5
inches.
Tie a Square Knot with cords
1 - 4, so the top of it rests at
the place measured.
|
|
|
|
|
|
|
|
|
|
|
Tie the next
knot with cords
3 - 6.
Cords 4 and 5 are shared
between the two knots, similar to what you
did in the 2nd top section of Macrame
Splendor.
|
|
|
|
|
|
|
|
|
|
|
|
|
|
|
|
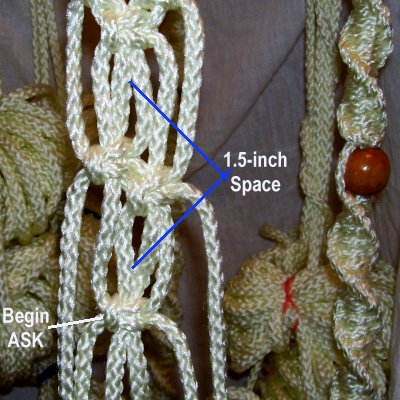
Move
down 1.5 inches and tie the next
ASK with cords 2 - 5.
|
|
|
|
|
|
|
|
|
|
|
|
|
|
|
|
|
Step 16:
Repeat
steps 14 and 15.
Step 17: Repeat
step 14.
Important:
You need to stop when the bottom
of the last knot
lines up with the last knot in
the Spiral Sennits. It's
OK to tie a few extra rows if necessary.
Measure once again,
making sure the
last row consists of 2 knots,
tied with cords
1 - 3 and 4 - 6.
Step 18: Attach
all the cords to the 12-inch ring with Larks
Head knots.
Do
not add any extras.
|
|
|
|
|
|
|
|
|
|
|
|
|
|
|
|
|
|
|
|
|
|
|
|
| |
Finishing Touches
|
|
|
|
|
|
|
|
|
Step
19: The Macrame Splendor
table can be finished in 3 ways:
Option 1:
Brushed
fringe
Using scraps as well as the material left in the
roll, add 16-inch cords to the ring to cover it
completely. Add enough cords to fill in each
section, between the ones already in place.
Trim all the cords to 8
inches. Unravel and brush until
smooth. Trim to neaten.
Option 2:
Tassel
Finish
Add the extra cords, as in Option 1.
Divide the cords into small groups.
Tie a Wrapped Knot around each group, using
18-inch cords. Tuck the ends of the 18-inch
cord inside the wrapped portion.
Trim the cords to at least 8 inches, and brush
until smooth.
|
|
|
|
|
|
|
|
|
|
|
|
|
|
|
|
Option 3:
Beaded
fringe
Trim all the cords to 12
inches (below the ring).
Save any scraps 20
inches or longer. |
|
|
|
|
|
|
|
|
|
|
|
|
|
|
|
|
|
For each cord,
tie an Overhand knot so it rests against
the Larks Head knot above it.
Apply glue before
tightening. |
|
|
|
|
|
|
|
|
|
|
|
|
|
|
|
|
In each group of 6 cords, place the beads as
follows:
Cords 1 and 6:
Beads should rest at 4 inches below the ring.
Cords 2 and 5:
Place the beads at 4.5 inches below the ring.
Cords 3 and
4: The beads should be placed 5
inches below the ring.
Tie Overhand knots below the beads and apply glue
before tightening. When it's completely dry,
trim off the excess material.
To
cover the exposed part of the ring, you have
three choices:
Option 1:
Use 20-inch scraps, as well as material left on
the roll, to add 12 extra cords between
each group already in place (total of 72
cords).
Add the beads as you did in the previous step. You
will need
144 beads for
this area, since you fold the cords in half.
Option 2:
You can use scrap cords to tie Wrapped Knots
around bundles of these new cords, which will look
like tassels. These can be beaded, or you
can just tie an Overhand knot at the tips (apply
glue).
Option 3:
Below are instructions for a Loop
Fringe.
You need two 36-inch cords for each of the 6 areas
you need to cover (total of 12 cords). |
|
|
|
|
|
|
|
|
|
|
|
|
|
|
|

|
|
Step
A: Fold a cord in half and attach
it to the 12-inch ring with a Larks Head
knot, between cords already in place.
Use the left
half to tie the first
half of a Larks Head, rotating clockwise.
Don't tighten
the knot.
|
|
|
|
|
|
|
|
|
|
|
|
|
|
|
|
|
|
|
Step
B: Tie the second
half of the knot, to the left
of the first.
Before
tightening, pull down on the
area between the knot you just tied
and the first one, until it's 3
inches
long. Measure from the ring to
the bottom of the loop.
Pull on the left end to tighten the
second knot.
|
|
|
|
|
|
|
|
|
|
|
|
|
|
|
Step
C: Use the left
half
and tie another loop in the same manner,
but make this one 2
inches long.
|
|
|
|
|
|
|
|
|
|
|
|
|

|
|
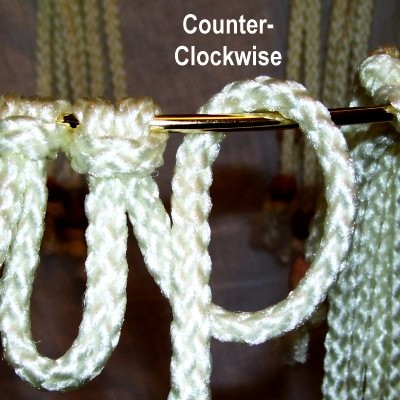
Step
D: Use the right
half to repeat the process, but
rotate counter-clockwise
when you tie the knots.
Repeat
steps A - D with a second cord,
placing it next to the one you just added.
Repeat
steps A - D, covering the
other exposed areas of the ring.
|
|
|
|
|
|
|
|
|
|
|
|
|
|
|
|
|
Step E:
After all the loops are finished, add beads to the
ends as you did the other cords.
|
|
|
|
|
|
|
|
|
|
|
|
| |
Step 20: Place
the 16-inch piece of glass or wood on the bottom
ring of the Macrame Splendor Hanging Table.
Approximately 4 inches in
the long sennits (above the lower ring) should
fold around the edge and under the table
top.
Stretch them as much as you
can, so the glass is as close to the
12-inch ring as possible.
Attach a sturdy hook to a ceiling and hang the
table from the ring at the top. |
| |
|
|
|
|
|
|
|
|
|
|
|
|
|
|
|
|
By
using any text or images on Free Macrame
Patterns, you are agreeing to our Terms
of Use
|
|
|
|
|
|
|
|
|
|
|
|
|
|
|
|
|
Have
any comments about Macrame Splendor? Contact
Me.
|
|
|
|
|
|
|
|
|
|
|
|
| |
|
| |
| |