|
|
| |
 |
|
| |
|
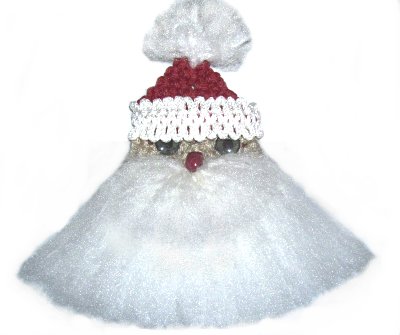
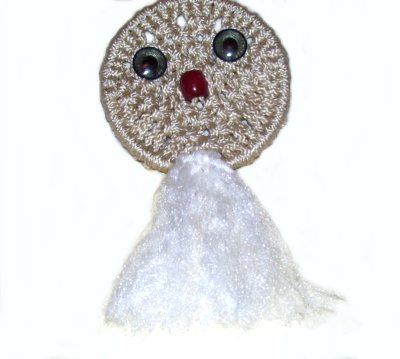
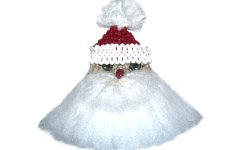
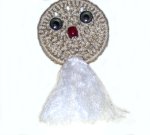
Description: This Macrame
Santa holiday decoration is a really fun project
to make with your children.
Your Santa will have a fluffy beard and
mustache, and a red hat with a brim, and a pom
pom at the top. You can use any type of eyes,
including those that wiggle.
You can make this Christmas ornament in several
sizes now. In the images shown, I made a
medium sized Santa, and he was 10 inches tall
when completed.
This pattern is rated moderate, since you
should have some experience with the decorative
knots listed, before attempting this
project.
|
| |
| |
| |
Supplies
Needed:
- Tan
material for the face
- White
material for hatband
- White
material for the mustache and beard (see
Preparation)
- Brass Ring (see
Preparation for sizes)
- Two eyes, 20 - 25mm (or beads)
- One red bead for nose, 15 - 20mm
- Project Board, tape and pins
- Fabric glue that dries clear
- Tweezers or small tip pliers
Important:
The amounts for all the materials will vary,
depending on the size. See the chart in
Preparation.
Add up the lengths for each color, so you know
how much purchase for your Macrame Santa.
|
| |
|
| |
|
Knots Used:
|
| |
| |
Preparation
|
|
|
To make a small
Macrame Santa, you need a 3-inch
ring for the face. Use 2mm
size material for the hat, face and brim. For
the beard, use
4mm material.
For a medium
size, use a 4-inch
ring and 4mm
size material. For the beard, 6mm material is
the best size.
For a large
size, use a 6-inch
ring and 6mm
size material. Use 6mm
material for the beard as well.
Important:
For the beard
and mustache,
cut the cords as
you apply them to the face (not
now). This way you can adjust the length if
necessary.
There is no need to prepare them in any way, since
you will be unraveling them.
Braided
material is the best for brushing, but it's not
easy to separate the fibers. Twist style
material is your other option, if you can find
some.
(Ebay is a good source for twisted style cord)
Use the following chart to cut the hat, brim, and
face cords for the Macrame Santa design: |
|
|
|
| Size |
|
Hat
- Short
|
|
Hat
-- Long
|
|
Brim
|
|
Face
|
| Small |
|
28
inch x 10 |
|
50 inch x 2 |
|
50 inch x 4 |
|
30
inch x 12 |
| Medium |
|
30
inch x 10 |
|
60 inch x 2 |
|
60 inch x 4 |
|
40
inch x 12 |
| Large |
|
36 inch x 12 |
|
70 inch x 2 |
|
70 inch x 4 |
|
50
inch x 12 |
|
|
|
|
| Prepare
these cords by applying tape to the ends. |
| |
|
|
|

|
|
The Face
|
|
|
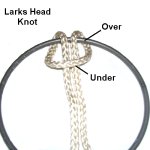
Step 1: Attach all of the tan
cords to the top
of the ring, using Larks Head knots:
|
|
|
|
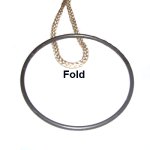
<<
Fold one cord in half and place it under
the ring as shown.
Bring the ends over
the ring, towards the inside.
Pass them under
the folded area. >>
Pull both ends firmly
to tighten. |
|
|
|
|
|

|
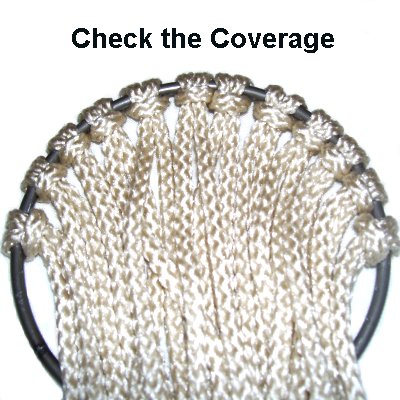
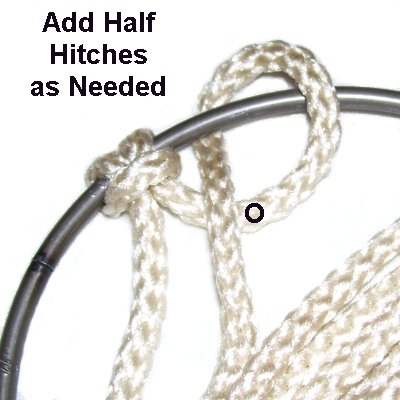
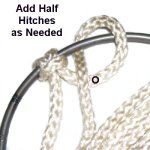
<<
After all the cords are mounted, check the
coverage by arranging the knots evenly
across the top
half of the ring.
Add
Half Hitches if the top half of
the ring is not completely covered (with
one or both halves). >>
|
|
|
|
|
|
|
|
When you are
finished mounting the cords, there should
be little or no space between the knots.
Choose which side of the ring you prefer
to call the front, since each looks a
little different. Place that side of
the ring facing up. Arrange the
cords so they pass in front of the ring at
the bottom. |
|
|
|
|
The face
for your Macrame Santa is made by tying rows of
Alternating Square Knots. The first
four images below show you the steps for tying a
Square knot.
All the Square Knots should be tightened as
much as possible. |
|
|
|
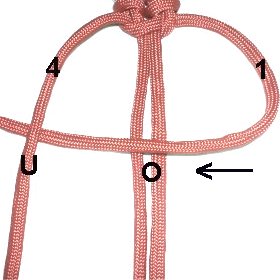
Left Square Knot Instructions
|
|
|
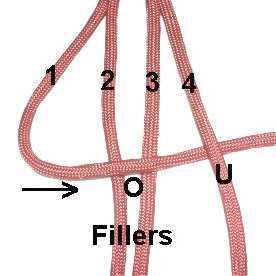
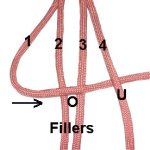
Mentally
number four cords. The fillers are
cords 2 - 3.
<<
Move cord
1 to the right, over
the fillers and under
cord 4.
Move cord
4 to the left, under
the fillers and over
cord 1. >>
|

|
|
|
|
|

|
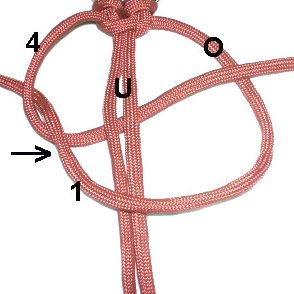
The
working cords have switched places.
<<
Move cord
1 to the left, over
the fillers and under
cord 4.
Move cord
4 to the right, under
the fillers and over
cord 1. >> |

|
|
|
|
|
|
|
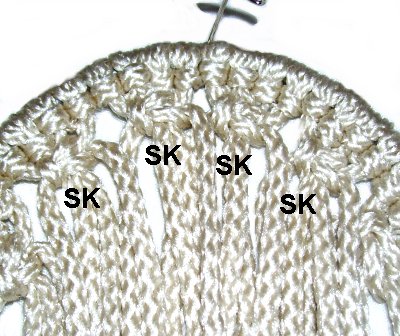
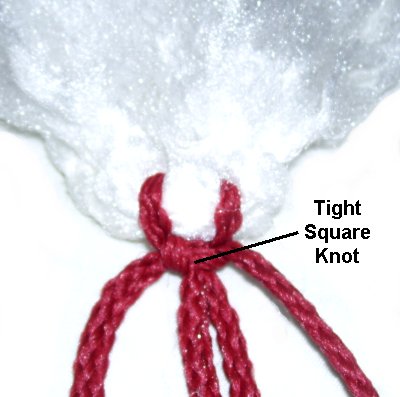
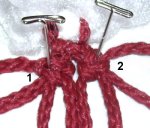
Step
2: Following the
instructions above, tie a row of Square
knots so they rest just below the Larks
Heads.
They should follow the
curve of the ring.
Each knot should consist of 2 working
cords and 2 fillers (total of 4 cords). |
|
|
|
|
|
|
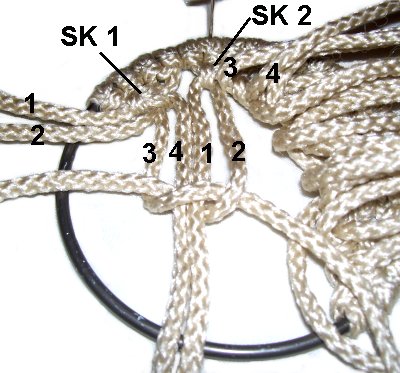
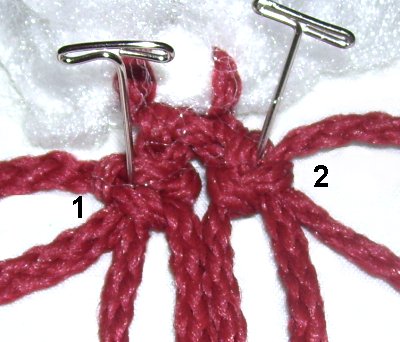
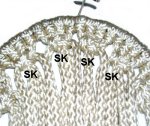
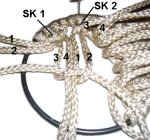
Step
3: Mentally number the
cords that come from two Square Knots (1 -
4). Alternate
the cords by using 3 and 4 from the SK on
the left, with 1 and 2 from the knot on
the right.
Use the new group to tie a SK. It will
rest below the ones in the first
row. Repeat
this step with the remaining
cords. |
|
|
|
|
Design
Tip: Another way to look at
alternating is that you tie the second row of
knots using cords
3 - 22 only. The first and last two
cords are not used.
As long as you are careful about selecting each
groups of 4 cords, the alternating should work
out. But it's a good idea to check that you
are using 2 cords from two knots from the previous
row. |
|
|
|
|
|
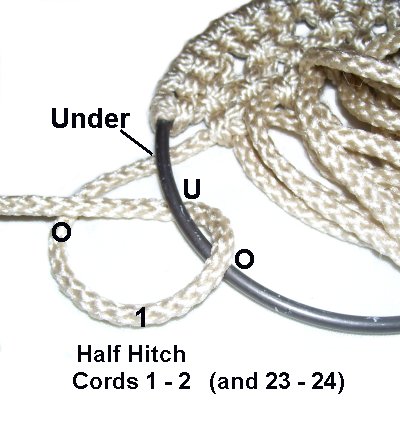
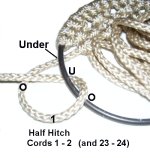
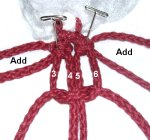
Step
4: Attach cords
1 and 2 to the ring with a Double
Half Hitch.
To do this properly, first pass the cord under
the ring. Make the first Half Hitch
in a counter-clockwise
direction, passing over
- under the ring, and over
the cord.
Repeat one more time, to make a Double
Half Hitch. |
|
|
|
|
Step 4,
continued: Finish the 3rd row by
tying Square Knots with cords 3 - 22.
Attach cords
23 and 24 to
the ring, as you did the first two cords, but rotate clockwise.
Step
5: Mentally re-number the
remaining cords 1 - 20.
Attach cords
1 and 2 to the ring, as in the last
step. Do the same with cords
19 and 20. |
|
|
|
|
|
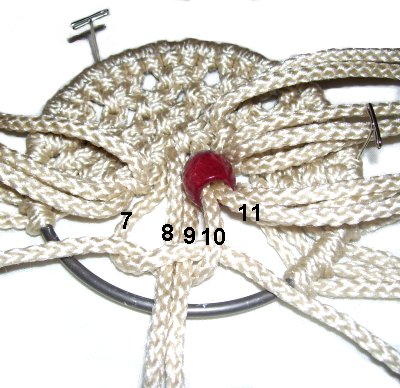
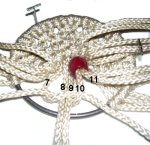
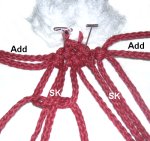
Step
6: Slide the bead for the
nose
of the Macrame Santa
onto cords
10 - 11.
Just below, tie the 4th row of SK using
the available cords, including
cords 10 - 11.
|
|
|
|
|
Step 6,
continued: Try to follow the curve
of the ring as best you can.
There may be some space between the knots in this
row and the ones made in row 3. |
|
|
|

|
|
Step
7: For the remaining rows,
don't worry about numbering the cords.
Just attach the first and last two cords
to the ring with DHH, as in the previous
steps.
Complete the row by tying SK with the
remaining cords.
Stop when the last row of SK is against
the bottom of the ring. Attach the
cords to the ring with DHH. |
|
|
|
|

|
|
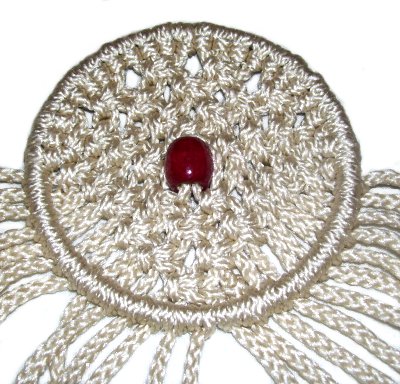
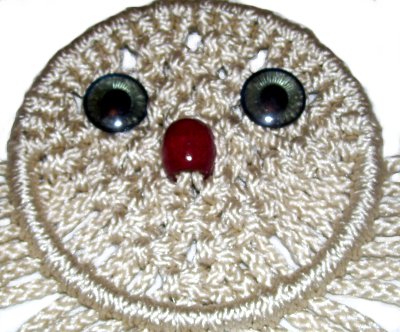
Step
8: This is the best time
to attach the eyes for your Macrame
Santa. They should be attached to
the fabric with glue.
(see tip below)
When using the type with washers,
poke the stem through a space between the
knots, and then apply the washer. |
|
|
|
|
Design
Tip: The best place to
attach the eyes is between rows
2 and 3.
They can either rest on top of the fabric, or be
pushed through a space if they have stems.
|
|
|
|
|
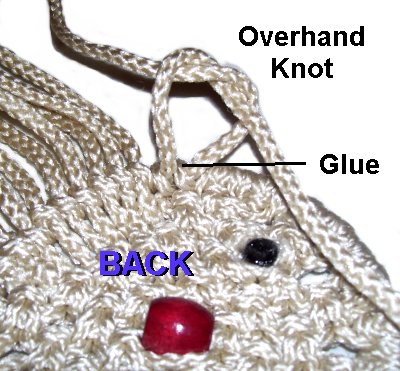
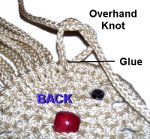
Step
9: To finish the face for
your Macrame Santa, flip the ring over so
you work in the back.
Pull the cords to the back of the face, so
they can't be seen from the front.
Using two cords per knot, tie tight
Overhand knots. Apply glue between the two
cords before tightening. |
|
| |
|
|
|
|
| |
Beard and
Mustache
|
|
|
Step 10:
To make the beard for your Macrame Santa, first
determine how long you want it to be.
Then cut a piece of the white
material double
that length. Add 1-inch extra since you will
need to trim the beard to neaten it.
(Example:
To make a 6-inch beard, the cord will be
13 inches long)
|
| |
| |
|
|
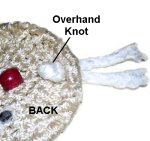
Tie an
Overhand knot in the center of the
cord. Find two spaces close to each
other, at the bottom of the ring.
Pass each end through those spaces, from
back to front. The knot should rest
in the back.
Apply glue under the
knot. |
|
|
|
|
|
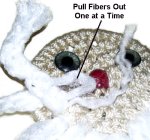
Unravel the
cord by pulling out one
fiber at a time, in the area close
to the face
of the Macrame Santa.
|
|
|
|
|
|
|
Brush the
fibers while holding
both ends
in your hand.
This way you can control the tension, so
you don't accidentally pull the knot out
of the face.
Attach several more cords in the
same manner, along the bottom of the
face. You can change the length of
the cords as needed, to produce the shape
you like.
|
|
|
|

|
|
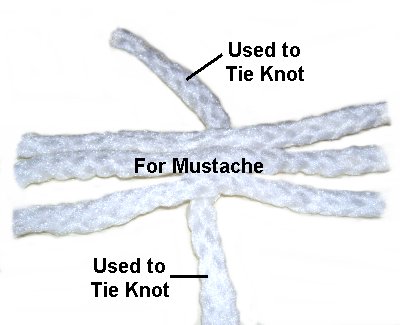
Step
11: Cut 4 white
cords, each at least 8 inches
long. Arrange 3 of them
horizontally, and one vertically, under
the others as shown.
Use the two ends of the vertical
cord to tie a very tight
Overhand knot around the middle of
the 3 cords.
|
|
|
|
|
|
Attach the
mustache to the face by passing the ends
used to tie the Overhand knot through one
space just below the nose.
(continued below)
|
|
|
|
Pull the knot through the space, so it rests in
the
back of the Macrame Santa.
Apply glue under the knot, and then push the ends
back through to the front
through
a different space.
Separate and brush
the fibers, and trim as needed until the mustache
for the Macrame Santa is the shape you want. |
|
|
|
|
|
| |
The Hat
|
|
|
| Step 12:
The hat for your Macrame Santa is made by adding
cords, so follow these instructions
carefully. |
|
|
|
|
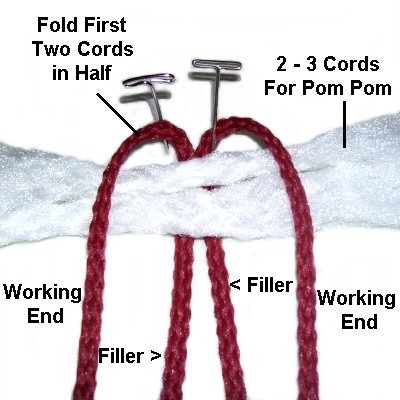
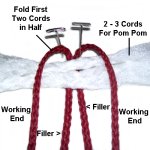
Fold the two long red cords
in half, and secure them to your
board. Cut 2 - 3 white
cords for the pompom, each 6 inches long.
Place them through the red cords as shown,
under
the working ends and over
the fillers. |
|
|
|
|
|
|
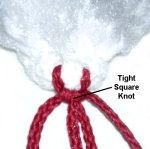
Tie a tight
Square Knot using the two working
ends, around the fillers.
Separate and brush the fibers for the pom
pom (white), and trim them to
approximately 2 inches.
You can add more material to the face
later, to make the pom pom more full. |
|
|
|
|
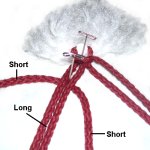
| Step 12,
continued: Now you will add the short red cords
to create the diagonal
shape for the hat of your Macrame Santa. |
|
|
|
|
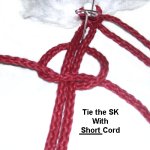
<<
Fold one short cord in half, and place it
under two of the long ones from step
12. Secure the cord.
Tie the Square Knot with the two ends of
the short
cord. The long cords are the
fillers. >> |
|
|
|
|
|
|
|
Repeat the
process again, adding another short cord
to the other two long ones.
Push both knots up to rest against the SK
above them. |
|
|
|
|
|
|
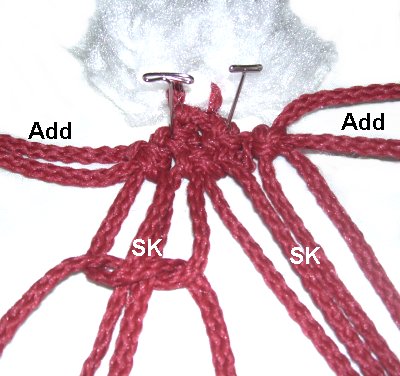
Step
13: You now have 8 cords
to work with, so mentally number them 1 -
8.
Add short
cords to 1 -
2, as well as 7 and 8, as you did
in the previous step.
Tie a Square Knot using cords 3 - 6.
When you are finished, there will be three
SK in this row. |
|
|
|
|
|
Step
14: You now have 12 cords
available for the 4th row. Mentally
number them.
Add a short
cord to 1 and 2, as well as 11
and 12.
Tie SK with cords 3 - 6 and with 7 - 10. |
|
|
|
| |

|
|
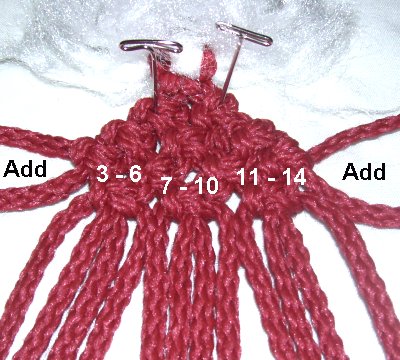
Step
15: Mentally number the 16
cords you now have to work with, for the
5th row.
Add a short
cord to 1 and 2, as well as 15
and 16.
Tie Square knots with cords 3 - 6, 7 - 10,
and 11 - 14. |
|
|
|
|
Step 16:
You now have 20 cords, so mentally number
them again. Add short
cords to 1 and 2, along with 19 and
20.
The Square Knots are tied in the following
groups:
This is where you STOP
adding cords for a small
or medium
size Macrame Santa.
For a large
decoration, add
two more cords at each edge of the hat
design, and tie Square Knots with the remaining
cords. |
|
|
|
Step 17:
Alternate the cords and tie the next row of
ASK. Two cords at each edge will not be used
for this row.
Alternate again, and tie the final row of ASK
using all the cords.
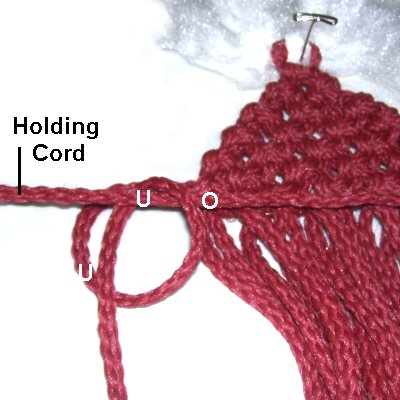
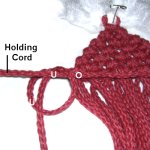
Step 18: Cut
a piece of red
material, at least 10 inches long.
Arrange it horizontally, on top of the working
cords for the hat. Secure it with tension,
since it's a holding cord.
|
|
|
|
|
Attach each working cord to the holding
cord with DHH.
Rotate counter-clockwise,
and progress left
to right.
Tighten the knots firmly.
|
|
|
|
|

|
|
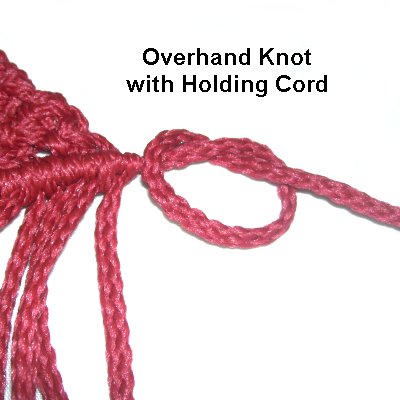
Tie a tight
Overhand Knot with each
end of the
holding cord.
Tighten it so it rests close to the Half
Hitches.
|
|
|
|
| |
Turn over the hat for the Macrame Santa.
Bring the ends of the holding cord to the back,
and work them under the back of two knots in the
area, to hold them in place. You will need
tweezers or small pliers to do this.
Apply glue. When it's dry, trim off the excess
material. |
|
|
|
|
|
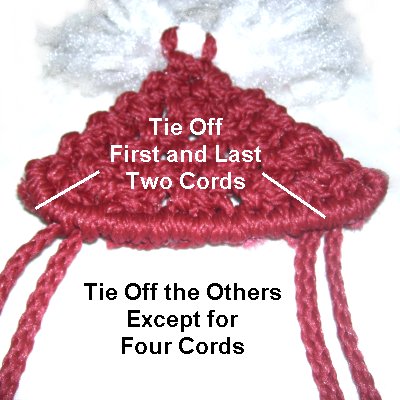
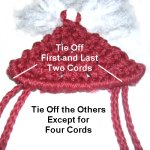
Step
19: In the back, tie off
the first
and last
two working cords by tying tight Overhand
knots (two cords per knot). Apply
glue while tightening.
Skip
past the next two cords at
each edge, and then tie off the
remainder in the same manner. The
four cords you keep will be used to secure
the hat to the face of the Macrame Santa. |
|
|
|
|

|
|
Step
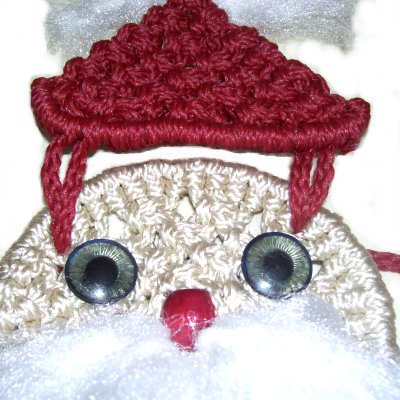
20: Attach the four cords
on the hat to the top
portion of the ring, by sliding the ends
through two spaces. Make sure the
hat is balanced.
Turn over the face
design and tie tight Overhand
knots with the two cords, on each
side. Apply glue to the knots as
well as underneath them. When the
glue dries, cut off the excess material. |
|
|
| |
|
|
|
|
The Hat Brim
|
|
|
The brim for the hat is made with Square knots,
arranged to form picots. In the images
shown, the red cords are there for instruction
purposes only.
You should use the FOUR WHITE CORDS
cut for this purpose. |
|
|
|
|
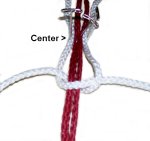
Step
21: Arrange the four cords
for the brim
to your board, vertically. Secure
them at the center.
Tie a left
Square Knot. Tighten it so it rests
next to the pins at the center.
|
|
|
|
|
|
|
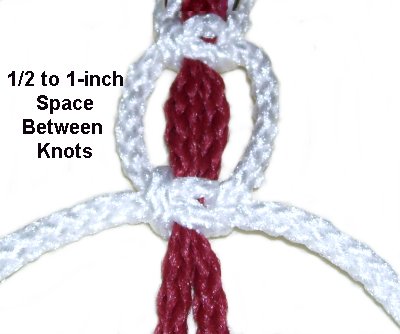
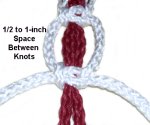
Step
22: Tie the next Square
knot, leaving a 1/2 to 1-inch space
between the two knots.
Push the second knot up, so it rests next
to the first knot. |
|
|
|
|
|
|
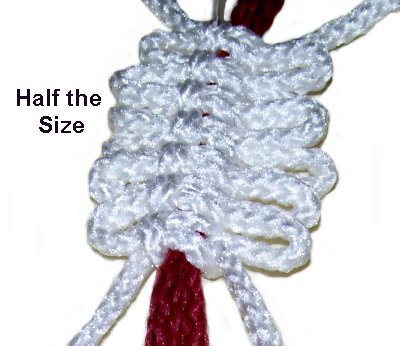
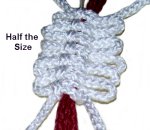
Step
23:
Repeat step 22 several
more times, until the brim is half
the size you need to cover the
bottom of the hat.
Tie one final SK, without the extra space
(no picot). |
|
|
|
|
|
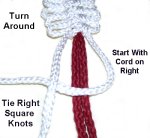
|
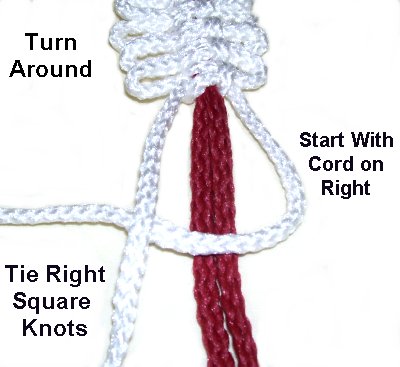
Step
24: Turn the brim around
and go back to the knot at the
center.
Move down and tie the next SK, but make
sure it's a right
Square Knot. In other words, start
with the cord on the right.
Move the knot up to form the next picot. |
|
|
|
Step 24,
continued: Continue to make more
picots, until the brim for your Macrame
Santa is the proper size for the hat.
Don't forget to tie the final SK without a picot
(no space). |
|
|

|
|
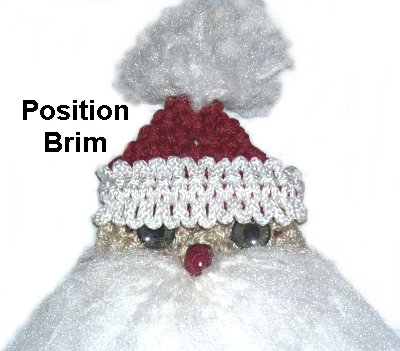
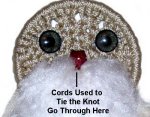
Step
25: Turn the Macrame Santa
to the front and position the brim.
It should rest on
top of the row of Half Hitches at
the bottom edge of the hat.
Once it's in position, pass only the working
cords through spaces between the
knots on the ring
(face), so they are in the back.
The fillers remain in front. |
|
| |
|
| |

|
|
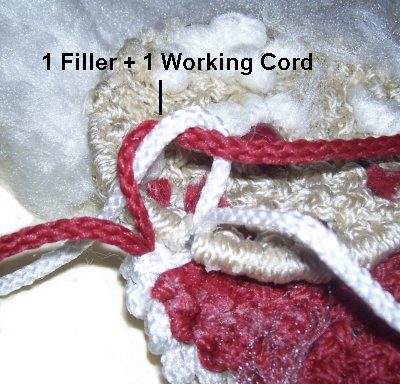
Step
26: Combine one filler
with one working cord to tie an Overhand
knot. Apply glue as you tighten it.
Do the same with the other two cords, and
then repeat the process at the other side
of the brim.
Trim the cords, and secure them to the
back of the face with more glue. |
|
|
|
|
Finishing
Touches: Add extra pieces of white
material to the sides
of the
face
and the area below the pom pom. Brush
and trim all the fluffed areas one last time.
Add a piece of scrap cord (or wire) to the back of
the hat, if you wish to hang the Macrame Santa
decoration. |
| |
| |
|
|
|
By using any text
or images on Free Macrame Patterns, you are
agreeing to our Terms of Use
|
|
|
|
|
Have
any comments about the Macrame Santa? Contact
Me.
|
|
|
|
|
|
|
| |