Leather Bracelet
|
| |
|
|
| |
|
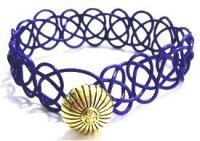
Description: This Leather
Bracelet features the Josephine knot,
which is also called the Double Coin knot.
You will be tying two variations of this
vintage knot to create this Micro-Macrame
bracelet design.
The material chosen for this Micro-Macrame
bracelet is round
leather, but you can switch to another material,
such as waxed cotton.
The knots hold their shape better if the
material is stiff.
Please note
that in many of the images, I used Paracord
instead of Leather, to show the details more
clearly.
|
| |
| |
| |
| Supplies
Needed: |
| |
- 2mm Leather or other material
- Project Board and tape or pins
- Fancy button or bead for the clasp
|
| |
| |
| |
|
Step 1: Cut 1 piece of
material, at least 2 yards long. Prepare
the ends to prevent unraveling. Leather needs no
preparation.
Important:
When securing leather or fragile material such
as Satin, be sure to use tape, or the
Cross-Pin
Technique.
|
| |
| |
 |
|
| |
|
|
|
| |
 |
|
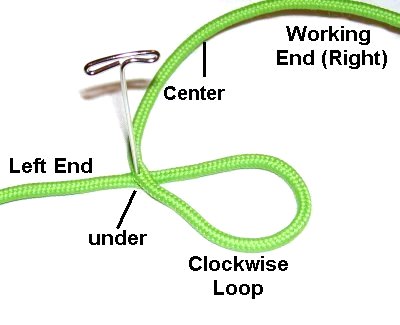
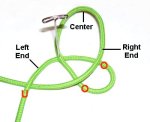
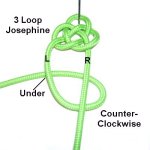
Step
2: Secure the center
of the cord to your board. Make a counter-clockwise
loop with the left
end.
Be sure you bring the end under
the vertical portion, to make the
crossing point on the left.
|
|
| |
|
| |
 |
|
Bring the right
end down, passing over
the first loop.
Before moving on to the next step,
pass the right end under
the left.
|
|
| |
|
| |
 |
|
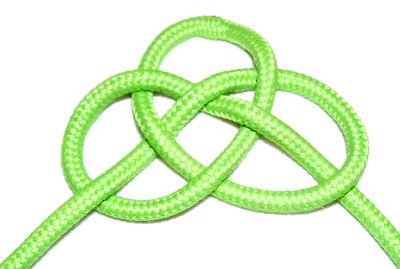
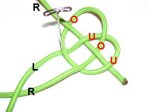
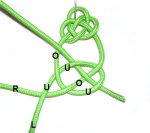
To make the third loop, bring the right
end up to the top of the knot, rotating
clockwise.
Weave it over
- under - over - under the four
segments of loops 1 and 2.
|
|
| |
| |
| |
 |
|
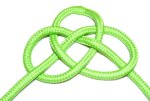
Balance and tighten the Josephine Knot,
so that Loop 2 is at the top, with the
ends at the bottom.
|
|
| |
|
| |
 |
|
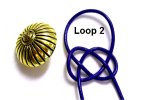
The largest loop
(#2) will be used to make the clasp for
the Leather Bracelet, so make sure it's
the right size for the bead or
button. |
|
| |
|
|
|
|
|
|
|
| |
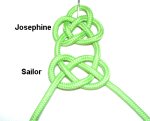
Step 3:
Now you will be making Josephine Knots
with only two loops, to complete the
Leather Bracelet.
Another name for this variation is the Sailor's
Knot.
|
|
| |
|
|
Use the left
end to make a counter-clockwise
loop.
The cord should pass under
to make the crossing point.
Bring the right
end down, passing
over
the first loop.
|
|
| |
|
| |
|
|
Move the right
end under
the left, as you bring it around in a clockwise
direction.
At the top, pass it over
the left end, and weave through the
first loop under
- over - under.
|
|
| |
|
|
|
|
Tighten the
knot by removing the slack
gradually.
This knot
should rest close to the one above it.
I left space between the two knots in this
image, so you could see the details more
clearly. |
|
|
|
| |
Step 4:
Repeat step 3 several more times, until
the Leather Bracelet is the size you wish to
make.
Place the knots close together, and tighten them
so they are the same size.
You can leave them wide and open as I did in the
image at the top of the page, or tighten them a
bit more. |
| |
|
| |
 |
|
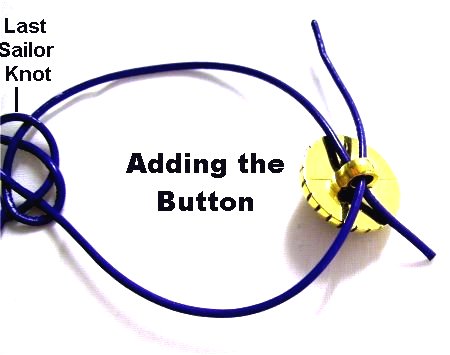
Step
5: The bead or button is
secured to the bracelet by passing the
ends through the shank in
opposite directions. |
|
| |
|
| |
 |
|
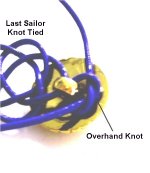
Pull on the
ends until the button is where you want it
placed. Apply glue to the button
where the knot will rest.
Tie an Overhand
knot, so it rests on the
side of the shank that's furthest
from the last Sailor knot you tied.
It doesn't matter where you place the knot
if you are using a bead. |
|
| |
|
| |
 |
|
Tie a second Overhand knot, placing it
on the other side of the shank, close to
the last Sailor knot tied. Add
glue before tightening.
Apply a generous amount of glue to the
top of the knot, and allow it to dry
completely. Cut off the excess material.
|
|
| |
| |
|
|
By using any text
or images on Free Macrame Patterns, you are
agreeing to our Terms of Use
|
|
|
|
|
Have
any comments about the Leather Bracelet? Contact
Me.
|
|
|
|
|
|
|
| |