|
|
| |
 |
| |
| |
|
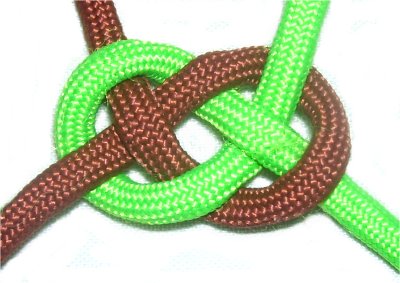
Description: The Sailors Knot
is considered a variation of the Josephine
knot. The difference is that
you use two separate cords. There are also
two loops, rather than three.
This decorative knot is a great technique to
use when making jewelry projects, such as the Leather Bracelet.
You can also use it to link 2 cords together,
or as a mounting knot.
Below the main instructions are two other ways
to use this knot; in a sennit (chain), and with
an alternating design.
|
| |
|
|
| |
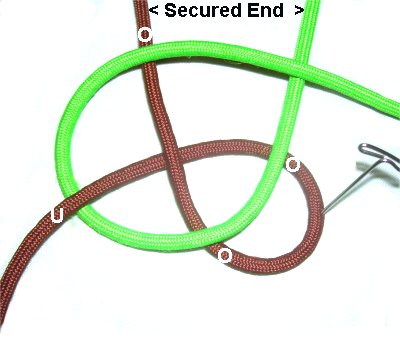
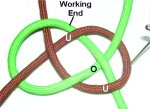
Step 1:
You need 2 cords to practice, each at least 36
inches long.
Using two colors really helps while you are
learning. |
| |
| |
 |
|
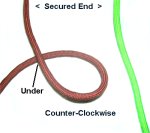
Secure both cords to your board
vertically.
Make the first counter-clockwise
loop with the cord on the left
(brown).
Make sure the working end passes under
the secured end to make the crossing
point.
|
|
| |
|
| |
 |
|
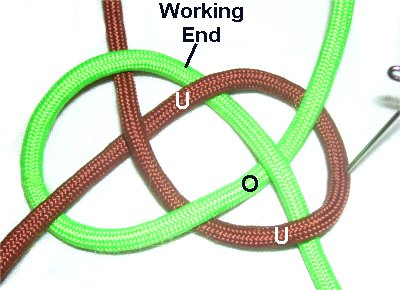
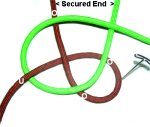
Step 2: Move the cord
on the right (green)
over
the loop, and under
the working end of the left cord.
Bring it over
the secured end (left
cord), as you rotate it clockwise.
|
|
| |
|
| |
 |
|
Step
3: Weave the working end of the
right cord through the loop made
by the left
cord, passing under
- over - under the three
segments. |
|
| |
|
| |
 |
|
Step 4: Tighten the
Sailors Knot by pulling on the ends.
|
|
| |
| |
|
| |
 |
| |
Creating a Sennit
|
| |
| |
|
|
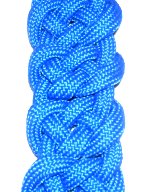
There are two types of patterns that
can be tied with the Sailors knot.
The first is a sennit,
which is tying several knots in a
vertical direction. The knots can be
close together, or be separated
slightly.
A design like this can be used as a
bracelet, belt, or strap.
|
|
| |
|
|
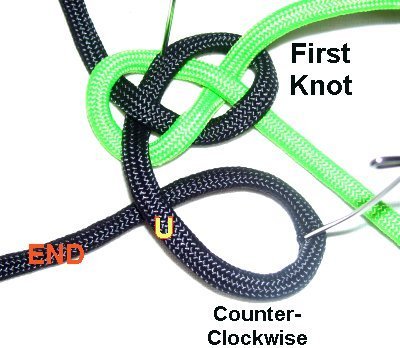
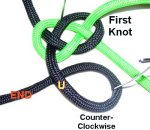
Step 1: Tie the first Sailors
Knot following the instructions above, close to
one end of the cords. Secure it to your board.
The working cords will be the long ends at the
bottom. |
|
| |
 |
|
Make a counter-clockwise
loop with the working cord on the left
(black).
Make sure the end goes under
to make the crossing point.
|
|
| |
|
| |
 |
|
Step 2: Bring the
working cord on the right
(green), over
the loop.
Pass it under
the working
end of the left
cord.
Pass it over
the segment of the left
cord coming from the knot
above.
|
|
| |
|
| |
 |
|
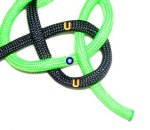
Step 3: Weave the right
end through the three segments
of the loop, under
- over - under.
Pull on the two loops first, to tighten
the area above
the knot.
Pull on the ends to tighten the loops.
|
|
| |
|
|
| Step 4: Repeat steps 1 - 3
to make the remaining knots in the sennit. |
|
| |
|
| |
|
| |
Alternating Pattern
|
| |
 |
|
| |
| |
The other way the
Sailors Knot can be used is in an alternating
pattern, similar to Alternating Square
Knots.
Start by securing 3 folded cords to your board, so
you have 6 cords to work with. |
| |
| |
 |
|
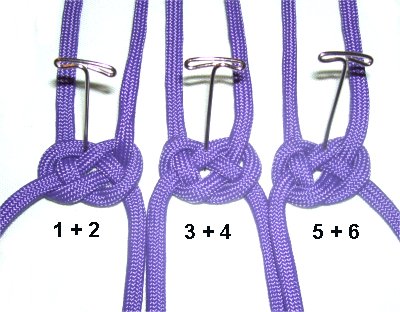
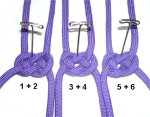
Step 1: Mentally
number the cords from left to right.
Make the first row of knots using cords
1 - 2, 3 - 4, and 5 - 6.
Tie them as you did in the first
set instructions, near the top of the
page.
|
|
| |
|
| |
 |
|
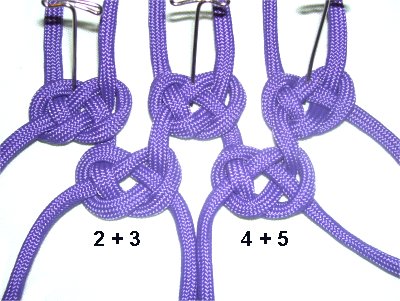
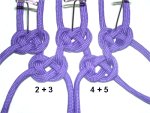
Step
2: For the second row, alternate
the cords.
The first knot is tied with cords
2 - 3. The following one is tied
with cords
4 - 5.
Tie them as you did in the second
set of instructions (the sennit).
|
|
| |
|
|
Design
Tip: In the images shown, space
was left between the rows to help you see the
details.
You can either mimic this arrangement when you
practice, or place the rows close together. |
|
|
| |
 |
|
Step 5:
Repeat
step 2 to make additional rows,
alternating the cords each time. |
|
| |
| |
|
|
|
By
using any text or images on Free Macrame
Patterns, you are agreeing to our Terms
of Use
|
|
|
| |
|
Have
any comments about the Sailors Knot? Contact
Me.
|
|
|
|
|
|
| |