|
|
| |
 |
|
| |
|
Description: These Larks Head
designs are small Macrame projects that will
help you gain experience with the Vertical
Larks Head knot. Be sure to
visit that page if you are not familiar with
this knot (click on the link).
Each of these designs have additional elements,
such as crossing and picots. They demonstrate
the options you have in using this interesting
knot.
Make sure you use a project board, since you
will need pins to secure the cords.
Larks Head
designs described below:
- Bracelet -- crossed design and alternating
colors
|
| |
|
| |
| |
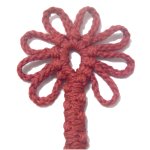
LARKS HEAD FLOWER
|
|
|
|
|
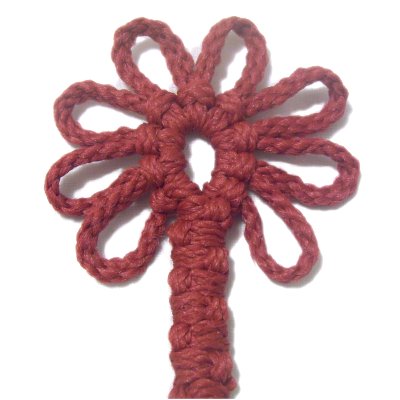
Description:
The Larks Head Flower features picot loops to make
the petals. The stem is also made with Vertical
Larks Head knots.
Larks Head designs with picots can be made with
fine material (1mm) to make earrings. Instead of
a stem, attach the cords to a hook.
You can also make the design larger by using
heavier material (6mm), creating an interesting
frame or wall decoration.
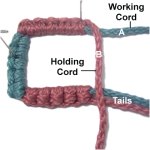
Designer's
Tip: Make sure you know the
difference between holding and working cords:
- Holding
= Knots are attached to this cord (brown cord
in images)
- Working
= Cord used to tie the knot (red cord in
images)
|
|
| |
| |
|
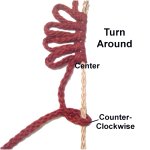
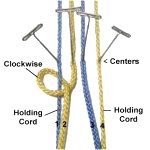
Preparation: Cut one holding
cord, at least 18 inches long. Cut one working
cord, at least 72 inches long.
Secure both cords to your project board
vertically. The holding cord should be placed to
the left
of the working cord, and should have tension.
Place a pin at the center of the holding cord.
Designer's
Tip: Larks Head designs are determined
by the shape and arrangement of the holding
cord.
|
| |
|
|
|
|
|
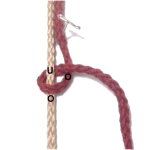
Step
1: Make a clockwise
loop with the working cord, passing over
- under the holding cord.
As you pull the working end right, pass over
to complete the loop.
|
|
|
| |
|
|
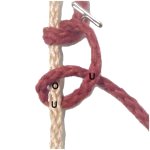
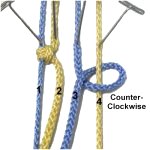
Step
2: The second loop for the Larks
Head knot is tied by passing the working
cord under
- over the holding cord.
As you pull it right, pass under
the working cord.
Tighten the knot firmly.
|
|
| |
|
| |
|
|
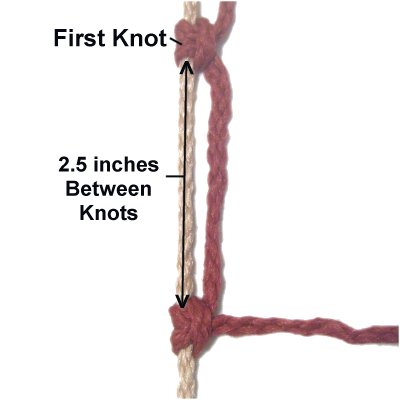
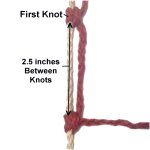
Step 3: Move down 2.5 inches,
then tie the next Vertical Larks Head
knot.
The picots in Larks Head designs can be
made any size, so the distance between
knots can be changed.
|
|
| |
|
| |

|
|
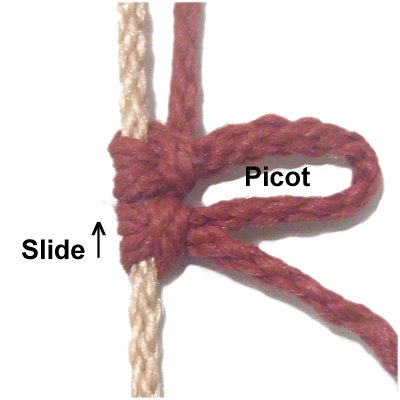
Step
4: Slide the second knot so it
rests against
the first knot, forming the picot loop.
The picot will be approximately 1.25
inches in size.
|
|
| |
|
| |

|
|
Step 5:
Repeat steps 2 -
4 three times, to make a total of
four picots.
Make sure the distance between the knots
is the same. |
|
| |
|
| |
|
|
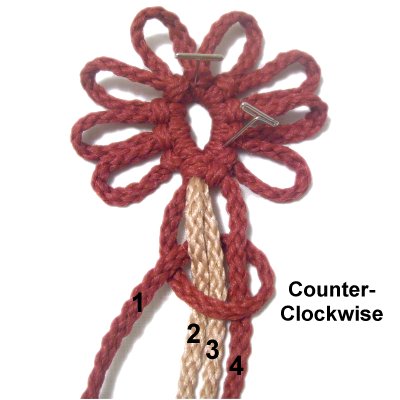
Step 6: Turn the
design around, so you use the other half
of the cords.
Repeat
steps 2 - 5, making sure the
knots have the same spacing as the first
half.
The knots should be tied
counter-clockwise.
|
|
| |
|
| |
|
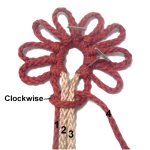
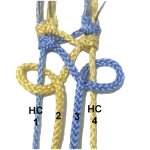
|
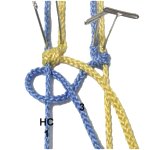
Step 7: Make a circle
by bringing the four ends
together. Mentally number the
cords 1 - 4.
Use cord
4 to make a clockwise
Vertical Half Hitch around cords 1 -
3. Make sure it's tight, so the
stem will be as narrow as possible.
|
|
| |
|
| |
|
|
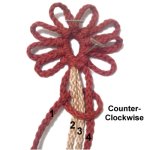
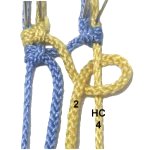
Step 8: Use cord
1 to make a counter-clockwise
Vertical Half Hitch around cords 2 - 4.
|
|
| |
|
|
|
|
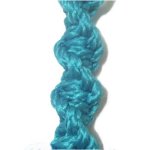
Designer's
Tip: Larks Head designs can
be combined with other knots.
You could make the stem with the Spiral
Stitch.
Click on the image or link to view
the instructions. |
|
| |
|
| |
|
|
Step
9: Repeat
steps 7 and 8 several times,
until the stem is the size you want.
Finish the ends in whatever manner you
prefer. |
|
| |
| |
|
| |
 |
| |
Larks Head Frame
|
|
 |
|
| |
|
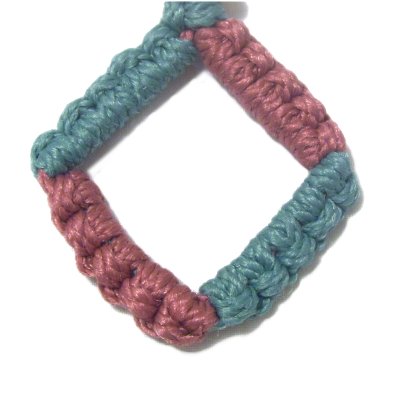
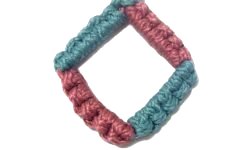
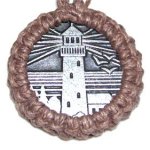
Description: Larks Head
designs are sometimes used as holiday
decorations. This frame is diamond shaped.
You can place an ornament inside so it
dangles.
Another option is to cut a holiday card or
photo into a diamond shape and secure it to the
back of the frame with glue.
|
| |
|
| |
|
|
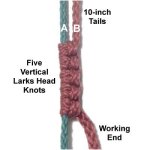
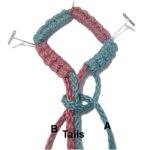
Step 1: You need two
cords, at least 50 inches long. Arrange
them vertically, and label them A and B.
Move down 10 inches from the end of the
cords, leaving two tails. Use cord
B to tie 5 Vertical Larks Head
knots onto cord A.
Push the knots close together as you
progress.
|
|
| |
|
| |
|
|
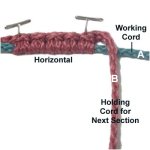
Step 2: Turn the
sennit so it's horizontal.
Bring cord B
forward vertically,
passing over cord A.
It will now become the holding
cord for the 2nd side of the
frame.
|
|
| |
|
| |
|
|
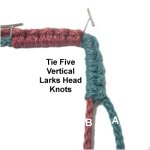
Step 3: Tie 5 Vertical
Larks Head knots
with cord
A onto cord B.
Push them close together so they are
the same size as the other side of the
frame.
|
|
| |
|
| |
|
|
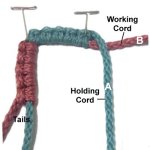
Step 4: Turn the frame
again. Bring cord
A forward vertically. It
will hold the knots for the 3rd side of
the frame.
Tie five Vertical
Larks Head knots with cord
B onto cord A.
|
|
| |
|
| |
|
|
Step
5: Turn the frame
one last time. Bring cord
B forward, and use it as the
holding cord for the 4th side of the
frame.
Tie five
Vertical Larks Head knots with cord
A onto cord B.
|
|
| |
|
| |
|
|
Step 6: Secure the
frame so the ends are at the bottom.
Tie a clockwise
Vertical Larks Head with cord
A, around both tails and cord
B. Position cord B to the left of
the tails.
|
|
| |
|
| |
Step
7 (optional): Tie a counter-clockwise
Vertical Larks Head with cord
B, passing around the tails and cord
A.
|
|
| |
| |
| |
|
| |
Larks Head Bracelet
|
 |
|
| |
|
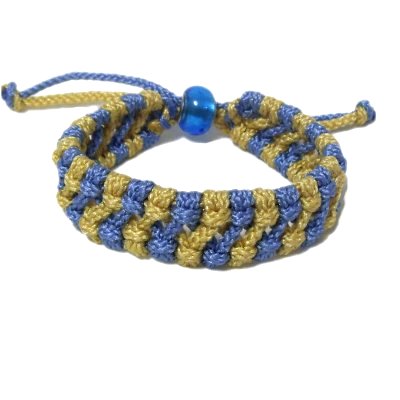
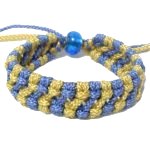
Description: Larks Head
designs can be used to make jewelry items, like
this bracelet. This Macrame project will help
you learn to alternate
colors and to form a crisscross
pattern.
Be sure to use two colors, even if you are just
practicing. Use 2mm material if you plan
to make the bracelet so you can wear it.
What makes this design unique is the fact that
the heads of the Larks Head knots are facing
inward, which is different from the two
projects previously described.
Please note that in the images only the first loop
of the Larks Head knot is shown. Use the
instructions for steps 1 and 2 of the FLOWER, if
you need a reminder of how this knot is tied.
|
|
|
|
|
|
The Pendant
Setting features this type
of crossing technique. The knotted
design wraps around the edge of a coin or
cabochon to make a pendant.
Click on the link or image to view the
page. |
|
|
|
|
|
|
Preparation:
Cut one working cord in each color, 72 inches
long. Cut one holding cord in each color,
18 inches long. Increase these
lengths if you plan to make the bracelet more
than 7.5 inches long.
You will need one bead for the clasp, which
should have a 5mm hole.
Secure the working cords between
the two holding cords, alternating the colors as
shown in the image below. Mentally number
the cords 1 - 4.
Line up the centers and secure them at that
point. The HOLDING CORDS should be secured
at both ends. Make sure they are straight
and have tension.
Important:
The distance between the two holding cords
should be 3/4-inch to 1-inch wide. Larks
Head designs should be consistent, so measure in
several areas to make sure the width is the
same.
|
|
| |
| |
|
|
Step 1: Make a
clockwise
Vertical Larks Head knot with working
cord
2 onto holding cord 1.
Tighten the knot so that it rests against
the pin at the center.
|
|
| |
|
| |
|
|
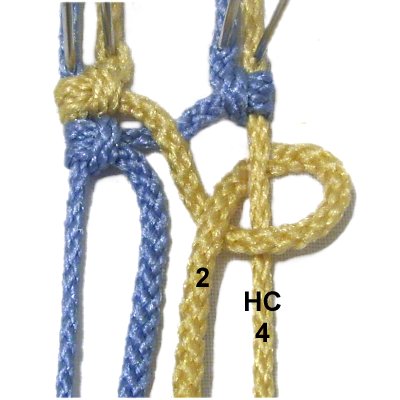
Step 2: Tie a counter-clockwise
Vertical Larks Head with working
cord
3 onto holding cord 4.
It should rest against the pin, too.
|
|
| |
|
| |

|
|
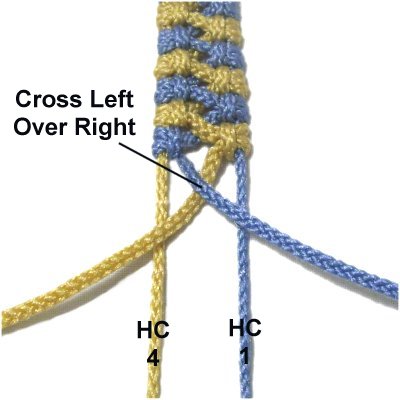
Step 3: Cross
working cord 2 over working cord 3.
|
|
| |
|
|
|
|
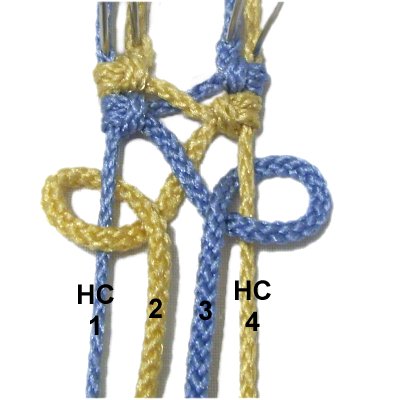
Step
4: Tie a clockwise
Vertical Larks Head knot with working
cord
3, onto holding cord 1.
|
|
|
|
|
Designer's
Tip: When you tighten in steps 4
and 5, make sure the holding cord remains straight
and taut.
The crossed areas should have tension, too. |
|
|
|
|
|
Step
5: Tie a counter-clockwise
Vertical Larks Head knot with working
cord
2, onto holding cord 4.
|
|
|
|
|
|
|
Step
6: Cross working cord 3
over 2.
Attach the working cords to the holding
cords next to them, as you did in steps 1
and 2.
|
|
|
|
| |

|
|
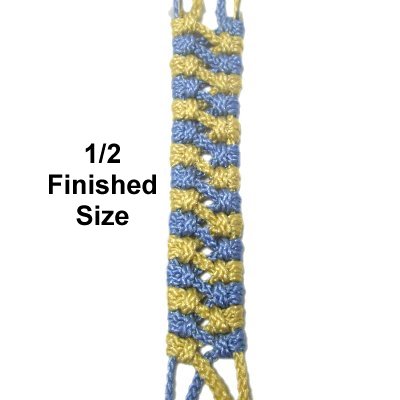
Step 7: Repeat
steps 3 - 6 several times,
until the bracelet is
1/2 the size you plan to
make.
So for a
7-inch bracelet, this half should
be 3.5 inches long.
|
|
| |
|
|

|
|
Step
8: Turn the bracelet around.
Mentally re-number the cords. Measure
the distance between the two holding cords
so the width remains the same.
Repeat
steps 3 - 6 several times, using
the other half of the cords.
|
|
|
| |
|
|
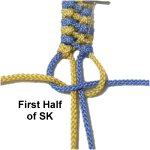
Step
9: After the bracelet is
the size you want, use the holding
cords to tie a Square Knot at
each end (first half shown in
image).
Click on the link to view the
instructions, if you don't know how to
tie a Square
knot.
|
|
| |
| |
|
|
|
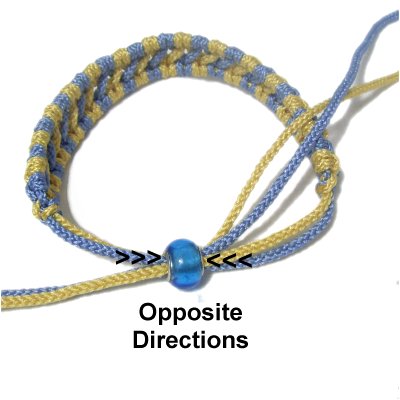
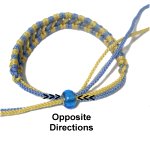
Step
10: In the BACK of the
bracelet, tie the holding
cords
together with some type of
finishing knot.
Apply glue and cut off the excess material
when it's dry.
Pass the working cords through the bead in
opposite directions. |
|
|
|
|
|
|
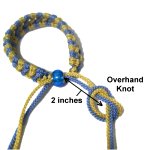
Step
11: Close the bracelet by
pulling on the ends.
Tie an Overhand knot with each pair of
working cords, tightening it so it rests 2
inches from the bead.
Change the placement of these knots if you
need the bracelet to open wider for your
hand to fit through. |
|
|
|
|
|
Feel free to send me suggestions
for other Larks Head designs you would like to
see on the site.
|
|
|
|
|
| |
By using any text
or images on Free Macrame Patterns, you are
agreeing to our Terms of Use
|
|
|
| |
|
Have
any comments about Larks Head Designs? Contact
Me.
|
|
|
|
|
|
| |
| |