|
|
| |

|
|
Description: The
Honey Pot Table is perfect for a baby
shower gift, and will create a special
touch for a baby nursery.
Try to find some cute Ceramic Bears
or other animals to decorate this
hanging table.
The finished Size is approximately 28
inches tall and 12 inches wide.
To change the size, the best place is
in the middle section (step 12).
|
|
| |
|
|
You can easily change the theme of this Macrame
project by using different colors and beads than
what is shown.
In the example, Color
A is white and Color B is yellow.
|
| |
|
| |
|
Supplies Needed:
- 4mm Macrame Cord (Color B --145
yards Color A -- 125
yards)
- Four 12-inch welded Brass Rings
- 6 Animal Beads (optional)
- 6 Round Beads with 10mm holes
- 12-inch Table Top (glass or wood)
|
| |
| |
|
Knots Used:
|
| |
|
|
| |
|
Cut the Cords as follows:
- 60 cords, each 50 inches long (Color
A)
- 60 cords, each 36 inches long (Color
A)
- 12 cords, each 7 yards long (Color
B)
- 8 cords, each 5 yards long (Garland
-- Color B)
- 1 cord 36 inches in length (either
color)
|
| |
|
|
| |
Mounting Process
|
|
| |
|
Step 1: Prepare the
cords with tape, glue or wax to prevent
unraveling.
Step 2: Pass the 7-yard
Color B cords
through the 2-inch ring, folding them over the
bottom, while holding the ring upright.
Match the ends so they are balanced.
Use the 36-inch
cord to make a Wrapped Knot around
them, so it rests just below the ring.
It should be approximately 1.5
to 2 inches long.
Apply glue under the ends near the top and
bottom edges of the knot. Cut off the excess
material from the short
cord when it's dry.
Pull
each long cord down firmly, so they tighten
around the ring.
Step 3: Place cords
through the 7-inch
ring and secure it flat on your board.
The Wrapped Knot should rest in the
center and be standing upright. Secure
the knot.
The cords should pass under
the ring, and be spread out evenly around
it.
Step 4: Attach each cord
to the ring with a Double Half Hitch.
Arrange it so there are six groups of 4 cords,
with space between them.
Be sure the tension
of the cords between the Wrapped Knot and the
ring is the same.
You can test it by holding the design up by the
small ring. Make adjustments to the DHH as
needed until it's balanced.
|
|
|
| |
|
Step 5: Mount the 50-inch
Color A cords to the 7-inch
ring, with Reverse Larks Head
Knots, folding them in half as you do so.
(see images below)
There should be 10
cords mounted in each of the spaces, between
the Color
B cords.
|
| |
|
| |
 |
|
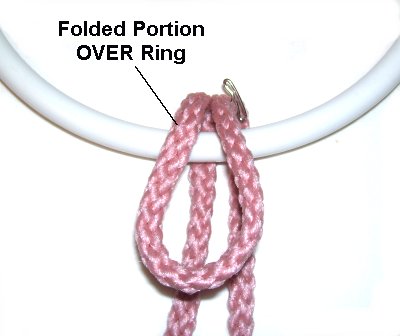
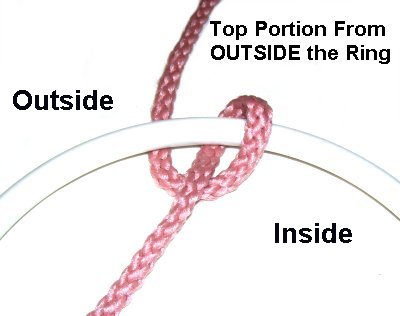
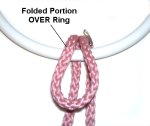
Design
Tip: To make a Larks Head knot
in reverse, place the folded portion over
the ring, so the ends pass underneath it. |
|
| |
|
| |
 |
|
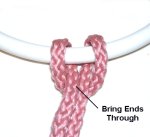
Bring the ends through the folded area.
The head will face backwards, towards
the inside of the
Honey Pot Table.
|
|
| |
|
| |
|
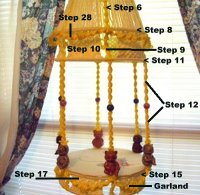
Here's a diagram of the Honey Pot
table, showing you what the different
steps will look like as you progress.
Click
on the image to see a larger view.
|
|
|
|
| |
|
|
| |
Top Section
|
| |
| |
|
Step 6: Tie a Spiral
Stitch sennit with each group
of 4 Color B cords,
so each measures 3
inches. Measure carefully, from
the top of the first knot to the bottom of the
last.
Step 7: Attach the 4 Color B cords
from each spiral sennit to a 12-inch
ring, with a DHH. (see
images below)
The last knot tied in the spirals should rest against
the ring. Make sure the design hangs
evenly when it is held up.
|
| |
|
| |
 |
|
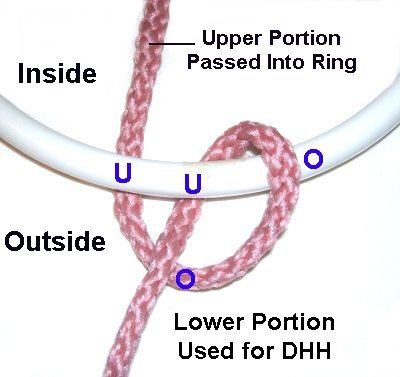
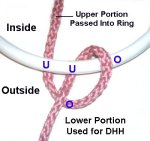
When tying a DHH onto a ring, pass the
cord into the ring first. Use the
lower portion to make the first Half
Hitch:
Move the cord under
the ring. Bring it
over -
under the ring, and over
the cord at the bottom.
|
|
| |
|
| |
 |
|
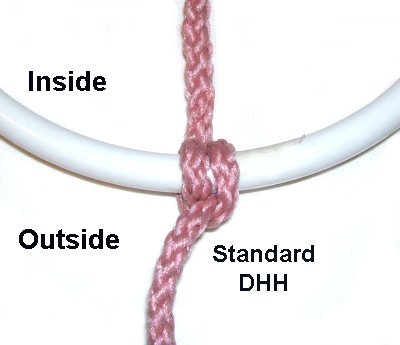
Tie the second
Half Hitch the same way, placing it to the
right. The end will rest on the outside
of the ring when you are finished. |
|
| |
|
| |
|
Step 8: Hang up the
Honey Pot Table by the small
ring.
Attach all the Color
A cords to the same
12-inch ring with DHH, between the other
cords (Color B).
There should be the same amount of tension on
each of these cords, so they are straight
and taut. Check to make sure the ring is
balanced.
Step 9: Tie a 3-inch
Spiral Stitch sennit with each group
of Color B cords.
Step 10: With each group
of Color A cords,
tie a panel of Alternating Square Knots.
These designs should each measure 3
inches from top to bottom. All
the SK should be made with 2 working cords and 2
fillers.
Step 11: Attach all the
cords to another 12-inch ring with DHH.
Start with the Color
B cords and then the Color
A cords. Make sure the ring is
balanced.
Let the remainder of the Color
A cords dangle for now, until its
time to make the finishing touches for the Honey
Pot Table.
|
| |
|
|
| |
Middle Section
|
|
| |
|
Step 12: Use 4 Color B cords,
and tie a 5-inch
Spiral Stitch sennit.
Slide a bead over all 4 cords. Switch
the working cords
with the fillers.
Continue tying the sennit for another 5
inches.
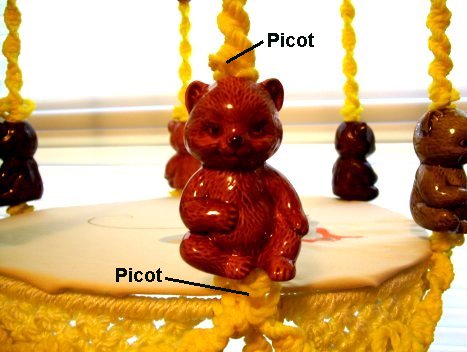
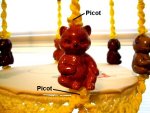
Step 13: (Optional)
Make a Picot by tying a Square
Knot resting approximately 2-inches below
the last spiral knot.
Slide the knot up to the last knot in the
spiral portion. Repeat this process again
to make a second picot.
|
|
|
| |
 |
|
Step
14: Pass all 4 cords
through an animal bead, if you are using
them.
Repeat
step 13, so the picots rest below
the beads. |
|
|
| |
|
Step 15:
Repeat steps 12 - 14 with the other five
groups of Color B cords.
Attach the cords to another 12-inch ring with Reverse DHH, following
the instructions below: |
|
|
|
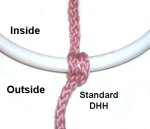
Important:
To reverse a DHH, you must reach across
the ring to tie each knot.
The top portion coming from the sennit should rest
on the outside
of the ring. |
|
|
| |
 |
|
Pass the cord under
the ring, pulling it to the inside.
Tie the first Half Hitch over
- under the
ring and over
the cord.
Make the second Half Hitch the same way.
|
|
| |
|
| |
 |
|
When you are
through, the table top for the Honey Pot
Table will be able to rest on
top of the DHH, with the
upper portion of the cord folded around
the edge of it. |
|
| |
| |
|
| |
Bottom Section
|
|
| |
|
Step 16: Mount each of
the 36-inch
Color A cords to the ring at the
bottom of the Honey Pot Table,
with
reverse Larks Head knots.
Place 10
cords between each of the Color
B sennits already attached, folding
them in half in the process
(total of 60 cords).
Step 17: Tie a 3-inch
panel of Alternating Square Knots with each
group of 20
Color A cords. This is similar to what
you did in step
10.
Step 18: Tie a Spiral
Stitch sennit with each
group of Color B cords,
measuring 3
inches.
Step 19: Attach all the
cords to the last 12-inch ring with DHH.
|
| |
|
|
| |
Finishing Touches
|
|
| |
|
Step 20: Trim the Color
A cords at the top
of the Honey Pot Table to 2
inches. Move them to the inside
and weave them into the panels. You can
apply glue to hold them in place.
Step 21: Repeat
step 20 with the Color
A cords at the bottom.
Step 22: Make sure
everything is balanced. Trim the Color B cords
at the bottom to 2
inches.
Weave them into the back
of the Spiral Stitch sennits.
Try to arrange them so they dont show.
|
| |
|
|
| |
Garland Decoration
|
|
| |
|
Step 23: Use four
5-yard cords for the first garland,
which is used to decorate the Honey Pot
Table.
Pass all 4 cords through spaces in one of the Color B sennits
just below the animal beads in the bottom
section. The garland will rest between the
two rings.
Match up the ends and center the cords.
Each half will be used to make a garland for
the Honey Pot Table, heading in opposite
directions.
So each half will decorate the areas between
3
Color B sennits.
|
| |
|
| |
Step 24:
Make a 4-inch
Spiral Stitch sennit with the 4 cords.
Optional:
Tie 2 Picots, as you did in steps
13 and 14.
Continue by tying another 4-inches of Spiral
knots.
Pass the cords through spaces in the next Color B sennit
from back to front. The
garland should have a gentle curve. |
|
|
| |
|
Step 25: Repeat
step 24 again, but when you get to the
picots, switch
cords, so the fillers become the new
working cords.
Step 26: Repeat
step 24 one more time.
Pass the ends through the spaces in the 3rd
Color B
sennit, front to
back. The ends should rest on
the inside
of the Honey Pot Table.
Use 2 cords to tie an Overhand knot. Do
the same with the other two. Trim the
cords, and apply glue to the knots.
|
|
|
| |
|
Step 27: Repeat
steps 24 - 26 with the other half of
the same
4 cords.
You'll finish by passing the ends through the same sennit
as in step 26.
Step 28: Repeat
steps 23 - 27 to make a garland at the
top of the table, between the two rings.
Step 29: Place the glass or
wood for the Honey Pot table on the first ring in
the bottom section (near the animal beads). Pull
the cords so they fit around the edges. |
| |
| |
|
|
|
By
using any text or images on Free Macrame
Patterns, you are agreeing to our Terms
of Use
|
|
|
|
|
Have
any comments about the Honey Pot Table?
Contact
Me.
|
| |
|
| |
 |
| |
| |