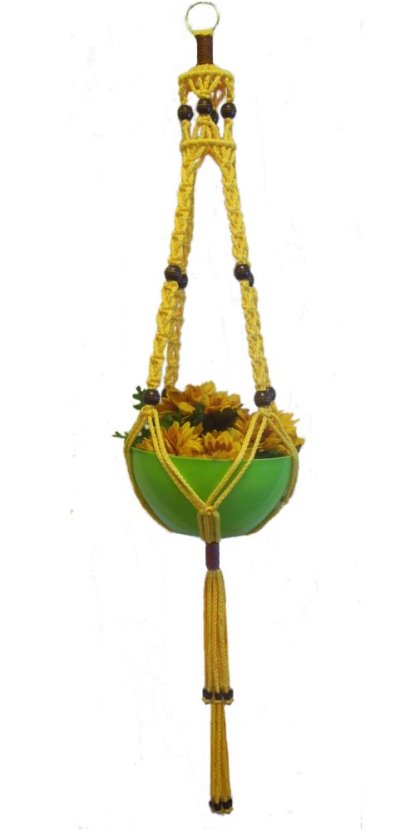
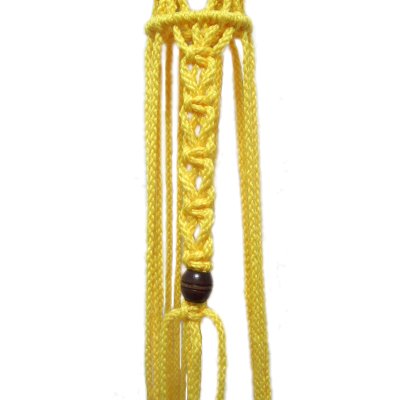
Description:
This Handcrafted Planter features the Switch
Knot, which is not usually
found in plant hangers.
It's made by switching fillers and
working cords before tying each Square
Knot, and is found in the long sennits
in the middle section.
Using the Switch Knot results in a
crisscross pattern, which has small open
spaces. So it has a more delicate
appearance. I encourage you to give it a
try.
You can use other knots, but make sure
you cut the cords longer than described
in Preparation.
This plant hanger is easy to make, and
is suitable for a beginners Macrame
project.
The finished length is approximately 50
inches, which includes a double fringe
at the bottom.
Cut
2 cords, each 36 inches long (for
Wrapped Knots)
In the images below, I used a contrasting color
(brown) for the Wrapped Knots, since I wanted to
use remnants. This is optional, but looks
very nice if you have any leftover material from
other projects.
Cut the cords longer if you plan to use
different knots in the long sennits. Multiply
the finished
size you want x 7 to get the length of
each cord.
Prepare the cords with
masking tape to prevent unraveling as
you work on the Handcrafted Planter. When
applying the tape, compress the ends of each
cord to make them as flat as possible, to make
beading easier.
Top
Section
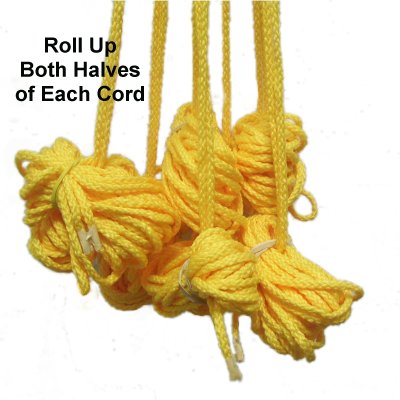
Step 1:
Fold the 6-yard cords over the bottom of the
2-inch ring, while holding the ring upright.
(See image for step 2)
Match the ends to center the cords.
For each cord,
roll up both
halves together and secure the
bundle with a rubber band.
The reason is that you will need to pull
the cords later on, and rolling the two
halves together ensures you are working
with one cord at a time.
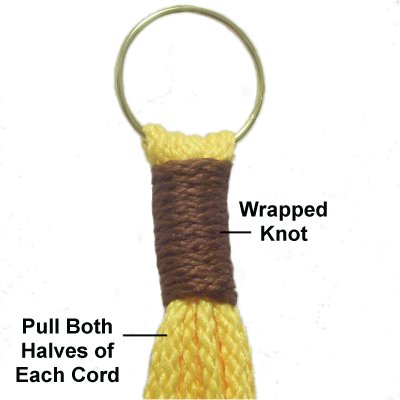
Step
2: Use a 36-inch cord to
make a Wrapped Knot around the entire
bundle of long cords. Start the knot
just below the ring, and wrap for 2
inches.
After the knot is tightened, pull BOTH
halves of each 5-yard cord at
the same time, so they grip the
ring tightly. Make sure the two ends
are still matched up, so each half is the
same length.
Step 2,
continued: You can now finish off
the ends of the 36-inch cord, cutting off the
excess material flush with the top and bottom of
the knot.
Push the stubs inside the knot so they can't be
seen.
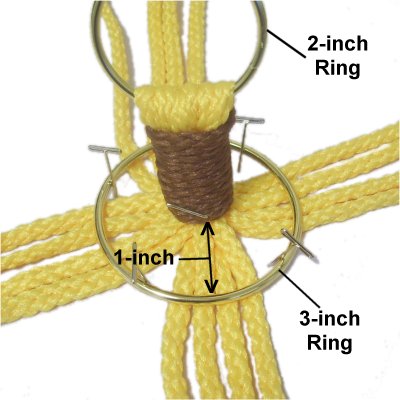
Step 3:
You now have 16 cords to make the Handcrafted
Planter. Divide them into four groups of 4
cords.
Place the Wrapped Knot on your project board,
standing upright as shown in the image
below. Secure it to your board.
Arrange the 4 groups of cords so they are spaced
equally, and are spread out around the ring.
Place a 3-inch
ring over the Wrapped knot and
position it on top of the cords as
shown.
Measure the distance between the Wrapped
knot and the ring. It should be
close to 1-inch in the four areas where
the cords rest.
Secure the ring in the areas between
the cords.
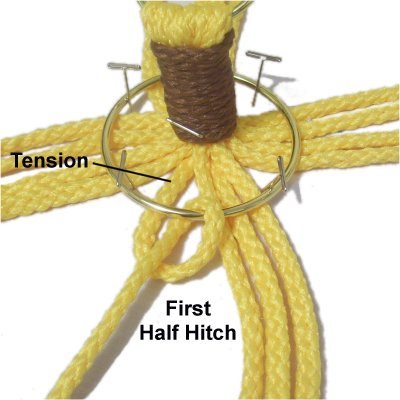
Step
4: Attach a cord to the 3-inch
ring with THREE
Half Hitches, rotating counter-clockwise.
This image shows the first knot.
Tighten the first knot as much as
possible, so there is tension
in the area between the Wrapped knot and
the ring.
Place the
second and third Half Hitches to the right
of the first. These should be tight
as well.
Repeat with the other three cords in the
group, then will all the remaining cords.
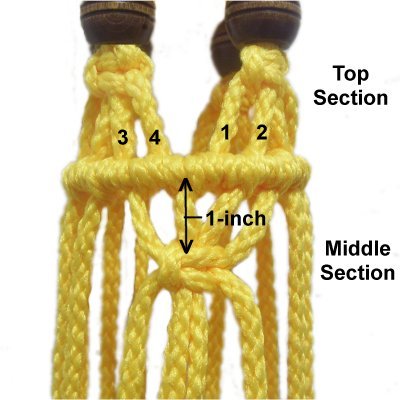
Step 5: Hang the
Handcrafted Planter by the small ring at the
top.
Keep the cords arranged in the same 4 groups.
Using one
group, move down 1-inch below the ring,
and tie a Square Knot. Measure in
the center of the group (near cords 2 -
3).
Slide a bead onto all 4 cords, then tie
another SK below it. (see Beading Tip
below)
Beading
Tip: The best way to add
the beads for the Handcrafted Planter is
to pass the fillers
through it first.
Push the END of one working
cord into the bead, arranged in
front of the fillers. Twist
the bead
with one hand while pushing the working
cord towards it with the other.
Repeat with the other working cord.
Step 5,
continued: Repeat this same
process
with the cords in the other three groups.
Make sure you measure carefully, so all the beads
are at the same level.
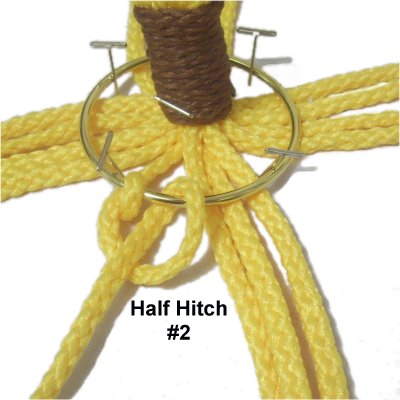
Step 6:
Working with one group of cords, measure from the
bottom of the Square Knot down to the area 1-inch
below it. Mark the spot with a piece
of tape.
Repeat
step 4.
As you tighten the first Half Hitch with
one cord, pull until the tape is touching
the ring.
Then tie the second and third Half
Hitches.
Step 6,
continued: Attach all the remaining
cords in the same manner, making sure you measure
accurately, or the ring won't be
level.
The tension of all the cords should be the same in
the area above the ring. Make adjustments if
you find some cords have looser tension than
others.
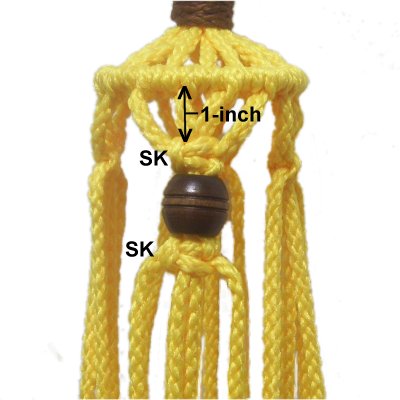
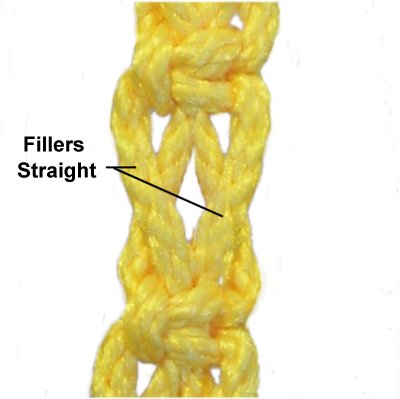
Long
Sennits (Middle Section)
This is the point
where I made the biggest change to the Handcrafted
Planter.
I tried various knots, and found the best knots to
use for the long sennits were Square Knots.
But tying them close together made this area very
bulky.
So I changed to the Switch Knot, which added space
between the Square Knots.
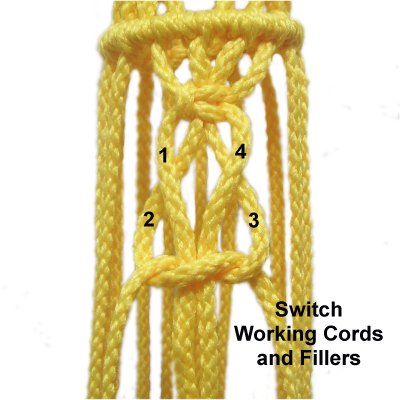
Step 7:
Mentally number the cords in each of the previous
groups 1 - 4.
You now need to alternate the cords, so select
cords 3 - 4 from one group and cords 1 - 2 from
the group next to it. Those 4 cords will be
used to create the Switch Knot sennit.
Move down
1-inch below the ring and tie a Square
knot. Make sure you measure so the
spacing is accurate.
Mentally number the cords 1 - 4.
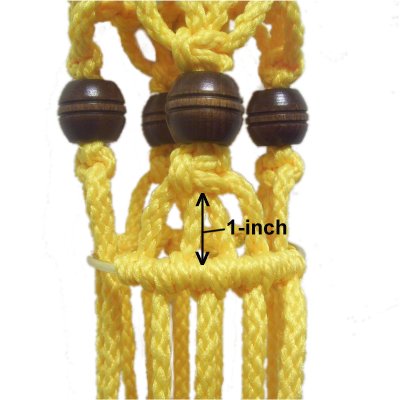
Step
8: Switch the cords by
placing the working cords (1 and 4)
between the fillers (cords 2 - 3).
Tie the next SK with cords 2 and 3.
The new fillers are cords 1 and 4.
This knot should rest 1-inch below the SK
tied in the previous step.
Step
8, continued: To make this
area of the Handcrafted Planter look
neat, pull on the fillers
after each knot is tied, so that the cords
are straight in the area between the two
knots.
Be careful, so you don't change the
position of the knots.
Step
9: Tie 3 more SK, switching
cords before each one.
Add a bead to all 4 cords, then tie a SK
below it.
Tie 4 more SK, switching cords before
each.
Add another bead with a SK below it.
Step 10:
Repeat steps 7 -
9, using the remaining
cords to create the other three
long sennits for the Handcrafted Planter.
Cradle
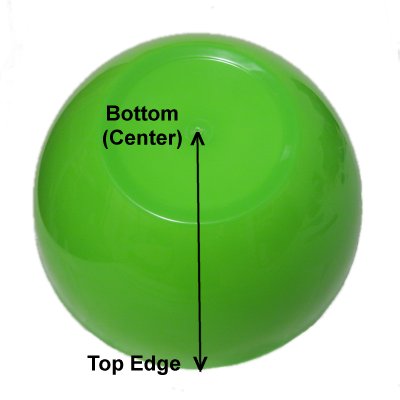
Step 11:
To start the cradle at the bottom area of the
Handcrafted Planter, measure the pot or bowl you
plan to use.
Start at the
top edge, and measure down the side and
across the bottom to the
center.
I'll refer to that result as the "Cradle
Size".
Step 12:
Place two long Switch knot sennits in front of you
side-by-side. Mentally number the 4 cords in
each one.
Alternate the cords by combining cords 3 - 4 from
the sennit on the left, with cords 1 - 2 from the
right sennit. Those 4 cords are used to tie
the next SK.
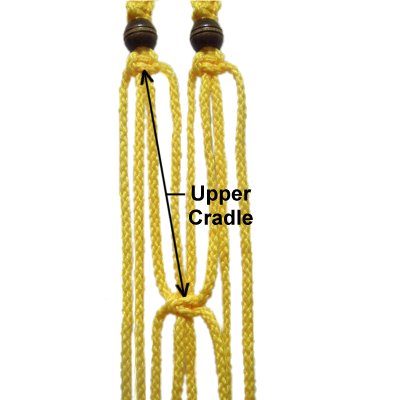
Upper
Cradle:Divide
the Cradle Size by 2, then add 2 inches.
Move down that distance, measuring from
the bottom of the last SK tied in the long
sennit.
Tie a Square Knot. Make sure all 4
cords have the same tension in the area
between the knots.
Step 13:Repeat
step 12 with the remaining cords,
alternating them before tying the SK.
Organize the cords to make sure they are not
crisscrossed, and are straight.
Try to form a box with the four groups, so one
group is in front, another group behind them, and
one group on each side.
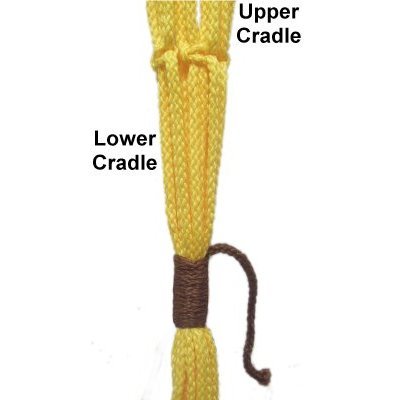
Step
14: To make the lower cradle for
the Handcrafted Planter, divide
the Cradle Size by 2. Move
down that distance below the SK tied in
steps 12 - 13.
Tie a 2-inch Wrapped Knot using a 36-inch
cord. The top of the knot should
rest at the point measured.
Don't cut off the excess material just
yet.
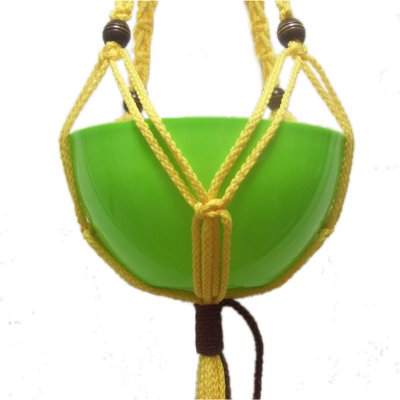
Test the
cradle by placing the pot or bowl
inside. The SK tied in steps 12 - 13
should rest half way between the top and
bottom edge of the pot.
Make adjustments by sliding the Wrapped
knot up or down.
Then you can cut off the excess material
from the 36-inch cord.
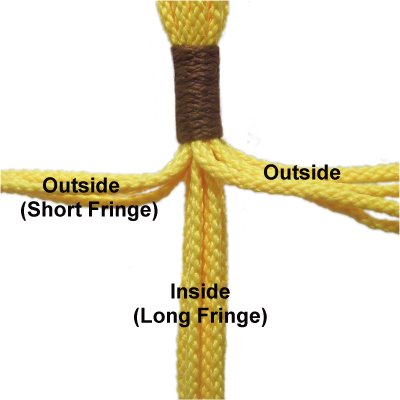
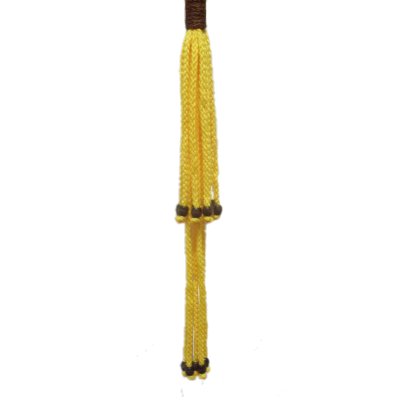
Double Beaded Fringe
Below are the instructions for a double beaded
fringe, which can be changed if you prefer a
different type of finishing method for the bottom
of the Handcrafted Planter.
Divide the
cords into two groups: Those coming out of
the Wrapped Knot on the outside
of the bundle, and those on the inside.
Apply small beads to each cord on theinside
group, placing them 14 inches below the
Wrapped Knot.
Tie Overhand knots below the beads, making
adjustments as needed so the beads are all on the
same level.
Apply the
small beads to the outside
group, so they rest 7 inches
below the Wrapped Knot.
Tie the Overhand knots below the beads,
making adjustments so they are on the same
level.
Cut off the excess material close to each
knot.
When using Bonnie Braid or Nylon material, you can
usually melt the stubs with a flame. Test
the material to make sure it melts rather than
burns.
Important:
After it's heated, press the stub against a
surface so that it rests flat against the knot.
By
using any text or images on Free Macrame
Patterns, you are agreeing to ourTerms
of Use