|
|
| |
|

|
|
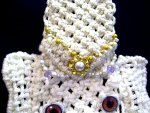
Description: The
Ganesha Decoration is the head of an
elephant wearing a crown. It is a
popular symbol in the Hindu religion,
and represents art, science, intellect
and wisdom.
This is a flat design and is meant to
hang on a wall. The crown can be
decorated with beads and buttons, or
with chains of small beads.
The finished size is
approximately 14 inches tall.
This Macrame pattern is rated Moderate,
and is suitable for those who know how
to tie the knots used in the design.
|
|
| |
|
| |
| Supplies
Needed: |
| |
- 6mm cord material (Crown: 17 yards,
Face: 40 yards)
|
| |
| |
| Knots Used: |
| |
|
|
| |
| |
|
| |
Cutting Instructions:
|
| |
- Crown: Cut 10 cords,
each 60 inches long. Cut 1 cord, 12 inches
long.
- Face: Cut 12 cords, each 60
inches long. Cut 1 cord, 36 inches long.
- Tusks: Cut 2 cords, each 18
inches long (either color).
- Trunk: Cut 1 cord,
at least 90 inches long. Cut one cord, 18
inches long.
- Ears: Cut
22 cords, each 24 inches long.
|
| |
| Prepare the ends with
tape, glue or wax to prevent them from unraveling
as you work. |
| |
|
| |
The Crown
|
| |
| |
|
Step 1: Secure the 12-inch
cord for the crown
of the Ganesha decoration to your board,
horizontally.
Attach 6 of the 60-inch
cords for the crown
to it, with Larks Head Knots.
Step 2: Tie 3 rows of
Alternating Square Knots (ASK).
|
| |
| |
 |
|
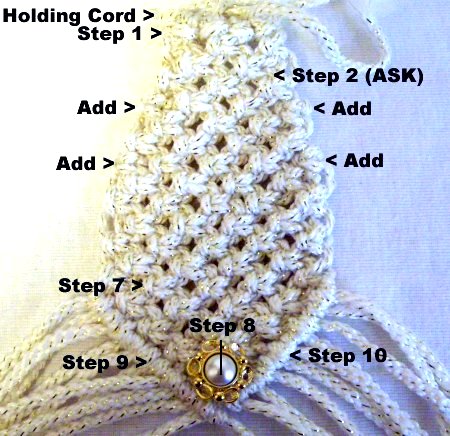
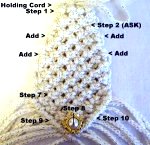
Here's a diagram of the steps you will
follow as you make the crown for your
Ganesha decoration.
Click the image to see a larger
view.
|
|
| |
|
| |
|
Step 3: Mentally number
the cords 1 -
12.
Add a new
60-inch cord
(for the crown) to cords 1 -
2, and another one onto cords 11 -
12.
Complete the row by tying the ASK with the rest
of the cords.
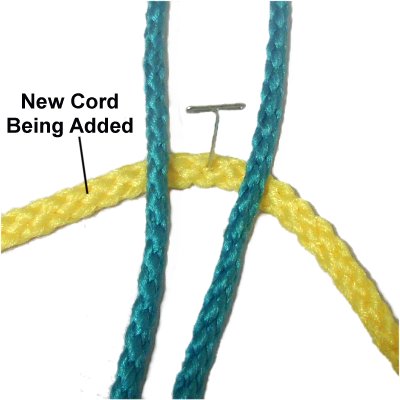
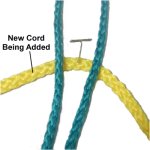
This is how to add
cords using a Square Knot: |
| |
|
| |
|
|
Slide the new
cord under cords 1 and 2. Match the ends
and center it.
(The
new cord is brown)
|
|
| |
|
| |

|
|
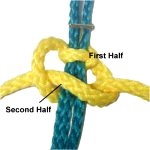
Use the new
cord to tie the first
half of the Square Knot, onto
cords 1 and 2, which are the fillers.
|
|
| |
|
| |
|
|
Tie the second
half of the Square knot. |
|
| |
|
| |
|
|
Tighten the SK until it's firm.
Now you have four ends to work with.
|
|
| |
|
| |
|
Step 4: Tie 2 rows of
ASK.
Step 5: Add new
60-inch cord
to cords 1 - 2 as well as cords 15 - 16, as you
did in
step 3.
Step 6: Tie 2 or more
rows of ASK, depending on how tall you want the
crown to end up.
Make sure you stop on a row where you
use all the cords (1 - 20).
|
|
|
| |
|
Step 7: The last 4 rows need
to form the point at the bottom of the crown:
- Row 1: Tie the ASK with
cords 3 - 6, 7 - 10, 11 - 14, 15 - 18.
- Row 2: Tie the ASK using
cords 5 - 8, 9 - 12, 13 - 16.
- Row 3: Tie the ASK with
cords 7 - 10, 11 - 14.
|
|
|
| |
|
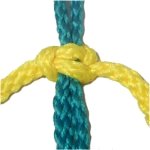
Step 8: Add a Button (or
a large bead) to cord
10. Pass cord 11 through it as well, if
the opening is large enough.
Tie the final Square Knot just below, using
cords 9 - 12.
|
|
|
| |
|
Step 9: Mentally number
the cords 1 - 20.
Place cord
1 diagonally along the left
edge of the V shape you just
made. Secure it so its taut. Attach
cords 2 -
10 to it with Double Half Hitches.
Step 10: Do the same
with cord
20, placing it along the right
edge of the V shape. Attach
cords 19 - 11 to it with DHH (in that
order).
To complete the lower edge of the crown for
your Ganesha Decoration, attach one holding cord
to the other with a DHH.
|
| |
|
|
| |
The Face
|
| |
| |
 |
|
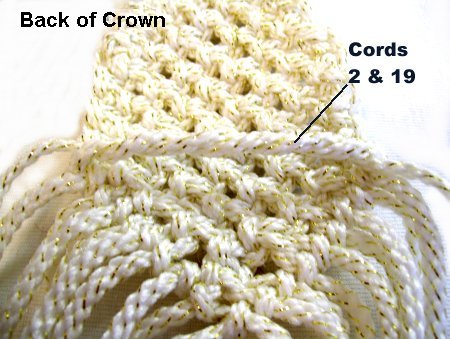
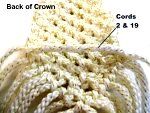
Step 11: Flip over the
crown so you are working in the
back
of it.
Move cords 2 and 19 towards
each other so they are horizontal,
across the back of the crown.
|
|
| |
|
| |
 |
|
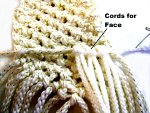
Secure both cords so they are taut,
since they are holding
cords.
Attach 8 of the 60-inch
cords for the face
to them with Larks Head Knots.
|
|
| |
|
| |
 |
|
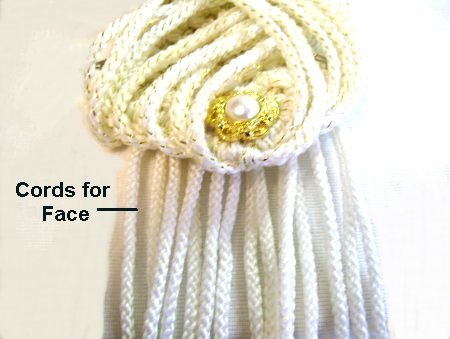
Step 12: Flip
the Ganesha Decoration so you are
working on the front
again. Move the cords for the
crown out of your way, so you are using
only the cords for the face.
Tie 3 rows of Alternating Square Knots.
|
|
| |
|
| |
 |
|
Step 13:
Mentally number the cords 1 - 16.
Add a new
60-inch cord to face
cords 1 - 2 and 15 - 16, as in step
3.
Use the remaining cords to complete the
4th row.
|
|
| |
|
| |
|
Step 14: Tie 2 rows of ASK.
Step 15: Add more 60-inch cords
to face
cords 1 -
2 as well as 19 - 20, as in step
3.
Step 16: Tie 3 rows of
ASK.
|
|
| |
| |
 |
|
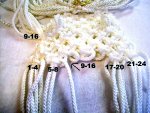
Step 17:
Mentally number the cords 1 -
24.
Tie the ASK using cords 1 - 4, and 5 -
8 on the left.
On the right, use cords 17 - 20 and 21
- 24.
|
|
| |
|
| |
The remaining cords (9
- 16) need to be pushed to the back of the face
for now.
They will be used for the trunk of the Ganesha
Decoration, which you will make later. |
|
|
| |
|
Step 18: Tie one row of
ASK with the remaining cords. Theres a
large gap in the middle now, but the knots need
to be tied the same way, across
the gap.
These 3 knots are made with: (3 - 6), (7
+ 8 + 17 + 18), as
well as (19 - 22).
When you pull the cords to make the knot in the
center, the face for your Ganesha Decoration
will pop out slightly.
Step 19: Tie the final
row of ASK using cords 5 - 8 and 17 - 20.
|
|
|
| |
|
Step 20: At the bottom
of the face, locate cords 1 - 4 and 21 -
24. Separate them from the others, since
they will be used to make the tusks.
Move the remaining cords to the back
of the face.
Trim the ends to 2-inches and apply glue to
hold them to the back of the design. You
can use tweezers to work them into the back of
the knots if you wish.
|
| |
|
|
| |
Tusks
|
| |
| |
Step 21:
Use the 18-inch
cords to make Wrapped Knots around cords
1 - 4 as well as 21 - 24.
The right tusk for the Ganesha
Decoration should be around 2
inches long.
The left one should be smaller,
around 1-inch
in size.
Apply glue to the Wrapped knots and allow it to
dry. Cut off the excess material. |
| |
|
| |
Mouth
|
| |
| |
|
Step 22: Pass
the 36-inch
cord through a space in the very bottom
of the face, on the left.
Center it so the ends are even.
Tie a sennit of Alternating Half Hitches
measuring 3-inches
long.
On the right,
pass the ends through the face from front
to back.
Flip over the Ganesha Decoration and tie a
tight Overhand Knot to hold the sennit in
place. Trim the ends and apply glue to the
knot.
|
| |
|
| |
Trunk
|
| |
| |
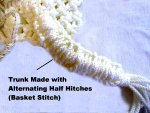
Step 23: Use
cords 9 -
16 to make the trunk. (Cords pushed aside in step
17).
They are the holding
cords for the Basket Stitch
design.
Center the 90-inch
working cord under them, matching the
ends. |
| |
| |
 |
|
Use the 90-inch cord to tie Alternating
Half Hitches onto the holding cords.
Keep everything flat, so the trunk is
as wide as possible.
Stop when you have around 4 inches of
material left.
|
|
| |
|
| |
|
Use the 18-inch
cord to tie a Wrapped knot around ALL
the cords for the trunk of the Ganesha
Decoration, including the long one used to tie
the knots.
Make it as tight as you can, and approximately
2 inches long. Apply glue to the entire
knot and allow it to dry. Cut off the
excess.
|
| |
|
|
| |
Ears
|
| |
| |
| Step 24: Now
it's time to make the large ears for your Ganesha
Decoration. |
| |
| |
 |
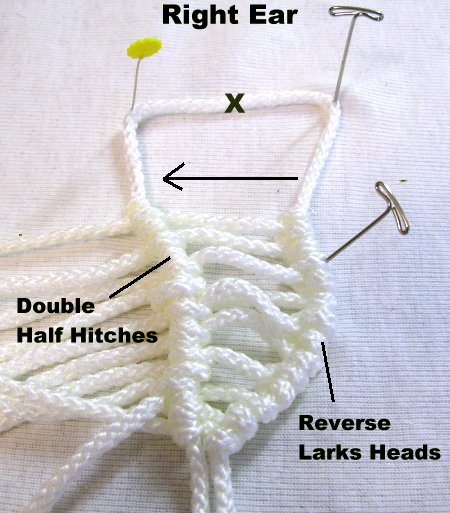
|
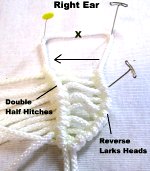
Arrange one of the 24-inch
cords into the shape of a long
triangle, measuring 4
inches top to bottom.
The widest part needs to be at the top.
That's the
area marked with an X in the
image.
Curve
it
so it resembles an elephant's ear,
which
is wide at the top and narrow near
the bottom.
|
|
| |
|
|
Mount 10 of the 24-inch
cords to the right
side of the triangle.
Attach each cord using reverse
Larks Head Knots. |
|
| |
|
Step 25: Move the cords
across to the left side of the triangle, and
attach them with Double Half Hitches.
You will need to turn the ear design so you can
attach them horizontally.
|
|
|
| |
|
Step 26: Select four
cords closest to the bottom
of the ear, near the point. Also use the ends of
the holding cord (total of 6 cords)
Weave
each one through the horizontal cords, moving towards
the
top of the ear.
Attach them to the widest part
of the triangle with DHH (marked with an X in
the image above).
Make
sure you alternate
the over-under sequence each time you
weave a new cord.
|
|
|
| |
|
Step 27: Two cords from
each end of the ear need to be kept long, so you
can attach it to the Ganesha Decoration.
Select those now and push them aside.
Apply glue to the back of the
knots, all the way around the ear. Let it
dry completely.
Cut off most of the excess material, applying
more glue as needed so the tips adhere to the
back of the knots. Don't
cut the cords you pushed aside.
Attach the top
of one ear by passing one cord through a space
at the edge of the face,
near the top (just below the crown).
Pass a second cord through a different
space nearby.
In the back of the design, tie the two ends
together with a tight Overhand knot.
Do the same lower down, attaching the lower
part of the ear in the most convenient place.
Step 28: To make the left
ear, repeat
steps 24 - 27.
Make sure you mount
the cords to the left
side
of the triangle when you first
get started. |
| |
|
|
| |
Finishing Touches
|
| |
| |
|
Step 29: Go back to the
lower part of the crown
and push all the ends through spaces in the
face, to the back
of the Ganesha Decoration.
Trim the cords so they are 2 inches long.
Apply glue to hold the ends in place. You
can tie finishing knots if you wish.
Pass the eyes
into spaces at the center part of the
face. Use glue or washers to hold them in
position.
|
| |
|
| |
 |
|
Step 30: To
decorate the crown, cut pieces of craft
wire 12 to 18 inches long. Slide
metal or glass beads over the wire,
arranged in circles or chains.
Attach the ends of the wire to the back
of the knots in the crown.
|
|
| |
|
| |
Locate the holding
cord at the top of the crown and tie
both ends together with a tight Overhand Knot.
Leave a space, and tie a Barrel knot.
This will form a loop so you can hang your Ganesha
Decoration to a wall. |
| |
|
| |
|
By
using any text or images on Free Macrame
Patterns, you are agreeing to our Terms
of Use
|
|
|
|
|
Have
any comments about the Ganesha Decoration? Contact
Me.
|
|
|
| |
 |
| |
| |
| |