Description:
The Feather Bar is a unique sennit that's
suitable for a variety of Macrame
projects. It features alternating
colors and a double layered design. So one
color rests above the other, which makes it
thicker than a regular sennit. The colors
are reversed on the back.
Paracord bracelets and belts can be constructed
with this design, along with pet leads, plant
hangers, and more.
In these instructions, the knots are tied around a
folded segment, so there is a loop at one end that
can be used for a clasp. But you can also
create this pattern with two folded cords or four
separate cords.
Click on the image or link to visit.
The video gallery contains tutorials for a
variety of interesting knots.
You can find this design under the name: Back
to Back Feather Bar
Preparation
Step
1: To practice the Feather Bar, you need
two cords at least 60 inches long.
When using this technique for a project, determine
the finished length, which should include a loop
for a clasp if you need one. Multiply that by 10,
and cut both cords to that size.
Please read the bottom section of Cord
Preparation to learn how to prepare Paracord
if you plan to use it. That's the material
shown in the images.
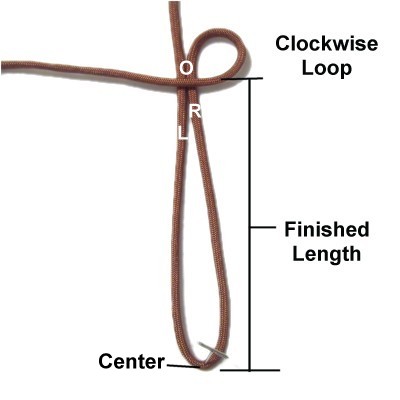
Fold cord
A in half, and secure it with the
fold close to the front of your
board. Use the right
half of the cord to make a clockwise loop, passing over
the folded segment.
Important:
The distance between the center fold and
the loop should be the finished length of
the item you are making.
Make a counter-clockwise
loop with the left
half of the cord, passing it over
the right half and under
the folded segment.
Pass it through the right loop under
- over.
Tighten the loops slightly, leaving some
room for the other cord.
Tie a button
knot in the center of cord
B (optional).
Pass each half through the loops in cord A
from below (under
- over).
Make sure it passes over
the portion leading to the ends.
Tighten the two loops firmly and secure
both cords.
To make a clasp, you need either a button knot,
a bead, or a regular shank type
button. At the other end, you leave a
loop suitable to fit around it.
The button knot shown in the example is the Oysterman
Knot. Another great choice is
to tie a Knife Knot.
Tighten it completely without a loop.
Feather Bar
Instructions
It's hard to keep track of the two working ends,
since they switch places. So mentally label them
where they are resting at the beginning of each
step.
The key to successfully creating the Feather Bar
is to use the working ends of one cord at a
time. Move the cord you are
not using out of the way when you construct
the knot in step 2.
The folded segment of cord
A should be mentally labeled right versus
left. The tightening process is easier
if you secure it with tension.
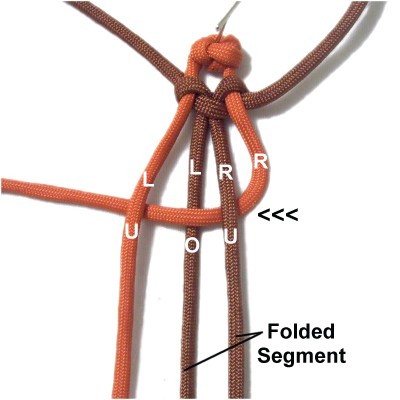
Step
2: Move both working ends
of cord A out of the way for now. Move the right
working endofcord Bto the left, passing under
- over the folded segment of cord
A.
Bring it under
the left working end of cord B.
Move the leftworkingendofcord Bunder
the left
half of cord A (folded segment), heading
right.
Pass it over
the right working endof cord B, as well as the right
half of cord A, in the center of the
knot.
Bring it under
the right working end near the curve.
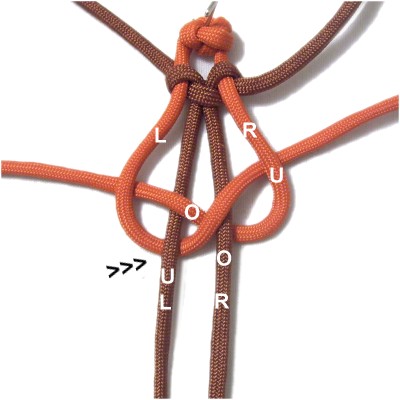
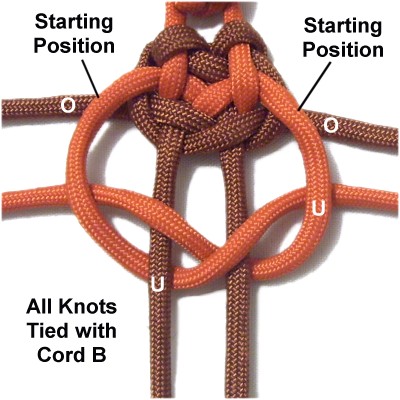
Step
3: Tighten the first knot
by pulling on the working ends of cord
B. Arrange them horizontally
when you are done.
Move each working end of cord
Aunder
cord B, arranged vertically.
Important:
Before you tie a knot with cord
A, you need to pass the working ends UNDER cord B,
as shown in the image above.
Before you tie a knot with cord
B, you pass the working ends OVER
cord A. You can see this in the image for
step 5.
The best place to change the starting position is
during tightening (step 3).
Step
4: Move the right
working endofcord Ato the left, passing under
- over the folded segment.
Bring it under
the left working end.
Move the leftworkingendofcord
Aunder
the left half of the folded segment,
heading right.
Pass it over
the right working endof cord B, as well as the right half of
the folded segment.
Bring it under
the right working end near the curve.
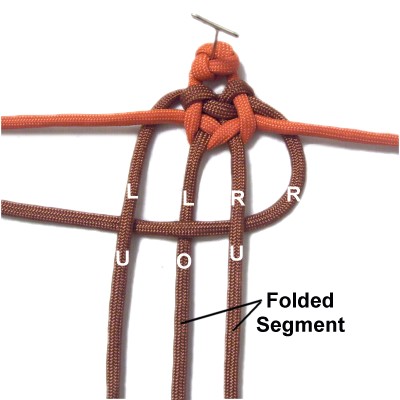
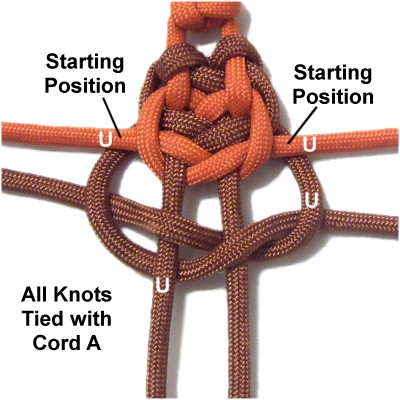
Step 4,
continued: Tighten the knot by
pulling on the working ends of cord
A.
Arrange them horizontally when you are done.
Move the working ends of cord B over
cord A on both sides, arranged vertically.
Important:
From here on, all the knots made with cord
B will have this same starting position
(see next image).
Step
5:Repeat
steps 2 and 3, using cord
B to tie the next knot.
Designer's
Tip: In the images above and below,
I've labeled the segments you pass the left
working end under.
Creating the Feather Bar will go faster if you
focus your attention on those two segments and
pass over everything else.
Step
6:Repeat
step 4, using cord
A to tie the next knot.
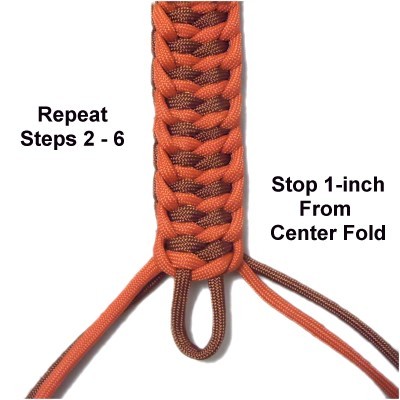
Step
7:Repeat
steps 2 - 6 several times, until
the last knot is approximately 1-inch from
the center fold.
There is one more knot to tie, so keep
that in mind when determining where to
stop. The loop needs to be large
enough to fit around the button knot at
the other end.
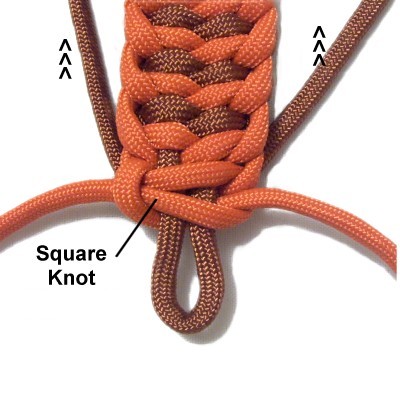
Step
8: Tie a Square
knot with the working ends
of the cord you used last in step 7.
The first
half should be tied around the
ends of the other cord and the folded
segment.
Move the working ends of the other cord backward,
then tie the second
half around only the folded
portion.
Step 8,
continued: Finish off the ends of
both cords in the manner most suitable for your
project. This is optional if you are just
practicing the Feather Bar.
When using Paracord, melt the tips as you did in
preparation.
By
using any text or images on Free Macrame
Patterns, you are agreeing to ourTerms
of Use