Fashion Bracelet
|
|
|
|
|
|
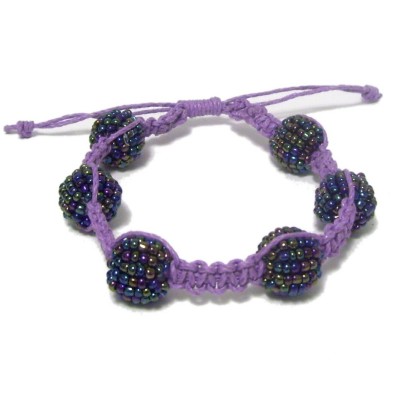
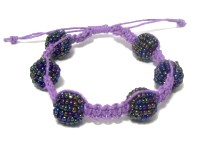
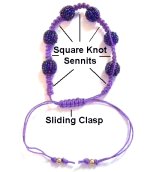
Description: This Fashion
Bracelet is a popular design, and I have
received many requests for a Macrame pattern.
Use round beads that are not
smooth, since the cords need to grip hold
of them, and could slide off if they are too
slick.
Pave or Disco
Ball Beads are great for this type of
design. |
| |
|
|
|
Supplies Needed:
- Project board, pins and tape
Knots Used:
Any type of decorative knot can be used in the
area between the beads, but the Square knot is
the most common.
The Sliding Clasp shown below is also made with
Square Knots, but you can use a different type
if you wish.
|
|
| |
|
|
Cutting Instructions:
- Cut two working
cords, at
least 2 yards long.
- Cut 2 fillers,
each at least 20 inches long.
For bracelets over 10 inches, cut the cords
longer.
|
|
|
|
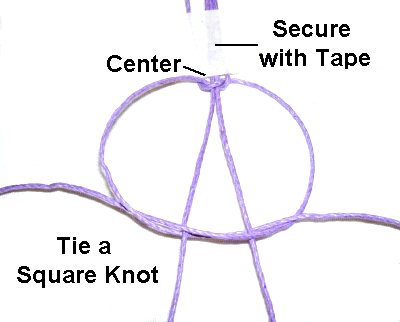
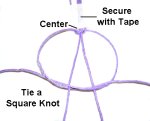
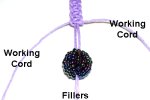
Step 1: Arrange the working
cords on your project board vertically, securing
them at the center with tape and
pins.
Place
the fillers between the two working cords. |
|
| |
 |
|
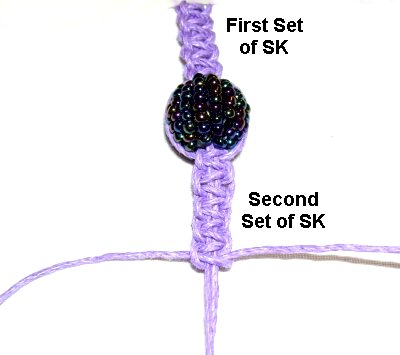
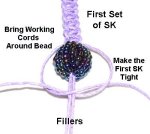
Tie the first Square Knot, tightening
it so it rests at the center
of the cords.
|
|
| |
|
| |
 |
|
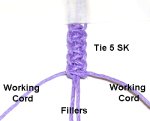
Step 2: Tie a total of
5 Square Knots, moving from the center
towards the ends.
You can tie a different number of knots
between the beads if you wish.
|
|
| |
|
| |
Other
Options: You can use
other decorative knots to make your Fashion
Bracelet. Two examples are shown below.
Please note that there was only one filler cord in
the images below; you will have two fillers. |
|
|
| |
 |
|
The Spiral
Stitch can be tied
between the beads.
You tie the first half
of a Square Knot over and over.
This type of sennit will not lie flat.
|
|
| |
|
| |
 |
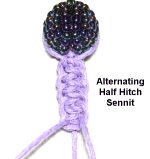
Another option is an Alternating
Half Hitch design.
Each working cord is used to tie one
Half Hitch onto the filler cords (core).
|
 |
| Half Hitch |
|
Completed Sennit |
|
| |
|
|
Design Tip: When using a Half
Hitch design for your Fashion Bracelet, I
recommend you tie a Square Knot above and
below each bead.
You can pull that knot tighter than a Half Hitch. |
|
|
| |
 |
|
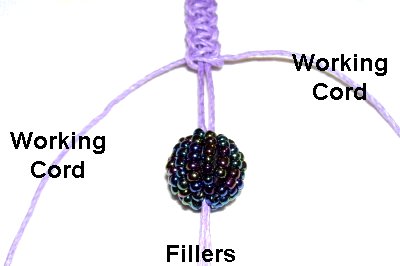
Step
3: After the sennit is the size
you want, add the bead onto the fillers. |
|
| |
|
| |
 |
|
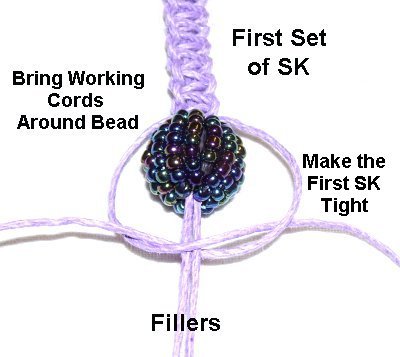
Step 4: Bring the
working cords around
the bead.
Tie the next knot just below the bead,
making sure the cords are
pulled
firmly and the knot is
tight as well.
|
|
| |
|
| |
 |
|
Step 5: Tie the same
number of knots you made in the
first sennit, so there's equal amount of
space between the beads.
|
|
| |
|
| |
 |
|
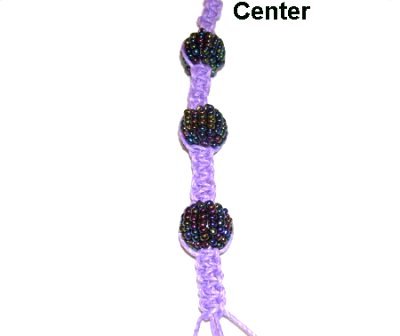
Step
6: Repeat
steps 3 - 5
two times.
Measure the Fashion Bracelet. It
should be
half the finished
size you are aiming for.
Add another bead if necessary.
|
|
| |
|
| |
|
Step 7: Turn
the Fashion Bracelet around.
Go back to the center and repeat
steps 2 - 6 to make the second half.
You should add the bead first,
at the center, then continue.
Design Option: You can add a
focal bead at the center, or a fancy button.
Make sure you measure the bracelet as you
progress, stopping when it's the right size.
|
| |
|
| |
 |
|
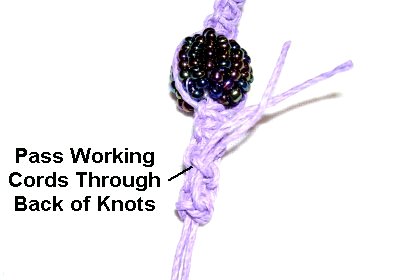
Step
8: Pull the two working
cords through one or more knots
in the back of the last
sennit. This will hold them in place.
Apply glue and allow it to dry before
moving on. Trim off any extra material. |
|
| |
|
| |
 |
|
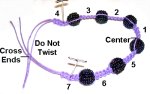
Step 9: Arrange the
design into a bracelet shape.
Cross the filler
cords coming from each end of
the Fashion Bracelet.
Make sure nothing is twisted in
any way. |
|
| |
|
|
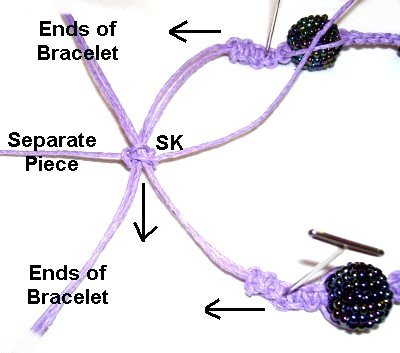
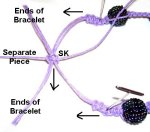
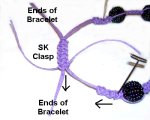
Step 10: To start the Sliding
Clasp, cut a separate piece of
material, at least 18 inches
long.
Pass it underneath the crossed
area of the bracelet's ends, and center
it by matching the ends. |
|
|
| |
 |
|
Tie a Square
Knot with the new cord, tightening it in
the center.
It should be vertical
in comparison to the bracelet, which is
horizontal (see arrows). |
|
| |
|
| |
Design Tip:
You can use other types of knots to make the
sliding clasp for your Fashion Bracelet.
For more ideas, see Sliding
Clasps. |
| |
|
| |
 |
|
Tie several
more knots, until the clasp is the size
you want. |
|
|
|
|
Finish off the cord used to make the clasp by
moving both ends to the back.
Tie the two ends together with a very
tight Overhand knot.
Add a small
amount of glue, and tie a second knot on
top of the first. Cut off the extra material
(from the cord used to make the clasp).
IMPORTANT:
Don't add too much glue, or the ends will stick to
the clasp and won't slide through properly.
|
|
|
|
| |
 |
|
Step 11: Pull the ends
of the bracelet to close the clasp. The
image shows the Fashion Bracelet in the
open
position.
Move down at least 2
inches, and tie Overhand or
Barrel knots with both
cords combined
(each pair). You can add beads if
you wish.
Add glue while
tightening, and cut off the
excess material when it's dry.
|
|
| |
| |
|
|
By
using any text or images on Free Macrame
Patterns, you are agreeing to our Terms
of Use
|
|
|
|
|
Have
any comments about the Fashion Bracelet? Contact
Me.
|
|
|
|

|
|
|
| |