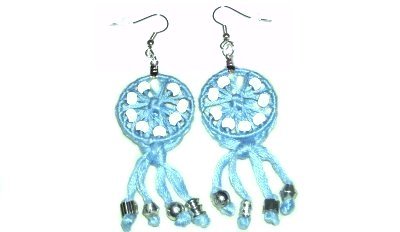
Description:
The Dream Earrings are metal hoops
covered with Macrame knots.
These Micro-Macrame earrings resemble a dream
catcher.
You can add shells or beads on the inside of the
circle, shown as white dots in the image above.
The best way to finish the ends is to apply
beads and let them dangle below the hoop.
These earrings need a delicate appearance, so use
1mm material. In the example shown, I used
cotton embroidery floss.
This pattern is rated moderate, due to the fine
materials and small size. Make
sure you have experience with the knots used in
the design.
Cutting
Instructions: Cut the number of
cords listed in the chart below. Each cord
should be at least 36
inches long.
Prepare the ends with glue
and allow it to dry before starting the Dream
Earrings.
Hoop Size
Number of
Cords to Cut (for 1 earring)
1-inch
8
cords
1.5-inch
12 cords
2-inch
16 cords
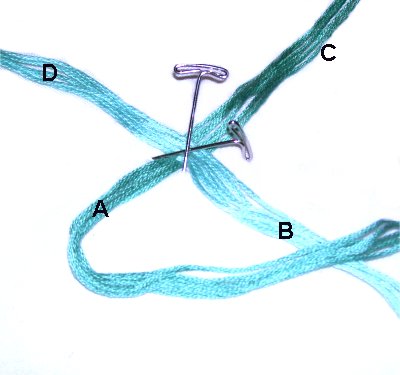
Crown Knot Instructions
Step
1: Divide the cords into
two groups.
Match the centers, crossing the cords to
form an X. Secure the center with tape or
pins.
Mentally label the four segments A - D
starting on the lower left.
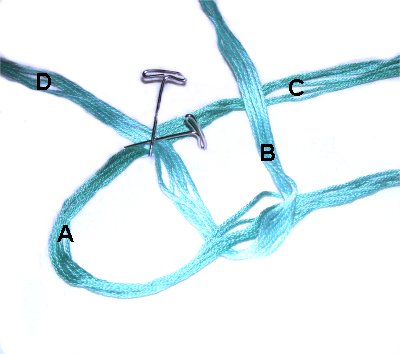
Fold segment
A over segment B, heading
right.
Designer's
Tip:Notice that I used
the Cross Pin Technique
to secure the area in the center.
This technique is the best method for securing
multiple cords, particularly when using delicate
material.
Fold segment
B vertically, over segment C.
Make sure you do not disturb segment A.
Fold segment
C to the left, crossing over
segment D.
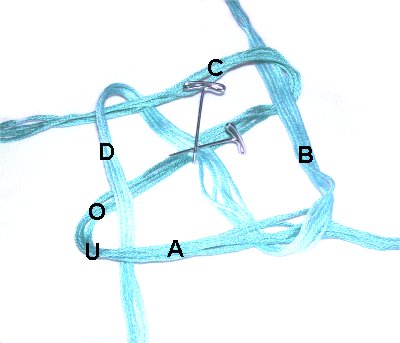
Fold segment
D forward, passing through the
curved portion of segment A over
- under.
Tighten the Crown knot by pulling
on all 4 segments.
Designer's
Tip: All the knots you tie should
be very small, so your Dream Earrings will have a
more delicate appearance.
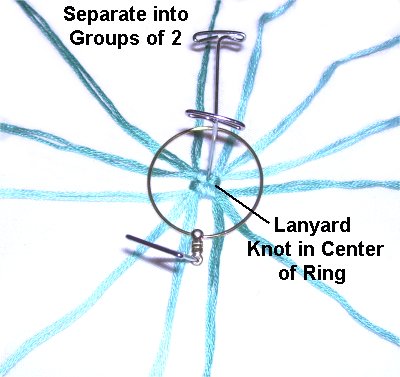
Inside the
Hoop
Step
2: Secure the Crown knot
to your board with one pin through the
center of it. Spread the cords
out evenly,
in groups of two.
Place the ring on top of the cords, so the
Crown knot is in the center.
Add extra pins where needed to hold the
ring steady.
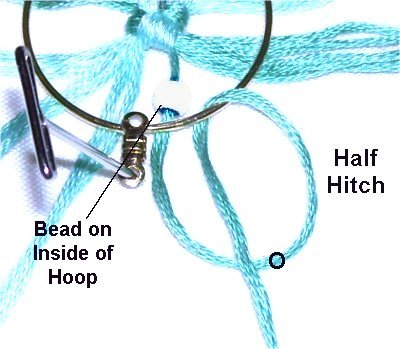
Step
3: Apply a bead to onlyonecord in each set of two. After
you apply each bead, slide it inside
the ring.
Tie a Half Hitch with the cord, passing it
over
- under the ring, and over
the cord. (counter-clockwise).
Hold the first
Half Hitch steady while you tie the next
one. Then tie 4 more, for a total of
6 Half Hitches.
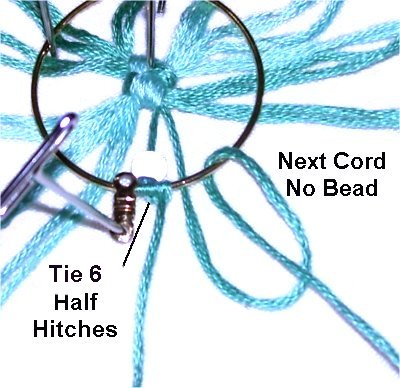
Use the next cord to tie 6 Half Hitches, with no bead.
They should rest next to the ones already
tied.
Move all the way around the ring, attaching all
the cords in the same manner.
Apply the beads to
one cord in each set of two(every other cord).
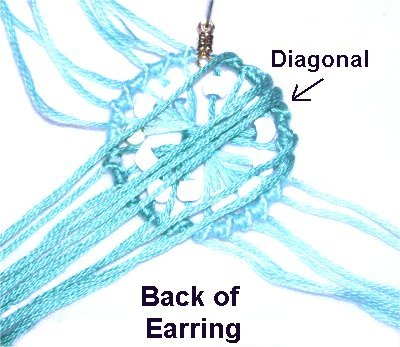
Back of Hoop
You will be weaving
the ends in the back of the hoop so that all the
cords are at the bottom when you are through.
The cords need to be neatly arranged.
Step
4: Organize the cords into
four equal groups, afteryou
turn over the earring.
Move the cords in the upper
right area down to those in the
lower left (diagonal). Secure them
so they are taut.
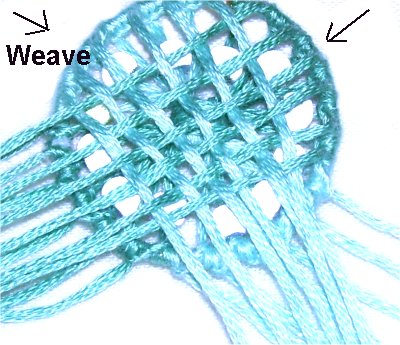
Weave the
cords in the upper
left through the diagonal cords
from the upper right.
The first cord closest to the top starts
the weaving by passing over
the next one. The one below it
starts by passing under,so
the weaving alternates.
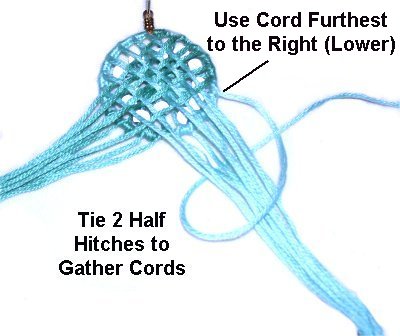
After the
weaving is done, select the cord furthest
to the right.
Make sure it's coming directly from the lower rightpart
of the hoop,
and is NOT
one of the cords you used to weave.
Tie 2 Half Hitches around the entire
group of cords at the right lower
area of the Dream Earrings design.
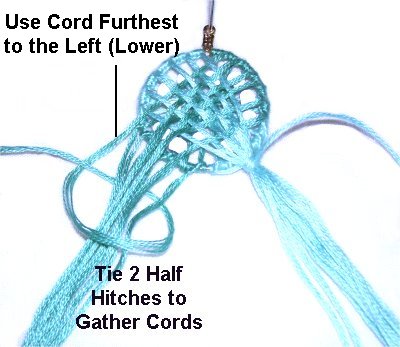
Repeat the
process on the left.
Make sure the cord you choose to tie the
knots is coming directly from the lower
leftpart
of the hoop.
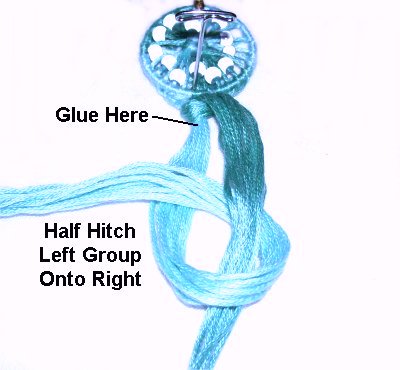
Finishing the
Dream Earrings
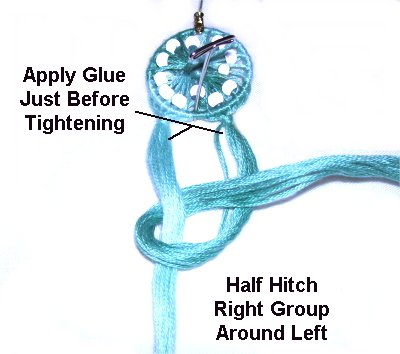
The finishing process includes a knot directly
under the bottom curve of the hoop.
Any knot can be used, as long as it can be tied
with the two bundles. I chose the
Alternating Half Hitch, which is shown below.
Step
5: Use the right group to
tie a Half Hitch around the left group of
cords.
Before you tighten the knot, apply a small
amount of glue near the top of the
bundles.
Tie a Half
Hitch with the left group of cords, onto
the right. Apply glue close to the first
knot before tightening the second.
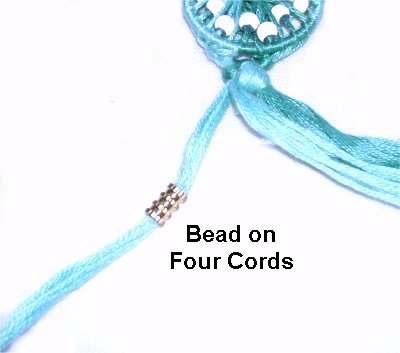
The beads on the ends are optional,
so if you are not using them, just tie
finishing knots and skip the next steps.
Step
6: Trim the cords,making sure you haveat least 6
inches to work with.The
Dream Earrings look best if the ends are
finished and smooth.
Divide the cords into groups of
four. Apply one bead to the first
group, where you want it to rest.
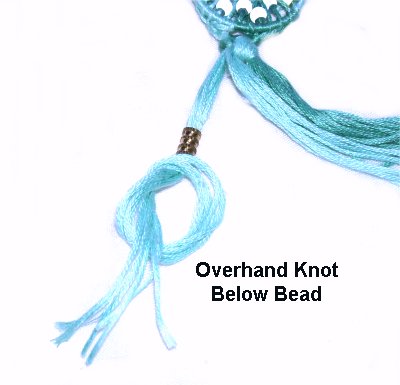
Tie an
Overhand knot just below the bead, with no
gap. Tighten it firmly.
Test the knot to make sure it can't slide
through the bead. You can tie a
second Overhand knot on top of the first
if necessary.
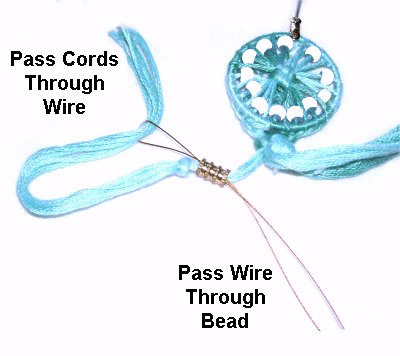
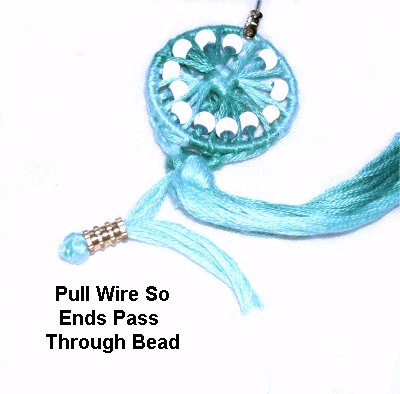
Step
7: Fold a wire in
half to make a threader. Pass it
through the bead, so the folded area is
near the knot.
Pass the four ends through the folded
portion.
Push the bead
forward slightly, so there's a slight gap
between it and the knot.
Pull on the ends of the wire, so the cords
pass through the bead again, heading
towards the hoop.
Use the threader to pull them one at a
timeif you can't
bring them through as a group.
You may find that the hole in the bead is not
large enough, so switch to a different one if
necessary.
Slide the bead back so you have access to the area
next to the knot. Apply glue to the knot and
just beyond it. Then slide the bead against
the knot with the glue inside.
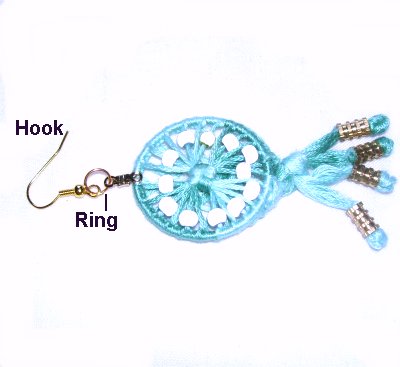
Repeat
steps 6 and 7 with the other groups of 4
cords. After the glue is dry, cut off the
extra material flush with the bead.
Make
sure you don't
cutthe
portion coming from the hoop;only
the ends are removed.
Step
8: Attach a small jump or
split ring to the earring hook along with
the hoop, so it dangles more easily
Step
9:
Repeat steps 1 - 8 to
complete the pair of Dream Earrings (if
you want two).
By
using any text or images on Free Macrame
Patterns, you are agreeing to ourTerms
of Use