Description:
This Coin Bracelet features a Chinese
Coin in the center. The design matches the Coin
Sandals, if you wish to coordinate.
The band is beaded, and there is a button
clasp. Any type of coin with an
opening in the center can be used.
This is a very easy Macrame pattern, suitable for
beginners. The most challenging part to
making this Micro-Macrame bracelet is handling the
fine materials. In the example shown, 1mm
Cotton Embroidery thread was used.
Cut 4 cords, each 11
times the finished length you wish to
make. So for a 6-inch Coin Bracelet, the
cords should be at least 66 inches long.
Prepare the tips of the cords by applying a thin
coat of glue. Allow it to dry completely
before starting.
Buttonhole Clasp
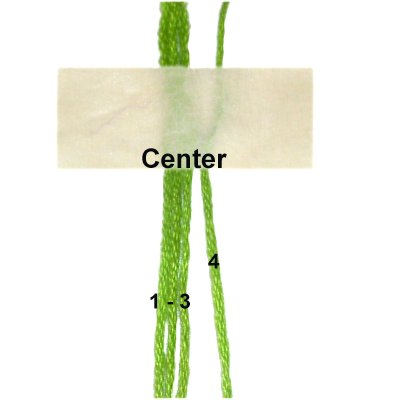
Step
1: Locate the center of all
4 cords, and arrange them vertically on
your board.
Apply a piece of masking tape across them,
so the bottom edge of it is at the center.
Mentally number the four cords. Cord
4 will be used to tie the Larks
Head knots for the clasp.
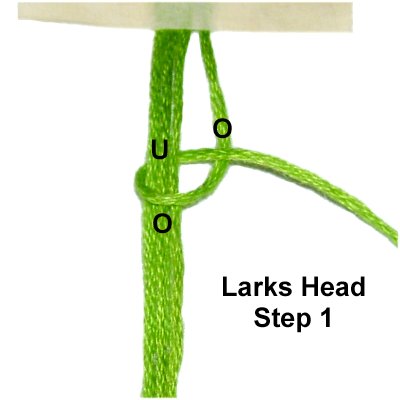
Step
2: Tie the first half of
the Larks Head knot, by passing cord 4 over
- under cords 1 - 3 (clockwise).
As you pull it right, pass over
cord 4.
Tighten the knot so it rests against the
bottom of the tape (see next image).
The second
half of the knot is tied by passing cord 4
under
- over cords 1 - 3.
As you pull it right, pass under
cord 4.
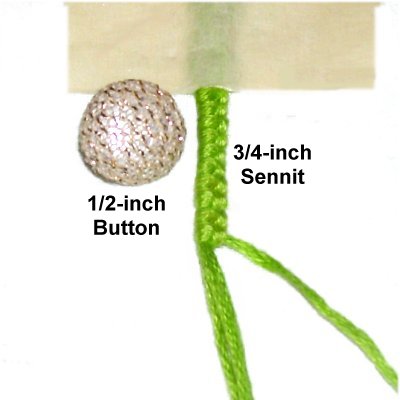
Step 3:Repeat
step 2 to tie several more Larks
Head knots. Push them close together as
you progress.
Stop when the sennit measures 3/4-inches
in length.
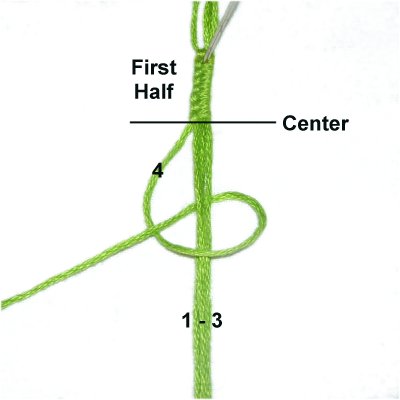
Step
4: Rotate the entire sennit
around on your board. Cord 4 will
now be on your left.
Starting at the center again, tie the same
number of Larks Head knots as in the first
half (or measure).
The only change is that the loops are made
in a counter-clockwise
direction.
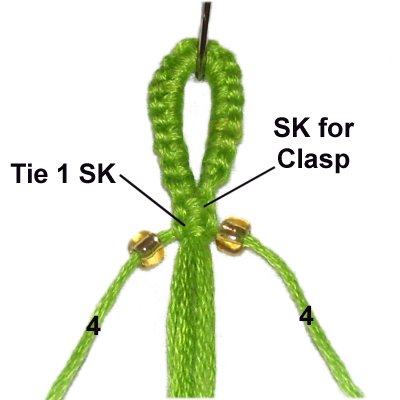
Step
5: Fold the sennit in half
and secure it at the fold.
Tie the first half of a Square Knot with
the two ends of cord 4. The fillers
are the remaining cords.
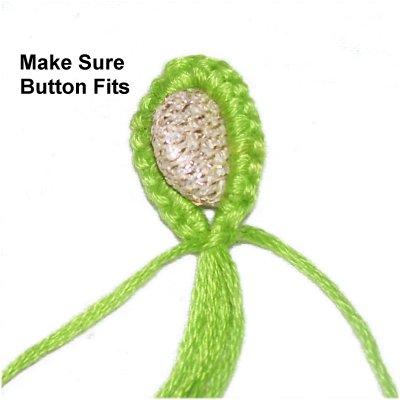
Test the
button to make sure it fits easily through
the loop.
You can backtrack and remove (or add)
Larks Head knots to adjust the size of the
clasp if necessary. Try pushing them
closer together first to see if that's
enough to reduce the size.
Then tie the second half of the Square
knot.
First Band
The band for the Coin Bracelet is a simple
Square Knot sennit with beads applied. This
can be changed if you prefer something else.
Keep in mind that the area around the coin is made
with Square knots, which is the best choice, since
the knots need to be flat.
Step
6: Tie one Square Knot
below the one you tied to close the clasp
(step 5).
Apply one seed bead to both working cords
(4).
Tie a Square Knot to secure the beads.
Step
7: Tie 4 - 6 SK, which
includes the one tied in the previous
step.
Slide the knots close together, to
eliminate the gap between the beads.
Add the next pair of beads, then repeat.
Step
8:Repeat
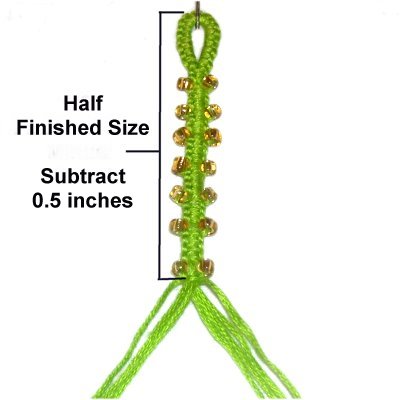
step 7 several times, until the
band for your Coin Bracelet is HALF
the finished size you are making, MINUS
0.5 inches.
So for a 6-inch bracelet, half would be 3
inches. Subtract 0.5-inch and the
sennit needs to be 2.5 inches long.
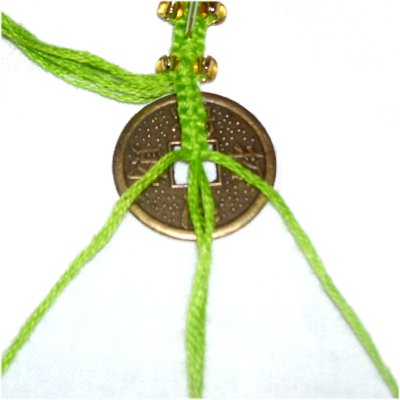
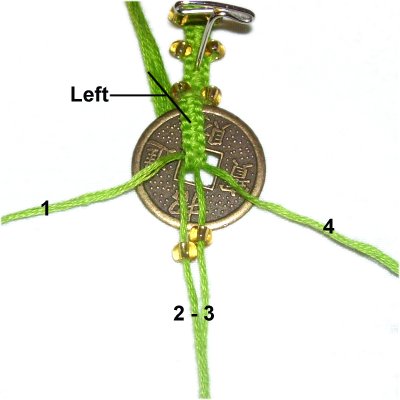
Attach the Coin
Step 9:
Now it's time to attach the coin to the center
area of the Coin Bracelet.
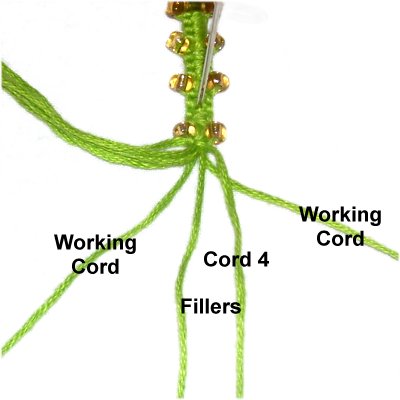
Divide the cords into two groups of four.
Move the left group aside for now, and use only
the right group.
Locate cord 4,
which is the shortest cord in the
group. You must move it so it will
be used only as a FILLER cord from now on.
Use two of the longcords
as the working cords for the next group of
SK. Mentally re-number, so the
working cords are 1 and 4.
Step
10: Place the coin under the four
cords, with the top edge of it close to
where you divided the cords into two
groups.
Tie another short sennit of SK with the
four cords, stopping when you reach the
hole in the center of the coin. Count the
number of SK you tied.
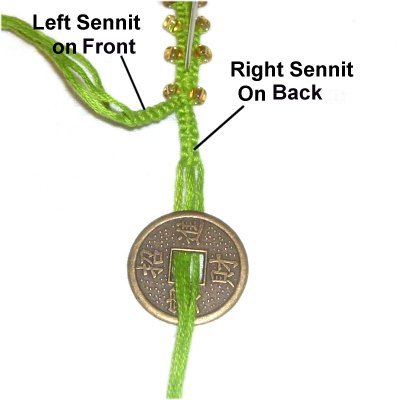
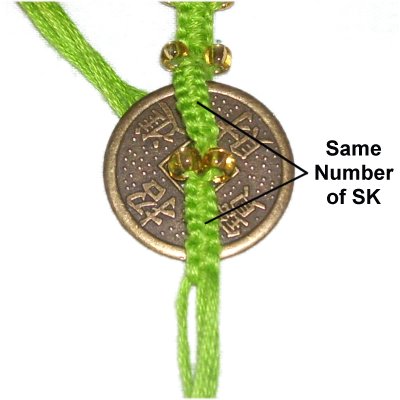
Step 11:
Using the other group of four cords on the left,
tie a sennit of SK.
Tie the same number of knots as you did in step
10. You can also measure both
sennits to verify they are the same size.
Step
12: Pass the cords from the
RIGHT sennit through the hole in the coin
from back
to front, so it ends up resting
on the back
of the coin.
The LEFT sennit should be moved aside for
now, but it will be placed on the front
of the coin in step 14.
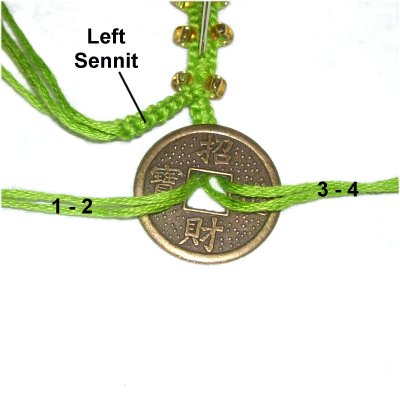
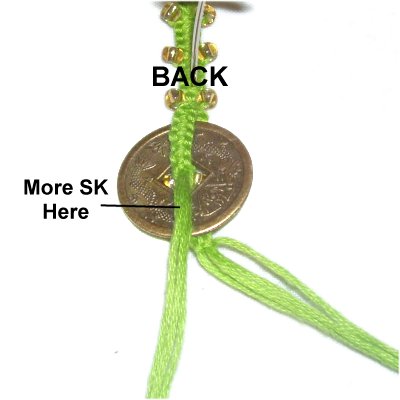
Step
13: Separate the cords from
the RIGHT sennit, so cords 1 - 2 go left,
and 3 - 4 go right.
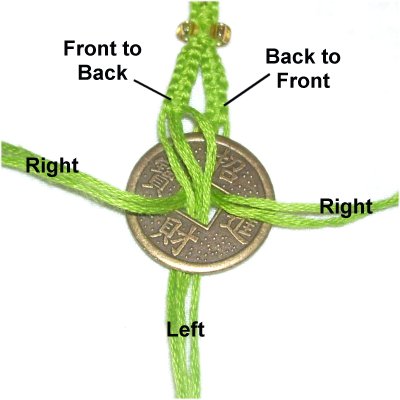
Step
14: Pass the cords from the
LEFT sennit through the hole in the coin
from front
to back.
Make sure they go between
the cords you separated in the last step.
Step
15: Move the cords from the
LEFT sennit out of the way. They are under
the coin right now.
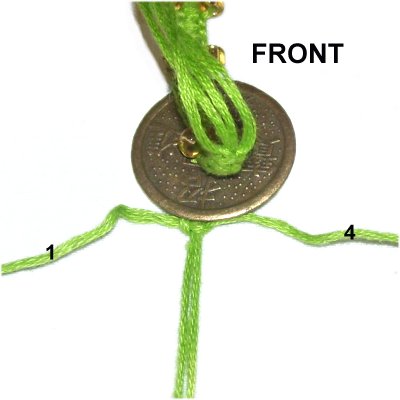
The four cords from the RIGHT sennit are
now used to make another sennit in the front
of the coin, from the hole to the bottom
edge. Mentally number them, and
apply beads to cords 2 and 3.
Tie the same
number of SK as you did in step
10. Measure it if you wish.
The last knot should rest slightly past
the lower edge of the coin.
Step
16: Turn over the Coin
Bracelet, so you can work with the cords
in the back
of the coin.
Tie the same number of SK as you did in step
10, using the four cords from the
LEFT sennit.
Step
17: Turn the Coin Bracelet
to the front again. Move the cords
from the front sennit out of the way.
Arrange those from the back so cords 1 and
4 are horizontal. Leave the other
two vertical.
Place the cords
from the front sennit straight down, so
you end up with 4 from the front and 2
from the back, in one group.
Tie one SK with cords 1 and 4. The
fillers are the six vertical cords.
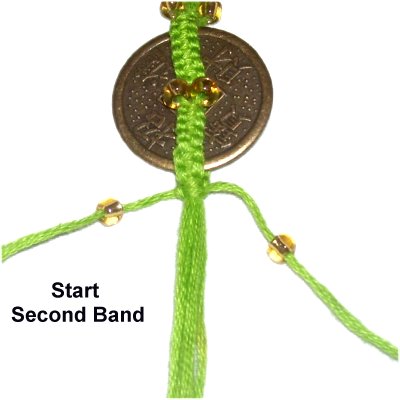
Second Band and Button
Step
18:Repeat
steps 7 and 8 to create the
second band for your Coin Bracelet.
Start by adding the beads to cords 1 and
4.
Measure as you progress, so that both are
the same size.
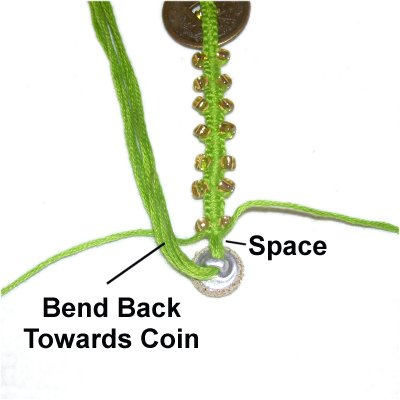
Turn over the
bracelet and slide the button onto the
fillers (all of them). The shank
should be face up.
You can clip off some of the fillers if
necessary, but do your best to get as many
through the shank as possible.
Sliding them through one
at a time really helps!
Step
19: Bend the fillers back
towards the coin.
Leave a little space between the button
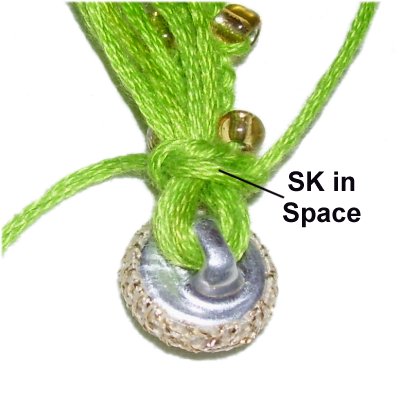
and the last knot tied in the band.
Tie one SK with
cords 1 and 4 around all the other cords,
even the ones bent back.
Tighten it so it rests in the space you
left for it. Apply glue while
tightening, so it's on the inside
of the knot.
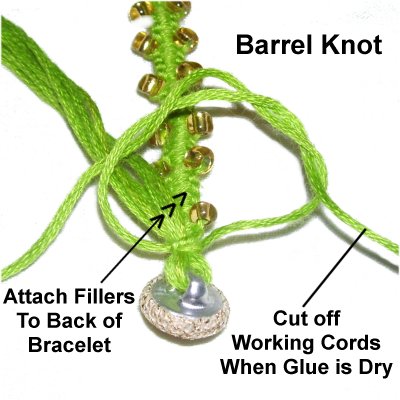
Step
20: Finish off cords 1 and
4 by tying a Barrel Knot. Apply glue and
tighten firmly. When the glue is
dry, cut off the excess material.
Trim all the fillers (in a group) down to
1/2-inch. Apply glue to the back of
the Coin Bracelet, and place them on the
glue. Use a clip to hold them in
place while the glue dries.
By
using any text or images on Free Macrame
Patterns, you are agreeing to ourTerms
of Use