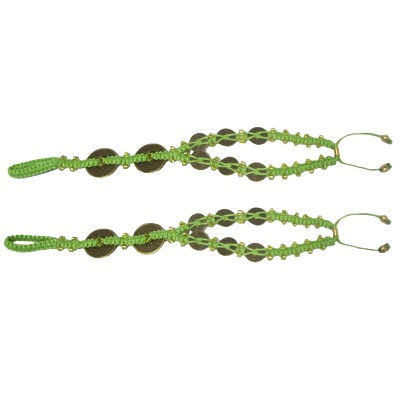
Description:
The Coin Sandals match the Coin
Bracelet, if you wish to
coordinate. Foot Jewelry has become very
popular in recent years, and this design is a
unique way to decorate your feet.
There are two large Chinese coins in the area on
the top of the foot, as well as small coins on the
ankle straps. The toe loop is knotted, and
the closure is a simple beads clasp (adjustable).
These Barefoot Sandals are easily made by
beginners, since only one knot is used for the
entire design -- the Square knot. Make
sure you know how to tie one before you give this
pattern a try.
Before you start the Coin Sandals, measure your
feet in the three areas described below:
Toe
Loop: Measure around the
second toe and add one inch.
Center
Piece: Measure the top of
your foot from the toe crease to the place
you want the straps to branch off.
Straps:
Measure from the branching point to the
back of the ankle (both directions).
Add all three measurements to get the total
length.
Cut two cords, each 8
times the total length. These will
be the fillers.
Cut two more cords, each 10
times the total length. These will
be the working cords.
Prepare the tips of the cords with glue
to prevent unraveling, and to stiffen the material
to make beading easier.
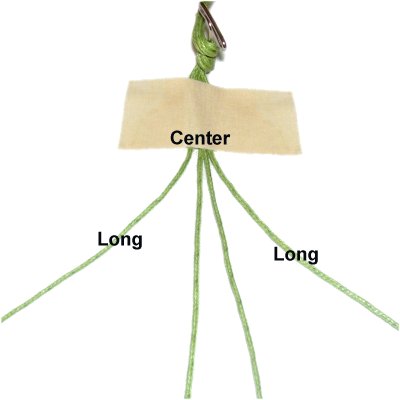
Toe Loop
Step
1: Secure the cords on your
board vertically, matching the centers.
The short cords should be between the two
long cords.
Place a piece of tape across the cords so
one edge is at the center
of the cords.
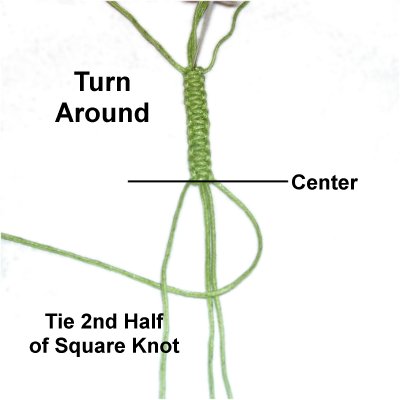
Step
2: Tie a sennit of Square
Knots HALF the toe loop measurement.
So for a 3-inch loop, stop at 1.5 inches.
Push the knots close together as you
progress.
Step
3: Turn the sennit around
after removing the tape.
Start at the center again, and tie the second
half of a Square knot.
Repeat
step 2.
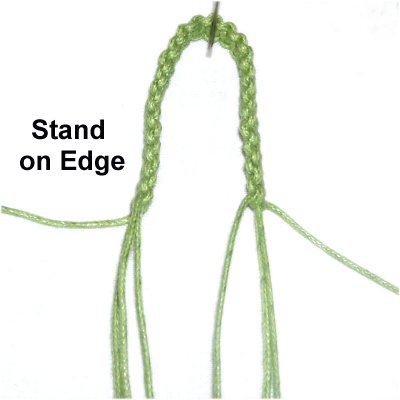
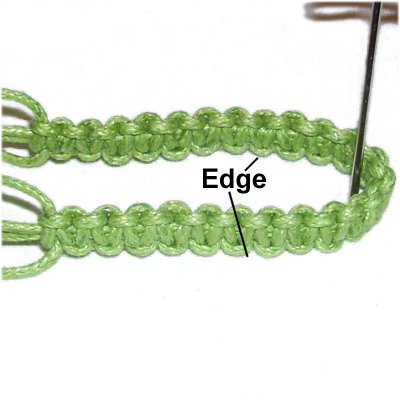
Step
4: Fold the toe loop in half.
Arrange it standing on one
edge, so the knots are
vertical.
Closer
View >>
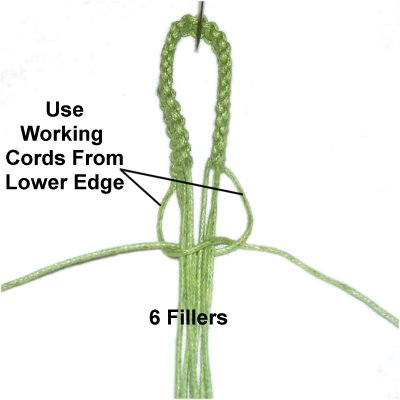
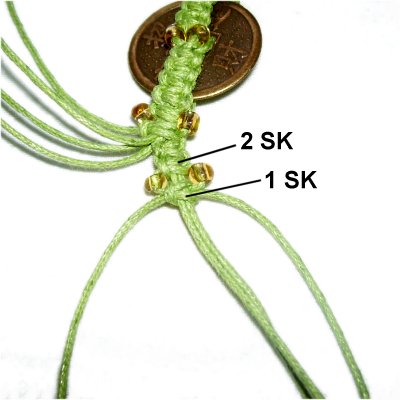
Step
5: Close the toe loop for
your Coin Sandals by tying one SK.
Use the working cords from the lower
edge, which is touching the
board. The remaining six cords are
the fillers for this knot.
Step 5,
continued: Try on the toe loop to
see how it fits.
Make adjustments if necessary, by removing the
last SK you just tied, then adding (or removing)
knots from both
ends of the toe loop sennit.
Repeat step 5 to close the loop.
Center Piece (Large Coins)
Step 6:
Before you can work on the center piece of the
Coin Sandals, which rests on the top surface of
your foot, you need to use a formula (below) to
determine the size for each area of SK and beads.
Each coin is close to 1-inch in size.
You have three
areas of SK and
beads:
Just past the toe loop, between the coins, and
after the second coin.
Important:
Please note that the minimum size for the center
piece of the Coin Sandals is 3 inches. For sizesunder 3 inches, use
only ONE coin, which should be in the middle
of the strap. The SK and beads will be in only two areas.
Here's the
formula:
Total length of center piece (from
preparation)
Subtract 1 inch for
each coin
Divide the result by 3 to get the length for
each area of SK and beads
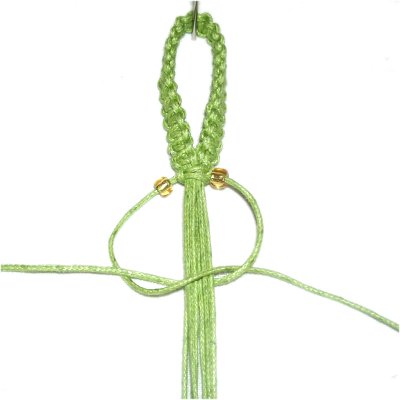
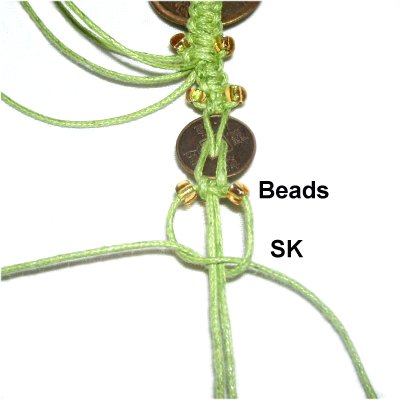
Step
7: Slide two beads onto the
working cords, then secure them by tying
one SK. Tighten firmly.
Important:
Push the knot close to the one before it,
to eliminate any gaps.
Step
8: Tie additional knots if
needed to reach the size you determined in
step 6.
Repeat
step 7, adding beads after every
2nd or 3rd knot.
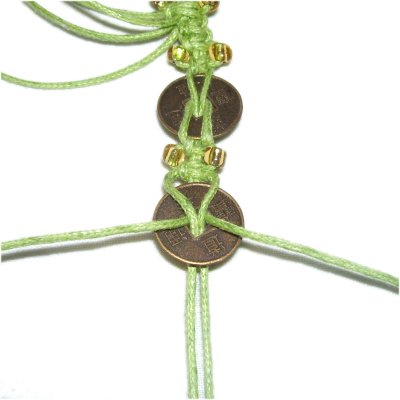
Step 9:
Now it's time to add the coins to the center piece
of your Coin Sandals.
Important:
File the edges inside
the hole so they are smooth.
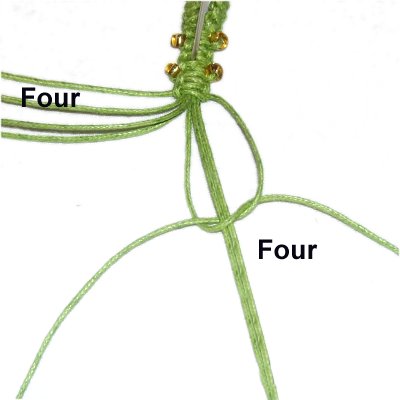
<<
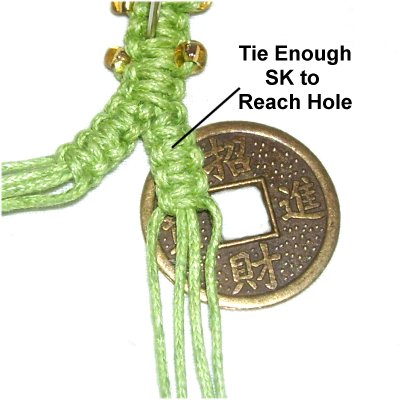
Divide the cords into two groups of
four. Do the following with both
groups:
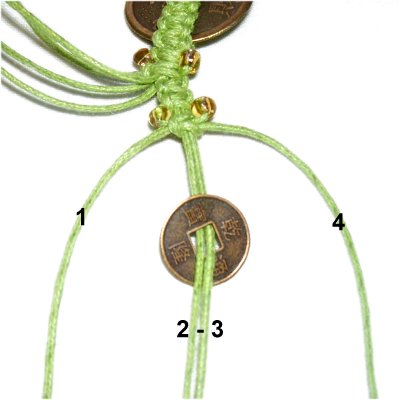
Place the coin under the cords, and tie
enough knots to reach the hole (3 - 5
knots). >>
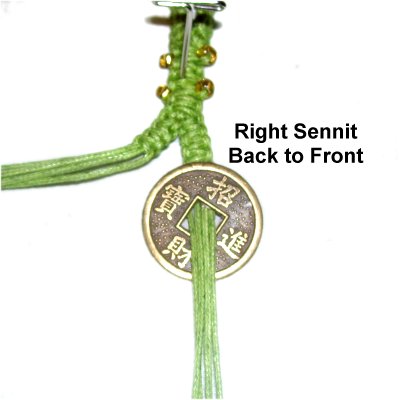
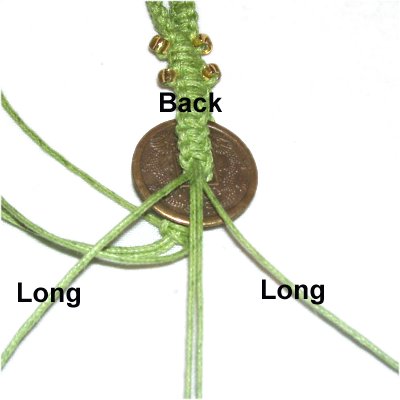
Step
10: Pass the cords from the
right
sennit through the coin from back
to front.
The side of the coin most appealing to you
should be face up, and considered the
front.
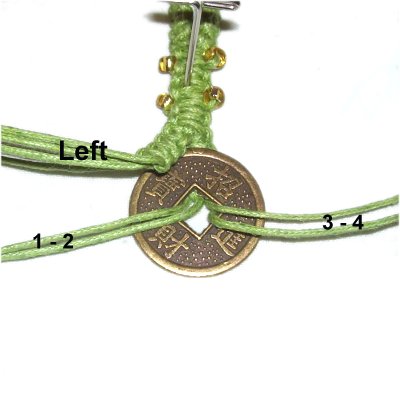
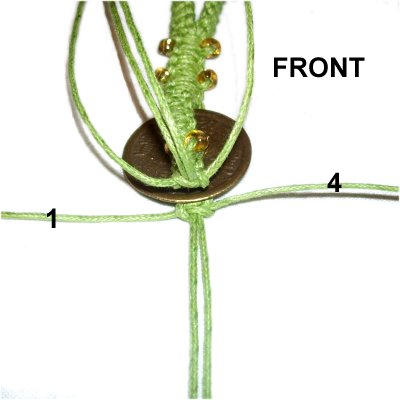
Mentally
number the four cords from the right
sennit.
Move cords 1 - 2 left, and cords 3 - 4
right.
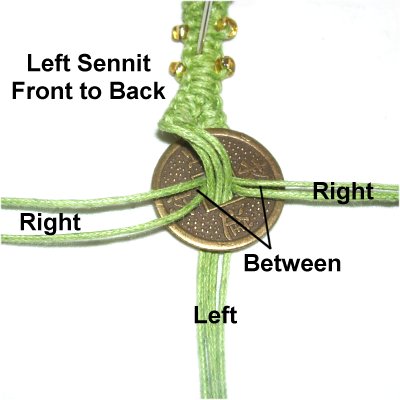
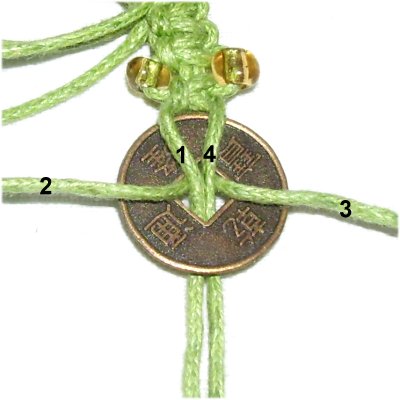
Step
11: Slide the cords from
the left
sennit through the hole from front
to back.
Make sure they pass between
the cords from the right sennit.
Step
12: Mentally number the
cords resting in front of the coin.
The fillers for the next set of knots are
2 - 3. Add a bead onto each one.
Use the four cords to tie a short SK
sennit, with the same number of cords as
in step
9.
Step
12: Turn over the Coin
Sandal, so you are working in the back.
Choose the two longest cords from the
group as the working cords, then tie the
same number of SK you did in the previous
step.
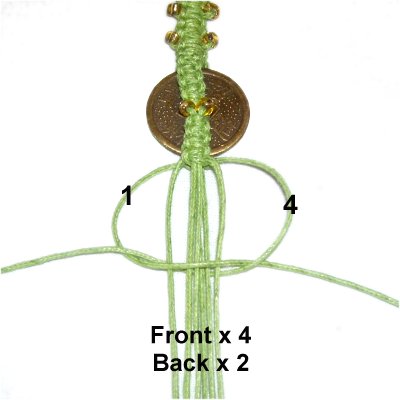
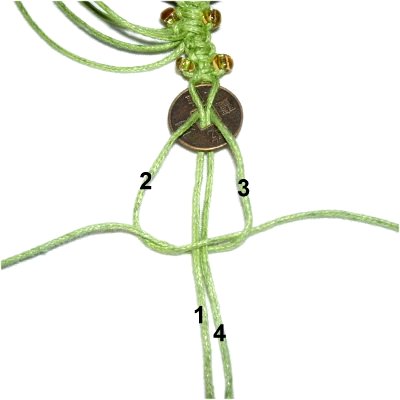
Step
14: Turn the design to the
front again.
Move cords 1 and 4 from theback group,
so they are horizontal. The fillers
( 2 - 3) should be vertical.
Step
15: Move the 4 cords from
the front group down vertically, to join
with the fillers from the back group.
Use the horizontal cords (1 and 4) to tie
a SK around ALL the others.
Step
16: Tie the second area of
SK and beads the size you determined in step
6.
Repeat
steps 9 - 14 to attach another
coin.
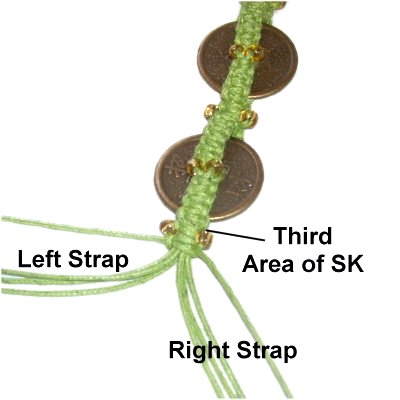
Step
17: Tie the third area of
SK and beads the size you determined in step
6.
Measure
the center piece. You can
add more SK and beads (or remove some) if
necessary.
Divide the cords into two groups of four,
for the straps.
Ankle Straps
The Ankle Straps for the Coin Sandals contain
three small (12mm) coins. Since you are working
with only four cords, they are attached
differently than the large ones.
These steps are
optional if you prefer to keep it simple
and tie only SK and beads.
Step
18: Using the four cords for the
right
strap, tie two SK.
Add a bead to the working cords, then tie
another SK.
Push the second knot close to the first.
Step
19: Mentally number the
four cords.
Pass cords 2 and 3 (fillers) through the
hole in a small coin, from back
to front.
Step
20: Move cords 2 and 3 to
the left and right.
Pass cords 1 and 4 through the hole front
to back, so they go between
cords 2 and 3.
Step
21: Use cords
2 and 3 to tiea SK around cords 1 and 4, which
are now the fillers.
The knot should rest against lower edge of
the coin, not on top of it.
Add beads to
the working cords, then tie a SK.
Push the second knot close to the first.
Step
22:Repeat
steps 19 - 21. Measure after this
coin is attached, to see if you have room
for the third.
You still need to tie 2
inches of SK and beads in order
for the Coin Sandals to be comfortable
(next step). So don't add the third
coin if that brings you over the coin
strap measurement made in preparation.
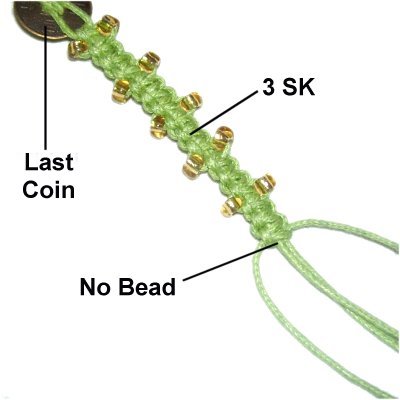
Step
23: Tie a 2-inch sennit of
SK and beads after the last coin is
attached. Push the knots close
together as you progress.
In this example, the beads were attached
to the working cords, then 3 SK were
tied. This can be changed if you
prefer more space between beads.
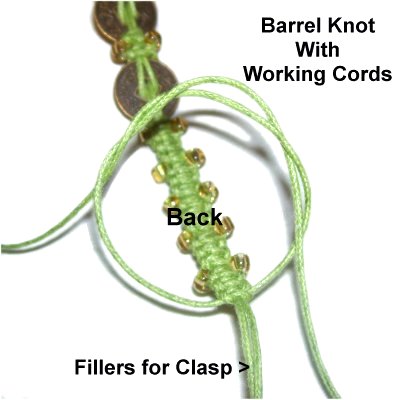
Step
24: Turn over the Coin
Sandal, so you are working in the back.
Tie a Barrel knot with the two WORKING
CORDS. The fillers are used for the
clasp.
Apply glue and cut off the excess when
it's dry.
Step 25: Repeat
steps 18 - 24 using the remaining four
cords, to make the left ankle strap for your Coin
Sandals.
Sliding Clasp
This design has a sliding bead clasp, to make
the sandals adjustable.
You can use a different closure if you wish to try
something else. Just make sure you leave
room so the straps can stretch out wide enough to
allow your foot to pass through.
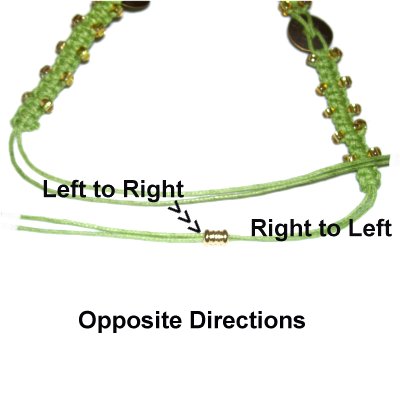
Step
26: Pass the fillers from the right
strap through the bead for the clasp from
right
to left.
Pass the fillers from the left
strap through from left
to right.
(See important information below)
Important:
Make sure the cords are not crossed or
twisted around each other in the area
between the SK and the bead.
Step
27: Pull the ends of the
cords to close the ankle straps.
Slide a bead onto two of the ends, placing
it at least 2 inches from the clasp
bead. This allows the straps to open
to that point, but no further.
Try the sandal on your foot to see if you
can get it through the straps with that
amount of extra space. Make
adjustments if needed.
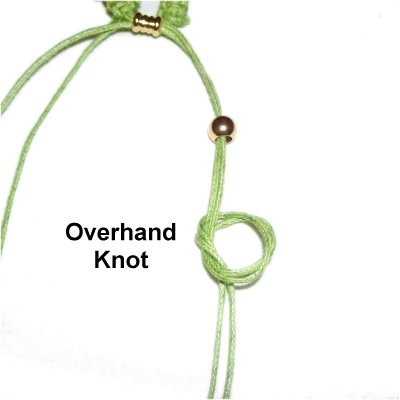
Step
28: Move the bead closer to the
clasp and tie an Overhand knot where it
was originally placed.
Measure to see if the knot is where you
want it, prior to tightening it all the
way.
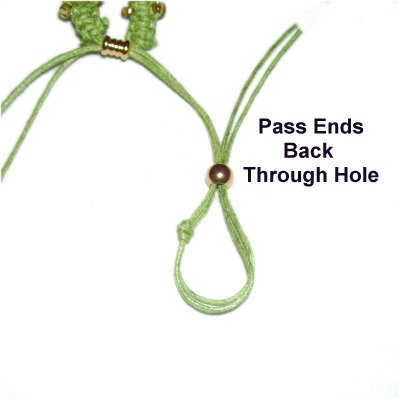
Step
29: Pass the ends of the two
cords back through the bead.
Pull them so the Overhand knot rests
against the bead.
Make sure the knot doesn't pass through
the hole. Use a different bead if it does.
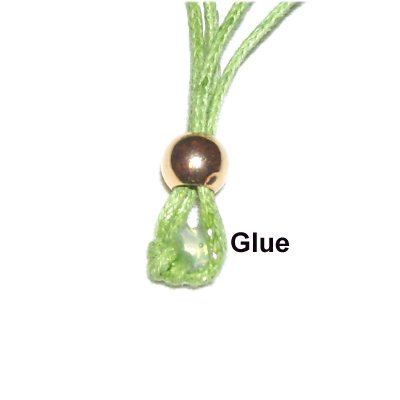
Step
30: Slide the bead back
away from the knot slightly, then apply
glue.
Push the bead back against the knot and
allow the glue to dry completely.
Cut off the excess material flush with the
bead.
Step 31: Repeat
steps 27 - 30 to finish the other two
ends.
Step 32:Repeat
Preparation and Steps 1 - 31, to make
another Coin Sandal.
By
using any text or images on Free Macrame
Patterns, you are agreeing to ourTerms
of Use