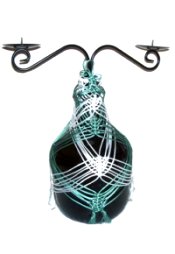
Description:
This Bottle Candelabra is made
with just a regular wine bottle, partially
covered with Square Knots arranged in an
unusual manner. You can use any type of
material, as well as a variety of bottles.
This Macrame pattern is written for two
colors. You can use a single color if you
wish to change this design.
Adding beads and small items like shells
is a good way to decorate this basic
design.
Since you need to be
able to tie knots and add cords without a project
board, this Macrame project may be too challenging
if you are a beginner.
Be sure to practice tying Square Knots without
a board several times before attempting
this project.
Important:
Since I used Satin cord for my Candelabra, I had
to make the knots very tight and use glue so they
didn't loosen. I recommend you use a
material like cotton the first time you try this
design.
Supplies
Needed:
2mm Cord Material (50+ yards x 2 colors --
depends on bottle size)
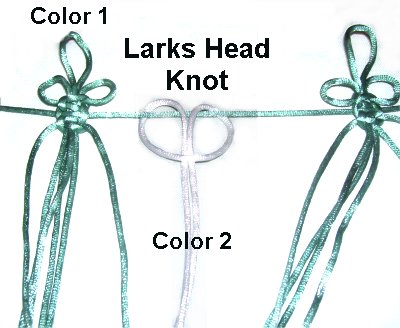
Here is the mounting process I used in the
Bottle Candelabra shown. If you wish, you
can use a different mounting technique.
In the example shown, color
1 is blue-green and color
2 is light silver.
Begin by cutting 6 cords of each color,
each 2.5
yards long (Color
1).
Cut one holding cord, at least 15
inches long (Color
1).
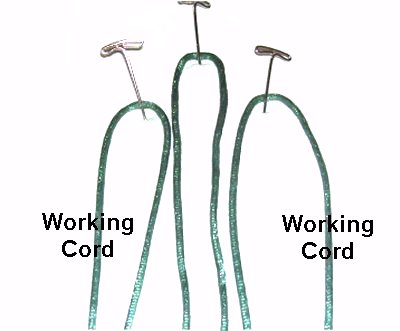
Step
1: Secure three 2.5-yard
cords to your board, folded in half (Color
1). The cord in the center
needs to be slightly higher than the other
two.
The two ends furthest to the left and
right will be the working cords for the
following knot.
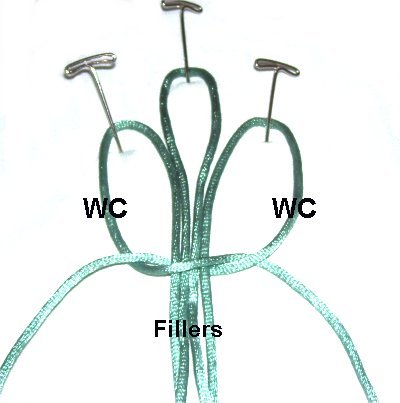
Step
2: Tie a Square Knot
using the two working cords. The
fillers are the other four.
Tighten the knot so the loop in the middle
is approximately 1/2
inch in size.
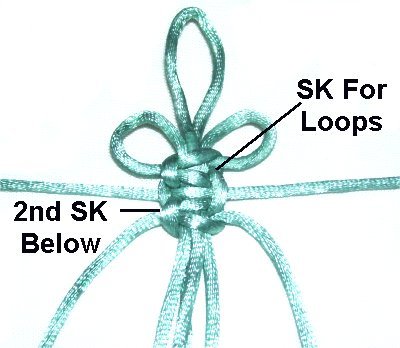
Step
3: Secure the holding
cord so it's horizontal. Position
the loop design you just made so it rests
against the top edge of the holding cord.
Position the working cords over
the holding cord.
The fillers should be under
the holding cord.
Step
4: Tie another Square knot
with the two working cords around the
fillers. It should rest on the other
side of the holding cord after you pull it
tight.
Repeat
steps 1 - 4 again, using the
other Color
1 cords. Leave space
between the two loop designs, for other
cords.
Step
5: Now you will mount the
Color
2 cords, fitting them between
the two loop designs. Start by
folding one in half, and place it under
the holding cord.
Tie a Larks Head knot by bringing the ends
over the holding cord, and then under
the folded area.
Step
6: You will now make two
more Larks Head knots, one with each
end.
To make the first halfof the knot, you move each end over - under
the holding cord, and over
the working
cord at the bottom.
Now make the second
half of the Larks head knot.
Move each end under
- over the holding cord,
and under
the working
cord at the bottom.
Step
7:Repeat
steps 5 and 6 to add two
more Color
2 cords (total of three cords mounted).
Slide the loop designs over, so they are on either
side.
The remaining
Color
2 cords should be mounted to the
left
of the others, in the arrangement you see
here.
Repeat
steps 5 - 7 to attach them to the
holding cord.
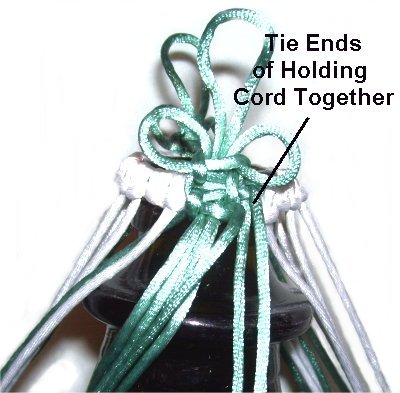
Step 8:
Tie the ends of the holding cord together, with an
Overhand knot, pushing the mounting knots as close
to each other as possible.
Place it on the Bottle Candelabra to see how it
fits, but remove it when making the adjustments.
The design should fit tightly
around the top of the bottle, so it can't slide
off.
Important:
You will know it's tight enough when you have to stretch
the design slightly to attach it, once both knots
are tied.
When it's the
right size, apply glue to the first knot,
and then tie a second Overhand
knot.
Place the mount design onto the top of the
bottle, applying glue underneath it.
Trim the ends of the holding
cord to 1-inch and attach them to the
Bottle Candelabra with glue.
Position them under
the other cords so they are hidden. Allow the glue
to dry before moving on.
Top Section
The top section of the
Bottle Candelabra requires you to add cords.
You won't be able to use a project board to do
this, so please practice Adding Cords
with a Square Knot before starting this area.
You will work with each group separately, so start
thinking of them as four distinct groups. The
color 1 loop designs are in the front and back of
the Bottle Candelabra. Color 2 cords are on
the right and left.
Cut 4 cords
of each color, two yards long (72 inches)
Step 1:
Fold a Color
2 cord in half, and place the center of
it under three
of the cords mounted to the bottle (same color).
Tie a Square knot with the new
cord. The ones already on the bottle
are the fillers.
Tighten firmly, pushing the knot up to
rest against the mounting knots.
Add the remaining 7 cords in the same
manner. Make sure you attach each
new cord to three
mounted onesof
the same color.
Push them all up as high as
possible. There should be a total of
10 cords in each of the four groups when
you are finished.
Mentally number the cords in each
group 1 - 10.
Tie a Square knot using cords 4 -
7.
Do the same for the other groups.
Crossover Designs
You will now make what I call "Crossover
Designs". You combine cords from two groups
(same color), bringing them across the bottle to
the opposite position than where they start.
So for the first row, the cords from the back and
front end up at the sides of the Bottle
Candelabra. The cords at the sides are
brought to the front and back. For the
second row, they are returned to their original
position.
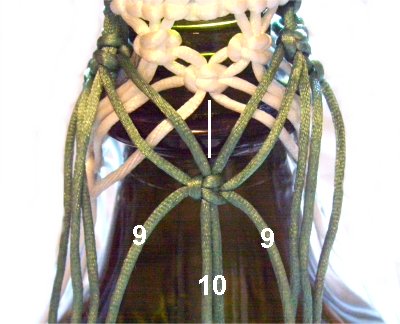
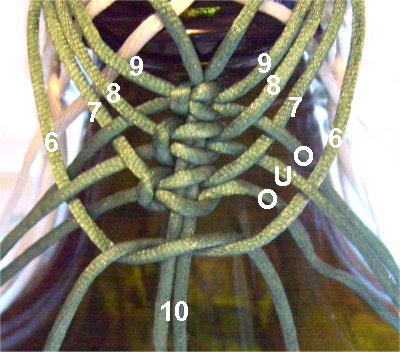
Step 2:
Mentally numberthe
cords in one group 1 - 10, moving left
to right.
For the other group of the same
color, number them right to left.
The reason for this is so you work with two
cords of the same number, which makes this process
less confusing.
You can actually label the ends with tape, writing
the numbers on it with a pen.
The images below show Color
1, but you can start with Color
2 (white) if it's easier for you, since
they rest under Color 1 (green).
The two fillers
are cords 10. Use cords
9 to tie the first Square knot
around the fillers. It should line
up with the Square knot tied in step 1.
Try to tighten it so it's about 1.5
inches below the other knot.
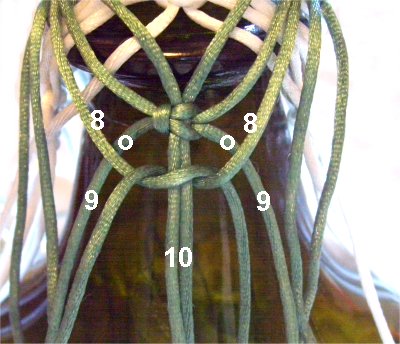
Step
3: Locate cords
8, and pass them over
cords 9. Use them to tie the next
Square knot onto the fillers.
It's
best to tie the knots loosely, so you can
make adjustments to the Bottle Candelabra
design. When you finish the other
side, and everything is balanced, you can
then go back and tighten them firmly.
Design Tip:
When making your Bottle Candelabra, do not try to
pull the cords tightly. Instead, they should
have a gentle curve, so they drape like a
necklace.
Step
4: Use cords
7 next, moving them under
cords 9, and over
cords 8, before tying the Square Knot.
Step
5: Use cords
6 next, moving them over
cords 9, under
cords 8, and over
cords 7.
Tie the 4th Square Knot in the crossover
design.
Go to the other side of the Bottle Candelabra,
and use the remaining cords of the same
color. Cords
1 are the fillers.
Use cords 2 - 5 to tie the SK, following the same
over-under sequence as what you just did with
cords 9 - 6.
Once everything is balanced, tighten all the knots
firmly. Apply glue to the back of the knots
if you wish.
Important:Do notattach this design directly to the Bottle
Candelabra. It causes the knots to become
unbalanced.
Step 6:
Repeat this process with the cords of the second
color (steps 2 - 5).
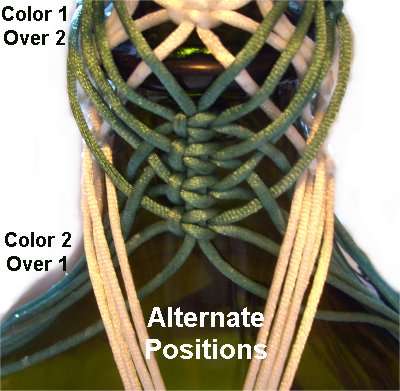
After all four
groups are knotted, alternate the
positions of the cords.
So Color
2 will now be used to tie a row
of SK, starting 1.5
inches below the last knot of the
Color
1 design.
In the previous row, Color 1 passed over 2
(green over white). Now it should be
the opposite
(color 2 overcolor
1).
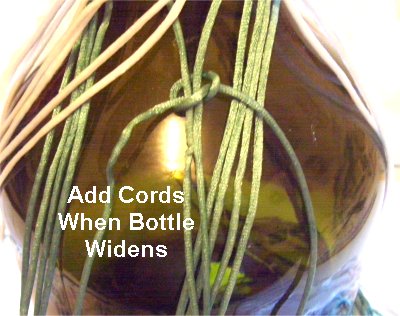
Step 7:
Chances are the bottle is becoming larger at this
point.
If not, skip this step until the Bottle
Candelabra begins to widen.
Cut
4 cords, each 2 yards long (both colors)
-- total of 8.
You add
one cord to each group in the
same manner as in step 1 -- Place the new
cord under the two
fillers. Tie a SK with the
new
cord.
Step 8:
Tie the next row with the same crossover design (steps
2 - 6). Since you now have an extra
cord, the over - under sequence is a
little different:
Cords 9 -- pass over
the new cord
Cords 8 -- pass under
the new cord, and over
cords 9
Cords 7 -- pass over
the new cord, under
9, over
8
Cords 6 -- pass under
the new cord, over
9, under
8, over
7
Make sure you complete this same process in all four groups
before moving on to the next step. Tighten
all the knots firmly, and check that the designs
are positioned evenly around the Bottle
Candelabra.
Design Tip:
I found that measuring down from the knot above
was the easiest way to make sure all the groups
are positioned the same.
Step 9:
Repeat steps 2 - 6 at least two more
times.
Add more 2-yard cords as you did in step
7, if the bottle continues to get
larger. In the images shown, I added
cords in the 3rd and 4th rows, but not the 5th.
Make sure you change the position of the cords
each time you repeat (front/back to sides).
Switch the colors each time as well (Color 1 over
2, and 2 over 1).
Remember that the over - under sequence will
change if you add cords. Make sure that half
the cords from each side are used in the crossover
designs.
So if there are 12 cords, use 1 - 6 in one group,
and
7 - 12 for the second group.
Design Tip:
The weaving for the Bottle Candelabra should
always end
by goingoverthe cords closest
to the fillers. You may
need to mentally re-number the cords as you
progress.
Make sure you
move down at
least 2 inches as you begin each
new row.
Try to keep the cords on an angle,
even if you have to move the knots down
more than 2 inches.
As you can see in this image, the 4th and
5th rows are more than 2 inches below the
3rd row.
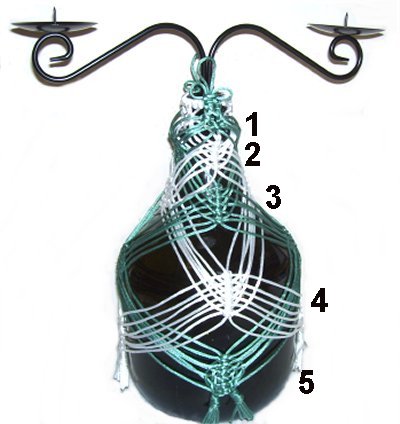
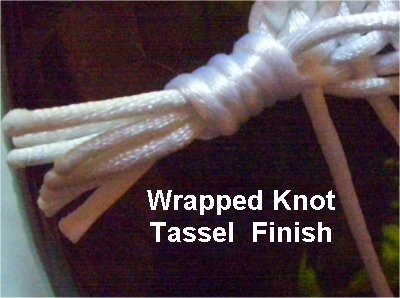
Finishing Touches
For the final
steps in your Bottle Candelabra, you need
to decide how to deal with the ends.
I made Wrapped Knot "tassels", but you can
also make a fringe, or add beads.
Here are the instructions for the Wrapped
Knot:
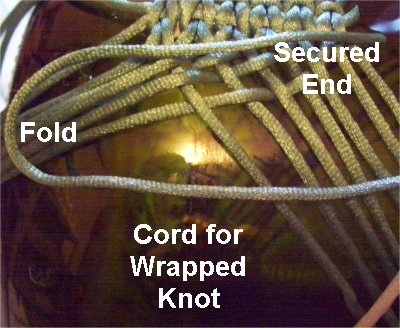
Step 10:
Cut one cord, 18 inches long. Secure one end with
tape, next to the last crossover design.
Move down 6
inches, folding the cord (closer to the
bottom). The long portion is used to wrap
the bottle cords.
Make sure you only wrap half
the number of cords in each group, so you
have two
tassels per group.
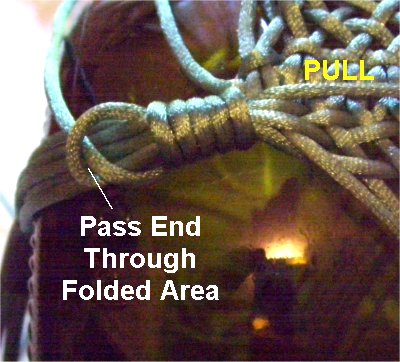
Step
11: Wrap the long end of the cord
around the secured end, as well as the
cords from the Bottle Candelabra
design.
Wrap firmly,
at least 4 times.
Step
12: Pass the working end through
the folded area of the cord. Make
sure you hold the wraps in place.
Pull the secured
end so the loop is pulled inside
the wrapped portion.
Step 12,
continued: Apply glue to the entire
knot before cutting the secured end flush with the
top of the Wrapped knot.
Step 13:
Trim the ends below the Wrapped Knot so they are
even with the bottom of the bottle.
Heat the tips or apply glue to prevent unraveling.
Step 14:
Place the cork for the metal candelabra into the
neck of the bottle. You can add tape to the cork
if it wobbles too much.
By
using any text or images on Free Macrame
Patterns, you are agreeing to ourTerms
of Use