Description:
The Bell Tower is a unique Macrame Plant
hanger. The design at the top
resembles a pair of double
bells.
Layered fringe is located below the small
bell as well as the bottom of the
cradle. Another option is to make a
beaded fringe in both areas.
The cradle is unique in that it is wide
and shallow, suitable for short plant pots
or bowl.
The size of the finished plant hanger is
36 to 40 inches tall, depending on the
length of the long posts. It
can be made longer by adding more
knots in that area.
This Macrame project is rated moderate,
since some experience is necessary.
Be sure to practice all the knots used in
the design before you get started.
40-inch
length: Cut 16 cords, each 7.5 yards
long.
These are referred to as the
"long cords" in the descriptions below.
(Optional) Cut the cords longer if you plan to
make the Bell Tower more than 40 inches
long. You need one yard for every 4 inches
you add to the length.
Wrapped
Knots: Cut 4 cords, each 36 inches
long.
Prepare the tips of the long cords with tape
to prevent unraveling while you work on the Bell
Tower.
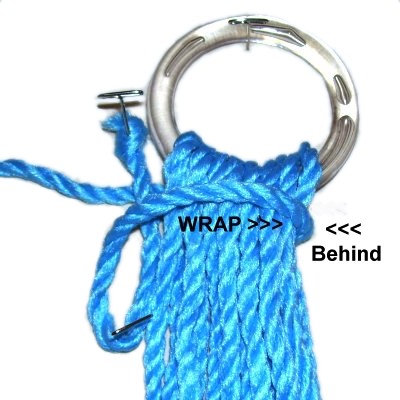
Step
1: Fold 8 of the long
cords, then pass them through a 3-inch
ring so they rest around the
bottom of it. Match the ends to
center the cords.
Secure one end of a 36-inch cord on the
left. Fold it as shown, so the long
portion is resting to the left of the
secured portion.
Begin the
Wrapped Knot by moving the long portion of
the 36-inch cord to the right, passing it
over
the front of the other cords. Bring
it under
those cords as you move it to the left.
Pull it tightly before repeating the
process to make the next wrap. The
first two wraps should beas close
to the ring as possible.
Wrap several
more times until the Wrapped Knot is 1.5
inches long. Pass the
working end through the folded area, which
looks like a loop now.
Pull the secured
end of the cord (top of knot), to
move theloop and working end inside
the knot.
Cut the ends of the 36-inch cord as short as
possible and tuck them into the wrapped
portion. Apply glue to secure the cords.
Important:
Pull down firmly on each of the long cords, so
they tighten around the lower portion of the ring.
Use these same
instructionseach
time you create a Wrapped Knot in the other
areas of the Bell Tower.
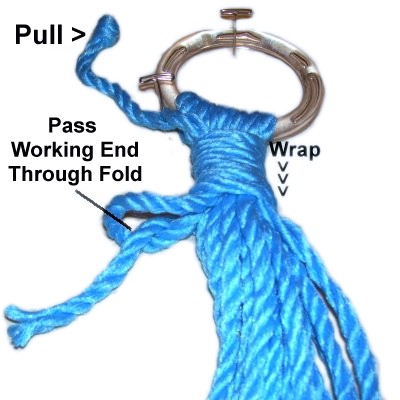
Large Bell Design
Step
2: Organize the long cords
into 4 groups of four cords.
Mentally number the cords in each group 1
- 4.
Tie a Square Knot in each group, using
cords 1 and 4 around cords 2 - 3
(fillers). Tighten them firmly so
they rest next to the lower edge of the
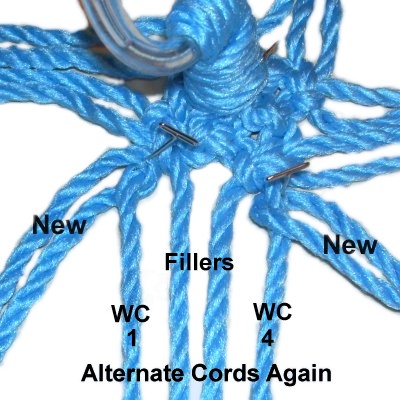
Wrapped Knot.
Alternate the
cordsin row 2
by combining cords 1 - 2
from one knot with 3 - 4 from another knot
(from the first row).
Step
3:Alternate
the cords again into the same
four groups as row 1. Mentally
number the cords in one group 1 - 4.
Fold a new long cord in half and place it
around working
cord 1. Do the same
around working cord 4.
Tie a Square Knot with cords 1- 4, making
sure you do not use the new
cords.
Step 4:Repeat
step 3, adding the remaining long cords
to the working cords in the other three groups.
Make sure you alternate the cords before you do
so, and tie the SK with the original cords, not
the new ones.
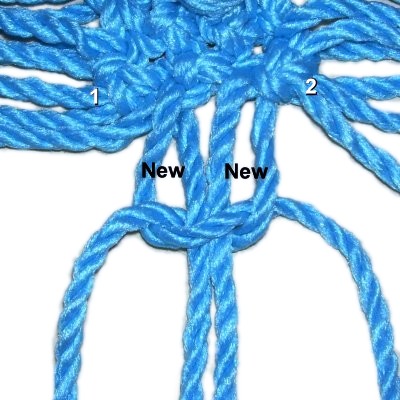
Step
5: Arrange the cords coming from
two SK
in front of you.
Find the 2 halves of one new
cord from the left knot as well
as the right knot. These are labeled
1 and 2 on the image.
Use those four cords to tie one SK, which
will rest between
knots 1 and 2.
Step 6:Repeat
step 5, tying SK with all the remaining new
cords.
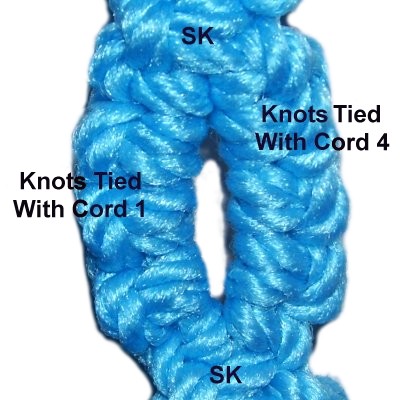
Tie 6 more
rows of ASK using all the cords. Work in a
circle to form a tube.
This may be easier for you if you hang the
Bell Tower from the ring at the top.
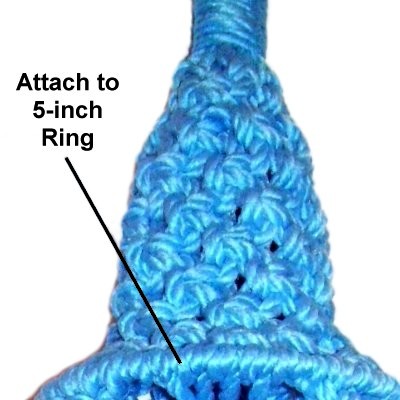
Step
7: Attach all the cords to a 5-inch
ring with Double Half Hitches
(DHH). Add extra Half Hitches if
needed so the entire ring is covered.
Tighten the Half Hitches as much as
possible, so the last row of ASK rests
against the ring. This will cause
the lower portion to spread out, forming
the large bell at the top of the Bell
Tower.
Small Bell Design
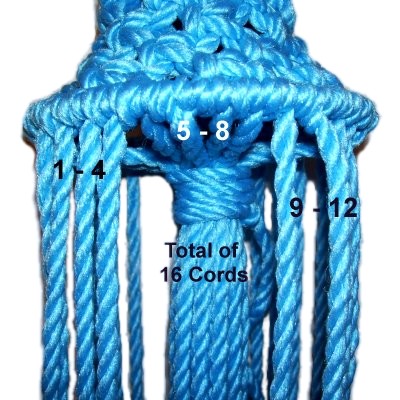
Step 8: Mentally
number the cords 1 - 32. Locate cords 5 - 8,
13 - 16, 21 - 24, and 29 - 32 (total of 16
cords).
Bundle these cords and pull
them to the insideof the remaining groups, since they will be
used to create the small bell for the Bell Tower
design.
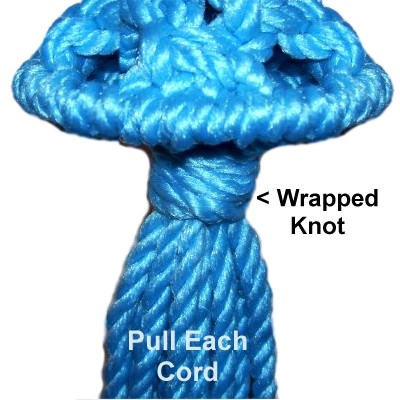
Use a 36-inch cord to make a 1.5-inch
Wrapped Knot around the bundled cords (as
in step 1).
Cut the ends of the 36-inch cord short and
tuck them into the wrapped portion.
Apply glue inside the knot to secure them.
Important:
Pull firmly on each of the cords in the
bundle. They should be straight and
taut in the area above the Wrapped
Knot.
The top
of the knot should be lined up with the
ring and rest in the center
of it. Adjust the knot so the Bell
Tower is balanced.
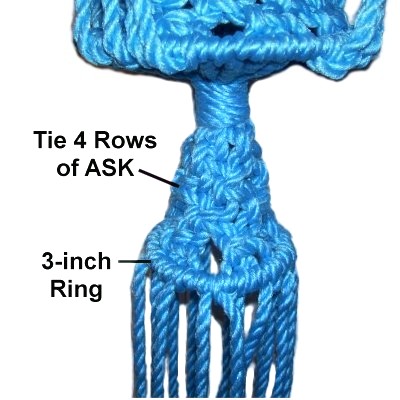
Step
9: Tie 4 rows of ASK,
moving in a circle to form a tube, just
like you did with the large bell.
Attach all the cords to a 3-inch ring with
DHH. Make sure you pull the cords
firmly when tightening, so the last row of
ASK rests against
the ring. Add extra Half Hitches if
needed so the ring is completely covered.
Bundle the 16
cords in the center of the ring. Tie
a 1.5-inch
Wrapped Knot around them using a
36-inch cord.
Cut the ends short and tuck them into the
wrapped portion. Apply glue to
secure them.
Important:
Pull each cord so the segments above the
knot are flat and taut.
Step
10: Measure from the lower edge of
the Wrapped Knot down 7
inches. Cut the cords at that
point.
SAVE
THE SCRAPS. They will be used to
make the cradle. Apply tape to the tips to
prevent unraveling.
Long Posts
Like most plant hangers, the Bell Tower has 4
long posts. These are made with Buttonhole
designs.
36-inch
size = total of six Buttonhole
designs
40-inch
size = total of eight Buttonhole
designs
If you cut the cords longer than 7.5-yards in
Preparation, you can make additional Buttonhole
designs to lengthen the Bell Tower. Each
buttonhole design is approximately 2 inches
long.
Make sure there are the same number of designs
above and below the bead.
Step 11:
The 4 groups of cords coming from the ring of the
large
bell are used to tie the posts. Mentally
number the cords in one
group 1 - 4.
Tie a tight Square knot using cords 1 and 4 around
fillers 2 and 3.
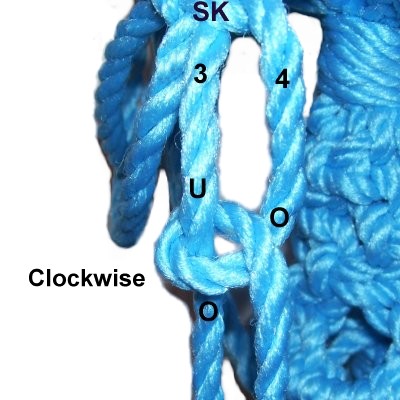
Step
12: Use cord
4 to tie a clockwise
Vertical Larks Head onto cord 3, as
described below:
The first half is tied by making a loop
with cord 4, passing over
- under cord 3. As you pull
it right, pass over
cord 4.
The second
half is tied by making another loop with
cord 4 under
- over cord 3.
Pass it under
cord 4 as you pull it right.
Step 13:Repeat
step 12 three more times, for a total of
4 Larks Head knots.
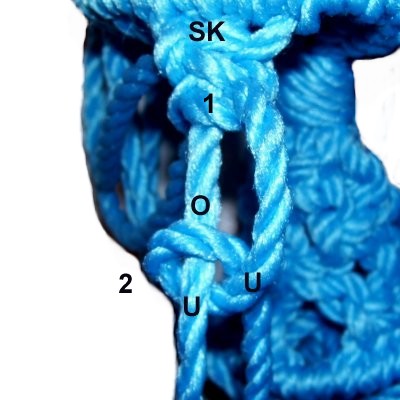
Step
14: For the left half of
the Buttonhole design, use cord
1 to tie fourcounter-clockwise
Vertical Larks head knots onto cord 2.
Complete the Buttonhole design by tying
another SK with the four cords. The
working cords are 1 and 4.
Step 15: Repeat
steps 12 - 14 to create more Buttonhole
designs using the same group of cords.
36-inch
size: Make 2 more Buttonhole
designs (total of 3)
40-inch
size: Make 3 more Buttonhole
designs (total of 4)
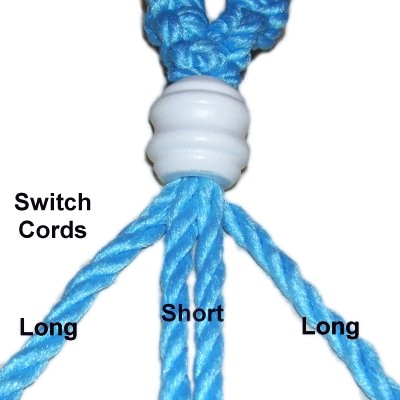
Step
16: Slide all 4 cords
through one bead, and position it against
the last SK.
Important:
Switch the cords so the shortest
two are between the two longer cords.
Step 17:
Use the two longest
cords to tie a Square Knot around the two
short cords (fillers).
Make a second set of Buttonhole designs:
36-inch
Size:Repeat
steps 12 - 14 three more times.
40-inch
Size:Repeat
steps 12 - 14 four more times.
If you increased the number of Buttonhole
designs above the bead, do so here as
well.
Step 18:Repeat
steps 11 - 17 in each of the remaining 3
sets of cords coming from the ring of the large
bell.
Step 19:
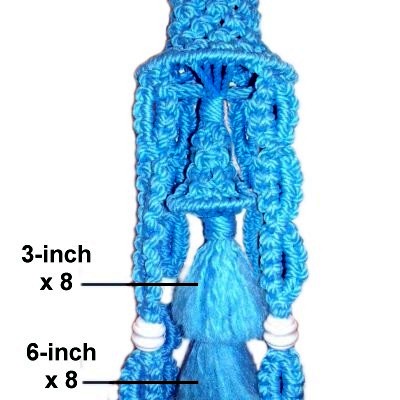
Before you create the cradle for the Bell Tower
you should make the fringe in the upper area.
Divide the cords dangling below the small
bell so that the 8 cords on the inside
center area of the bundle are used to
make the long fringe.
A shorter fringe is made with the 8 cords on the outside.
Measure from the bottom
of the Wrapped knot down to the following lengths:
Long
Fringe: Unravel the cords as much
as possible, then brush and trim them to 6
inches.
Short
Fringe: Unravel the cords,
then brush and trim them to 3 inches.
The Cradle
The Cradle for the Bell Tower starts out by
adding several cords to each of the long sennits.
You
need a total of 32 cords, each 1.5 yards long.
Sort through the scraps you cut off from the small
bell in step 10. Use any scraps that are at
least 1.5 yards long (54 inches). For
scraps over 3 yards long, cut them in half.
Step 20:
Each time you are asked to add cords, you fold a
1.5 yard cord in half and place it under the two
cords that will hold the knot. Secure it at
the center, and make sure it's balanced. Use
thenew cord
to tie a Square Knot.
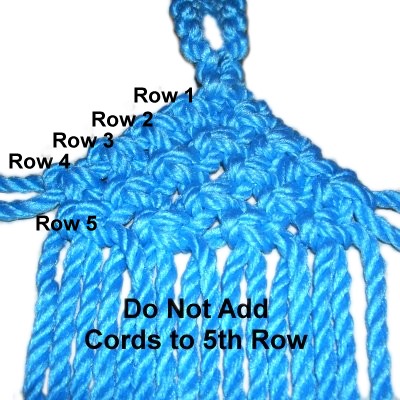
Row 1:
Mentally number the four cords coming from
one of the long posts.
Add a 1.5-yard cord onto cords 1 -
2.
Add another 1.5-yard cord onto cords
3 - 4.
Row
2: Mentally re-number the 8
cords.
Add a 1.5-yard cord onto cords
1 - 2.
Add another one onto cords
7 - 8.
Tie an ASK with cords 3 - 6.
Row
3: Mentally re-number the
12 cords.
Add a 1.5-yard cords onto cords
1 - 2.
Add another one onto cords
11 - 12.
Tie an ASK with cords 3 - 6 and with 7 -
10.
Row 4:
Mentally re-number the 16 cords.
Add a 1.5-yard cord onto cords
1 - 2, and another onto cords
15 - 16.
The ASK with cords 3 - 6, 7 - 10, and 11 -
14.
Row
5: Mentally re-number the
20 cords. Do not add any new cords
to this row.
Tie ASK with cords 3 - 6, 7 - 10, 11 - 14,
and 15 - 18.
Mark cords 1,
2, 19, and 20with
a small piece of tape so
you can easily identify them.
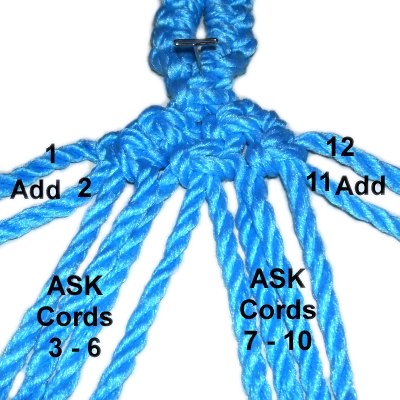
Step 21:
Repeat step 20, adding a total of 8 new
cords to the other three long posts.
Be sure to mark
cords 1, 2, 19, 20 after tying the knots
in row 5.
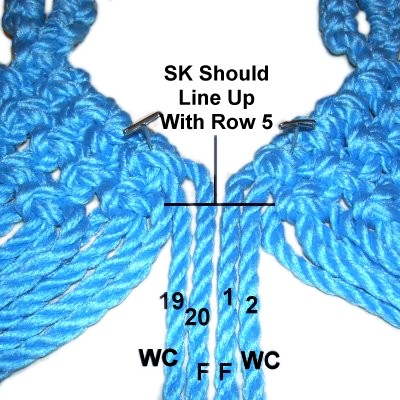
Step 22: Place
two of the V designs next to each other. Make sure
the long sennits for the Bell Tower are not
twisted and are face up.
Locate cords
19 - 20 from the left V design.
Locate cords
1 - 2 from the V design on the
right (all marked cords)
Tie a SK with the 4 cords. The
working cords used to tie the knot should
be 19 and 2.
Step 23:Repeat
step 22,
linking all four V designs by connecting
cords 19 and 20 with cords 1 and 2 (marked
cords).
Each design should be connected to another on both
sides.
Step 24:
Tie several more rows of ASK, working in a circle
all the way around the cradle for the Bell
Tower.
The number of rows is up to you, but make sure you
stop
when the shortest cords are 18 inches
long.
Step 25:
You will now be attaching half
the cords to the last 5-inch ring at the
bottom of the Bell Tower. Pass the four
cords from each SK into the ring one set at a
time.
Attach cords 2 and 3 in each set of four with DHH
(fillers of SK). Cords 1 and 4 should dangle
freely inside the ring.
Make sure these DHH are firmly tied so the ring
rests against
the last row of ASK. You can add extra Half
Hitches if necessary to completely cover the ring.
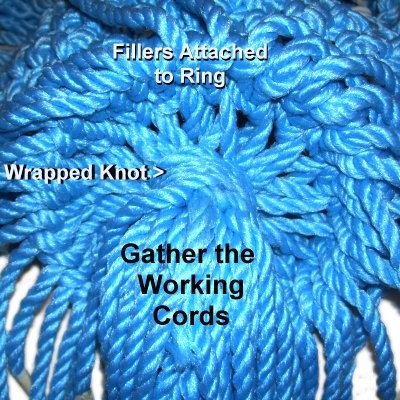
Step 26: Gather
all the cords you did
not attach to the ringinto a bundle. Make sure they are as
straight as possible and don't overlap one
another.
Tie a 1.5-inch Wrapped Knot around them
using a 36-inch cord. Make sure it rests
in the center of the ring.
Important:
Pull down on each cord, so they are
straight and taut in the area above the
knot.
Lower Fringe
The fringe for the Bell Tower consists of 3
layers. You can make the layers any length,
but try to keep each layer at least 2 inches
different from the next, so you can see all three
levels.
Step
27: Select 12 cords from
inside the bundle of cords you
just wrapped, and cut them to at
least 7 inches.
Trim the remaining cords from the bundle
to at
least 5 inches.
To make the
third layer of Fringe for your Bell Tower
Planter, trim the cords attached to the
ring to at least 3
inches.
Unravel
and brush all the cords to create
the fringe as you did in step 19.
By
using any text or images on Free Macrame
Patterns, you are agreeing to ourTerms
of Use