Description:
The Badge Holder is a long Macrame
necklace featuring Larks Head knots. There
is a buttonhole loop in the front where you attach
a badge clip. That's the metal portion shown in
the image above.
You create the beaded neck strap in two parts,
each half the total length. In the
finishing steps, you link the two halves. The
necklace fits over the head, since it does not
have a clasp.
Make sure the total length is at
least 26 inches in length, or
that it can fit easily over your head.
The beads are an important part of this design,
since they make the necklace more stable.
You can use waxed material if you don't want the
beads.
The finished length described below is the
measurement all
the way around the beaded
portion. This does
not include the buttonhole in the front.
Since this Macrame project features basic knots,
it's rated Easy and suitable for beginners.
Supplies
Needed:
2 mm Cotton cord material (see total amounts
below)
Badge clip with strap (the type with a snap
closure)
To determine the appropriate size for your Badge
Holder, put a cord around your neck and bring the
ends together where you want the clip to
rest. Make sure you can slip it
off over your head. Then measure the cord to get
the finished length you need to make.
Choose the size you want to make from the table,
and cut the cords to the proper length.
Prepare the tips of the two holding
cords with glue.
Tie Overhand knots at the tips of the two working
cords.
(Optional) To
eliminate fuzz, rub beeswax on the cords.
Finished
Length
Working
Cords
Holding Cords
26
- 28 inches
Cut 2 cords,
4.5 yards long
Cut 2 cords,
2.5 yards long
29
- 31 inches
Cut 2 cords,
5 yards long
Cut 2 cords,
3 yards long
32
- 34 inches
Cut 2 cords,
5.5 yards long
Cut 2 cords,
3 yards long
Front of Badge Holder (Loop)
Secure the two working
cords on your board vertically, matching
the centers. Apply a piece of tape to mark
the center, which is where the first Larks Head
knot will rest.
Use the cord
on the right
to tie all the Larks Head knots onto the
cord on the left. The two loops
should be tied rotating clockwise.
Step 1:
Make a loop with the right cord over
- under the left cord. As
you pull it right, pass over
the right cord. Tighten firmly.
Step
2: Tie another clockwise
loop under
- overthe
left cord. As you pull it right,
pass under
the right cord. Tighten firmly.
Steps
1 and 2 = One Larks Head Knot
Step
3:Repeat
steps 1 and 2, tying a total of six knots
for the first half.
Check to verify that the short plastic
strap on the clip is the same width
as 4 knots.
For clips with wider straps, tie more than
6 knots.
Step
4: Remove the tape and
turn the knots around on your board.
Secure the first knot at the center.
Tie 6 Larks Head knots with the same
working cord, rotating
counter-clockwise. Add
extra knots if you did so in the first
half.
Step
5: Place the clip at
the center of the buttonhole design.
Fold and snap it together.
Add extra knots at each end of the Larks
Head design if needed.
Bring all 4 cords together, forming the
loop at the front of the Badge Holder.
Step
6: Mentally number the
cords 1 - 4.
Move working
cord 1 to the right, over
cords 2 and 3 (filler cords) and under
working cord 4.
Move
working
cord 4under
filler cords 2 and 3.
As you pull it left, bring it over
working cord 1.
The
two working cords have switched places.
Move working
cord 1 to the left,
over filler cords 2 and 3 and under
working cord 4.
Move working
cord 4under
fillers 2 and 3 and over
working cord 1.
Badge Holder Neck Strap
The neck strap
features Larks Head knots that face opposite
directions.
Beads are applied to the two holding
cords, which are added in the next few
steps:
Step
7: Move cords 1 and 4 out
of the way.
Place a
new holding cordunder
cords 2 and 3.
Balance the new cord by matching the ends,
then secure it at the center.
Use the two
halves of the new
cord to tie a Square knot onto cords 2 and
3.
Follow the four step process shown in step
6.
Slide the SK backward, so it rests against
the one tied in step 6.
Step 8:Repeat
step 7 with the second holding
cord. You will now have 8 cords to
make the beaded portion of the Badge Holder.
Step 9:
Mentally number the cords 1 - 8. Turn the
design horizontally so the clip is on the
right. Move cords 1 - 4 out of your
way. You will be using cords 5 - 8 for the
first half.
Check to make sure the two
holding cords (6 and 7) are the new ones
you added in steps 7 and 8. They are shorter
than the other two, which are the working
cords. You can re-arrange the cords if
necessary.
Slide a bead
onto holding cords 6 and 7.
Use a wire threader if necessary (see
below).
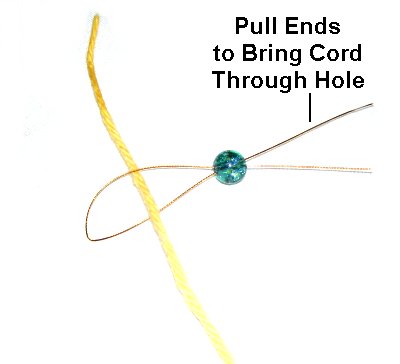
Slide the cords through the bead one at a
time.
Fold a wire in
half, and slide it through the bead hole.
Pass the end of one cord through the
folded area of the wire. Pull on
both halves of the wire to bring the cord
all the way through the hole.
Step 10:
All the Larks Head knots in this section of the
Badge Holder are to be made following the two
steps below:
Make
a loop with cord
8 by passing over
- undercords 6 and 7 (clockwise).
As you pull it to the right, bring it over
cord 8.
For the next
loop, move cord 8 under
- over cords 6 and 7.
Bring it under
cord 8 as you pull it to the right.
Both
steps = 1 Vertical Larks Head knot
Step
11:Repeat
step 10, tying the next Larks
Head knot with cord
5 onto holding cords 6 and
7.
Rotate counter-clockwise.
Add the next bead to cords 6 and 7.
Step 12:
Repeat steps 10
and 11 several more times.
After each bead is added, the first knot is tied
with cord 8, followed by cord 5. Make sure you follow
this same pattern all the way through.
Stop when the first half of the Badge Holder is halfthe size you
are aiming for, minus
3 inches.
So for a 30-inch total length, half would be 15
inches. Subtract 3 inches = 12 inches.
Step 13:
Tie 2.5
inchesof
Larks Head knots, but do
not add any beads.
Step
14: Turn the Badge Holder
around so the clip is on the left.
Use cords
1 - 4 to make the second half.
The beads are placed on cords
2 and 3.
Cord 1 = knots counter-clockwise
Cord 4 = knots clockwise
Step 14,
continued: After each bead is
added, the first knot is tied with cord 1,
followed by cord 4. Make sure you follow
this same pattern so both halves match.
Stop the beaded
area at the same
place as the first half. Be
sure to measure
each halfrather
than counting the beads.
Placing the two halves side by side is the best
way to ensure you stop in the right place, but you
can use a tape measure if you wish.
Step 15: Repeat
step 13.
Finishing
Touches
Step
16: Locate the two working
cords for the first half of the Badge
Holder (cords 5 and 8). Tie them
together with an Overhand knot.
Apply glue before tightening.
Make sure the knot rests in the back,
and is as tight as possible.
Step
17: Organize the remaining
cords by forming a circle with the two
halves. The first half, which now
has only two cords, should be closest to
the front of your board.
Cords 2, 3, 6, 7 were the holding cords,
and should rest next to each other heading
in opposite directions.
Step
18: To connect the two
halves, use cord
4 to tie a Larks Head knot onto all
4 holding cords. Tighten
firmly.
Use cord 1 to tie the next knot.
Alternate back and forth between the two
cords, tying several more knots measuring
1/2-inch.
Step 19:
Pull the holding cords to remove the slack
between the two ends of the necklace. The
knots should be close together when you are
through.
Make sure nothing
is twisted.
Organize the cords so that three are one one side
of the strap and three on the opposite side, as
shown below.
Step
20: Turn the Badge Holder
upside down so you are working in the
back. Use one cord from each side to
tie an Overhand knot. Apply glue
before tightening firmly.
Repeat with the other two sets of
cords. Cut off the extra material
when the glue is dry.
By
using any text or images on Free Macrame
Patterns, you are agreeing to ourTerms
of Use