Description:
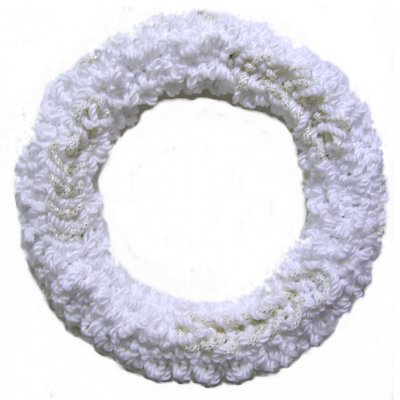
The Winter Wreath features Square Knot
Picots attached to a wreath
frame.
To make a wreath with rings instead of a frame,
see the Triple Ring Wreath.
The most challenging part to this Macrame pattern
is fitting your hands and fingers between the
sections of the frame as you tie the knots.
When you purchase the frame, make sure it's at least 12 inches in
diameter, or the spaces may be too small.
Since you will be manipulating the cords more than
usual, be sure to use braided
cord material. Twisted style material was used in
the example, which was difficult to work with,
since the fibers separated too easily.
This holiday decoration is written to be made with
either one color, or with a combination of two
colors mixed together.
Make sure you know how to tie Square Knots, and
can do so without
using pins, since this design is easier
to make with the frame sitting on your lap.
In the example shown, cord
1 is white, and cord
2 is ivory with gold threads.
To calculate the amount of material you need to
purchase, do the following:
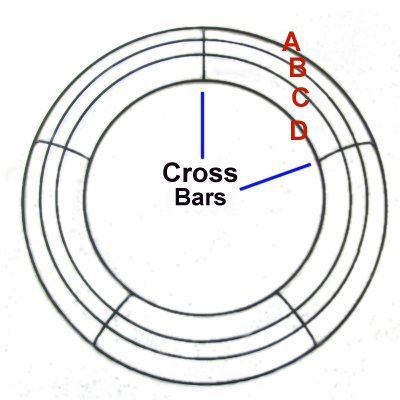
On one ring, measure the area between two
cross bars (see image below), and multiply
that by 12.
Multiply that by 2, since there are two
cords per section.
Multiply the result by the number of
sections on the ring you measured.
Divide by 36 to get the total yards (or
meters) you need for the one ring.
Repeat for each ring.
Add the total yards for all the rings
combined, and that will be the amount you need
to purchase. When using two
colors, divide the total yards in half and
that will be the amount to purchase for each color.
Wreath frames
usually have 3 - 4 rings separated into
five or more sections by vertical cross
bars.
Mentally label the four rings A - D,
starting on the outside.
Step 1:
Begin with the outer ring, labeled A. Measure
between two cross bars and multiply
that size by 12.
You need two
cords per section, cut to the length you
came up with. So if your wreath frame has 5
sections, you need 10 cords.
To make a Winter Wreath with two colors,cut 1
cord per section, with
each color. So for a 5-section
frame, cut 5 cords of each color.
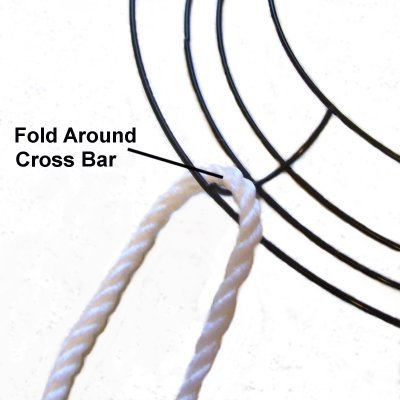
Step
2: Place the frame on your work
surface upside
down, so you are working in the back.
Fold cord
1 in half and position it around
one of the cross bars on the outer ring (A).
The right
half of the cord should rest over
the cross bar, and the left half under
it.
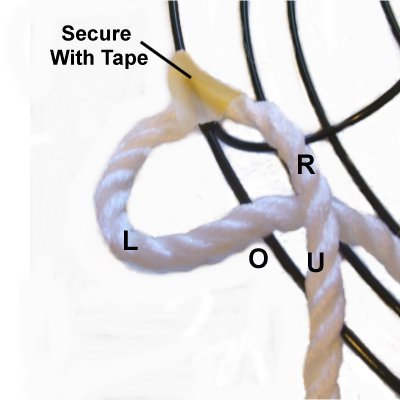
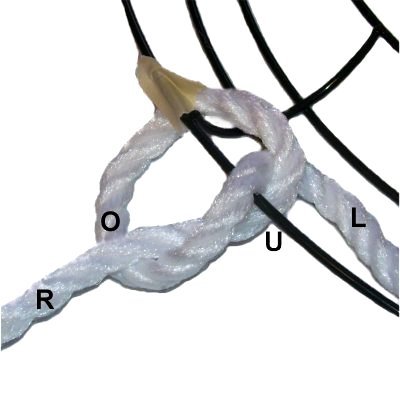
Step
3: Secure the center of the
cord to the frame with tape. Tie the
first Square Knot as follows:
Move the left half
of the cord over
the outer ring (A), which acts as the
filler for the SK.
Place it under
the right half of the cord.
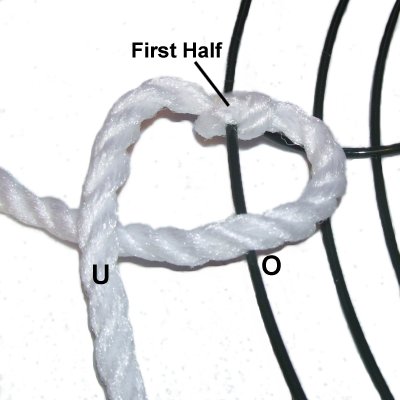
Step
4: Move the right
half of the cord under
the outer ring, and over
the left half, as you pull it left.
This completes the first half of the
Square knot. Tighten the knot
firmly.
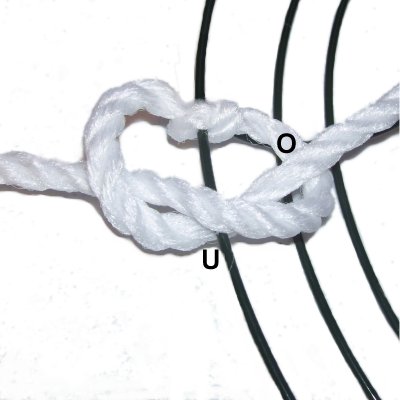
Step
5: The ends have now
switched places.
Move the left
half, which is now on the right,
to the left.
Pass it over
the ring andunder
the other half of the cord.
Step
6: Move the right
half, now on the left, to the
right.
Pass it under
the ring and over
the left half of the cord.
Step
7: Fold cord
2 in half and place it under the
ring next to the first knot.
Repeat
steps 3 - 6, tying a SK with the
second cord.
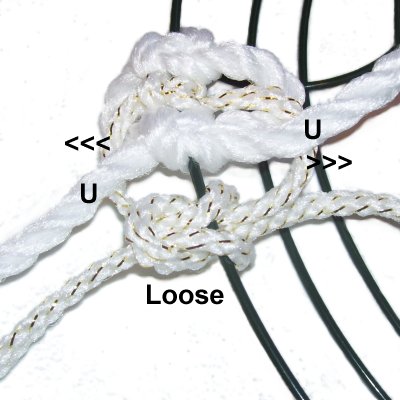
Step 8:
Move the ends of cord
2 to the sides horizontally, as shown in
the image below.
Bring the ends of cord
1under
the ends of cord 2.
Use cord
1 to tie the next Square Knot, but do
not tighten it. (It needs to
be loose so you can form the picots).
Move the knot next tothe one made by cord 2.
Pull sideways
on the two segments of cord
1 that rest between the knots (arrows).
This forms the picots for the Winter
Wreath, which should be at least 1-inch in
size.
Tighten the loose knot gradually,
being careful not to remove the picots.
Step
9: Move the ends of cord
1 to the sides, placing the ends of cord
2 under them.
Use cord
2 to tie a loose SK, as you did in step
8. Move it into position next to
the previous knot.
Pull
on the segments between the knots to form
the picots. Tighten the loose knot
gradually.
It's important to keep the picots close to
the same size, so the Winter Wreath looks
neat.
Step 10:
Repeat steps 8 and 9 several times, until
you reach the next cross bar. Alternate
between the two cords.
Push the knots close together as you progress, so
you can fit in as many knots as possible.
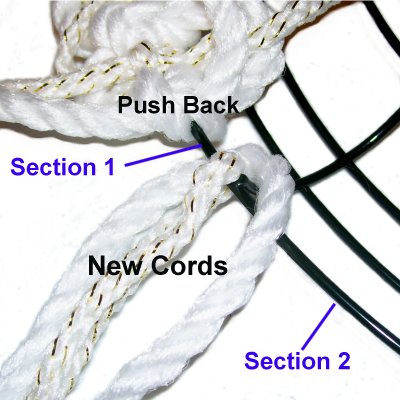
Fold two new
cords in half and place them around the
outer ring, next to the last knot
tied. You can wrap them around the
cross bar if you wish.
Push the knots in section 1 back slightly,
to give you room for the new cords.
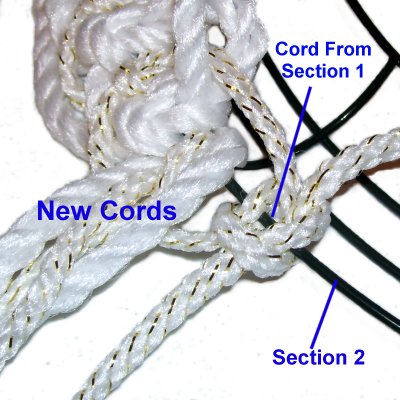
Step
11: Use one of the cords
from section
1 to tie the first knot in
section 2 (not the new cords).
The best cord to use is the one that would
ordinarily be next if you had continued in
section 1.
See
important information below:
Important:
Make sure you bring the ends under
the new cords before tying the knot loosely.
Form the picots, and then tighten.
This step is very
important because the picot will disguise
the cross bar, since itpasses over it.
Don't be tempted to skip past this step, or the
Winter Wreath design will have obvious gaps in the
knot arrangement.
Step 12:Repeat
steps 8 - 9 using the two new
cords to cover section 2.
When you reach the next cross bar, repeat
steps 10 - 11 to add new cords for
section 3. Then cover that section, as in steps 8
and 9.
Continue repeating steps
8 - 12 until the entire outer
ring for the Winter Wreath is covered.
Step 13:
Go to one section and locate the ends of one
cord. Tie them together with Barrel Knots,
making sure the knots are in the back
of the Winter Wreath frame. Do the same with
the second cord.
You can add glue if you wish. Cut the ends
off close to the knots.
You may find it easier to work in the front
of the frame, since these two rings are usually
resting at a different level than rings 1 and
4.
When working in the front,
you should make one important change:
You need to bring
the ends of the cord you will be using OVER
those of the other cord, rather than under.
Also, when you finish off the ends in step 13,
make sure the knots are in the back
of the frame (turn it over).
Step
15: Apply a small piece of wire to
the outer ring at the top, for hanging the Winter
Wreath on a wall. Decorations can also be
added anywhere on the wreath.
By
using any text or images on Free Macrame
Patterns, you are agreeing to ourTerms
of Use