Description:
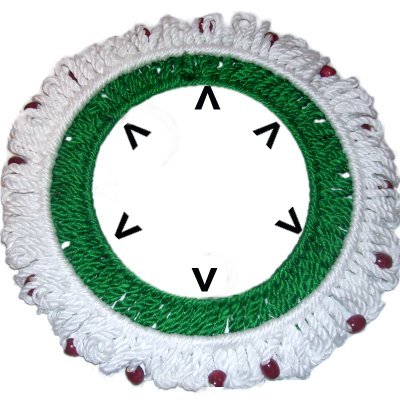
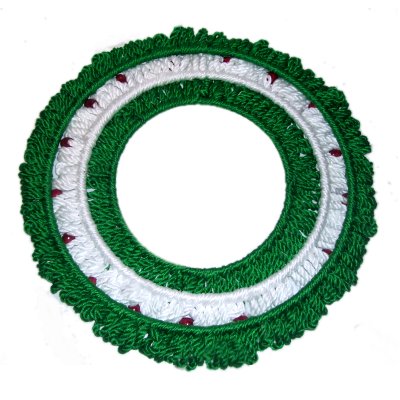
This Triple Ring Wreath features picots
made with Larks Head knots, facing one direction.
The center ring is a contrasting color. The
beads are optional.
To decorate this Macrame wreath, you can add
bells, natural items like pine cones and dried
berries, or even artificial flowers.
By using green and white and adding red beads,
this wall decoration is perfect for the winter
holidays. To make it in Autumn colors, try
Rust and Gold cord material, with ivory or black
beads.
This Macrame pattern is rated easy and is suitable
for beginners. Only two decorative knots are used
in the entire wreath design.
This decoration can be made any size, using the
formula provided for the cord lengths.
Supplies
Needed:
6mm Macrame Cord in two colors (see
preparation for amounts)
Here is the formula to determine the cords
lengths for your Triple Ring Wreath.
You need one cord
for each ring:
Multiply the diameter of the ring (in
inches)by 3.14
= Area
to be covered
Multiply the Area
to be covered by
17.5 = cord
length
Divide the cord
length by 36
to get the yards
(or meters).
Add up the cord length in yards, for all
three rings, to get the amount to purchase.
Prepare both ends of each cord with tape to
prevent unraveling.
Prepare each of the rings by applying a small
piece of tape in one area.
The first knot is placed next to the tape, which
will help prevent the knots from sliding as you
work.
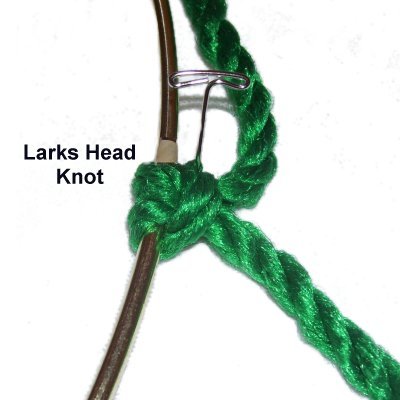
Outer Ring
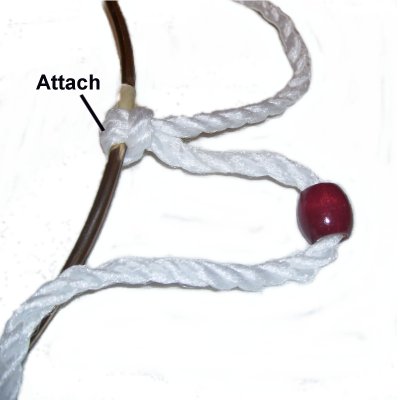
Step
1: Use the outer ring
first (largest size). Attach the
cord to it with a Larks Head knot, with
the head facing outward.
Slide the knot against the tape, and turn
the ring so the knot is vertical,
as shown.
Below
are the steps for the Larks Head knot:
Fold
the cord in half and place it under
the ring with the folded area on the outside.
Move
the ends over
the ring. Pass them under
the folded area of the cord.
Pull both ends to tighten.
Step 1,
continued: Move one half of the
cord aside, since it will be used to cover the
other half of the ring.
Roll up each end of the cord by wrapping
it around your hand several times, and then secure
it with a rubber band.
The remaining Larks Head knots for the Triple Ring
Wreath are tied in two
parts, as shown below.
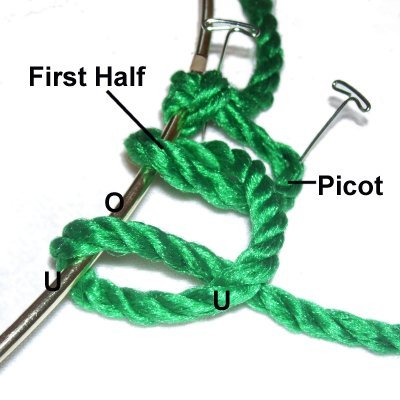
Step 2:
Form the picot by pulling the end you are
working with to the side, and secure it 2
inches from the ring.
Move the end over
- under the ring and overthe
cord, to create the first half of the next
knot.
Move
the cord under
- over the ring and under
the cord to make the second half of the
knot.
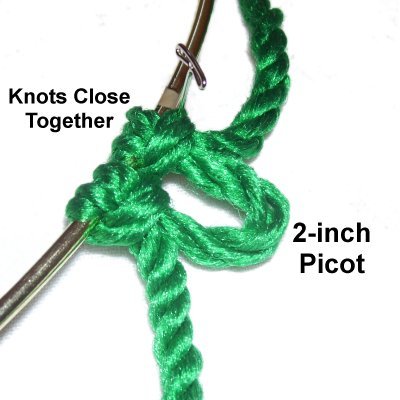
Adjust the size of the picot if needed,
and hold
it steady while you tighten the
knot.
Push
the second knot against the first. Pull on
the picot to tighten the knot firmly.
Step 3:
Repeat step 2, until the first
half of the ring is completely covered in
knots. Push the knots close together
as you progress.
Stop when you have 3
inches left (tail).
Step 3,
continued: Turn the ring around so
you have access to the second half. Use the
other end of the cord, and repeat
steps 2 and 3 to cover the rest of the
ring.
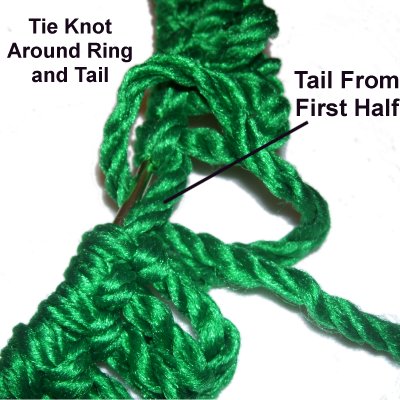
Important:Stop 2 inches before
you reach the last knot tied in the other
half.
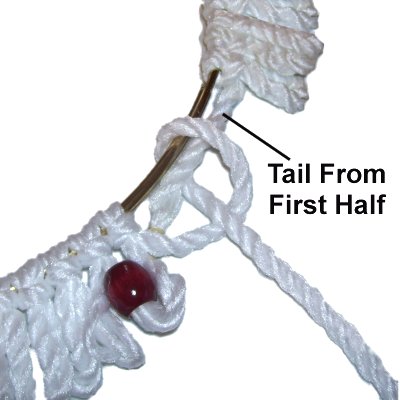
Locate the
3-inch tail from the other half of the
cord. Place it beside the ring on
the outside,
heading towards the last knot you just
tied.
The remaining knots for the second half
should be tied around the ring as well as
this tail. Tie as many as possible,
so the ring is completely covered. Do not cut off
the remaining material.
Middle Ring
Step 4: To
start the middle portion of the Triple Ring
Wreath, attach the cord to the ringas instep 1.
The beads in the following directions are optional.
Slide several
beads onto one half of the cord, if you
plan to use them. Move one bead
close to the ring.
When you roll up the cord, do so beyond
where the beads rest, so you can move them
as needed.
Repeat
step 2, creating one
picot loop.
Design
Information: The reason for
"loading' several beads onto the cord is so you
won't need to unroll the material completely,
each time you add a bead to decorate the Triple
Ring Wreath.
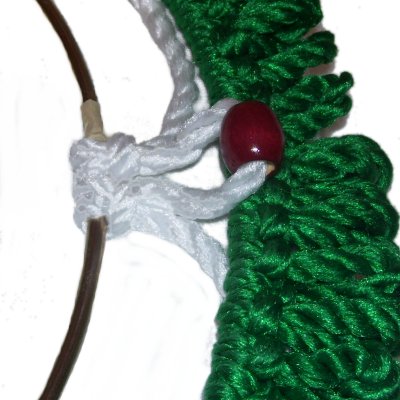
Place
the middle ring inside the large outer
ring. Measure the distance between the two
rings.
The folded
area of the picot you just made
should rest on
top of the knots covering the
outer ring.
Adjust the size of the picot if necessary.
Step
5: Tie 5 picot loops the
same size as the first, then slide the
next bead into place prior to tying the
6th picot.
Tie five more knots, then add another
bead. Continue on in this manner
until you have 3
inches of material left.
Step
6: Turn the ring around,
and repeat
step 5 to complete the second
half.
When you reach the area 2 inches from the
last knot tied in the first half, move the
tail into position and tie the remaining
knots around it as well as the ring.
Do
not cut off the remaining material.
Inner Ring
Step
7: Repeat
step 1, attaching the
cord to the inner ring (smallest
size).
Measure the distance between this ring and
the one for the middle, like you did in step
4. Adjust the size of the
picot as needed.
Repeat
steps 2 - 3, covering the rest of the
ring.
Do
not cut off the excess material.
Assembling the Wreath
Step
8: Turn over the smallest
ring so you are working in the back
of the Triple Ring Wreath.
Cut one wire, at least 5 inches
long. Spread the knots in the area
close to the looseend
of the cord, and wrap the wire around the
ring at least two times.
Make sure you wrap from back to front.
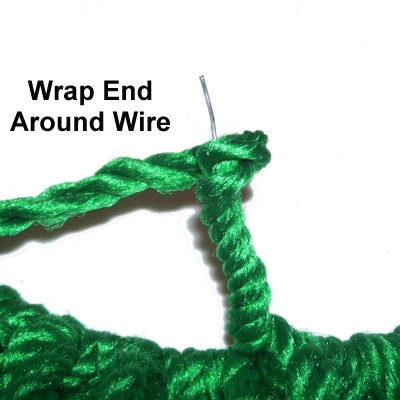
Step
9: Wrap the end of the
cord around the wire several times,
leaving the last 2 inches uncovered.
Tie a Half Hitch to secure the cord to the
wire.
Step 10:
Place the middle ring around the inner
ring, and balance it so there is equal distance
all the way around the Triple Ring Wreath.
Attach the wrapped wire to the middle
ring, being careful not to alter the ring's
position.
Make sure you are working in the back,
and wrap from back
to front.
Directly
across on the other side, attach another
wire to connect both rings.
Do the same in at least 4 other
areas.
As you work, make sure the rings remain
balanced, with the same distance between
them in all areas.
Cut 10-inch pieces of cord material, the same
color as the inner
ring (smallest). You can use the entire
cord, or individual fibers.
Wrap one cord around each wire to disguise it.
Attach each end of the cord to the rings with Half
Hitches, next to where the wires are
positioned.
Finish off the cut ends of these cords by working
them through the back of the knots in the area and
applying glue.
Step
11: Place the outer
ring around the other two, and adjust it
so the Triple Ring Wreath is balanced.
Repeat
steps 8 - 10, attaching it to the
middle ring.
Make sure you use the loose end from the middle
ring to wrap the first wire. Use the same
color to disguise the other wires.
Attach a small piece of wire at the top of the
large outer ring, to hang the Triple Ring Wreath
to your wall.
By
using any text or images on Free Macrame
Patterns, you are agreeing to ourTerms
of Use