|
|
| |
|
| |
| |
|
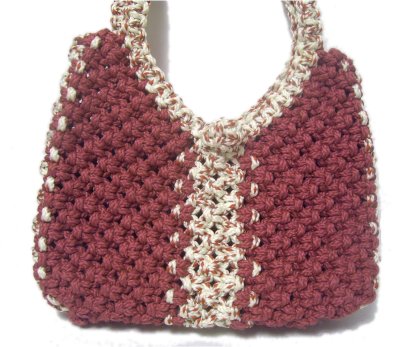
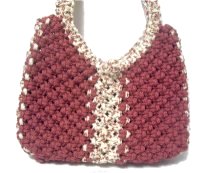
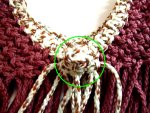
Description: The
Teardrop Purse design is a great Macrame pattern
to help you learn important skills such as
adding cords and creating symmetry.
The name comes from the fact that the straps
form a oval teardrop shape. You can make it with
one or two colors, and use either natural or
synthetic materials.
Bonnie Braid cord was used in the example shown
(polypropylene).
Color
A is the ivory flecked material, and color B is
cranberry.
This Macrame project is advanced,
so is not suitable for beginners.
The finished size is approximately 12
inches wide x 20 inches tall, which
includes the strap.
|
| |
| |
| |
|
Supplies Needed:
- 6mm cord in 2 different colors, 100 yards
of each
- Cellophane or Masking Tape
|
| |
| |
| Knots Used: |
| |
|
|
| |
|
| |
|
Note: The Square Knots in the
Teardrop Purse all have 2 fillers and 2 working
cords.
Make sure you know how to tie the knots in both directions,
or this project will be difficult for you to
complete.
Youll be cutting cords as you progress
through the pattern, rather than all at the
beginning.
|
| |
| |
|
|
The Straps
|
|
| |
- Cut 4 cords, each 6 yards long (Color A)
- Cut 4 cords, each 4 yards long (Color
A)
Put tape on the ends, for easy
identification later on, and to prevent
unraveling.
|
|
|
| |
|
Step 1: Use two 4-yard
cords and two 6-yard cords for each
strap.
For the first one, secure the center
of the 4 cords to your project board, arranged
vertically in the following arrangement.
Mentally number them as well.
|
|
|
| |
Step 2:
Tie a left Square Knot in
the center of the cords, next to
the pins.
Cords 1 and 4 are the working cords.
Secure the knot and remove the remaining pins. |
|
|
| |
|
Step 3: Tie 24 left Square
Knots with the 4 cords, as you
did in step 2.
Step 4: Turn the design
around, and go back to the center. Repeat
step 3.
Important:
You need to switch to right
SK for the second half, so the pattern
is the same.
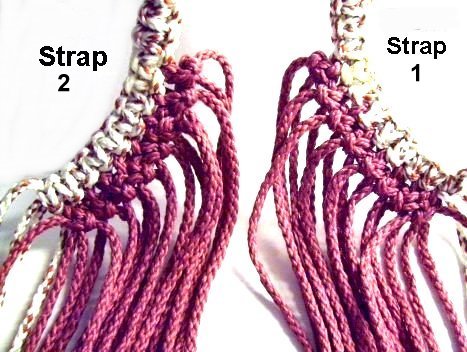
This is considered
strap 1.
|
| |
| |
Repeat
Steps 1 - 4, using the remaining cords,
to make strap
2.
Tie right SK
for the first half, and left
SK for the second half (opposite of other
strap). |
|
| |
| |
| |
| |
 |
|
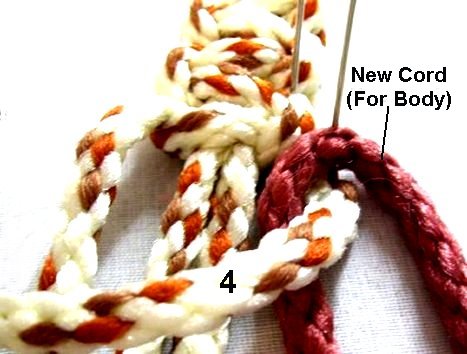
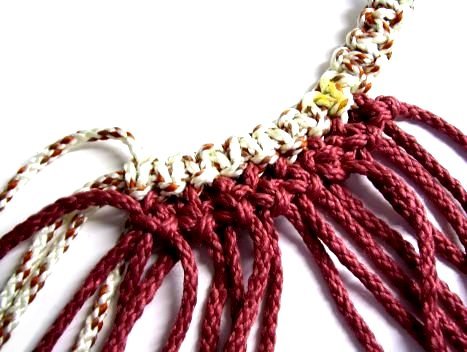
Adding Cords for Body
|
| |
| Step
5: Cut 16 cords, (color
B), each 3 yards long. Prepare the
ends with glue, a knot, or tape.
These cords will be called the body
cords, since they are used to form
the main portion of the Teardrop Purse.
You should sit facing one end of
strap 2 for these next steps.
Important:
Make sure the knot in front of you is a right
SK. Turn the strap
around if necessary.
Mentally number the cords in the strap 1 - 4,
and make sure it's face
up.
|
| |
| |
 |
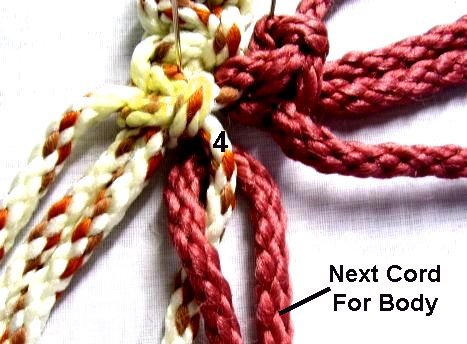
|
Add one body cord to the 4th
strap cord, which is the
working cord on the right.
To do this, center the new cord
underneath, and secure it with a pin.
|
|
| |
|
| |
|
|
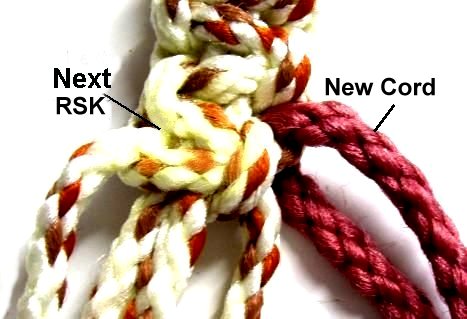
Step 6: Tie a right
SK, using only
the four
strap cords (color
A).
This will hold the new body cord in
place, since it's between the two knots.
|
|
| |
|
| |
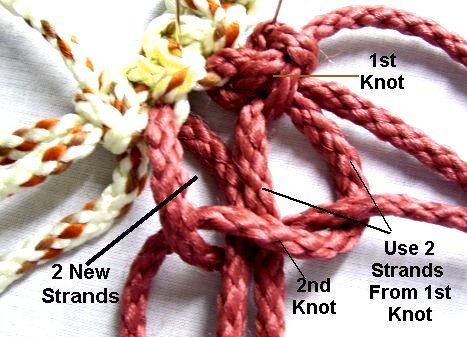
Design
Tip: Mark this knot with tape or
a pin, so you can easily find it later.
In the images, the knot was colored yellow so you
can see it better. |
| |
|
| |
 |
|
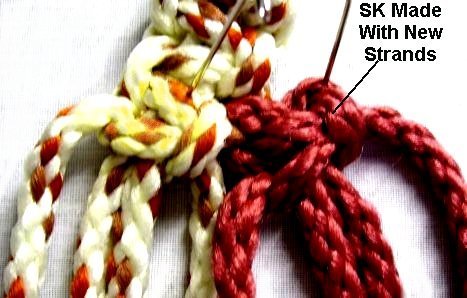
Step
7: Add a second body
cord, by folding it in half and placing it
to the right of the one
previously added. Secure it with a
pin. |
|
| |
|
| |
 |
|
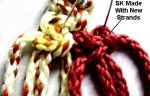
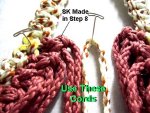
Step 8: Tie a right
SK, combining both halves of
the new cord with those from the first
body cord you added (Color
B only). This knot will
rest beside the strap.
|
|
| |
|
|
| Important: Pull on
the filler cords
to remove any slack above the knot. |
|
|
| |
 |
|
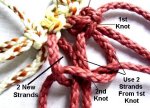
Step 9: Add the
3rd body
cord to strap cord 4,
coming from the last SK you tied in step
6. Center it, and secure it with a
pin.
Tie a right SK,
using only the four strap
cords.
|
|
| |
|
| |
 |
|
Step 10: Tie a right
SK using both halves of the new
cord, along with two of the body
cords next to it, which are from the
knot you made in step 8.
|
|
| |
|
|
Here's
a review of steps for adding the remaining body
cords to the straps of the Teardrop Purse:
Attach each body
cord onto cord
4 of the previous knot tied in the strap.
Then you tie another knot in the strap
to hold it in place.
Next, you combine the two halves of the new body
cord with
two next to them (same color).
|
|
|
| |
 |
|
Step 11: Repeat
steps 9 and 10, adding
5 more body
cords (total of 8).
|
|
| |
|
| |
|
The following steps mimic the ones you
just completed, but left
SK are tied.
Step 12: You will now use strap
1 of the Teardrop Purse. Verify that the
knot in front of you is a left SK.
Mentally number the cords 1 - 4.
|
|
| |
|
Step 13: Add one body
cord to strap
cord 1, which is furthest to the left.
Center the new cord underneath it, and secure
it with a pin.
Tie a left
SK, using only the strap
cords. Mark this knot in
some way, so you can find it easily.
Step 14: Add another body
cord, by folding it in half, securing it to the
left of
the one added in the previous step.
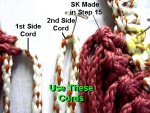
Step 15: Tie a left
SK, using both halves of this new cord
combined with the previous body
cord added in step
13. Pull on the filler cords to
remove any slack.
Step 16: Add a another
body
cord to strap
cord 1,
which comes from the SK tied previously
(step 13).
Center it, and secure it with a pin. Tie a SK
with the strap
cords to hold it in place.
Tie a SK using the new body
cord just added, along with 2 of the adjacent
cords (color
B), which are from the previous knot
tied in step 15.
|
| |
|
| |
|
|
Step
17:
Repeat step 16 to add
the remaining body cords (total of 8).
When finished, half the
cords for the body will have been added to
the straps of the Teardrop Purse. |
|
| |
| |
Step
18: Repeat steps 5 - 17, to add 8 more body
cords to the other end of both straps
(total of 16 on each strap).
Important:
Make
sure you reverse
the direction of the knots.
The cords should be on the same
side as the first half (both
straps). Details
are below:
Strap 2 will
now have body cords added onto cord
1, tied
with left
SK.
Use
the directions for steps
12 - 17.
For strap
1, the body cords are added to cord 4 in
the strap, with right
SK.
Follow the directions for steps
5 - 11.
|
|
|
|
|
|
Side of Handbag (Gusset)
|
| |
| |
|
Step 19:
To begin the first side of the
Teardrop Purse, re-secure the design. The straps
should be resting vertically,
approximately 2 inches apart.
(See image above)
Strap
2 should be on the left,
with the body
cords having right
SK.
- Cut 2 cords of color
A, each 90 inches long (2.5 yards)
These cords are referred to as side
cords in the instructions
below.
Tie an Overhand
knot at the tips, to make it easy to
identify them later on.
|
| |
|
| |
 |
|
Fold 1 side cord in half, and secure it
between the two strap
designs.
It should line up with the right
SK you tied in step
8
(first
body cord added).
|
|
| |
|
|
Step 19,
continued: Tie a left
SK with the 2 halves of the side cord,
along with the 2
body
cords to the LEFT
of it.
This new knot will be made up of both
colors, and will face the opposite
direction of the body cords. This will form
the striped pattern for the gusset.
Pull down on the fillers
to remove the slack and the loops above the knot. |
|
|
| |
 |
|
Step 20: Fold
the other side
cord in half, and secure it to
right
of the first side cord, close to the body
cords on the right.
Tie a right
SK with the two halves combined
with the first two body cords coming
from the right strap.
|
|
| |
|
| |
 |
|
Step
21: Using both body and
side cords, tie 6
rows of Alternating Square Knots
(ASK) as described below: |
|
| |
| |
|
In each new row you will add two additional
body cords
that are attached to the straps.
This will cause the side section of the
Teardrop Purse to widen, since you are tying
more knots as you progress.
Remember that Alternating Square Knots are made
by using 2 cords coming from two adjacent
knots in the previous row.
The knots made with Color A will
form a stripe. They are all tied with Left
SK.
The mixed
color knots will face the opposite
from those made by the color
B cords.
Below is specific information as to the
direction of the knots, but you should double
check the direction as you progress.
RSK = Right
Square knots
LSK = Left
Square knots
Mix = Both
colors
Important:
The numbers below indicate how many
knots are tied in
the row.
So for row 3, there are a total of 5 knots in
the entire row. Make sure you only tie one
knot with each set of four cords.
|
|
|
| |
Row 1:
RSK x 1 (color
B) -- LSK x 1 (color
A) -- LSK x 1 (color
B)
Row 2:
RSK x 1 (color B) -- LSK x 1 (mix) -- RSK x
1 (mix) -- LSK x 1 (color B)
Row 3:
RSK x 2 (color B) -- LSK (color A) -- LSK x 2
(color B)
Row 4:
RSK x 2 (color B) -- LSK x 1 (mix) -- RSK x 1
(mix) -- LSK x 2 (color B)
Row 5:
RSK x 3 (color B) -- LSK x 1 (color A) -- LSK x 3
(color B)
Row 6:
RSK x 3 (color B) -- LSK x 1 (mix) -- RSK x 1
(mix) -- LSK x 3 (color B)
|
| |
|
| |
|
Step 22: Repeat
steps 19 - 21 to create the second side
panel, at the other end of the
straps.
|
| |
| |
|
|
Body of
Teardrop Purse
|
| |
| |
|
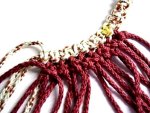
Step 23: Fold the
design at
the side panels so the straps are at
the top of your work surface, directly in front
of you.
The loose ends should be heading vertically
(downward). The side designs you just made
should be to the right and left. One strap will
be lying on
top of the other.
In other words, the cords should be organized
to look like the general shape of the
Teardrop Purse. (see image below)
Bring the remaining portion of the strap cords towards
each other at the center,
forming a teardrop shaped design.
These cords should all be color
A, and there is tape on the ends of
them.
|
| |
|
| |
 |
|
The 8 cords
for the front half (on top) should be from
the same
strap.
Ignore the 8 cords for the back half
(bottom) for now. |
|
| |
|
| |
 |
|
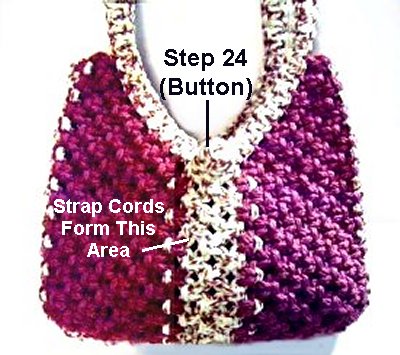
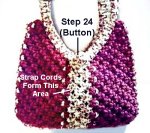
Step 24:
Mentally number the 8 strap cords.
You will now make a SK button for the
front of the Teardrop Purse. Skip past step
24 if you do not want
this decoration, and use the instructions
for
step
25 instead.
|
|
| |
|
|
Step 24: Use
cords 3 - 6 to tie one Square Knot. Move
down ¼-inch and tie a short sennit of 4 Square
Knots.
Pass the ends through the space, from front to
back, to form the Button.
Tie a Left
SK with cords 1 - 4, and a Right
SK with cords 5 - 8, just below it. |
|
|
| |
Step
25: Flip the Teardrop Purse upside down
to work on the back
half.
Mentally number the strap cords in
the center 1 - 8.
Tie a tight
left
SK with cords 3 - 6.
Just below, tie a Left
SK with cords 1 - 4, and a Right
SK with cords 5 - 8. |
|
|
| |
|
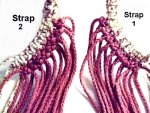
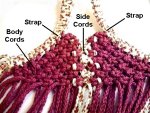
Step 26: Organize all
the cords into 2 groups, the front and the
back. This is easier if you can hang the
purse by the straps, so the cords dangle
freely.
Make sure the sides of the Teardrop Purse are
to the right and left. The
knots you tied in steps
24 and 25 are in the center
of the design.
Step 27: Tie one row of
Alternating Square Knots, in the front
section. Tie left
Square Knots to the left of the center, and right
Square Knots on the right. They should
match the ones nearby.
The knot in the center,
which lines up with the button knot, should be a
left
Square Knot.
Repeat step 27
to start the back
section of the Teardrop Purse.
|
|
|
| |
|
Step 28: Join the front and
back of the Teardrop Purse by tying ASK with the
color
A side cords,
on both the left and right areas of the
design.
Important:
The direction of the knots should match those in
the gusset.
|
|
|
| |
|
Step 29: Continue to
make the Alternating SK pattern, moving
around both halves of the Teardrop purse. You
should have enough material to tie a total of 16
to 18 rows.
When you get to the sides,
the direction of the SK should match those in
the area. Just look at the knots above
where you are working to see the pattern.
Step 30:
You need at
least 12 inches to finish the Teardrop
Purse, so measure the shortest
cords if you decide to make additional rows.
|
|
|
| |
|
Step 31: The last row
will be a little different from the others:
Drop the 4
color
B cords that are closest to the side
cords (color A), at both sides of the
purse (total of 8).
Drop the same cords on the
back half as well. Just push them to the inside
of the purse and
don't use them for the next row.
Tie a final row of Alternating Square Knots
with the remaining cords.
|
| |
|
|
| |
Finishing Touches
|
| |
| |
|
Step 32: To close the
bottom, turn the Teardrop Purse inside
out, and hold it between
your knees.
Tie tight Overhand Knots using sets of 2
cords. Make sure you select one cord from
the back and the front to tie one
knot. Apply glue prior to
tightening, so it's on the inside
of these knots.
To make sure you use all the
cords (including the ones you dropped), trim
each cord to 2 inches after each knot is tied.
|
| |
|
| |
Step
33: When the glue is dry,
trim all the cords more, to 1-inch in length, and
unravel them completely. This makes a fluffy
fringe on the inside
of the Teardrop Purse.
Turn the handbag right side out, and its ready to
use. |
| |
| |
|
|
|
| By using any
text or images on Free Macrame Patterns, you are
agreeing to our Terms of Use |
|
|
|
| Have
questions about the Teardrop Purse? Contact
Me. |
|
|
| |
|
| |
| |