Description:
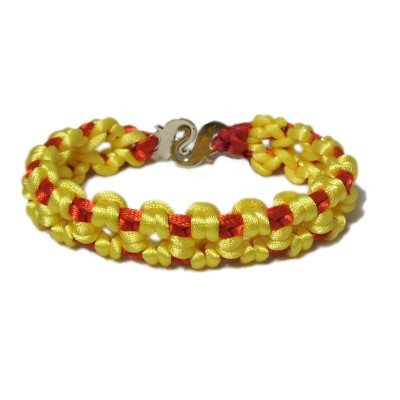
The Sun Bracelet features a unique
combination knot called the Aztec Sun Bar.
Part of the design is made with the Vertical Larks
Head knot, which gives each tiny "sun" it's
rounded shape. You also use Half Hitches to
make extra loops.
To truly make this Micro-Macrame bracelet sunny
and bright, use either orange or yellow as the
primary color. The holding cords should be
red.
Any type of clasp can be used. Keep in mind
that it needs to be large enough for two cords to
pass through it.
Satin material was used to make the bracelet
shown. Make sure you do not push pins
through this material if you plan to use it.
Lean the pins over the cords, or use the Cross
Pin technique.
Supplies
Needed:
2mm cord material (one or two colors)
2-part jewelry clasp
Project board, pins
Glue that dries clear (and does not darken
the fabric)
Preparation:
Cut two holding cords and one working cord using
the information below.
To make the Sun Bracelet in sizes different than
those listed above, multiply
the finished size by 13 to determine the
length of the working
cord.
Finished
Size
Working
cord x 1
Holding
Cords x 2
6
inches
80 inches
1
yard
7
inches
90 inches
1 yard
8 inches
3 yards
1 yard
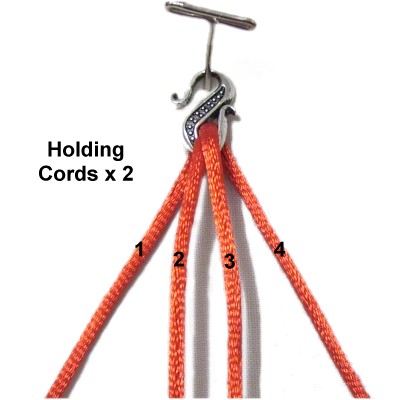
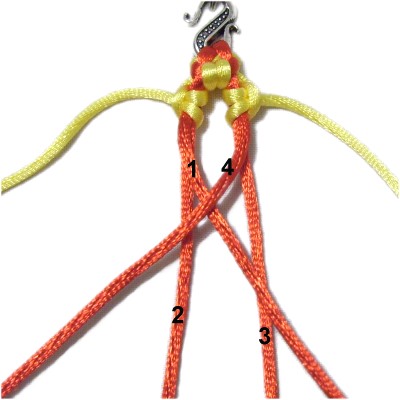
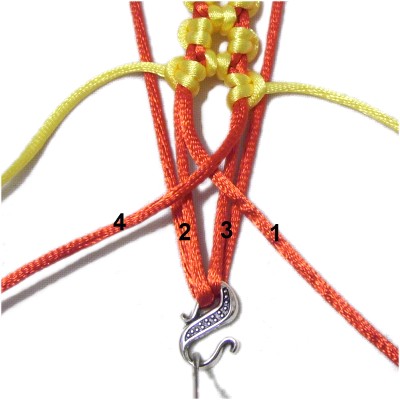
Step
1: Pass both holding
cords through the opening in the
clasp.
Match the ends to balance each half.
Mentally label the four segments as shown.
Place a small piece of tape on segments
1 and 4, so you can locate them
easily.
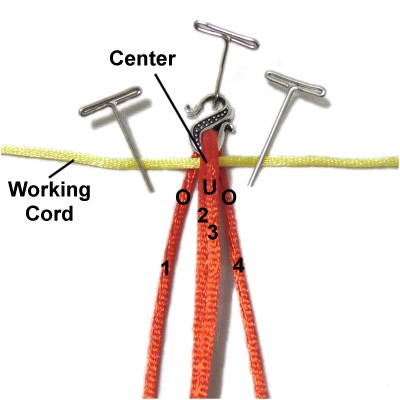
Place the center of the working
cord next to the clasp, and
arrange it horizontally. It should rest under
holding cord segments 2 and 3, and over
segments 1 and 4.
Cross holding
cord segments
1 and 4 right over left, resting
on top
of segments 2 and 3.
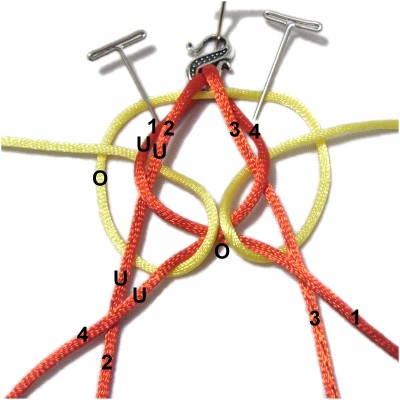
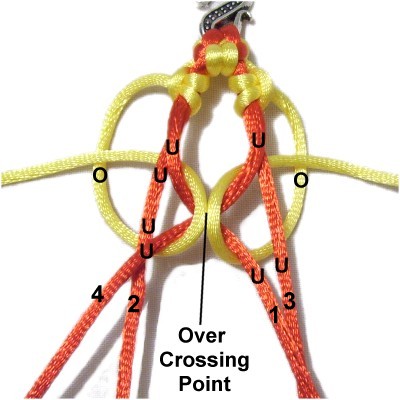
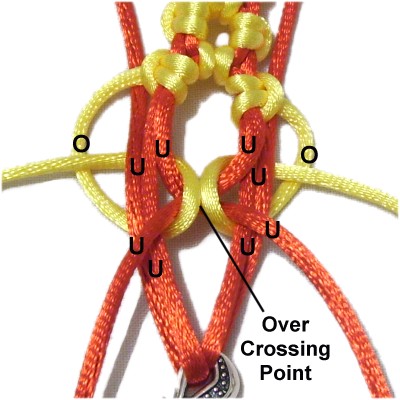
Step
2: Move the right
half of the working
cordunder
holding cord segments 3 and 1. Bring
it over
the crossing point of 1 and 4.
Move it to the right, passing under
segments 3 and 4. Bring it over
the working cord to complete the Half
Hitch.
Designer's
Tip: Each time you make the Half
Hitches for the Sun Bracelet, just remember that
the working cord passes over
the holding cords only at the crossing
point.
It passes under
all the other areas of the holding cords.
Move the left
half of the working cord under
holding cord segments 2 and 4. Bring
it over
the crossing point.
Move it left, passing under
segments 1 and 2. Bring it over
the working cord to complete the Half
Hitch.
Tighten the
loops by first pulling on holding cord
segments 1 and 4. Then tighten the
two Half Hitches.
Mentally re-number segments 1 and 4, and
make sure segments 2 and 3 are between
them.
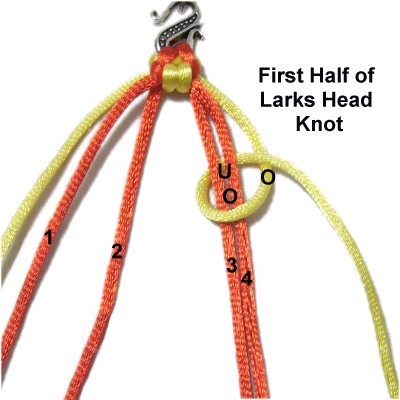
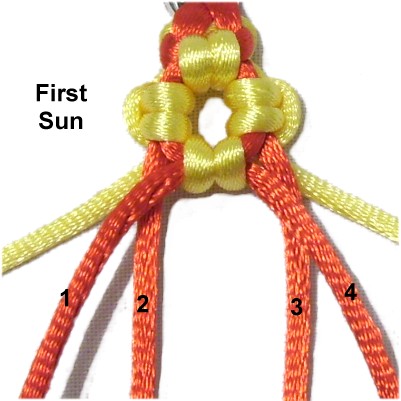
Step
3: Use the righthalf
of the working
cord to make the first half of a
vertical Larks Head knot:
Pass the working cord over
- under segments 3 and 4 of the
holding cord, rotating clockwise.
As you pull it right, pass over
the working
cord. Tighten firmly.
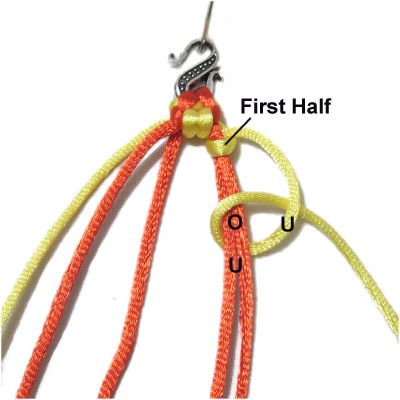
For the second
half of the knot, pass the working cord under
- over the holding cords.
As you pull it right, pass under
the working
cord.
Tighten firmly.
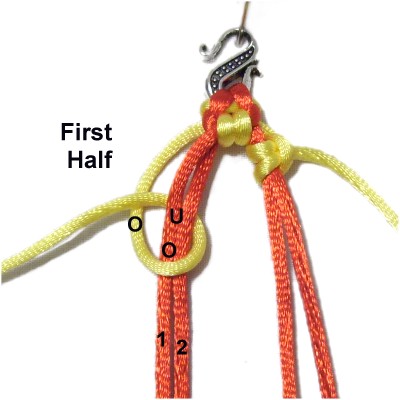
Step
4: Use
the lefthalf
of the working
cord to make another vertical
Larks Head knot:
Pass the working cord over
- under segments 1 and 2 of the
holding cord, rotating counter-clockwise.
As you pull it left, pass over
the working
cord. Tighten firmly.
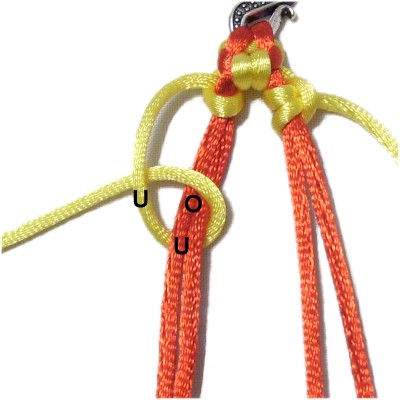
For the second
half of the knot, pass the working cord under
- over the holding cords.
As you pull it left, pass under
the working
cord.
Tighten firmly.
Step
5:
Cross holding cord segments
1 and 4 right over left, resting
on top of segments 2 and 3.
Repeat step 2
to make the next pair of Half Hitches with
the working cord.
Remember that the working cord passes over
the holding cords only at the crossing
point. It passes under
the remaining segments.
Pull on
holding cord segments 1 and 4. Then
tighten the Half Hitches.
Mentally re-number segments 1 and 4, and
make sure segments 2 and 3 are between
them.
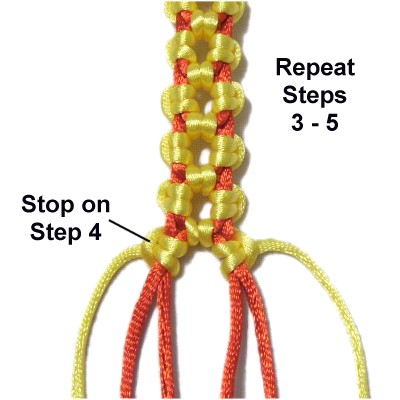
Step
6:Repeat
steps 3 - 5 several times, until
the Sun Bracelet is the size you planned
to make.
Stop on
Step 4(left
Larks Head knot).
Designer's
Tip: The following information
shows you one way to attach the other half of the
clasp.
There are other ways to accomplish this step,
depending on the type of clasp you are
using. You may need to experiment to figure
out which method works best for your project.
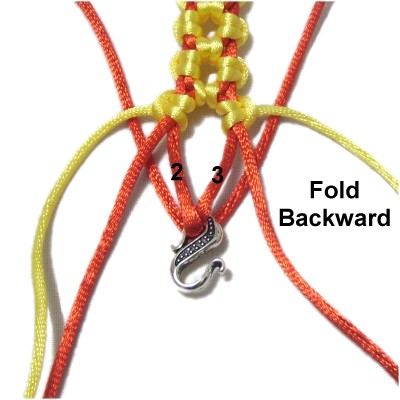
Step
7: Pass holding cord segments
2 and 3 through the other part of
the clasp.
Fold them backward towards the knotted
portion of the Sun Bracelet. Make
sure you leave room between the clasp and
the Larks Head knots.
Cross holding
cord segments 1 and 4 right over left,
resting on top of segments 2 and 3.
Repeat
step 2 to make the two Half
Hitches with the working cord.
The only change is that you need to go
around both
parts of segments 2 and 3, since
you folded them.
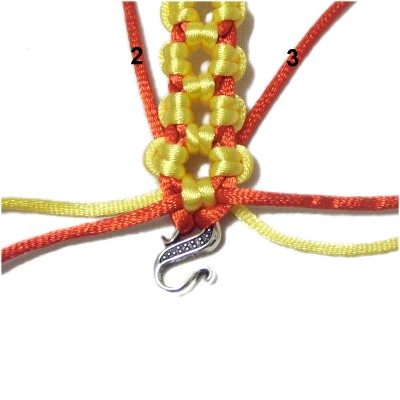
Step
8: Start the finishing
process for the Sun Bracelet by pulling on
holding cord segments 2 and 3. This
will move the clasp close to the last
"sun".
Move the other cords to the BACK of the
design and slide them under at least 1
loop to hold them in place. Apply glue to
secure them. When it's dry, cut off the
excess material.
By using any
text or images on Free Macrame Patterns, you are
agreeing to ourTerms of Use