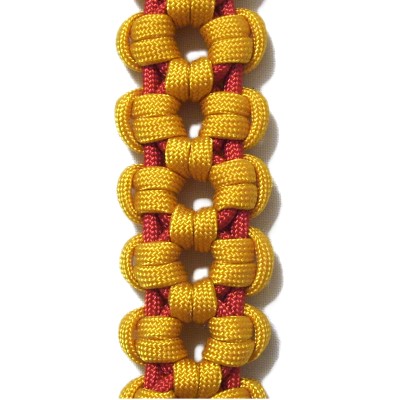
Description: The Aztec
Sun Bar is made by combining the Vertical
Larks Head with extra
loops.
It's an excellent design for Macrame
bracelets, key rings and belts. You
could also use it for the long posts in
a Macrame Plant Hanger or Table.
Paracord was used in the example
shown. It requires special
treatment, so please read Cord
Preparation if you plan
to use this material.
The Sun
Bracelet has been updated,
so it's now made like the instructions on
this page.
Click on the image or link if you wish to
make this easy Micro-Macrame project after
you practice.
Preparation and Mounting
To practice,
cut 2 holding cords at least 18 inches long.
Cut one working cord at least 60 inches long.
Prepare the tips of the cords in the most suitable
method for the material you are using.
When using the Aztec Sun Bar in a Macrame project,
the working
cord should be at least 13
x the finished size you want to
make.
The holding
cords should be at least 3
x the finished size.
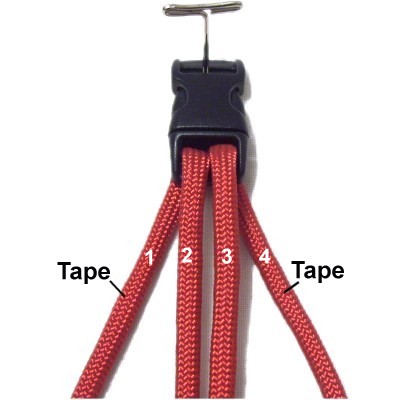
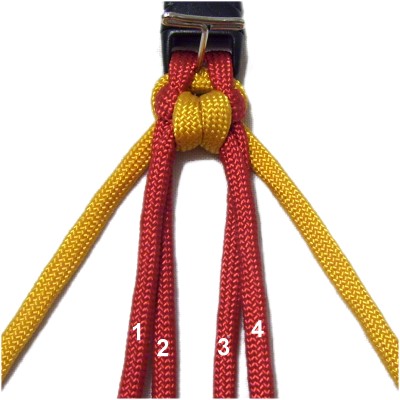
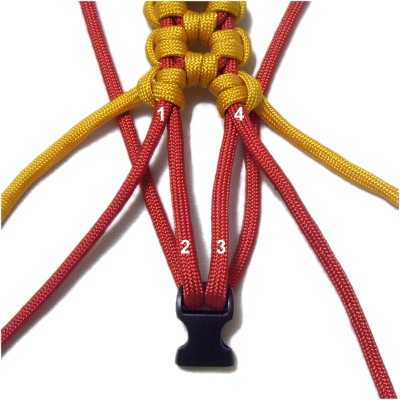
Step 1: Fold the holding
cords in half and slide them
through the opening in a clip. This
is optional
if you are just practicing.
Match the ends to balance the cords.
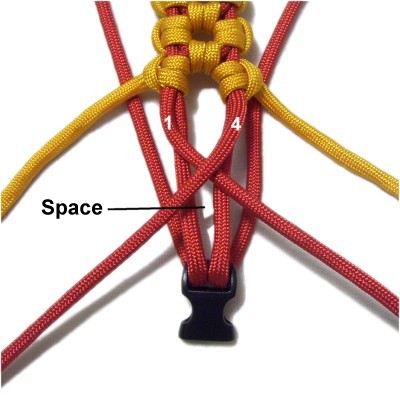
Mentally number the four segments as
shown. Place a piece of tape onto
segments 1 and 4 to mark them.
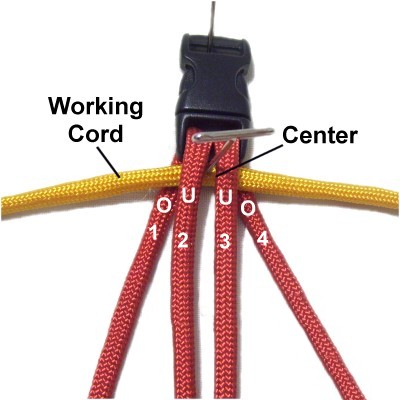
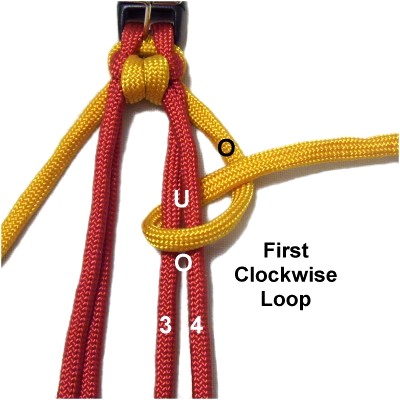
Arrange the working
cordover
segments 1 and 4 and under
segments 2 and 3.
Balance the cord and secure it at the
center.
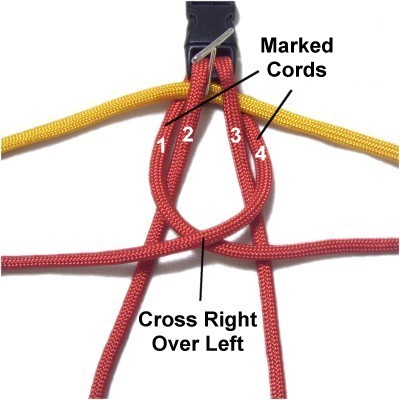
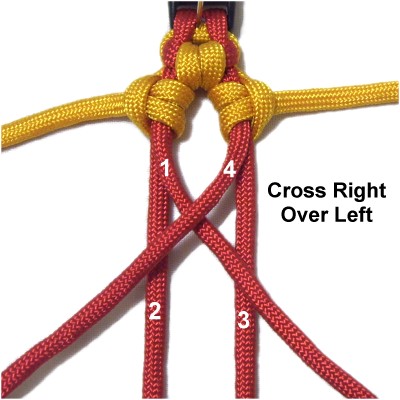
Cross marked segments
1 and 4right over left, resting
on top of the other half of the holding
cords.
These are the only two segments you will
cross as you make the Aztec Sun Bar, which
is why you marked them.
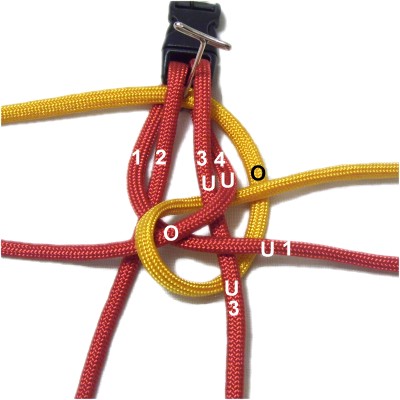
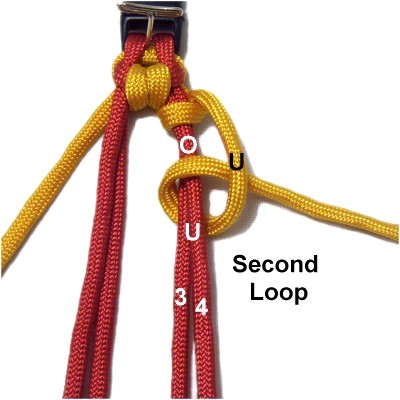
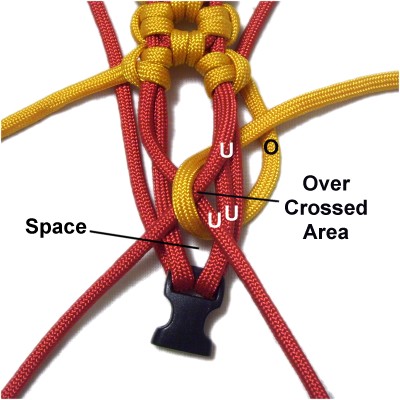
Step
2: Move the right
half of the working cord under
segments 1 and 3 (on the right),
then bring it over
the crossed area of the holding cords.
Move it under
segments 3 and 4 heading right. Pass over
the working cord to complete the loop.
Designer's
Tip: Whenever you make this portion
of the Aztec Sun Bar, there is only one place
where the working cord passes OVER the holding
cords -- at the crossing point of segments 1 and 4
in the center of the design.
Make sure you pass it under
the other portions of the holding cords.
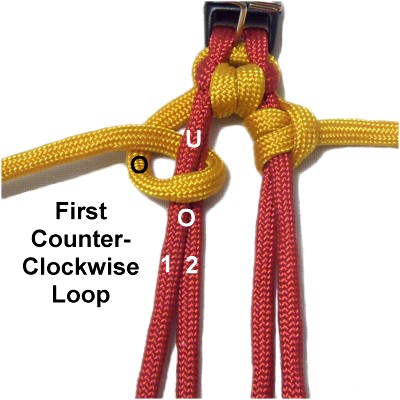
Move the left
half of the working cord under
segments 4 and 2 (on the left), then over
the crossed area of cords 1 and 4.
Move it under
segments 1 and 2 heading left.
Pass it over
the working cord to complete the loop.
Pull segments 1
and 4 first, then tighten the loops made
with the working cord.
Arrange the holding cords so that segments
1 and 4 are on the outside,
with 2 and 3 between them.
Mentally re-number the cords.
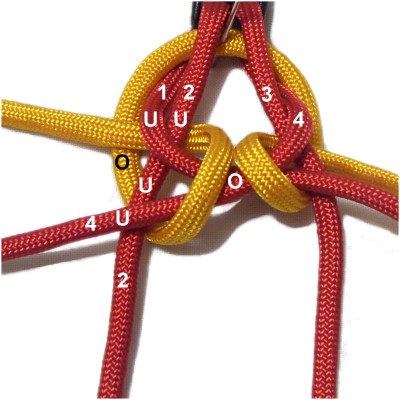
Aztec Sun Bar Design
Step 3: Start a Larks
Head knot by making a clockwise
loop with the right
half of the working cord,passing over
- under segments 3 and 4.
As you pull it right, pass over
the working cord to complete the
loop. Tighten firmly.
Complete the
Larks Head knot by making a second loop,
passing the working cord under
- oversegments 3 and 4.
As you pull it right, pass under
the working cord to complete the
loop. Tighten firmly.
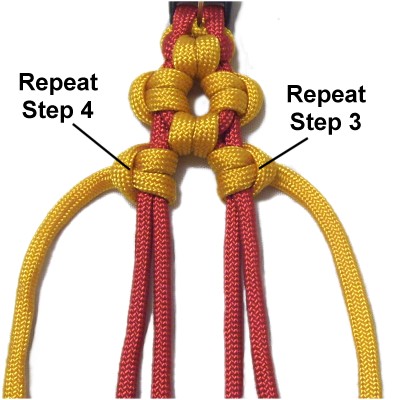
Step 4:
Start another Larks Head knot by making a
counter-clockwise
loop with the left
half of the working cord,passing over
- under segments 1 and 2.
As you pull it left, pass over
the working cord to complete the
loop. Tighten firmly.
Complete the Larks Head knot by making
the second loop, passing the working
cord under
- oversegments 1 and 2.
As you pull it left, pass under
the working cord to complete the
loop. Tighten firmly.
Cross segments 1 and
4 right over left.
Segments 2 and 3 should remain straight.
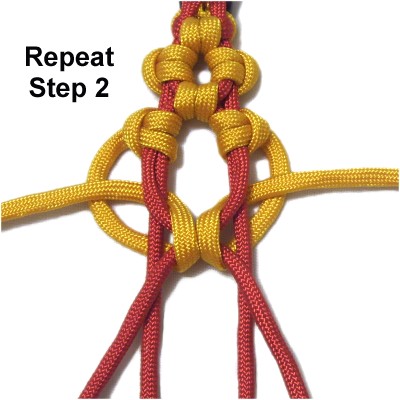
Step 5: Repeat
step 2, making theright
loopwith the
working cord.
Remember the only place the working
cord passes over the holding cords is in
the center where cords 1 and 4 are
crossed.
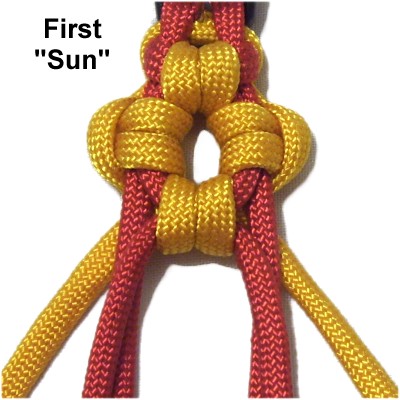
Step
5, continued: Make the left
loop with the working cord.
To complete
the first "sun", pull segments 1 and 4,
then tighten the loops made with the
working cord.
Arrange the holding cords so that segments
1 and 4 are on the outside,
with 2 and 3 between them.
Mentally re-number the cords.
Step
6:Repeat
steps 3 - 4, tying the next
pair of Larks Head Knots.
Repeat
step 2, making the two loops with
the working cord.
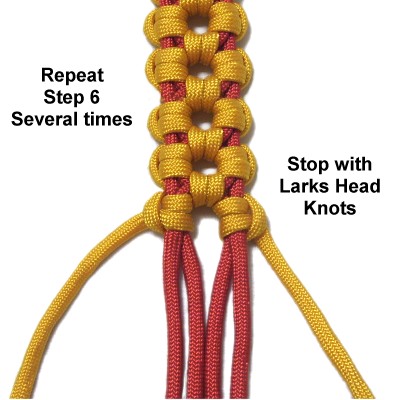
Step
7:Repeat
step 6 several times, until the
Aztec Sun Bar is the size you need.
Stop with the Larks Head knots, since you
need to add the clip before you make the
last two loops (next step).
Finishing the Bar
Step
8: Pass segments
2 and 3 through the opening in
the other half of the clip. Bend
them back towards the knotted area.
Make sure the clip is in the correct
position (not upside down).
Cross segments 1
and 4 as you did in the other areas of the
Aztec Sun Bar.
Make sure there is space between the clip
and the crossed area. The working
cords will pass through this space in the
next step.
Step
9: Move the right
half of the working cord through
the space, passing undersegment
1 and both
parts of segment 3.
Bring it over
the crossed area, then under
the 3 holding cords heading right.
Pass over
the working cord to complete the loop.
Move the left
half of the working cord through
the space, passing under
segment 4 and both
parts of segment 2.
Bring it over
the crossed area, then under
the 3 holding cords heading left.
Pass over
the working cord to complete the loop.
Pull segments 1
and 4 and tighten the two loops.
Pull on segments 2 and 3 to bring the clip
close to the end of the bar.
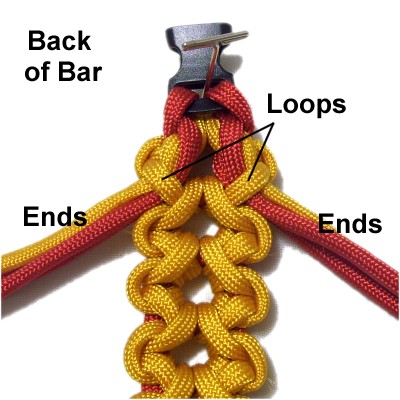
Slide the ENDS of the cords under loops is
the BACK of the bar, then finish them off
in the manner most appropriate for the
material you are using.
By
using any text or images on Free Macrame
Patterns, you are agreeing to ourTerms
of Use