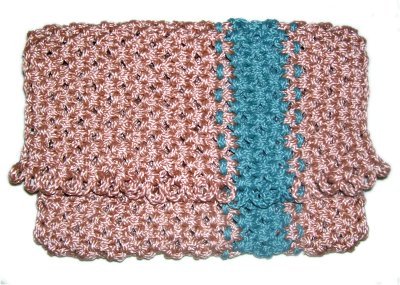
Description:
This Striped Clutch features picots along
the edge of the flap. By using a second color, and
shifting between left and right Square Knots, a
symmetrical stripe is formed.
This is an easy Macrame pattern, suitable for a
beginner's project. You should have some
experience tying both right and left Square Knots,
but they are both described as part of these
instructions.
The finished size for this clutch purse is 9
inches wide and 6.5 inches top to bottom
(folded). You can easily make it wider by
adding more cords.
In the example shown, color
A is light brown and color
B is turquoise.
To make the Striped Clutch wider than 9 inches,
cut additional cords in sets of two, so you have
an even number.
Cut 4 color
B cords, each 4 yards long.
Left Square Knot Picots
Step 1:
Fold two color
A cords in half and secure them at the
center. The following images show you how to
tie a Left
Square Knot to form the picots at the
edge of the flap.
You can used these instructions to form all the left SK as
you create the body of the Striped Clutch.
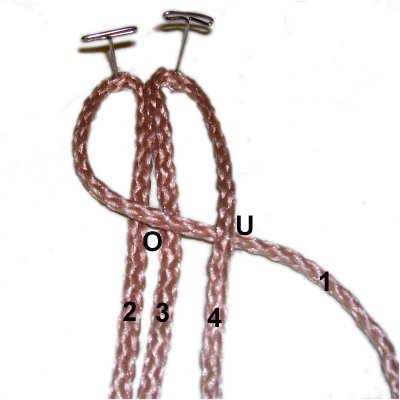
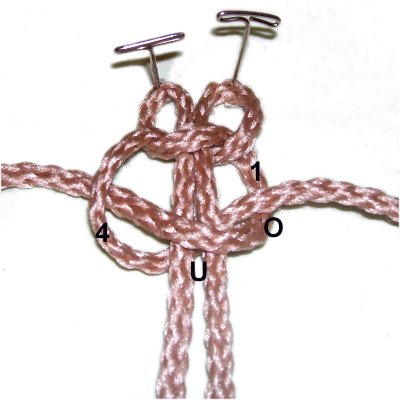
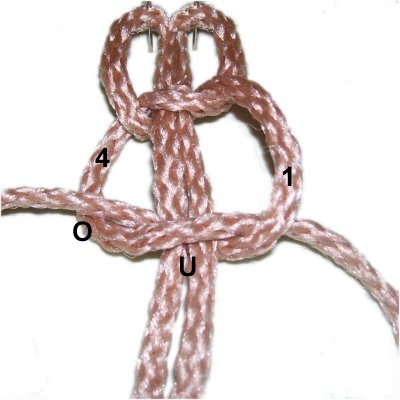
Mentally number the 4 segments, as if they were 4
separate cords.
<<
For a left SK you always begin by
moving cord
1 to the right,
over
cords 2 - 3 and under
cord 4.
Move cord 4 to the left,
under cords 2 - 3, and over cord 1.
>>
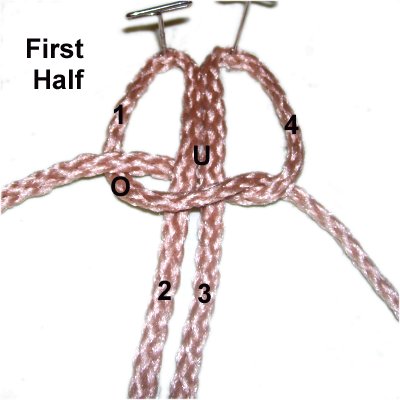
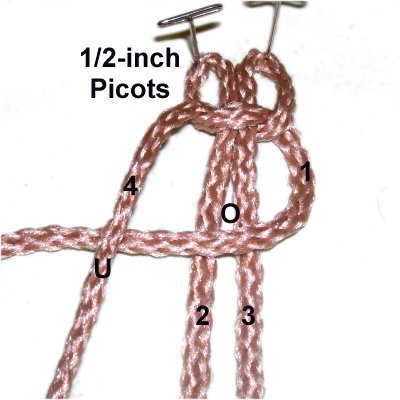
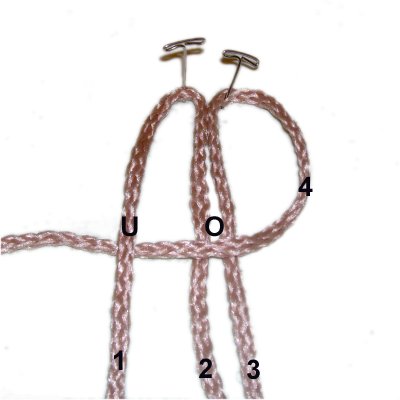
Adjust the first half of the knot so it rests
1/2-inch below the fold (1/2-inch picots).
Cords 1 and 4 have switched places, so the
direction is now changed for the second half of
the SK.
<<
Move cord 1 to the left,
over
cords 2 - 3 and under
cord 4.
Move cord 4 to the right,
under
cords 2 - 3, and over
cord 1. >>
Step 2: Repeat
step 1 two more times, so you have a
total of 3 picot loop designs (color A).
Step 3: Repeat
step 1 with two color B cords,
creating one picot loop design.
Right Square Knot Picots
Step 4: The
following instructions are for the right
Square Knot picot designs. Make at
least 7
picots withcolor
A. You can create more in this
color if you want the Striped Clutch to be wider
than 9 inches.
Make one right picot design with color
B.
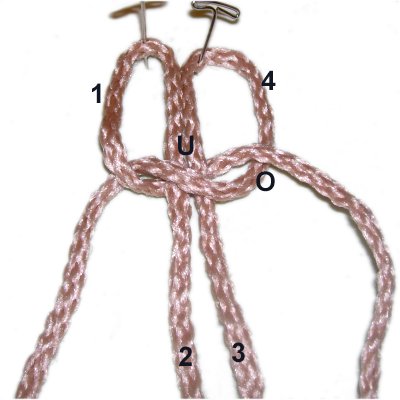
<<
For right SK, you always start by moving cord
4 to the left,
over
cords 2 - 3 and under
cord 1.
Move cord 1 to the right,
under
cords 2 - 3, and over
cord 4. >>
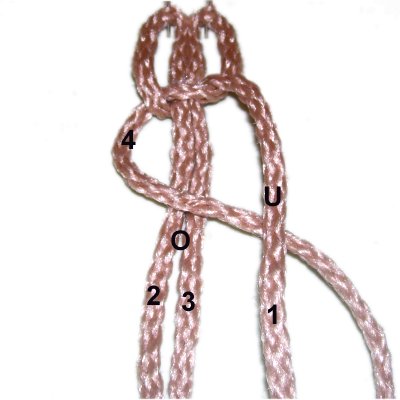
For the second
half, move cord 4 to the right,
over
cords 2 - 3 and under
cord 1.
Move cord 1 to the left,
under cords 2 - 3, and over cord 4.
>>
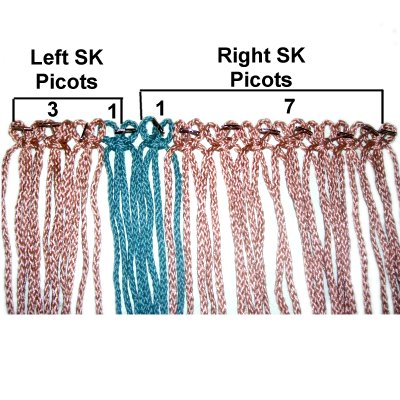
Step 5:
Arrange all the picot designs on your board as
follows:
Threecolor
A LEFT picots (steps 1 - 2),
followed by onecolor
B Left picot design (step 3).
Onecolor
B RIGHT picot (step 4), followed
by the seven
picot designs made with color
A.
Any extra picot designs you made are
placed to the right of the others.
Body of Purse
The Striped Clutch is made with rows of
Alternating Square Knots (ASK). You should
know how to alternate cords before starting, so
practice if you are unfamiliar with how ASK
patterns work.
You should start on the left for each row, so the
instructions make sense. Mentally number the
cords 1 - 48.
Pay close attention to the direction of the SK
(right or left), since the stripe made with color
B is dependent on the direction changes.
Left SK:
First working cord moved will be on the left.
Right SK:
The working cord on the right is moved first.
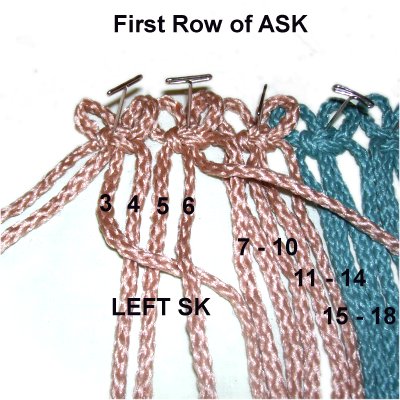
Step
6: The first row is tied starting
with cord 3, in groups of four.
The first four knots are left
SK made with cords:
3 - 6 (color A)
7 - 10 (color A)
11 - 14 (color A and B combined)
15 - 18 (color B)
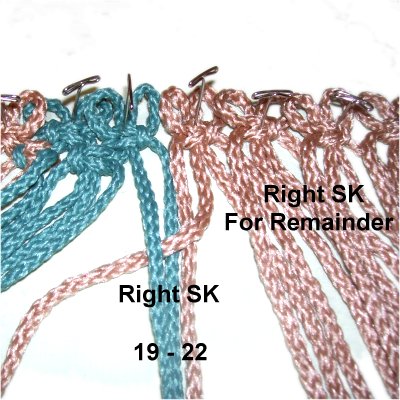
Step
7: You switch to a right
SK when you use cords 19 - 22,
which is color A and B combined.
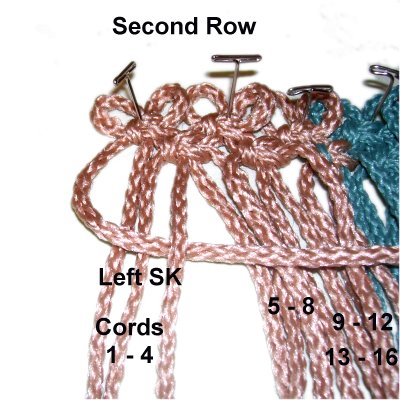
Step
8: The second row begins
with the four left SK, tied with cords:
1 - 4 (color A)
5 - 8 (color A)
9 - 12 (color A)
13 - 16 (color B)
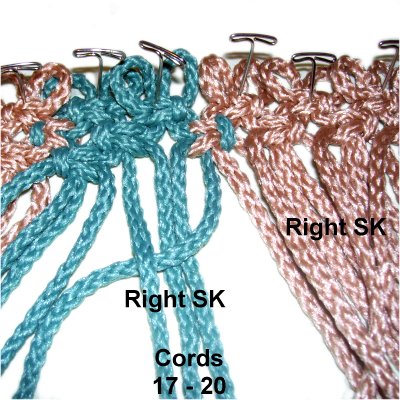
Step
9: Tie the first right SK
with cords 17 - 20, which is color
B.
The remaining knots are tied with the
following cords: 21 - 24, 25 - 28, 29, 32,
33 - 36, 37 - 40, 41 - 44, and 45 - 48.
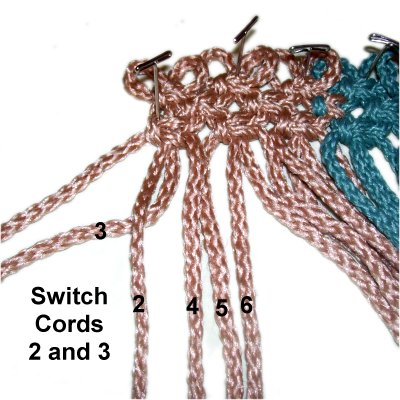
Step
10:Repeat
Step 6, but before you do so, switch
cords 2 and 3.
So the first left SK is tied with cords 2,
4, 5, 6.
Cord 2 needs to be used as a working cord
one time, and this is the best place to do
it.
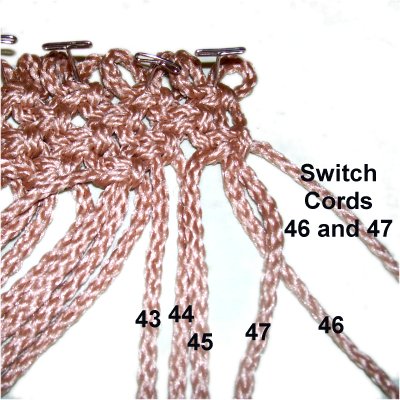
Step
10:Repeat Step 7,
but when you get to the last ASK in the
row, switch
cords 47 and 46.
So the final right SK is tied with cords
43, 44, 45, 47.
Step 11:
For the remainder of the Striped Clutch, you
repeat steps 8 and 9 and then repeat
steps 6 and 7.
Do this over and over, until the design is 18
inches long (from the top of the picots down to
the last row of ASK.
Stop on a row
where you use cords 3 - 46 (steps 6 and 7).
Here are someimportant detailsto
take note of as you progress:
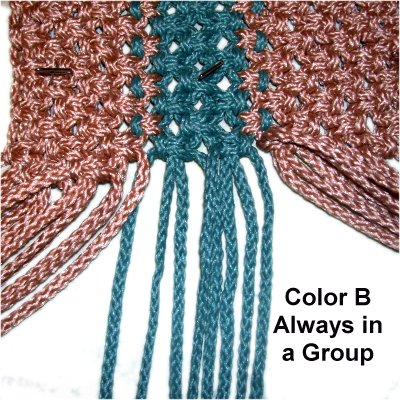
Before you
start each row, check to make sure that
the color
B cords are always in a
group. It's easy to switch cords
around accidentally, and in this area
that's BAD.
So be careful when you are in the striped
area, and pay close attention to the
position of the cords (see next
image).
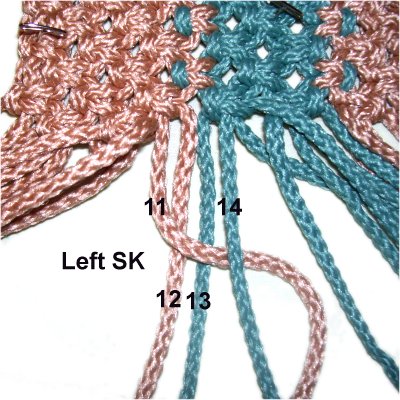
In
rows where you repeat steps
6 and 7, the two colors are mixed
at the stripe. You will always start the
Square knot with the color
A cord.
In this case, that's cord 11, since you
are tying a left SK.
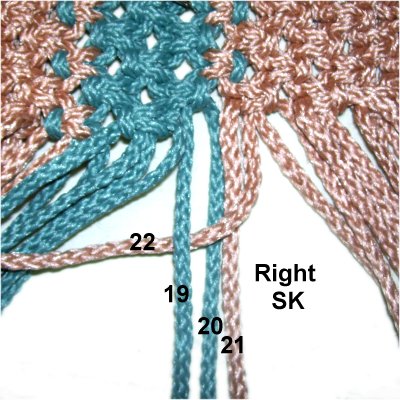
In the same
row, the next mixed color knot also begins
with the color
A working cord.
In this case, that's cord 22, since you
are making a right SK.
The final detail you should follow is that the
first FOUR knots in each row are all left SK, and
the rest are right SK.
Again, the Striped Clutch is dependent on
accurately switching directions at the proper
place. The stripe won't be symmetrical
otherwise.
Front Edge
The front edge of the Striped Clutch is made
after all the ASK are tied.
Make sure you know how to tie Double Half Hitches
(DHH).
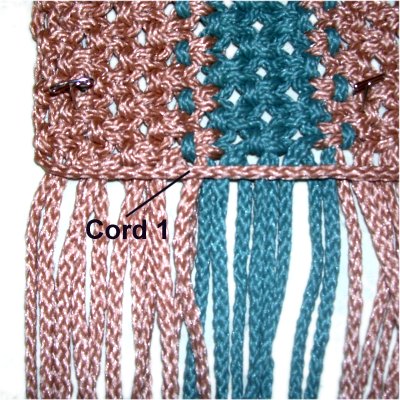
Step
12: Move cord 1 to the
right, resting on top of all the other
cords.
It will be the holding cord for the first
row of DHH.
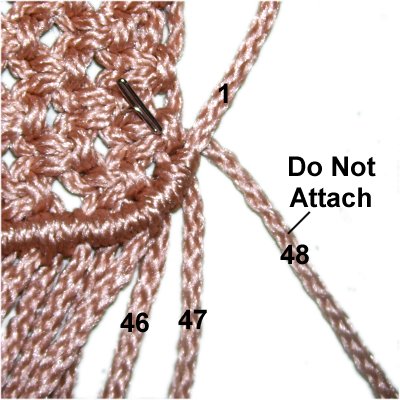
Step
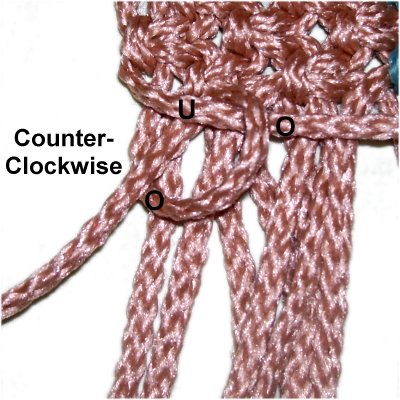
13: Attach cords 2 - 47 to
holding cord 1 with DHH. Rotate counter-clockwise
when making each loop. Tighten each
knot firmly.
The bar that forms should rest against
the last row of ASK, and be curved at the
left and right edge of the purse (see next
image).
As you
progress, push the knots as close together
as possible so you have room for all the
cords.
Make sure you do not attach cord 48, which
is the last one on the right edge of the
Striped Clutch.
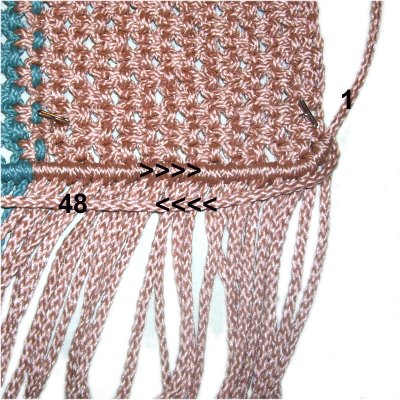
Step
14: Move holding cord 48
to the left, positioned just below the
first row of DHH.
Attach cords 47 - 2 with clockwise
DHH, in that order.
Pause
when you reach the area with the stripe.
Finishing Touches
Step
15: Finish off the cords by
trimming each one down to 2 inches.
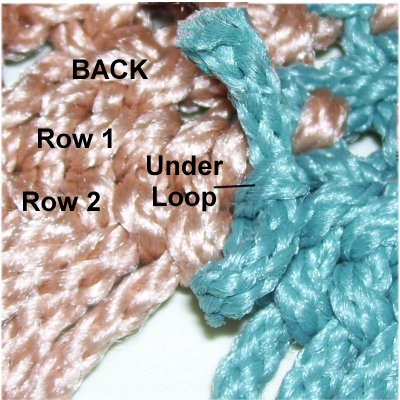
Turn the Striped Clutch over, so you are
working in the back.
Slide each cord under a loop made in row
1, which is the row next to the ASK.
Use tweezers or fine tip pliers as
needed.
This purse should be lined, covering the cut
edges of the cords. If you do not wish to do
so, trim the cords a little more, and apply glue
to adhere them to the inside surface.
When using synthetic materials like nylon, you can
heat the tips with a flame to melt the material
and prevent fray.
Step 16:
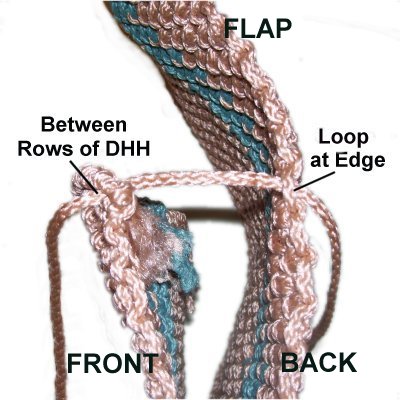
Now it's time to lace up the sides. Start by
measuring the Striped Clutch from the picots down
to 5 inches. That's the flap, so fold it at that
point.
Move down 6.5 inches and fold it again, which
divides the back from the front. The portion
with the DHH is considered the front.
Hold the purse between your knees, or stand it up
on one edge. There are loops along the edges
of the purse, between the rows of ASK. Match
up the loops on the front and back portions (not
the flap), so they are directly across from each
other. There should be one loop at the fold
between the back and front.
Use two 18-inch pieces of scrap cord, or cut two
new ones, to lace up the sides.
Step
17: Slide the lacing cord
between the two rows of DHH, as close to
the edge as possible (front of
purse).
Slide it through a loop directly across
from it (back of purse).
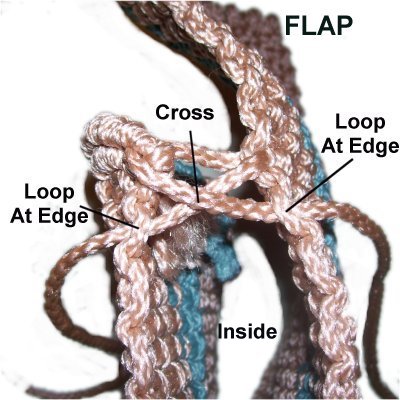
Step
18: Cross the two ends of
the lacing cord and then pass them through
the next set of loops.
Make sure you pass them from inside to
outside.
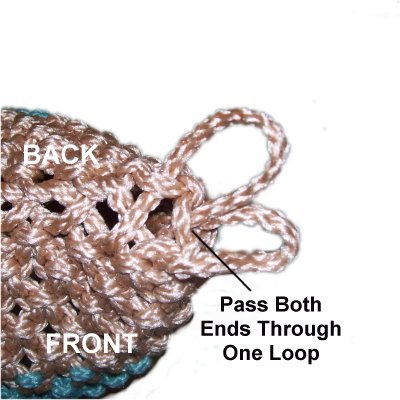
Step
19:Repeat
step 18 several more times,
passing the ends through the other loops,
until you reach the folded area between
the back and front.
Pass both ends through the same loop at
the fold, pushing them to the INSIDE of
the Striped Clutch.
Make sure the lacing is tight before you
move on.
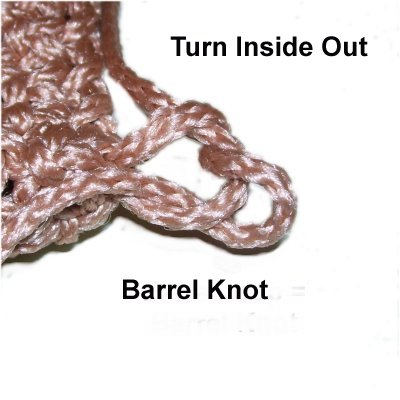
Step
20: Turn the purse inside
out, so the lacing cord is on the outside
and easy to work with.
Tie a Barrel Knot to secure it (Overhand
Knot + Extra Loop).
Trim the material off close to the knot
and apply glue. You can melt the
material with a flame if using synthetic
cord like nylon.
Step 21:
Turn the Striped Clutch so the cut ends in the
front are on the inside. You can now sew a
lining into it, directly over the ends.
The best place to stitch it in the front section
is between the two rows of DHH. There's
plenty of space for a needle and thread.
By
using any text or images on Free Macrame
Patterns, you are agreeing to ourTerms
of Use