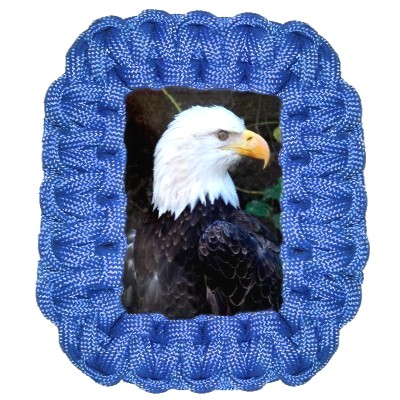
Description: This
Square Knot frame can be used to
decorate photos and artwork. You can
also use this technique to make a
pendant for a necklace design.
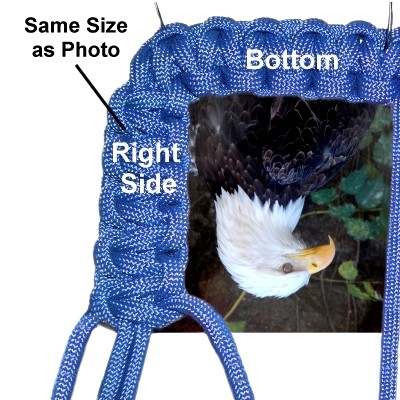
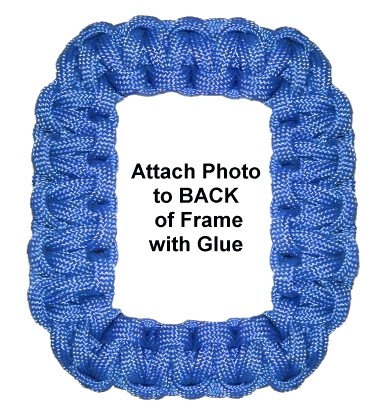
The photo or item you are framing is
attached to the back of the frame with
glue or tape. So the photo needs to be
slightly larger than the opening in the
center of the frame.
This is an easy project, suitable for
older children, teens and adult
beginners.
Since the Square Knot Frame can be any size,
begin by measuring each side
of the photo or piece of art. Make sure
you write down the length and width
measurements, since you will be using them as
you construct the frame.
Frame
Size: Add the measurements from
all 4 sides of the photo or artwork.
Frame size under 12 inches -- use 2mm size
material
Frame size 12 - 20 inches - use 3mm or 4mm
material
Frame size over 20 inches -- use 6mm
material
Cord
Length:Multiply the frame sizeby 7.Cut
4 cords
to this length.
Total Amount
to Purchase: Cord
length x 4
Important:
Prepare the tips of all four cords with tape.
Please read Cord Preparation
if you plan to use Paracord, which is the
material shown in the example. Specific
information about Paracord is found near the
bottom of the page.
Bottom Sennit
The Square Knot Frame has four sides, and you
start at the bottom as you make it. Then you
create the right side followed by the left.
The last section is the top, which is made in two
parts.
Make sure you know how to tie a Square
Knot, since the instructions for tying
them are not part of these instructions.
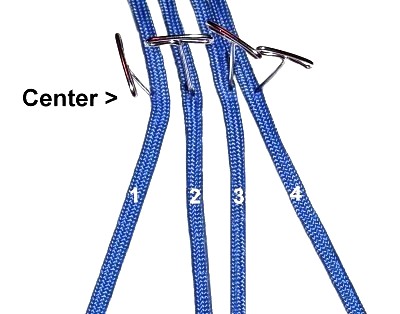
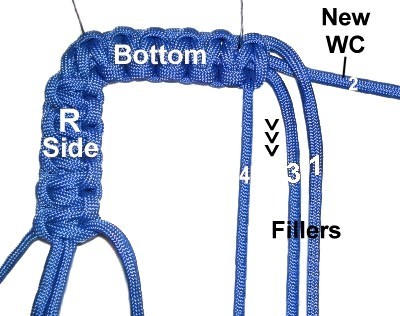
Step 1: Arrange
the cords on your project board
vertically. Secure the centers so
they are line up as shown.
Mentally number the cords.
The working
cords are 1 and 4.
The fillersare cords2 - 3.
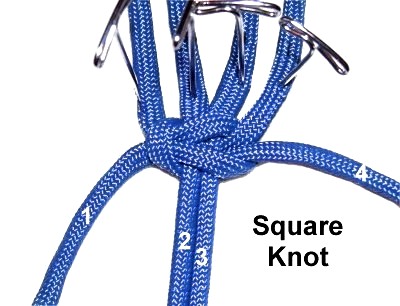
Step 2: Tie the first
Square Knot with the working cords.
It should rest at the center
of the cords, close to the pins.
Tie more Square Knots until the sennit
measures the same as thelower edge
of the photo or artwork you are framing.
Side Sennits
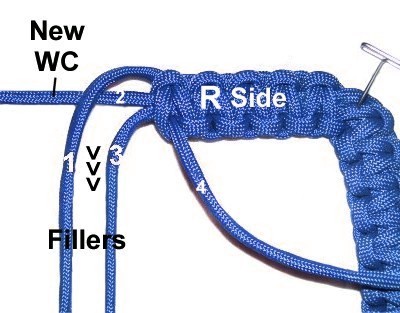
Step 3: Rotate
the bottom sennit on your board so it's horizontal.
The last SK you tied should be on your left
(see next photo).
Curve cords 1
and 3FORWARDvertically.They will be the fillers
for the
right side of the frame.
Cord 1 should pass over
cord 2, which should be heading left as
shown.
Cords
2 and 4 will be the new working
cords.
Use working
cords 2 and 4 to tie the first
Square knot, which forms the corner.
Pull firmly on filler
cords 1 and 3, so the corner
angle is as sharp as possible.
Try to keep the SK level
(not tilted).
Tie more Squareknots until the side sennit
measures the same as the rightside of the
photo or artwork.
Step 4: Find the center
of the cords, which is where you started the
Square Knot Frame.
Cord
4 should be on the LEFT after you move it
in the next step below.
Curve cords
1 and 3 FORWARD vertically,
which will be the fillers
for the leftside
of the frame.
Cord 1 should pass over
cord 2, which is heading right.
Cords
2 and 4 are the working cords.
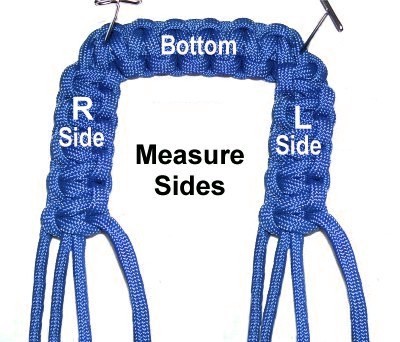
Tie more SK until the left side of the
frame has the same
number of knots as the right
side.
Make sure you also measure
the sennits, so both sides are the same
length. Push the knots
closer together as needed.
Top Sennits
Step 5: Turn the Square
Knot Frame so the bottom
sennit is on your right.
The right
sideof the frame should be
closer to the back of the board.
Mentally re-number the cords coming
from the right
side. Cord
4 should be on the right.
Curve cords
1 and 3 FORWARD vertically.
They will be the fillers for the first
half of thetop sennit.
Cords
2 and 4 will be the working
cords.
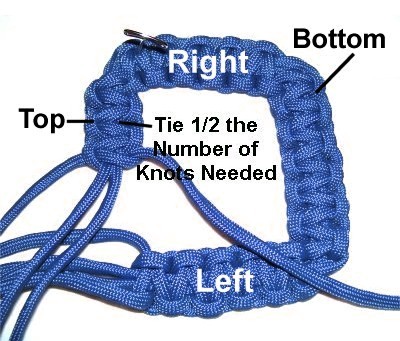
Step 6:Count the number of knots you tied to
create the bottomsennit
of the Square Knot Frame.
Measure
the length of the sennit, too.
To start the first half of the top
sennit, tie 1/2
the number of knots you counted.
This short sennit should be 1/2 the
total length of the bottom.
Designer's
Tip: Should your frame have an odd
number of knots for the top and bottom sennits,
just do the best you can with the measurements and
knot count.
The Square Knot Frame does not have to be precise
in order to work.
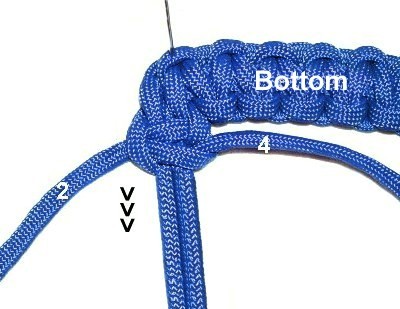
Step
6, continued: Rotate the frame on
your board so the first half of thetopsennityou just tied
is at the lowerright,
heading BACKWARD (see image below).
The bottom
sennit of the frame should be on your left.
Curve cords
1 and 3 FORWARD vertically. They
will be the fillers for second half of the top
sennit.
Cords 2 and 4 will be the working cords.
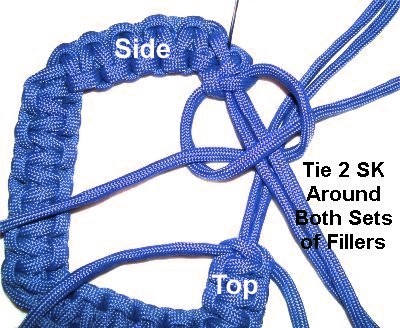
Tie one
Square Knot to form the corner.
Locate the fillers
coming from the first half of the top
sennit (on your right).
Cross both sets of fillers
in the area between the SK you just tied
and the short top sennit.
Step 7: Tie twoSquare Knots for the second half
of the top
sennit.
Make sure they go around both setsof fillers (total of 4 cords),
and they are firmly tightened.
Tie additional SK as needed so the
total length of BOTH top sennits is the
same as the bottom sennit.
Make sure the knots are tied so the
fillers stay in the backof the frame, even if you have
to reposition them.
You should see only the KNOTS when you
are looking at the front
of the frame.
Pull on the fillers
to bring the two halves close together.
Step 8: To
finish off the filler
cords for the Square knot Frame, weave
them under a few of the knots in the BACK of the
design.
Apply glue to
hold them in place.
Step 9:
You have two options for dealing with the working
cords:
Finishing
Option 1: Weave them through
the knots like you did the filler cords. When
the glue under all 4 cords is dry, cut off the
excess material.
Finishing
Option 2: To make a loop to hang the
frame, tie them together with an Overhand knot
so it is touching
the back of the frame. Leave some space, then
tie another one to make the loop.
Important:
Don't forget to seal the tips of the cords with
a flame if you are using Paracord (same as
preparation).
Attach the
photo or artwork to the back of the frame
with glue (or double sided tape).
By using any
text or images on Free Macrame Patterns, you are
agreeing to ourTerms of Use