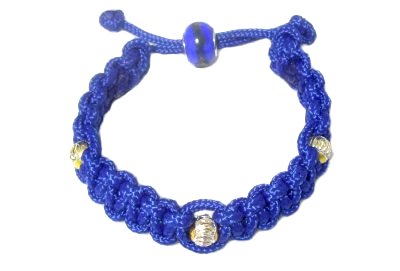
Description:
This Square Knot Bracelet features the most common
decorative knot used in Macrame. You will
learn to tie Square Knots in both directions.
This Macrame project is a great way to introduce
older children and teens to this craft, and it
makes a nice youth group project. This
pattern is also suitable for adult beginners.
There are small beads between short sections of
Square Knots, and a larger bead for the sliding
clasp. The best material for this
project is nylon Parachute Cord, but any material
can be used.
Important:
When using Parachute Cord, an adult should
supervise because the material needs to be melted
with a flame.
Measure your wrist to determine the size you
want to make. This will be called the FINISHED LENGTH
in the following instructions.
Multiply
the finished length by 5, and add 5 inches.
Cut 2 working cords to that length.
Cut one filler
cord, 18 inches long. For
Square Knot bracelets over
7 inches long, cut this cord
longer.
Design
Tip: You can use a different material for
the filler (1mm - 1.5mm), if your beads have tiny
holes.
Prepare the ends of the cords to prevent
unraveling as you work. You can apply a
small piece of masking tape to each end of the
filler cord to make beading easier (optional).
When using Parachute cord, prepare by melting the
tips with the BBQ lighter. This will seal
the outer covering around the inner core of the
material.
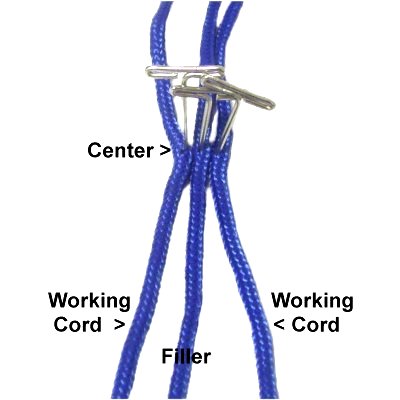
Secure the
center of all 3 cords on your project
board vertically (up and down).
The shorter filler cord should rest
between the two working cords.
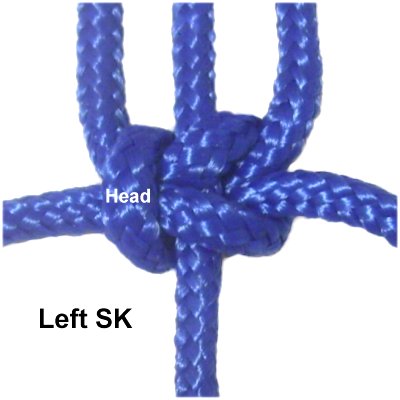
Section 1: Left SK
The first
section of the Square Knot bracelet is
made by tying Square Knots with the "head"
facing left.
The head is the vertical area shown on
this image.
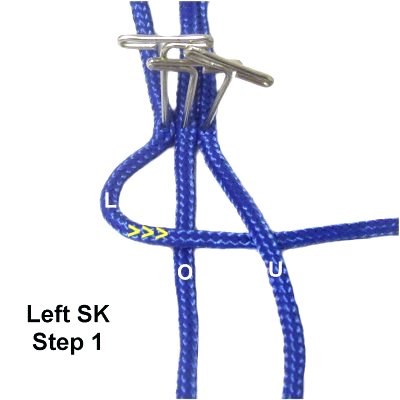
Step
1: Curve the left
working cord to the right,
passing over
the filler and under
the right working cord.
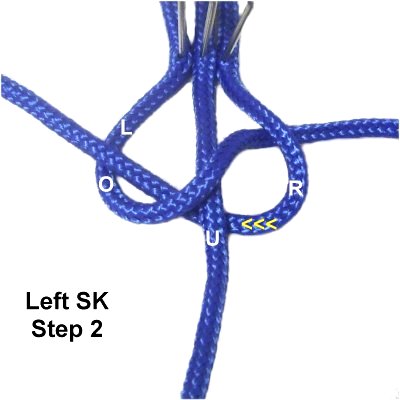
Step
2: Move the right
working cord to the left, passing
under
the filler and over
the left working cord (near the curved
area).
Pull both ends to tighten the first half
of the SK. It should rest against the pins
at the center.
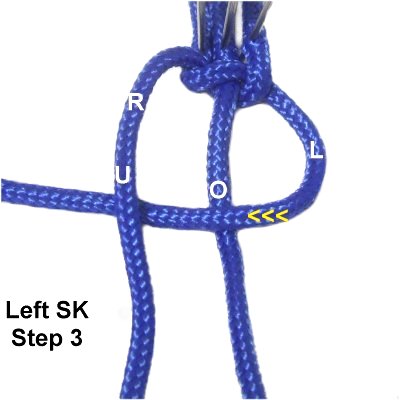
Step
3: The working cords have
now switched positions, so the direction
you move the cords is the opposite of the
first half:
Curve the left
working cord to the LEFT, passing
over
the filler and under
the right working cord.
Step
4: Move the right
working cord to the RIGHT,
passing under
the filler and over
the left working cord (near the curved
area on the right).
Pull both ends to tighten the second half
of the SK.
Design
Tip: The placement of the beads for
your Square Knot Bracelet is entirely up to you,
but if you want to arrange them evenly, follow the
spacing directions suggested below.
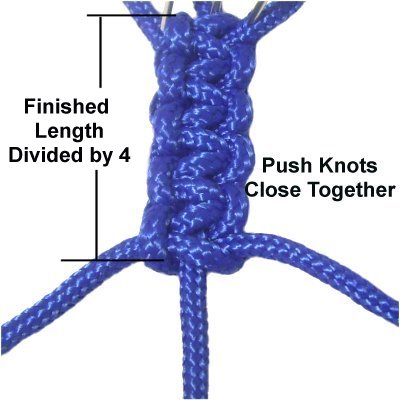
Step
5:Repeat
steps 1 - 4 several times,
pushing the knots close together after
each one is tied.
Divide
your finished length by 4.
Measure as you progress, and stop when you
reach that size.
Section 2: Left SK
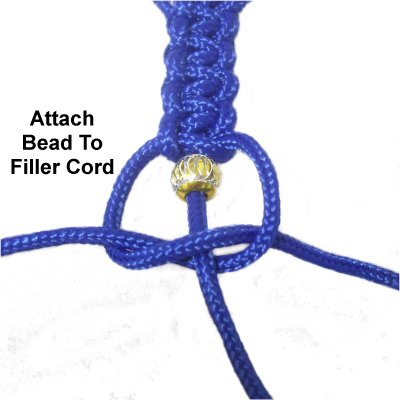
Step
6: Slide a bead onto the filler
cord.
Repeat
step 5.
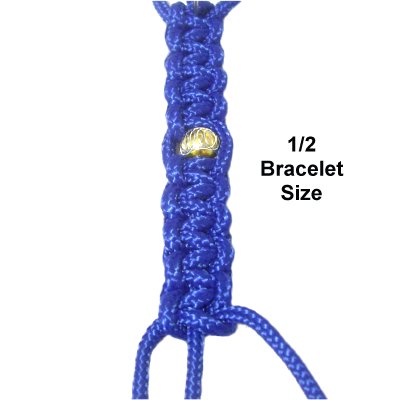
Important:Include
the bead when you measure.
Step
7: Measure the first half of the
Square Knot bracelet, from the first SK to
the last.
It should be 1/2 the finished length. (see
tip below)
Design
Tip: It's easy to get frustrated
over the measurements, tying and untying the
Square Knot Bracelet to make it
perfect.
Sometimes all you need to do is push the knots
closer together or separate them slightly. They
can slide up and down the filler cord
easily. So try that first before removing
knots.
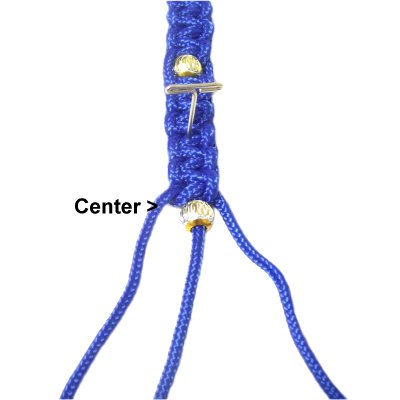
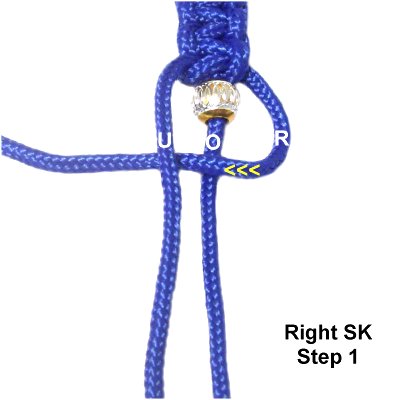
Section 3: Right SK
Step
8: Turn the entire bracelet
around on your board, arranged so the
knotted portion is heading toward the back
of it, with the other half of the cords
heading forward.
Slide a bead onto the filler cord, so it
rests at the center of the Square Knot
bracelet.
You now need
to right RIGHT SK, since you turned the
bracelet around.
Here are the instructions:
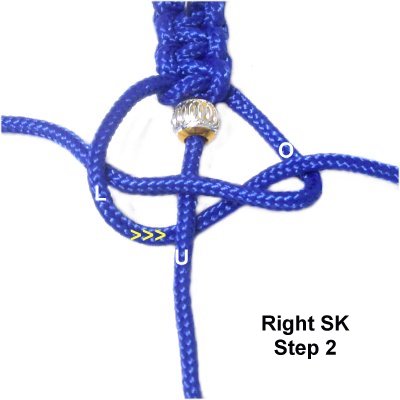
Step
9: Curve the right
working cord to the left, passing
over
the filler and under
the left working cord
Step
10: Move the left
working cord to the right,
passing under
the filler and over
the right working cord where it curves.
Pull both ends to tighten the first half
of the knot.
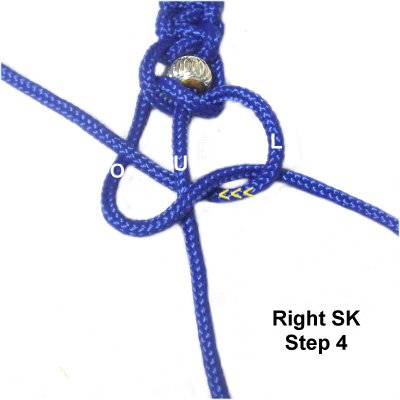
Step
11: The two working cords have
switched positions.
Curve the right
working cord to the RIGHT, over
the filler and under the left working
cord.
Step
12: Move the left
working cord to the LEFT, passing
under
the filler and over
the right working cord where it curves.
Pull the ends to tighten the knot.
Step 13:
Repeat step 5,
tying the same number of Square knots as you did
for Section 1. Make sure you tie RIGHT SK.
Repeat
step 6 and 7, tying the same number of
knots as in Section 2.
Measure the entire Square Knot Bracelet, to make
sure it's the size you want. Try it on your
wrist to see if it fits properly.
Keep in mind there will be a bead between the
first and last knots (clasp).
Finishing and Bead Clasp
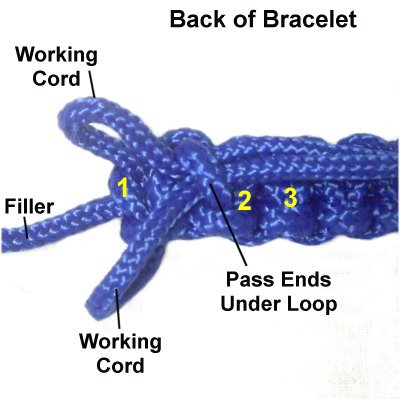
Step
14: Turn over the
bracelet so you work in the back.
Mentally number the three knots at the end
of the bracelet.
Use your tweezers or pliers to move the
ends of the working
cords under one or both loops of
Square knots #2 and #3.
Step 14,
continued: Apply glue under the
cords near Square Knot #3, so the ends stick to
the knots. The area should be as flat as possible.
When the glue is dry, cut off the excess material.
For Parachute cord, use the BBQ lighter to melt
the stubs, pressing them against the knots.
Step 15:Repeat
step 14 at the other end of the Square
Knot Bracelet.
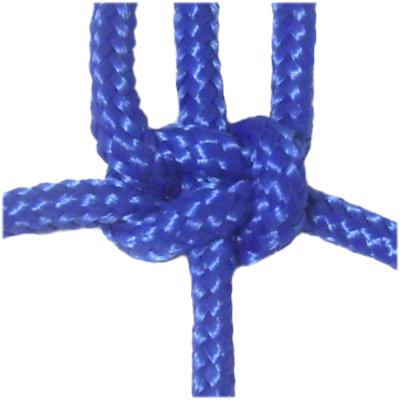
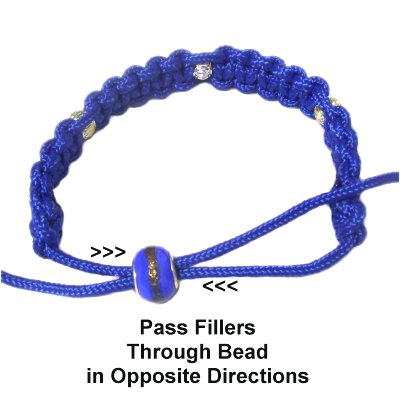
Step
16: To make the Bead Clasp,
pass the two ends of the filler
cord through the large bead in opposite
directions.
Pull both ends to close
the bracelet.
Design
Tip: You can use a knotted sliding
clasp, which is made with a separate cord.
You cross the ends of the filler cord and tie one
or more knots around the two halves.
The Wrapped knot clasp is the best one to use, but
you can also tie Square Knots to make the
clasp. Please see Sliding
Clasps for more details.
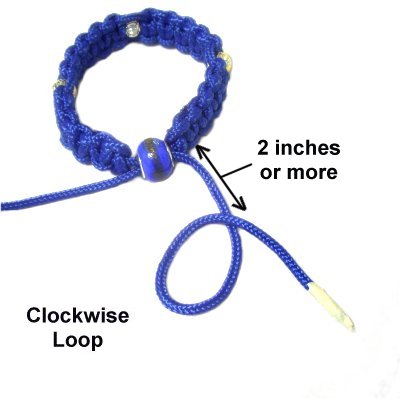
Step
17: Measure one end of the
filler cord, down two inches (or more)
from the bracelet.
Make a
clockwise loop at that position.
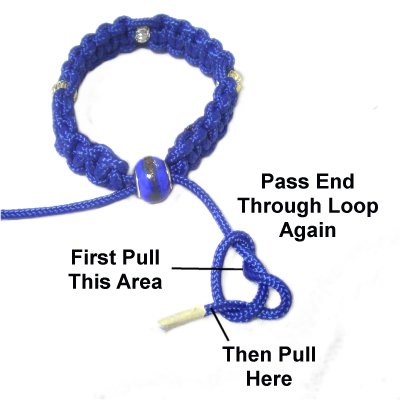
Pass the end
through the loop, under
- over.
Pass the end
though the loop again, under
- over.
Apply glue and tighten the Barrel Knot by
pulling on the first
loop.
Then pull the end to tighten the rest of
the knot.
Step 18:
Repeat step 17,
tying a Barrel knot at the other end of the filler
cord.
Put on the Square Knot bracelet to see how it
fits. You can still untie the Barrel knots
if needed, so make adjustments now.
Cut off the excess material close to surface of
the Barrel Knot. Heat and melt the stubs if
you are using Parachute cord.
By
using any text or images on Free Macrame
Patterns, you are agreeing to ourTerms
of Use