Important:
Paracord has an inner core material that can come
out of the nylon around it. So it's important to
seal the end with a flame.
To prepare the cords for the Speaker Hanger, light
a candle and hold the tip of each cord in the
flame for a few seconds. Pinch the outer portion
so the back and front stick together.
Apply tape around the tips as well.
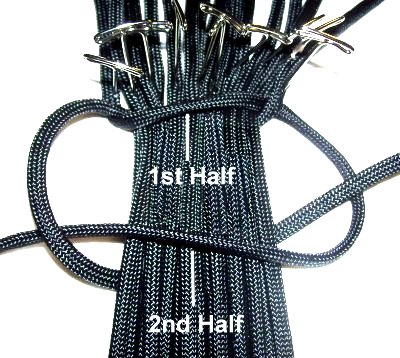
Top Section
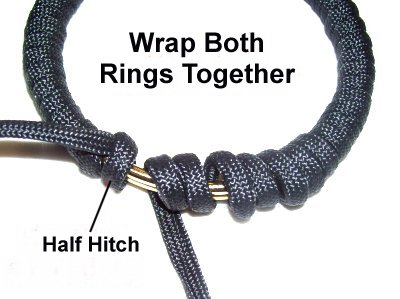
Step 1: Wrap the
two rings together by attaching a
2-yard cord at the top, with a
Larks Head knot. Use each half to wrap
1/2 of the rings. The ends will
meet at the bottom.
Make sure the wraps are tight
and close together.
Important:
Apply glue to the rings as you
wrap, placing the material directly on the glue.
Trim the ends, but don't cut them off completely.
Melt the tips with a flame.
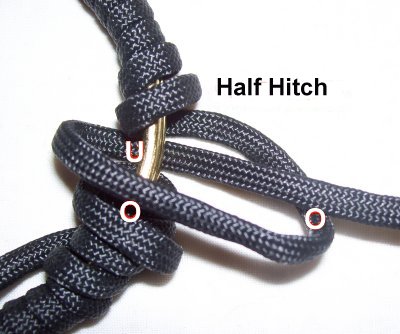
Secure the
wraps with a Half
Hitch (at the bottom):
Pass one cord over
- under the ring, and over
the cord as you pull it right.
Repeat with the other cord. Apply
glue to the Half Hitches, and allow it
to dry completely.
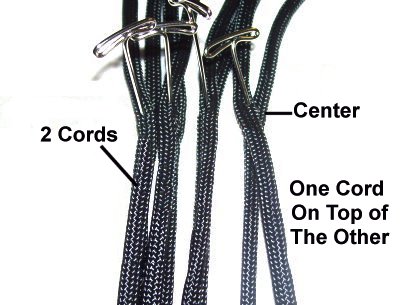
Step 2: Locate the center
of each 15-yard
cord, by matching the ends.
Secure the center
of the cords to your project board or
work surface.
Place 2
cords together (one on top,
one below).
Step 3: Make sure the
8 sets of 2 cords (total of 16) are
close to each other and are not twisted
or kinked.
The centers should all be
lined up,
so the Speaker Hanger is neatly arranged
in this area.
Important:
Bundle each cord as described below,
to keep them from tangling.
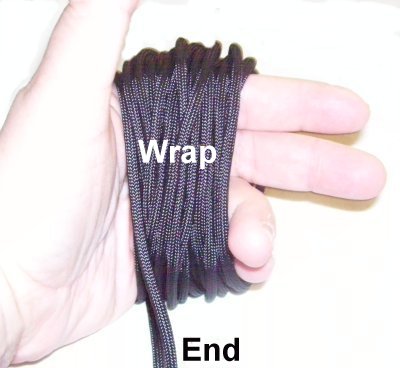
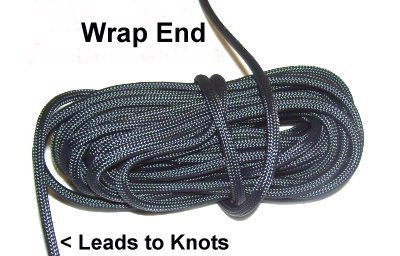
Bundling Long Cords
Move down at least 8 inches from the
center, and wrap the cord around your
hand several times. Stop when you have
about 12 inches left.
Wrap
the end around the center several times,
to hold the coils together.
Wrap firmly and pull the
end tightly, so you end up with a sturdy
bundle that's easy to handle.
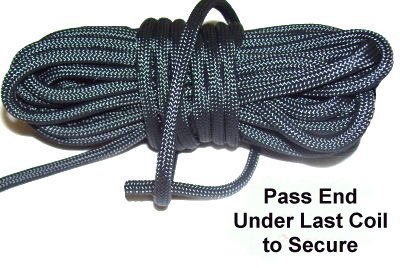
Pass the end under the last coil you
made, to hold it in place. Pull tightly
to secure it.
As you work on the Speaker Hanger, pull to get
more cord from the bundles.
Make sure you tug on the end to tighten the wraps
around the center, since the roll gets smaller as
you pull from it.
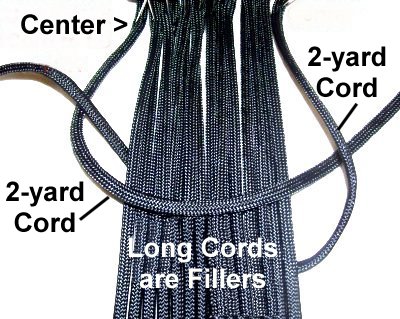
Step 4: Locate the center
of two of the 2-yard
cords. Secure 1 on either side
of the long cords. Make sure the centers
line
up with the others.
These are the working
cords for the thick Square
knots, at the top of the Speaker Hanger.
The long cords are the fillers for this
area.
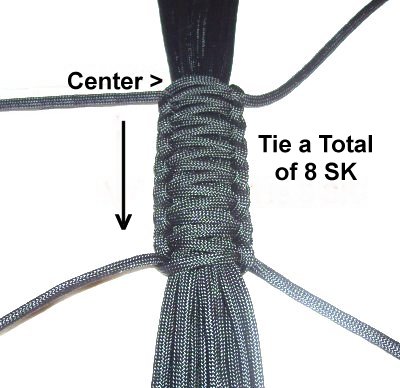
Step
5: Use the lower
portion of the 2-yard cords to
tie the first
half of a Square Knot.
Go around the entire bundle of long cords
to make a wide, thick knot.
Tighten the first half, making sure it
rests close to the center, where the
cords are secured. Try to keep the
long cords arranged neatly.
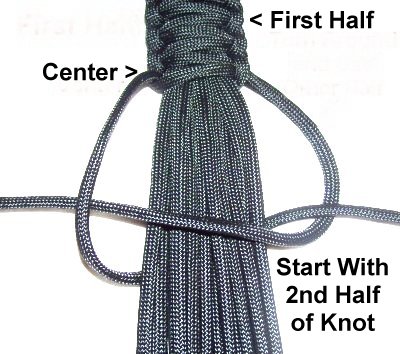
Tie the second
half of the SK.
Tie 7 more
Square Knots, moving from the center
downward, towards the ends (total of 8
SK).
Turn
the board around,
so you are using the other half of the
2-yard working cords.
Tie 8 more SK, moving from the center
towards the ends.
Start with the second
half of the SK, since the first
half is already tied at the center.
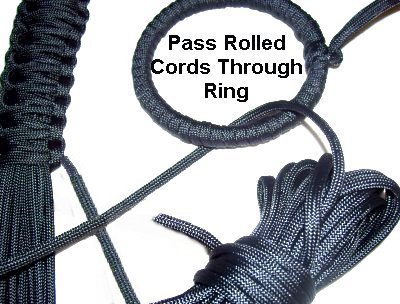
Step 6: Pass the
rolled cord bundles at one end
through the ring.
It helps to do this step with the
Speaker Hanger suspended from a hook in
the ceiling or wall.
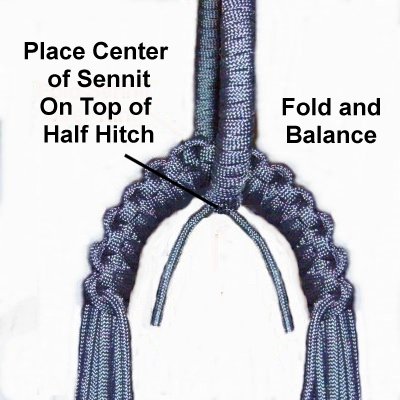
Step 7: Arrange the center
of the SK sennit on top of the Half
Hitches at the bottom of the
ring.
The rolled bundles should dangle on
each side of the ring.
Fold the sennit, matching the last
knots tied in each half, so it's
balanced.
Step 8: Apply the
fabric glue to the inside
of the SK sennit, as well as the bottom
of the ring.
Wrap a piece of scrap cord
around the SK sennit while the glue
dries.
Step 9: Place the Speaker
Hanger on your work surface horizontally,
with the ring on your left.
Secure a 60-inch
cord below the SK sennit, so
the secured end is near the ring (Left).
To start the Wrapped Knot, fold the
cord 6
inches from the secured end,
to your right.
Bring the working end around the
bundle, passing over
the secured end.
Pass it over
the front and under
the back of the long cords. Pass
it under
the secured end as you bring it to the
front again.
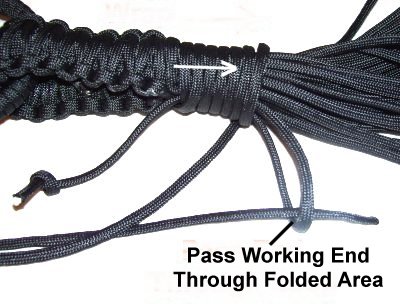
Continue to wrap firmly,
with the coils close together.Move
from the bottom of the SK sennit,
towards the folded area (arrow).
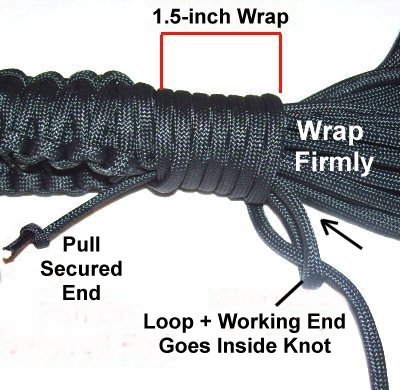
Stop when the knot is 1.5
inches long. Pass the end
through the folded area, which now looks
like a loop.
Remove the pin from the secured
end, and pull on it. The loop
will be pulled inside the knot, along
with a portion of the working end.
Apply a light coat of Fabric Glue on
the outside of the knot. Trim the two
ends of the 60-inch cord flush with the
bottom and top of the knot. Melt the
tips with a flame.
Long Sennits
(Middle Section)
Step 10: Organize the long
cords by dividing them into 8
groups of 4.
Put each group in a plastic bag, or use another
method to keep them organized. They should still
be rolled up.
Suspend the Speaker Hanger from the
ceiling or wall.
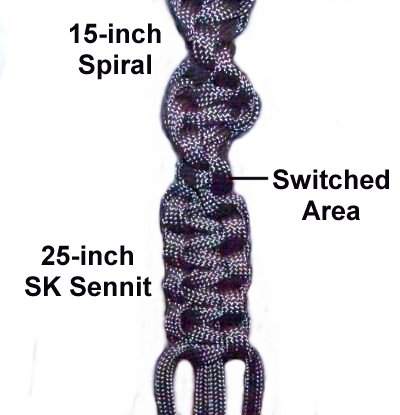
Using one group of 4 cords, tie a
Spiral Stitch sennit measuring15 inches.
See important tip below
Important:
This area of the Speaker Hanger should be neat and
uniform.
Start by tying 5
Half Knots. Push the knots together to
eliminate any space.
Twist the spiral design so the back moves to the
front, facing you (half twist). Then tie 5
more knots.
Repeat this
process several times, as you continue.
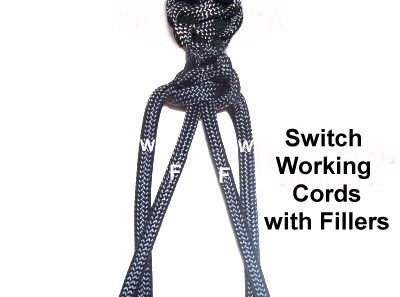
When the spiral portion is finished, switch the working
cords with the fillers.
It's best to put the working cords under
the fillers when you switch them.
Design
Option: To disguise any of the
switched areas in the hanger, you can apply beads
before tying the next knot.
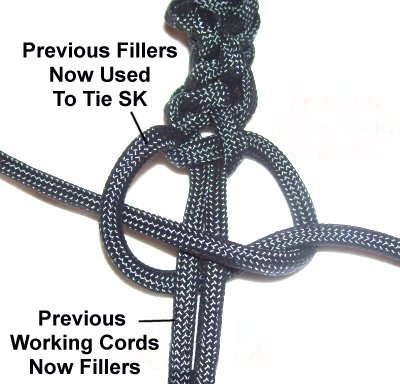
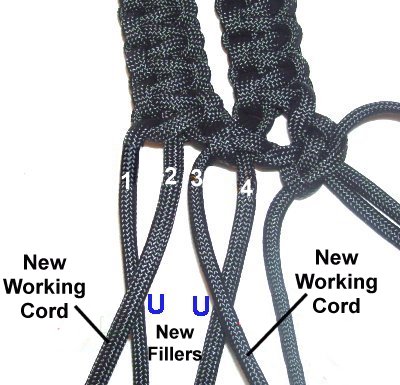
Step 11: The previous
fillers are now the working cords for
the next portion of the sennit.
Tie the first Square Knot. Remove all
the slack above
the knot by tightening it firmly
and pulling down on the fillers.
Tie additional Square Knots to create a
sennit measuring 25
inches.
As you progress, push up on the knots
to eliminate any space between them.
Repeat
steps 10 - 11, using each
group of four cords, to create the
remaining sennits for the Speaker Hanger.
Make sure they are all the same length, in both
the Spiral Stitch area and the Square Knot
portion. Measure carefully.
Upper Cradle
(Lower Area)
Step 12: Select two
sennits that are close to each other,
and mentally number the cords 1 - 8.
Make
sure they are not twisted.
Tie a SK with cords 3 - 6,
to connect them.
Repeat
this process with the remaining sennits
for the Speaker Hanger.
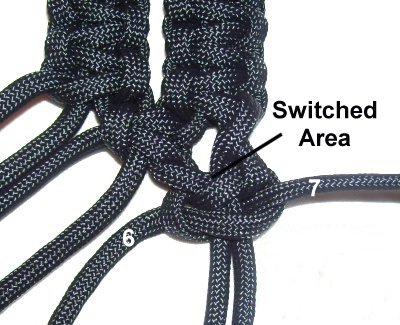
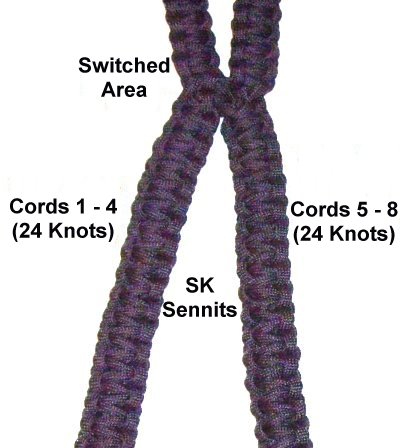
Step 13: Go to one
pair of linked sennits, and locate cords
5 - 8.
Pass cords 5 and 8 over
cords 6 and 7, to switch
them.
Cords 6 and 7 now become the new
working cords, with 5 and 8 as the
fillers.
Design Option:
This is another area where you can add beads to
decorate the Speaker Hanger and disguise the
switched portion.
Add them before you tie the knots (step13 and 14).
Tie a Square
Knot with cords 6 and 7.
Pull out as much of the slack above the
knot as you can, when you tighten the
knot.
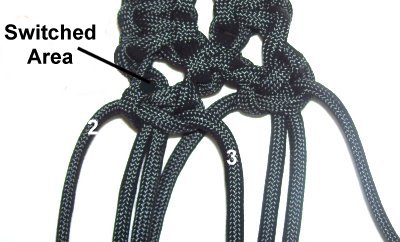
Step 14: Pass cords 1
and 4 under
cords 2 and 3, to switch
them.
The new working cords will be 2 and 3,
and the fillers are cords 1 and 4.
Tie a Square
Knot with cords 2 and 3.
Pull out as much slack as you can above
the knot.
Step 15: Using cords 1
- 4, tie 23
knotsto make the SK sennit on the left
(total of 24).
Do the same with cords 5 - 8 to make
the SK sennit on the right.
Make sure each sennit is the same size,
and that the knots are pushed together
to eliminate any slack.
Repeat
steps 13 - 15 with the remaining linked
sennits, to finish the upper cradle for the
Speaker Hanger.
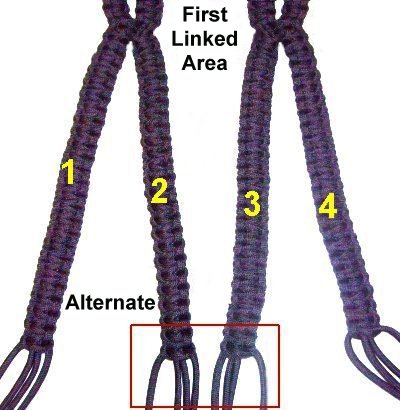
Lower Cradle
Step 16: You now need
to alternate the
sennits when you combine them to make
the lower part of the cradle. You do
this by putting 4
sennits next to each other.
Mentally number them 1 - 4. Link
sennits 2 and 3 with one SK, as you did
in Step
12 (cords 3 - 6).
Step 17: Do the same with the
remaining sennits.
Sennit 4 in the image above will be linked with
sennit 5. Sennits 6 and 7 are linked, as
are 8 and 1.
The most important thing to remember when
making this portion of the Speaker Hanger, is
that the newly combined sennits have to be
alternate to the first ones you linked together
in step
12.
Step 18:
Go to each new set of linked sennits, and switch cords as
you did in steps
13 and 14.
After the first knots are done, tie an additional
19
SK (total of 20), similar to what you did
in step
15.
Measure each sennit carefully to make sure they
are all the same length.
Finishing Touches
Step 19: Bring all the ends
together in one bundle. Make sure none of the
sennits are twisted, especially in the cradle
area.
Use a 60-inch
cord to make a 1.5-inch
Wrapped Knot, as you did in step
9.
Apply glue to the cords inside
the bundle as you wrap. This way the knot holds
onto the cords better, since nylon is slippery.
Wrap tightly.
Apply glue to the outside
of the Wrapped knot, and cut off the end flush
with the knot (60-inch cord only). Melt
the tip with a flame.
Pullon
each of the long
cords to remove any space above the
Wrapped Knot. It should rest against the bottom
of each sennit.
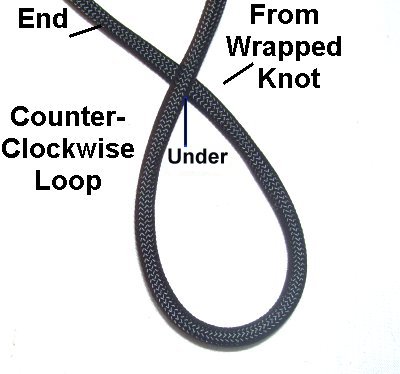
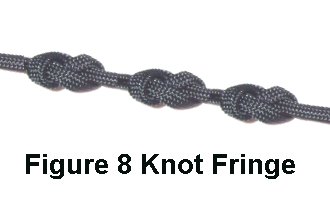
(Optional)
Step 20: To make a
Figure 8 fringe for the Speaker Hanger,
use one cord to form a counter-clockwise
loop. It should be close to the
Wrapped Knot.
Pass the end under
the segment coming from the
Wrapped Knot.
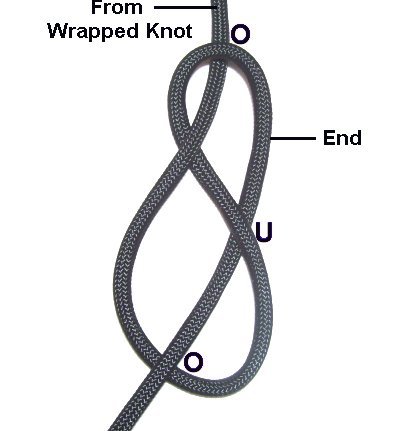
Bring the end to the right, passing over
the segment coming from the Wrapped
Knot.
Pass it through the loop under
- over (from below).
Pull the end tightly and try to
position it as close to the Wrapped Knot
as possible.
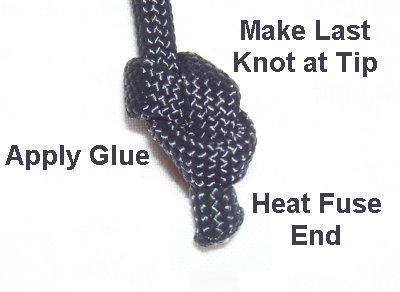
Tie several
more Figure 8 Knots along the length of
the cord you are working with. The space
between each one should be the same.
The final
Figure 8 knot should be at the tip.
Apply glue to this knot and heat fuse the
end to prevent unraveling.
By
using any text or images on Free Macrame
Patterns, you are agreeing to ourTerms
of Use