Description:
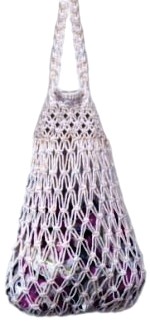
The Shopping Bag is very similar to the
net bags used in Europe. It features
widely spaced rows of Alternating Square
Knots, which creates a design similar to a
fish net.
The top edges are closely tied for added
support, and there are two straps.
This Macrame project is rated
moderate. Beginners should
not attempt this bag until they have made
other projects successfully.
The finished size is 18 inches
tall. The area at the top is 9
inches wide. The bottom stretches to
15 inches when pulled sideways. When
made with 24-ply cotton cord material it
can hold over 15 pounds.
Dawn Kepler inspired me to create this
Macrame pattern.
Important:
The Shopping Bag is made in two
pieces(front
and back).
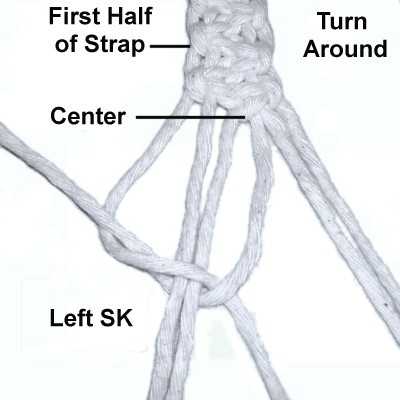
You start by making the first strap in steps
1 - 5. The first knot is tied at the
center of the cords and you work in both
directions.
In step 6 you make a second strap.
Then you begin the front
piece by attaching the working cords
to one strap in steps 7 - 21.
You then repeat the process to make the back piece
in step 22.
In step 23 you connect both halves at the
sides.
In steps 24 - 30 you make the rest of the
bag and finish off the bottom, working all the
way around both halves of the Shopping Bag.
Step 1:You
begin the Shopping Bag by making one of the
straps.
Cut
4 cords, each
4.5 yards long.
Cut
2 cords,each 3.5 yards
long.
Prepare the tips to prevent unraveling (tape works
well).
Arrange the
cords vertically and secure them at the CENTER.
They need to be placed in the following
order:
The 4.5
yard cords should be in the 1, 3,
4, and 6 positions.
The 3.5 yardcords should be
placed at 2 and 5.
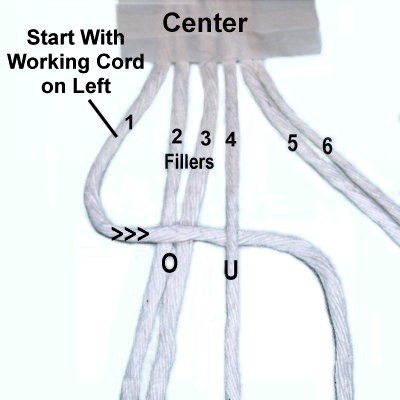
You will be tying both right and leftSquare knots for the straps.
Below are the instructions for tying LEFTSK,
which are made with cords
1 - 4.
You can use the same general instructions when you
tie left SK
in other areas of the Shopping Bag.
Step 2:
Mentally number the strap cords 1 - 6.
The working cords are 1 and 4 and the fillers are
cords 2 - 3. Move cords 5 - 6 to the side
while you tie the first knot.
Move cord
1over
the fillers and under
cord 4, heading left to right.
Move cord
4under
the fillers and over
cord 1, heading right to left.
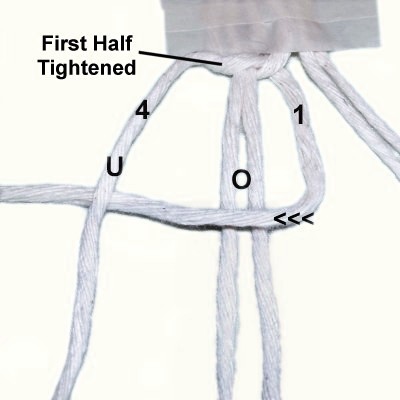
Pull working cords 1 and 4 to tighten the
first half of the Left SK. It should
rest against
the tape.
Designer's
Tip: The rule to remember when
tying Square Knots in opposite directions is that
the head
of the knot will face the direction of thefirstworking cord
you move.
So a LEFT SK begins by moving the working cord
on the left, which is cord 1 in this
case. When you finish all 4 steps, the
head will face left.
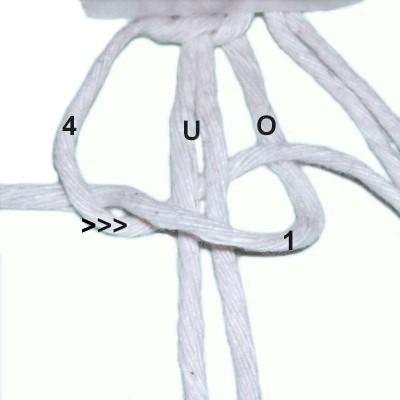
Working cords
1 and 4 have switched places.
Move
cord
1over
the fillers and under
cord 4, heading right to left.
Move cord 4under
the fillers and over
cord 1, heading left to right.
Tighten the second half by pulling on
cords 1 and 4.
Step 3:
To create the zigzag pattern for the strap, you
will now use different cords and tie the knot in
the opposite direction.
The instructions for the RIGHTSK
are below. You can use the same general
instructions when you work on other areas of the
Shopping Bag.
The working cords are 3 and 6. Cords 4 and 5 are
the fillers.
Move cord
6over
the fillers (cord 4 and 5) and under
cord 3, heading right to left.
Move cord
3under
the fillers and over
cord 6, heading left
to right.
Tighten the first half of the Right SK
so it's close to the previous
knot. Make sure it's not tilted.
Working cords
3 and 6 have switched places.
Move cord
6over
the fillers and under
cord 3, heading left to right.
Move cord
3under
the fillers and over
cord 6, heading right to left.
Tighten the knot firmly.
Step
4: Continue making the zigzag
pattern by tying a left
Square knot with cords 1 - 4 followed byright
SK with cords 3 - 6.
Continue this alternating pattern until
the first half of the strap is 7
inches long.
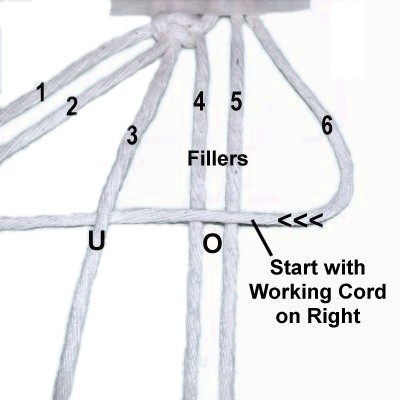
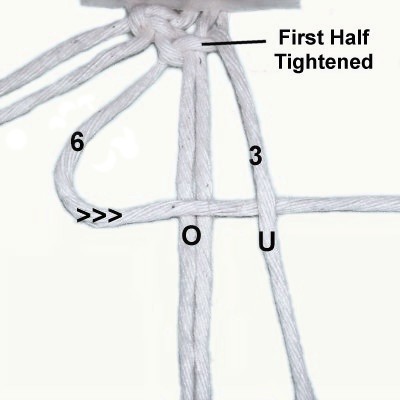
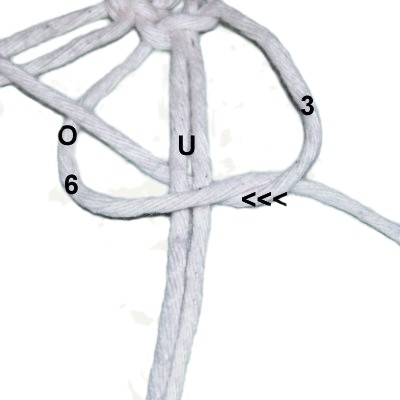
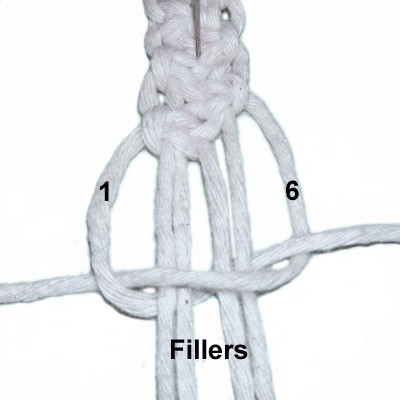
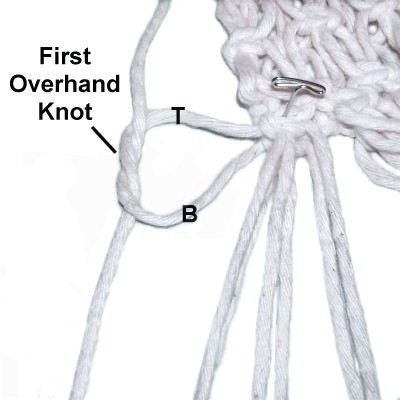
Tie one more
Square Knot using cords 1 and
6.
There should be four
fillers (cords 2 - 5).
It should face the opposite direction from
the last knot tied, so it follows the same
pattern.
Step
5: Turn
the strap aroundon your
board, and go back to
the center. Mentally re-number the
cords.
Repeat
steps 2 -4 to create
the second half of the same strap.
The first knot you tie should be a left
SK.
Step
6: Repeat steps 1
- 5to make another
strap.
When you get to step
5, place the new strap next to
the first one and compare their
lengths.
Continue tying the second strap until it's
the same length as the first one.
Front Piece
Now it's time to mount the working cords for the
Shopping Bag, which are attached to the
straps.
Important:
You will only use one strap at a time, so put one
strap aside for now.
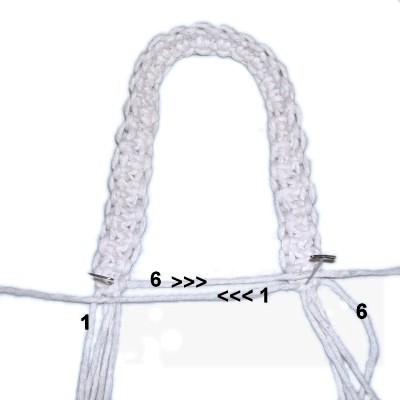
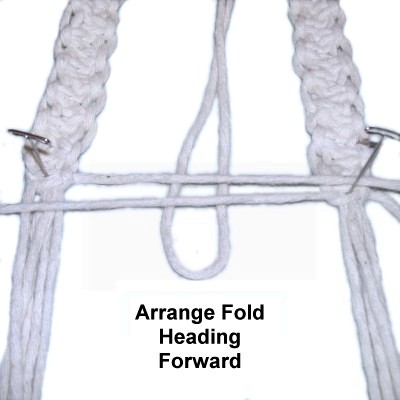
Step 7:
Fold the strap so the cords are heading toward you
(forward). Mentally number the 6 cords
coming from the left half of the strap. Mark
cords 1 and 6 so you can identify them easily.
Do the same thing
with the cords coming from the right half of the
strap.
Locate
cord 6
from the left
half of the strap, then move it
to the right horizontally.
Locate cord
1 from the right
half of the strap, then move it
to the left horizontally.
Secure them so they have tension.
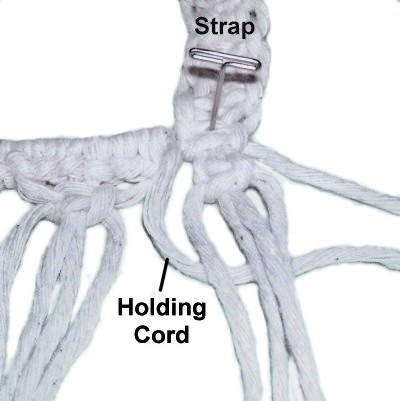
Step 8: The
working cords for the Shopping Bag will be
attached to BOTH holding cords acting together.
You should treat them as if they were one
cord.
Important:
Do not attach the working cords to the holding
cords separately. You
are not making a circle.
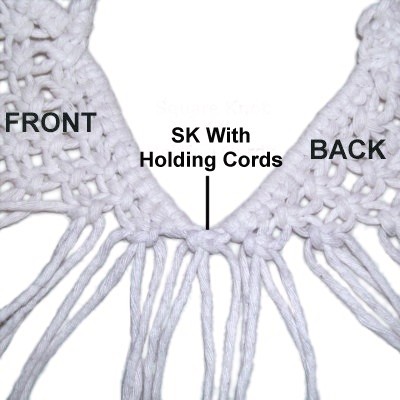
When you are done with the following steps, there
should be one straight row of Larks Head knots
resting between the two halves of one strap.
It should look like the images shown.
Cut
6 working cords, each 2.5 yards long.
Prepare the tips to prevent unraveling.
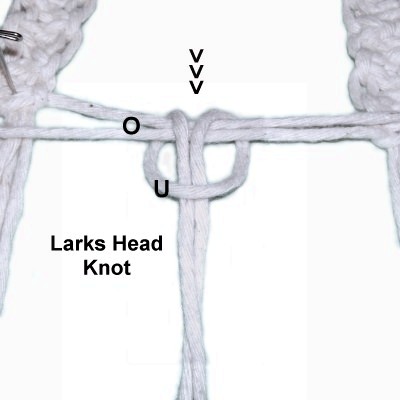
Fold one working cord in half and place it
under
BOTH holding cords in the center area of
the design.
The center fold should be heading forward.
Make a Larks
Head knot by moving both halves of the
working cord toward you, passing overthe
holding cords and under
the folded area of the working cord.
Pull the working cord to tighten the knot
firmly.
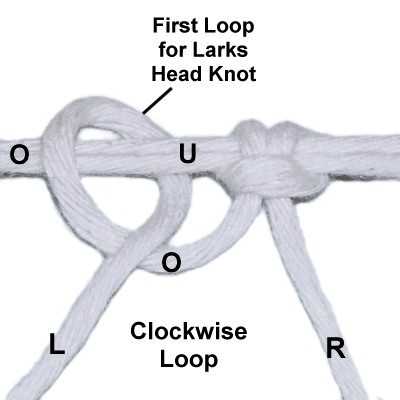
Step 9: Use
the left
half of the working cord to make another
Larks Head knot, using the following 2-step
method:
Move the left
half over
- under the holding cords,
rotating clockwise.
Pull it toward you, passing over
itself to complete the loop.
Tighten the knot firmly, so the loop rests
against
the left side of the first Larks Head
knot.
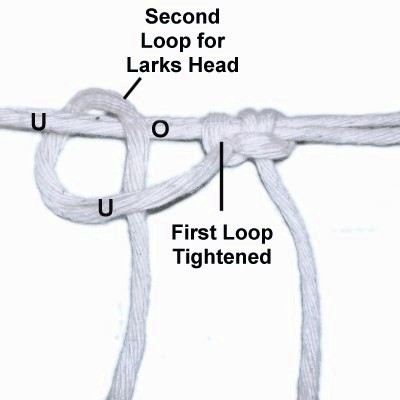
Make a second
loop to the
left of the first, by moving the
left half of the working cord under
- over the holding cord, rotating
clockwise.
Pull it toward you, passing it under
itself to complete the loop.
Tighten firmly.
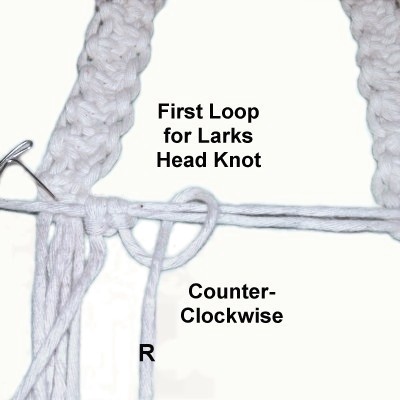
Step
10: Slide the knots to the left,
so the second one rests against
the strap.
Repeat
step 9 using the right
half of the cord. The two
loops are made rotating counter-clockwise.
The second loop is made to the right
of the first.
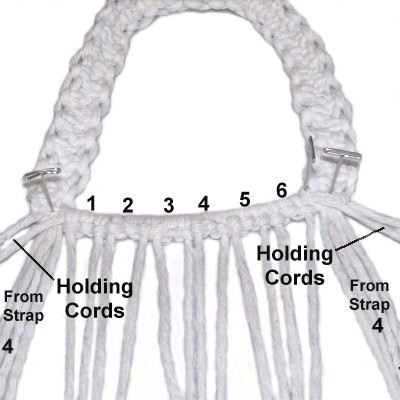
Step 11: Repeat steps 8 - 10,
mounting the remaining 5 working cords to the
holding cords
(same strap).
After all the cords
have been mounted, pull
the holding cordsso
the knots rest close to each other,
as shown in the image below.
Adjust the knots as needed so the upper edge
of the Shopping Bag is neat.
Step
12: Move the four holding
cords to the sides. They
are
marked with tape, so should be
easy to identify.
The remaining 4 cords from each half of
the strap are working cords, along with
the ones you just mounted.
This gives you a total of 20 cords for row
1.
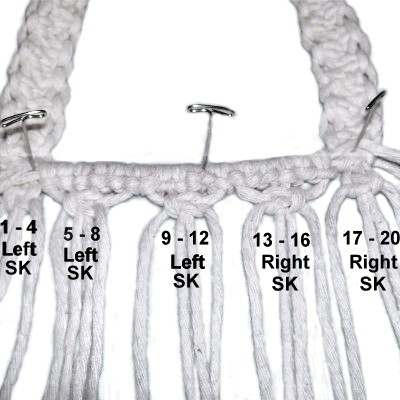
Step
13: Tie the first row of
Square Knots as follows:
Left
SK:
Cords 1 - 4, 5 - 8, and 9 -12
Right
SK:
Cords 13 - 16 and 17 - 20
Tighten the knots firmly so they rest
close to the Larks Head knots.
Step
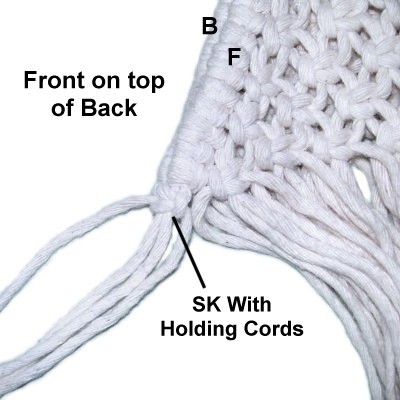
14: On the right side of the
Shopping Bag, arrange both of the marked holding cordsdiagonally
heading right (see next image below).
One of them will need to be placed under
the Square knot tied with
cords 17 - 20 (strap cords),
before securing them in position.
Step 14,
continued: On the left side of the
bag, arrange the holding cords diagonally
heading left.
One should be placed under
the SK tied with cords
1 - 4, then you can secure them.
Step 15:
New working cords will now be attached to thediagonal
holding cords in the same manner as the ones
mounted previously. Always tie one Larks
Head knot followed by one with each half of the
cord (steps 8 - 10).
This will be done on each side of the Shopping
Bag. So you are adding two new cords in each
step. When you mentally re-number the cords,
make sure you do not count the holding
cords.
When you tie the next row of Alternating Square
Knots, you will be including the new cords just
added.
Cut
4 cords, each
2.5 yards long.
Prepare
the tips to prevent unraveling.
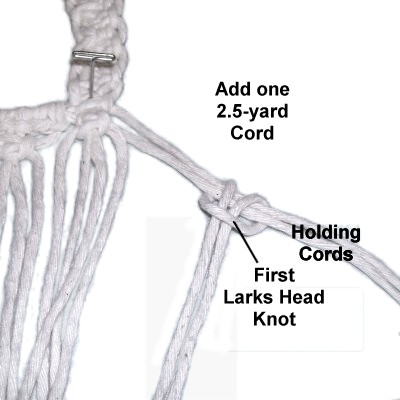
Step
16: Attach one 2.5
yard cord to the holding cords
with a Larks Head knot, on both sides.
Use each half to tie another knot, as you
did when you mounted the other cordsinstep
9 - 10.
Push the knots close to the first row of
Square knots, and mentally number ALL the
working
cords 1 - 24.
Step
17: Tie the 2nd row of
Alternating Square Knots as follows:
Left
SK:
Cords 1 - 4, 5 - 8, and 9 - 12
Right SK:
Cords 13 - 16, 17 - 20, and 21 - 24
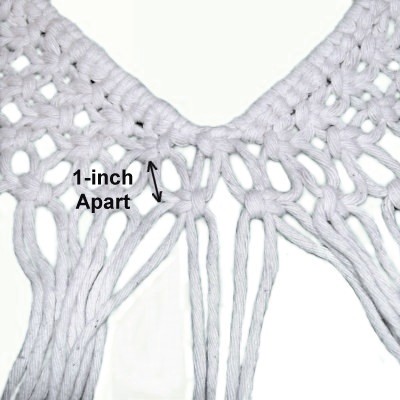
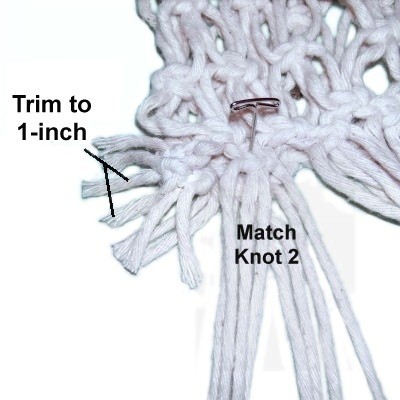
Step 17,
continued: The top portion of the
Shopping Bag needs to be stronger than the
bottom. So after you tie the first left SK
with cords 1 - 4, tighten it so it rests close to
the Larks Head knot on that side.
When you tighten the other knots in the row, they
should line
up with the first one. The spacing
between the rows should be no more than 1-inch.
The bag will look better if you take your time and
make straight
rows. Check to make sure none of the
knots are tilted.
Step 18:
Repeat step 16, attaching another 2.5
yard cord to the diagonal holding cords on
both sides.
Mentally number the cords 1 - 28, and tie the 3rd
row of ASK as follows:
Left
SK:Cords
1 - 4, 5 - 8, 9 - 12, and 13 - 16
Right
SK: Cords 17 - 20, 21 - 24, and 25
- 28
You now add more working cords in the same
manner. All that changes is the length of the
cords:
Cut
four cords, each2-yards
long.
Prepare
the tips to prevent unraveling. Step 19:
Attach a 2-yard
cordto the diagonal
holding cords on each side of the bag using the
same technique as in step 16.
Mentally number the cords 1 - 32, and tie the 4th
row as follows:
Left
SK: Cords 1 - 4, 5 - 8, 9 - 12, 13
- 16
Right
SK:
Cords 17 - 20, 21 - 24, 25 - 28, and 29 - 32
Step 20:
Repeat step 19, attaching one 2-yard
cord to the diagonal holding cords on
each side of the bag.
Mentally re-number the cords 1 - 36. Tie the
5th row as follows:
Left
SK: Cords 1 - 4, 5 - 8, 9 - 12, 13
- 16, and 17 - 20
Right
SK:
Cords 21 - 24, 25 - 28, 29 - 32, and 33 - 36
Step 21:
Repeat step 19, attaching another 2-yard
cord to the diagonal holding cords on
each side of the Shopping Bag.
Mentally re-number the cords 1 - 40. Tie the
6th row as follows:
Left
SK:
Cords 1 - 4, 5 - 8, 9 - 12, 13 - 16, and 17 - 20