|
|
| |
 |
| |
| |
|
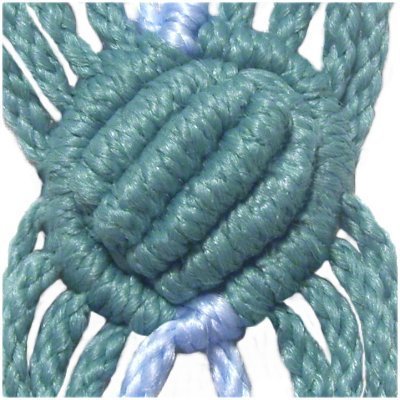
Description: The Shell Knot is
simply a curved diamond with diagonal rows of
Double Half Hitches that pop upward.
In vintage patterns, this technique is often
named the Berry Knot, or a Nut Design.
The key to making it look appealing is to use
slender material and to tighten the knots as
much as possible.
You could add this decoration to decorate
handbags, plant hangers, wall hangings, or in
curtain patterns.
Click on the images below to go to the page
described:
|
| |
|
|
|
Make sure you
know how to tie the Double Half
Hitch diagonally in both
directions.
Practice controlling the holding cord with
one hand while tightening the knot with
the other hand.
|
|
|
|
|
|
|
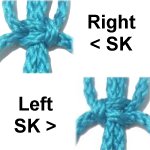
The Square
Knot is an important part
of this design, so be sure to practice
tying both left and right variations.
|
|
|
|
|

|
|
Want to make a
project after you learn the Shell
Knot?
This Mini Turtle
is a beginner's project based on this
knot. |
|
|
|
| |
| |
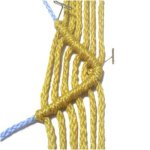
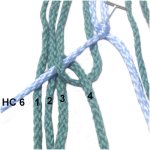
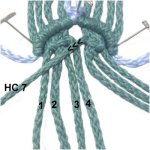
Step
1: Fold a holding cord in half and
secure it vertically on your board.
Place two 36-inch working cords on each side of
the holding cord, after folding them in half.
|
| |
| |
|
|
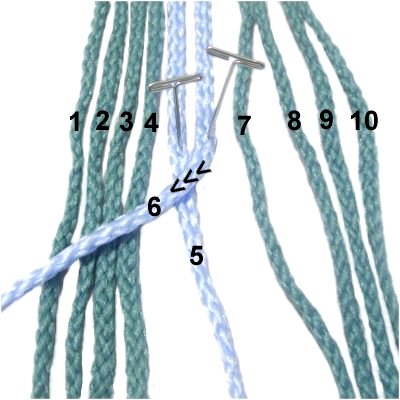
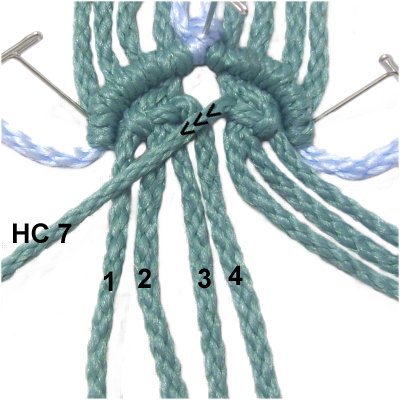
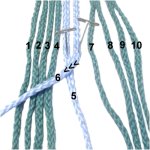
Mentally number the cords 1- 10.
The holding cords should be 5 and 6.
Cross cord 6 over cord 5, and secure it
diagonally towards the left.
|
|
| |
|
| |
|
|
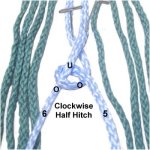
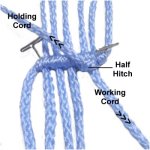
Use cord
5 to tie a clockwise
Double
Half Hitch (DHH) onto cord 6.
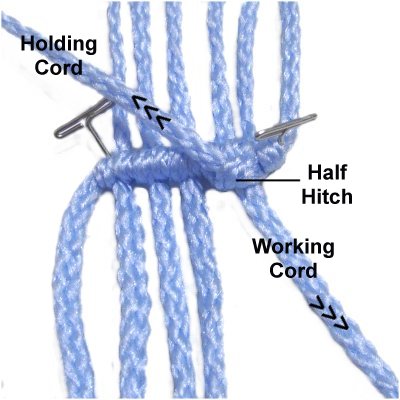
A single Half Hitch is tied by making a
loop over
- under the cord holding the
knot (cord 6).
|
|
| |
|
|
| Designer's
Tip: It's important to tighten ALL
the knots as much as possible. |
|
|
| |
|
|
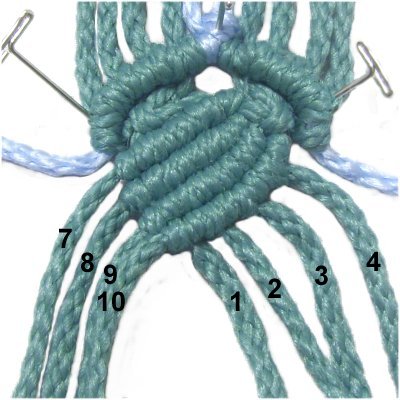
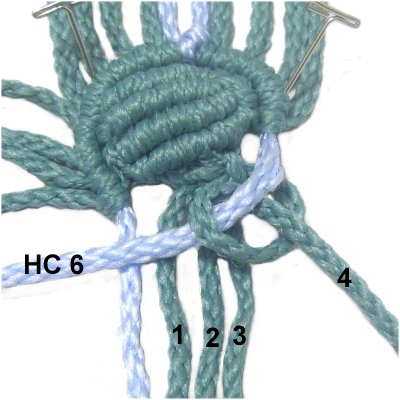
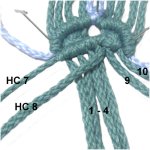
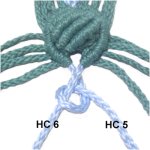
Step
2: Place holding cord 6 on
top of the working cords on the left.
Attach cords
4 - 1 to it with clockwise
DHH (in that order).
|
|
| |
|
| |
|
|
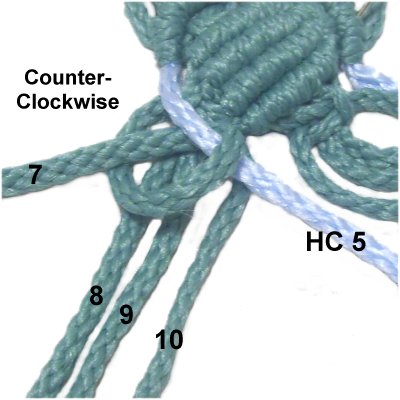
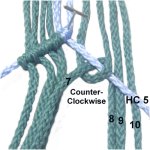
Step
3: Move holding cord 5 to
the right, resting on top of the working
cords.
Attach cords
7 - 10 to the holding cord with
DHH, rotating counter-clockwise.
|
|
| |
|
| |
|
|
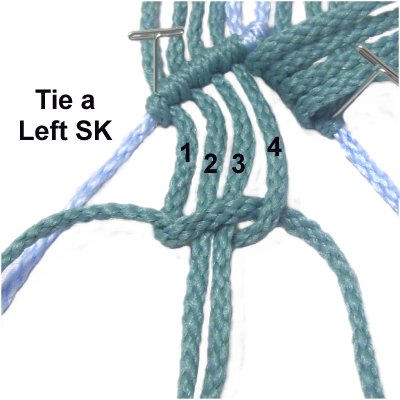
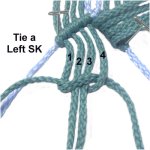
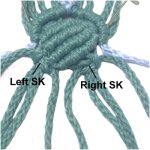
Step 4: Tie a LEFT
Square Knot using cords
1 - 4.
Make sure it's very
tight and rests against the row
of DHH.
Encourage the DHH above it to curve
(see step 5).
|
|
| |
|
| |
|
|
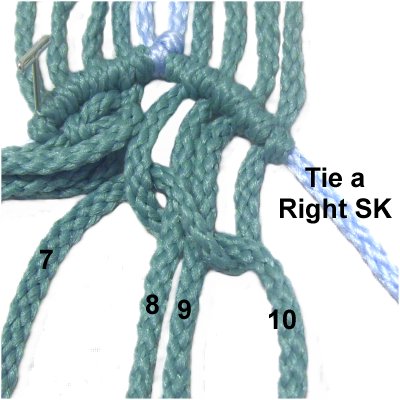
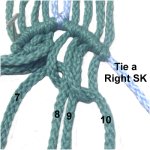
Tie a very tight RIGHT SK
with cords
7 - 10.
Encourage knots above it to curve.
|
|
| |
|
| |
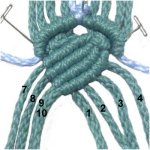
Now you will work on
the center portion of the Shell Knot, which is
made with four rows of diagonal DHH. Cords 7
- 10 are used to hold the knots, and 1 - 4 are
used to tie them.
The original holding cords (5 and 6) are not used,
so push them aside for now. |
| |
|
| |
|
|
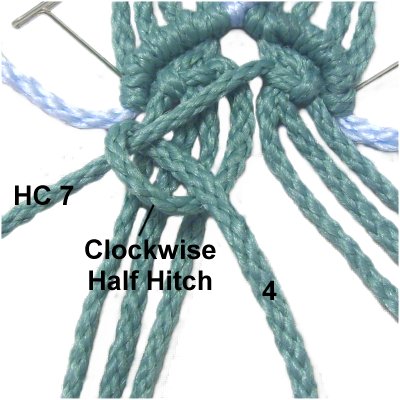
Step 5: Move holding
cord
7 to the left,
resting on top of the working cords.
It should be close to the Square Knot
on the left.
Secure it (or hold it) with tension.
|
|
| |
|
|

|
|
Use working
cord 4 to tie a clockwise
DHH onto holding cord 7.
Tighten both Half Hitches as much as
possible, and pull on the holding cord so
the two SK are close together.
|
|
|
|
| |
|
|
Step 6: Move holding
cord 8 to the left, resting on
top of the working cords.
Follow the tightening instructions below
as you attach working cords 1 - 4 to
holding cord 8.
|
|
| |
|
|
|
|
Tightening
Instructions: Every
time you make more than one row of DHH,
you should tighten the knots in this
manner:
Pull the holding cord towards the previous
row with one hand (diagonally), while
pulling the working cord with your other
hand.
|
|
|
|
| |
|
|
Make 2 more rows
of DHH in the same manner.
Use holding cord 9 for the 3rd row.
Use holding cord 10 for the 4th row.
|
|
| |
|
| |
|
|
Step
7: Tie a left
SK with the four cords on the left
(holding cords 7 - 10).
Tie a right SK with the group on the
right.
Make sure these knots are as
tight as possible.
|
|
| |
|
|
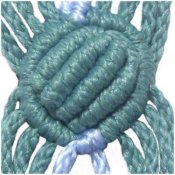
Designer's
Tip: The center portion of the
Shell knot should pop upward slightly, but you may
need to give it some help by pushing it from
below.
Check to see if there are any obvious gaps between
the rows of DHH. Go back and tighten the
knots more if necessary, to eliminate those gaps. |
|
|
| |
Now you will make the
lower edge of the Shell Knot.
Remove the pins from holding
cords 5 and 6 (light blue in images). |
| |
|
| |

|
|
Step 8: CURVE holding
cord 5 towards the center
of the shell (right).
Attach cord 7 - 10 to it with
counter-clockwise
DHH.
Push the knots close together, so the
first one you tie (cord 7) rests against
the DHH in the upper shell.
|
|
| |
|
| |

|
|
Move holding
cord 6 towards the center
(left).
Attach cords 4 - 1 to it with clockwise
DHH, in that order.
Push the knots close together, so the
first one rests against the DHH in the
upper area.
|
|
| |
|
| |
Important:
Pull both holding cords as much as
possible, so the Shell Knot becomes
round. The outer portion needs
to be very close to the 4 rows of DHH.
Your goal is to hide the Square Knots, so keep
making adjustments until the knot is round and
neat. |
|
|
|
|
|
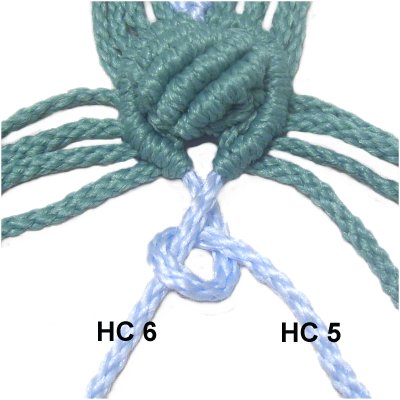
Step
9: Bring holding
cord 5 under
holding cord 6, and attach it with a
clockwise DHH.
Push down on the SK in the lower right
area just before tightening the DHH.
|
|
|
|
|
|
By
using any text or images on Free Macrame
Patterns, you are agreeing to our Terms
of Use
|
|
|
|
|
Have
any comments about the Shell Knot? Contact
Me.
|
|
|
| |
 |
| |
| |