|
|
| |
 |
|
| |
|
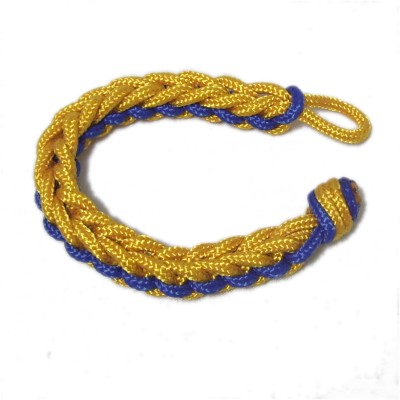
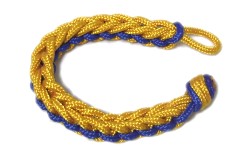
Description: The Scout
Bracelet is named for the fact that it's often
used as a project in Girl Scouts. It's a very
easy Macrame bracelet, suitable for children and
beginners.
It features a decorative knot called Endless
Falls, which produces V-shaped
designs on the front. The clasp is made
with a loop and an Overhand knot.
This knot is optional, if you prefer a button
knot instead. You could also add a regular
button or bead, depending on the thickness of
the material.
In the example shown, nylon Paracord was used,
but you can make it with just about any
material. I recommend you use 2mm to 3mm
material, since anything wider will be too bulky
for children to wear.
Kim Roslewicz inspired me to
create this unique Macrame pattern.
|
| |
| |
| |
|
Supplies Needed:
- 2mm to 3mm material (2 colors)
|
| |
| |
| |
|
Preparation:
Measure the wrist of the person who will wear
the Scout Bracelet. The working cord should be 10 x the length of
the wrist. It's the primary color
you will see in both the front and back of the
bracelet.
The
holding cord should be at least 18 inches
long. This cord will look like stitches
along the sides of the bracelet.
In the example shown, the working cord is
yellow and the holding cord is blue.
Prepare the ends of both cords with tape. When
using Paracord,
an Adult
should heat
the ends with a flame to melt the
nylon, which prevents the inner core from being
pulled out accidentally.
See Cord Preparation
for specific details regarding this material
(described at the bottom of the page).
|
| |
|
| |
|
|
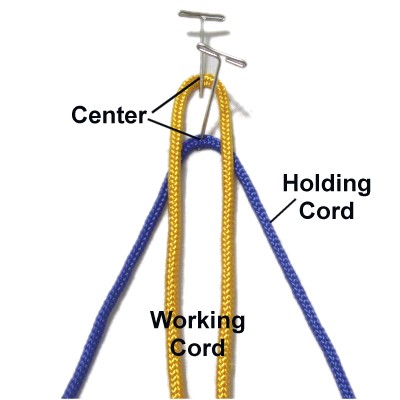
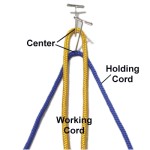
Step
1: Fold the working cord
in half and secure it to your board.
Place the holding cord under
it, and secure it too.
Make sure the centers of both cords
line up.
|
|
| |
|
| |
|
|
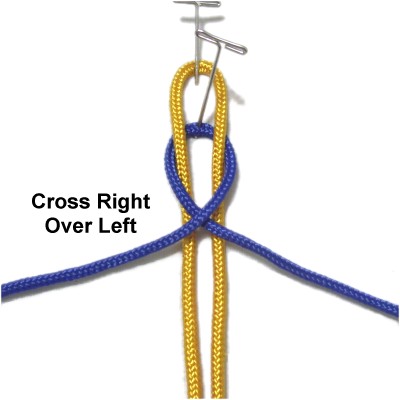
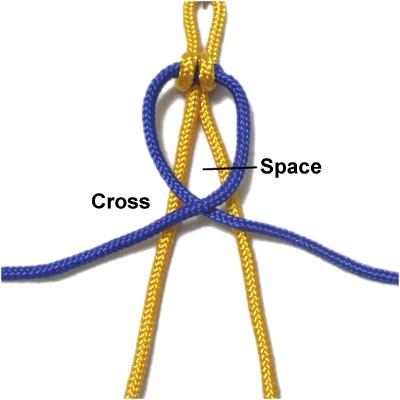
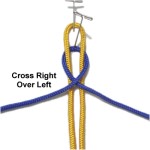
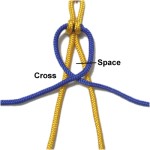
Step 2: Cross the two
halves of the holding cord right over
left, arranged on top of the working
cord.
|
|
| |
|
| |
|
|
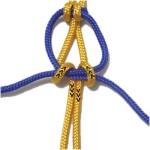
Step 3: Move
both halves of the working cord
backward, passing over
the crossed area of the holding cord.
Pull them toward you, passing under
the crossed area.
This creates a pair of loops that wrap
around the holding cord.
|
|
| |
|
| |
|
|
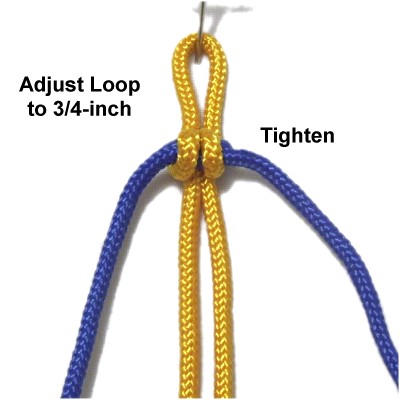
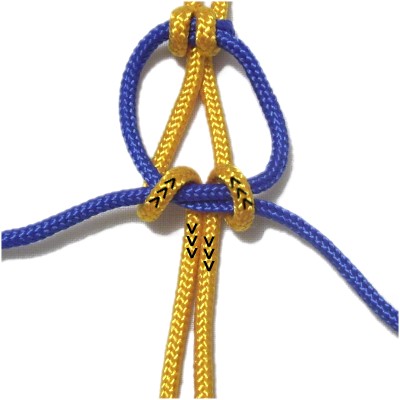
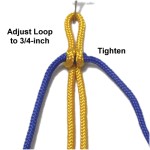
Step
4: Tighten the holding
cord first, by pulling on both
halves at the same time.
Then do the same with the working cord,
adjusting the loop to 3/4-inch.
|
|
| |
|
| |
|
|
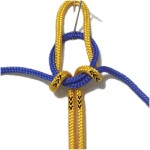
Step
5: Separate the two halves
of the working cord so there is space
between them.
Repeat
step 2. |
|
| |
| |
|
|
Step
6: Repeat
steps 3 and 4.
Complete the Scout Bracelet by
repeating steps 5 - 6 several times, until
it measures your wrist length.
Remember you still have one knot to tie.
|
|
|
|
|
| |
Overhand Knot
Clasp
|
|
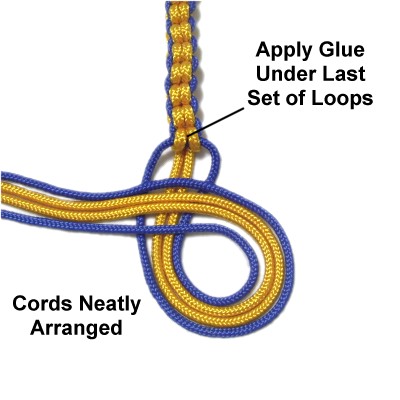
The Scout Bracelet can be finished in several
ways. The easiest is to tie an Overhand
Knot, which is shown below.
When you tighten the last set of loops in step 5,
apply glue under
them, which helps prevent them from loosening (see
next image). |
|
|
| |
| |

|
|
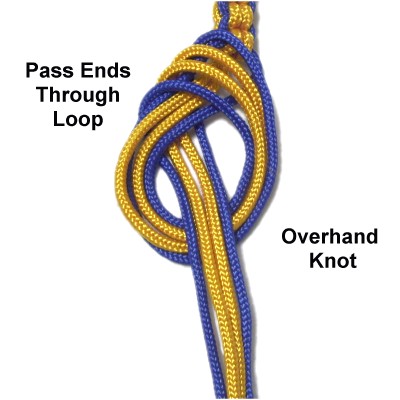
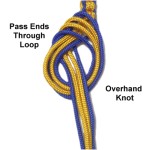
Step
7: Make a counter-clockwise
loop with the ends of the cords.
They should be neatly arranged and rest
side-by-side. |
|
| |
|
| |
|
|
Step 8:
Bring the ends through the loop from
below, to complete the Overhand
knot. Tighten the knot firmly,
applying glue as you do so.
When it's dry, cut off the excess material
close to the outer surface of the knot.
Make sure an Adult
applies a flame to the tips to melt the
stubs against the knot. |
|
| |
|
| |
|
|
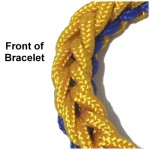
Turn the Scout Bracelet over so you can
see the V-shaped designs on the front.
|
|
| |
| |
|
|
|
By
using any text or images on Free Macrame
Patterns, you are agreeing to our Terms
of Use
|
|
|
| |
|
Have
any comments about the Scout Bracelet? Contact
Me.
|
|
|
|
 |
| |
|
| |