|
|
| |
 |
|
| |
|
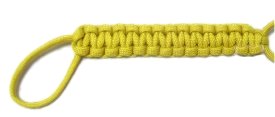
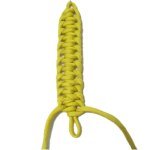
Description: The Portuguese
Sennit is a series of Square knots tied around a
loop. It's sometimes called the Solomon
Bar.
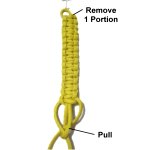
In the final step, one loop at the top is
pulled, which removes the one at the bottom and
secures the ends.
This technique can be used when you need a
strong stable loop, followed by knots, such as
in a plant hanger. It's also a nice way to make
a key ring.
The Genoese Sennit is also
described below, since it is a similar
technique. The knot featured is the Alternating
Half Hitch instead of Square Knots.
Be sure you know how to tie a Square
Knot as well as the Alternating
Half Hitch (with holding cord)
before you get started.
|
| |
|
| |
|
This design is on the Fusion
Knots website.
Click on this image or link to go to
the site.
Be sure to view the video
gallery, which contains
tutorials for many unique decorative
knots.
|
|

|
|
| |
| |
| |
|
|
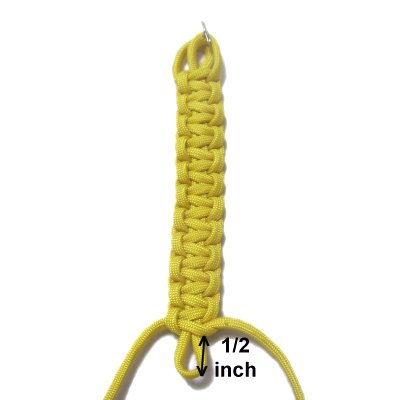
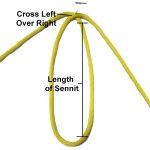
Step 1: You need one
cord 60
inches long to practice
the Portuguese Sennit.
Fold the cord at the center, crossing
the ends left over right to make a
loop. Secure it to your board
vertically.
The loop should be 5 inches long if you
are practicing.
See
information below
|
|
| |
|
|
Important:
When using this technique in a Macrame project,
cut the cord at least 12
x the finished length you want to make.
The finished length includes the knotted portion
and a loop at one end.
You make the first loop at least 1-inch longer
than the finished length so you can tie extra
knots, since the knotted portion compresses during
tightening. It's usually 1 to 2 inches
shorter after tightening. |
|
|
| |
|
|
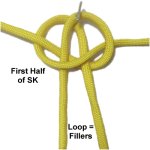
Step 2: Use the two
ends to tie the first Square
Knot. The loop acts as the filler cords.
Tighten the knot 1/2-inch from the
crossing point.
This image shows only the first half of
the SK.
|
|
| |
|
| |

|
|
Step 3:
Tie several more SK to complete the
sennit.
The last knot should rest 1/2-inch from
the folded area of the loop. |
|
|
|
| |
|
|
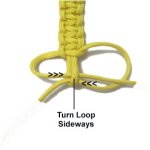
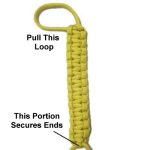
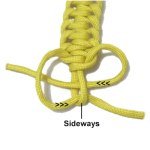
Step 4:
At the bottom of the Portuguese Sennit,
turn the loop sideways, so the opening is
horizontal.
Pass the ends through in opposite
directions. |
|
| |
|
| |
|
|
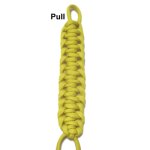
Step
5: Pull the exposed segment of
the loop
at the bottom
of the design to remove ONE of the areas
at the top, which look like small loops.
This is optional, if you prefer to keep
both intact.
|
|
| |
| |
|
|
|
Step
6: Pull the remaining loop
at the top
of the Portuguese Sennit to secure the
ends.
|
|
|
|
|
| |
 |
| |
Genoese Sennit
|
|

|
|
|
The Genoese Sennit is another knotted design
with a loop at the top. You will be tying
Half Hitches instead of Square knots.
You can do the same thing with Vertical
Larks Head knots, if you wish to
experiment. |
|
| |
| |

|
|
Step
1: Repeat
step 1 in the instructions for
the Portuguese sennit.
The length
of the loop should be 1-inch longer than
the finished size you are aiming
for.
|
|
| |
|
| |
|
|
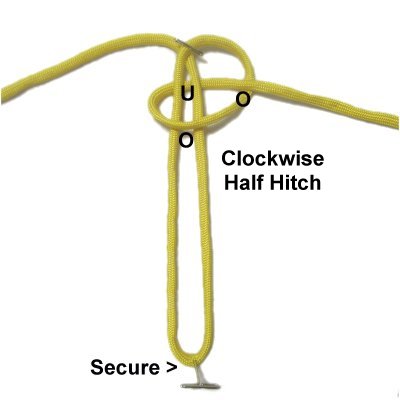
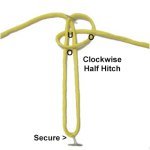
Step 2: The loop holds
the knots, so secure it at the bottom
(with tension).
Make a clockwise
Half Hitch with working end on the
right, passing over
- under both halves of the
loop, and over
the working end.
Tighten it 1/2-inch below the crossed
area.
|
|
| |
|
| |
|
|
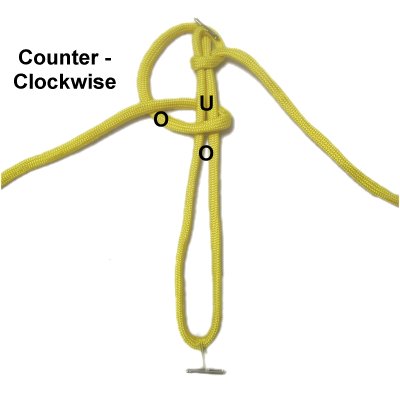
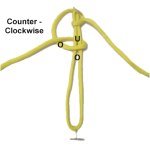
Step
3: Make a counter-clockwise
Half Hitch with the working end on the
left.
See
information below before tightening
|
|
| |
|
|

|
|
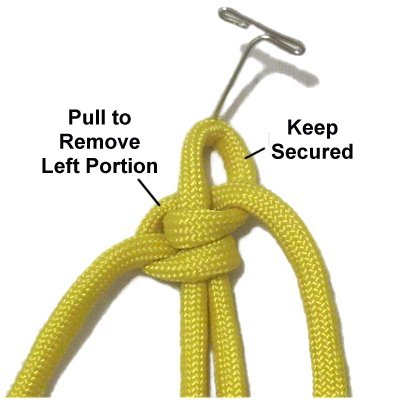
When you
tighten the second Half Hitch, pull the
cord so the left portion of the loop is
removed.
Keep the right portion secured.
This is optional if you prefer to keep
both segments intact.
|
|
|
|
|
| Designer's
Tip: By removing one portion of the
upper loop now, the completed sennit will have a
smaller loop at the top (1-inch). |
|
|
| |
|
|
Step
4: Repeat
steps 2 and 3 several times,
alternating between the two working cords.
Stop when the last knot is 1/2-inch from
the bottom of the loop. |
|
| |
|
| |
|
|
Step 5:
Turn the lower part of the loop sideways,
then pass the ends through in opposite
directions. |
|
| |
|
| |
|
|
Step
6: Pull the loop at the top,
which will secure the ends at the bottom.
|
|
| |
| |
|
|
|
By
using any text or images on Free Macrame
Patterns, you are agreeing to our Terms
of Use
|
|
|
|
|
Have
any comments about the Portuguese Sennit? Contact
Me.
|
|
|
|
|
|
|
| |