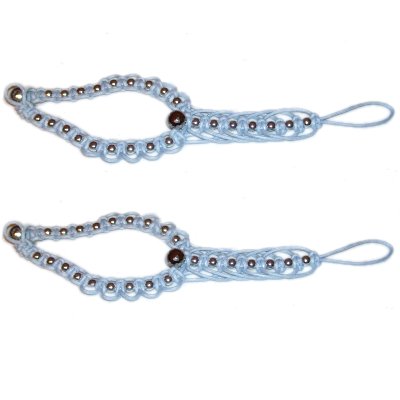
Description:
These Picot Sandals are a great way to
decorate your feet. Foot Jewelry has become
very popular in recent years, and these are really
unique.
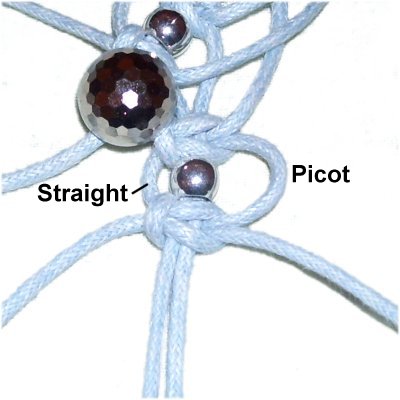
The area that fits on the top of the foot is a
Fish Bone picot design made with Square
Knots. The straps feature one sided picots
(loops), which can be used as attachment points
for charms, if you wish to decorate these Barefoot
Sandals. A button or focal bead can be added
in the area where the straps come off the center
piece.
There is a loop-button clasp in the back of the
ankle. This can be changed if you prefer
something else.
The material used in the example is waxed cotton,
which holds the shape of the knots better than
more flexible material. Satin cord and
Leather are also good choices for this design.
The
beads are NOT optional -- you need them
to provide space between the knots, especially in
the straps. Any size round beads can be
used, but make sure they have 5mm
holes.
This Macrame pattern is rated easy, suitable for
beginners.
Before you can start the Picot Sandals, you must
first measure your feet.
These are three areas you need to measure:
Toe
Loop: Measure around the
second toe, and add 1-inch, so the knots
start just beyond the toe.
Fish Bone
Design: Measure from near
the toe, up towards the top of the foot
where you want the straps to branch off.
Straps:
Measure from the branching point to the
back of the ankle (both directions).
Preparation,
continued: Add up all three
measurements to get the total length for your
Picot Sandals, which will be close to your shoe
size.
Cut 4 cords, each at least 9
times the total length.
Prepare the ends in some manner to prevent
unraveling.
Toe Loop
Step
1: To make the toe loop for
your Picot Sandals, fold one cord in
half. Secure it at the fold.
Place a second cord under it, then match
the ends so it's balanced. Secure it
as well.
See information below
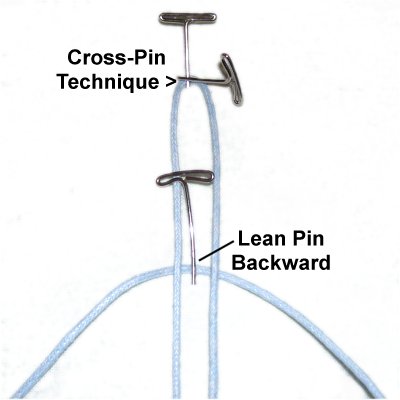
Design Tip:
There are three ways to secure cords, depending on
the material you are using:
Straight Pin:
The first is to put the pin through the material,
but only if the fabric can handle it without
damage.
Cross-Pin
technique: When using delicate
material like Satin
or Leather, use this method. One
pin leans backward over the cord, and another pin
leans forward, so they cross.
Basic Leaning:
When cords are close together, you can simply lean
one pin backward over the cord, so it's almost
flat on the board.
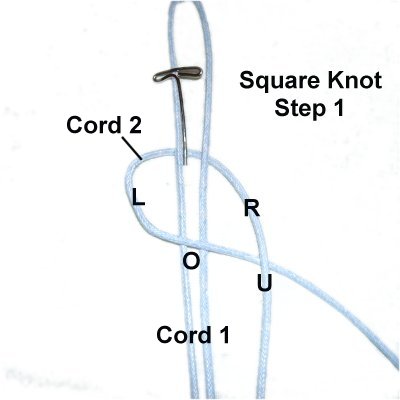
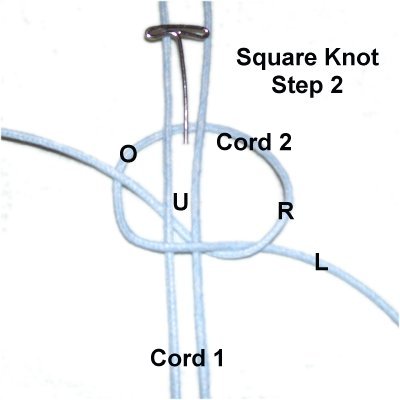
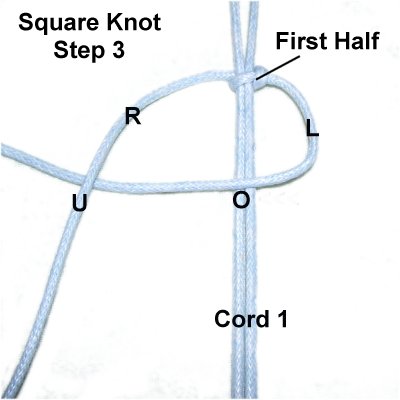
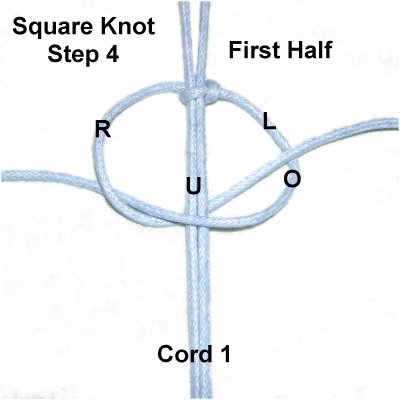
Step 2:
Now you will tie a Square Knot to attach the
second cord to the first. Cord 1 acts
as the fillers for the knots.
Tie all the Square Knots in the Picot Sandals
following these four steps:
<<
Move the left half of cord 2 over
cord 1, and under
the right half of cord 2 (left to right).
Move the right half of cord 2 under
cord 1, and over
the left half of cord 2 (right to left). >>
Pull the ends of cord 2 to tighten the knot
around cord 1.
The two halves of cord 2 have switched places, so
the direction you move them is the opposite for
the second half of the Square Knot:
<<
Move the left half of cord 2 over
cord 1, and under
the right half of cord 2 (right
to left).
Move the right half of cord 2 under
cord 1, and over
the left half of cord 2 (left
to right). >>
Tighten
firmly.
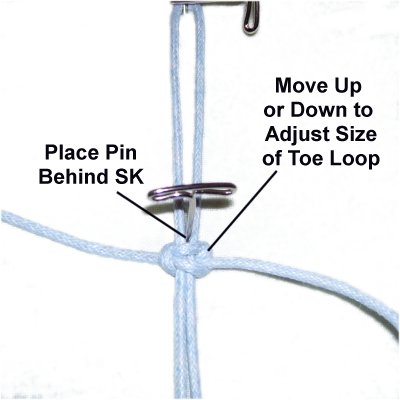
Try the loop
around your toe to see if you like the
size. Make adjustments by sliding
the SK up or down.
Place a pin behind
the SK to prevent the knot from moving
backward.
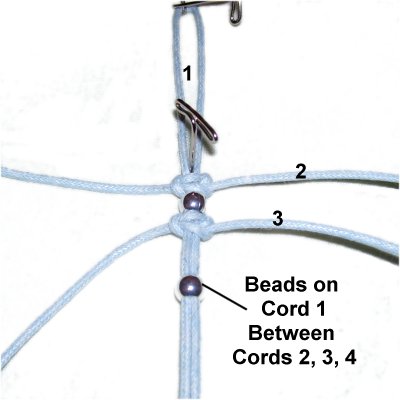
Step
3: Slide a bead onto both
halves of cord
1.
Attach cord
3 to cord 1, as you did in the
previous step.
Add another bead, then attach cord
4 in the same manner.
Fish Bone Design
To make the Fish Bone design for your Picot
Sandals, you need to keep your cords
organized.
Always arrange the ends of cords 2 - 4 horizontally,
when they are not in use. Cord 1 should
remain vertical.
Mentally label cords 2 - 4, which are the working
cords. Beads are attached to cord 1, between
each SK.
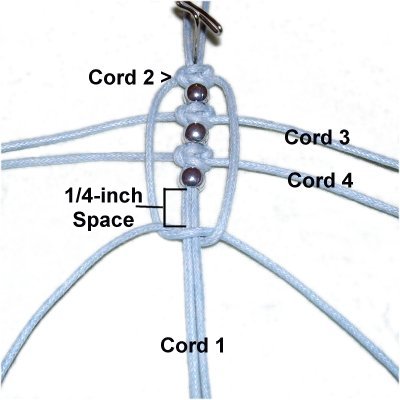
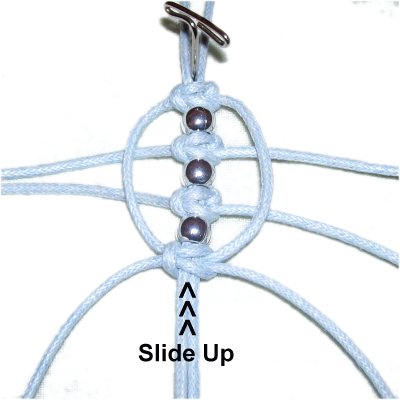
Step
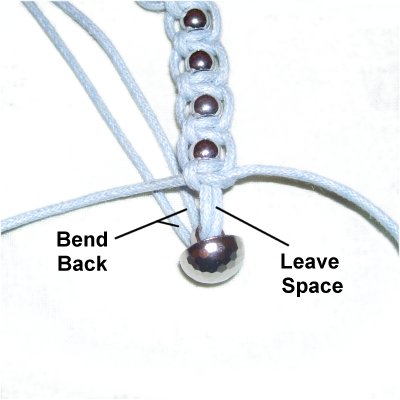
4: Add a bead to cord 1,
and slide it up to rest below cord 4.
Bring the two ends of cord
2 down, passing over
cords 3 and 4. Tie a SK with cord 2,
onto cord 1.
Important:
Leave a 1/4-inch space between this knot
and the bead.
Slide the
Square Knot up to rest against the bead.
This causes the cord to bulge outward,
forming the picots.
Before you move on, arrange the ends of
cord 2 horizontally, like the others.
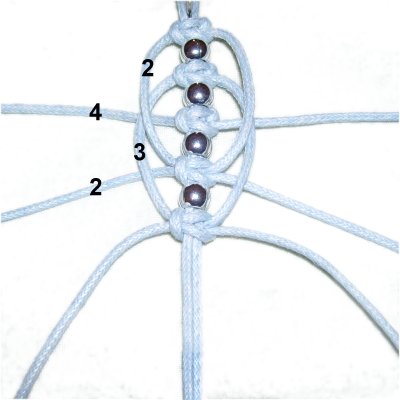
Step
5: Add a bead to cord 1.
Move cord
3 down, passing over
cords 4 and 2.
Tie a Square knot with cord 3, onto cord
1.
Make sure there is a 1/4-inch space
between this knot and the bead. Then
slide it up to form the picots.
Step
6: Add a bead to cord
1. Move cord
4 down, passing over
cords 2 and 3.
Tie the SK, placing it 1/4-inch away from
the bead. Then push the knot up, as
you did in previous steps.
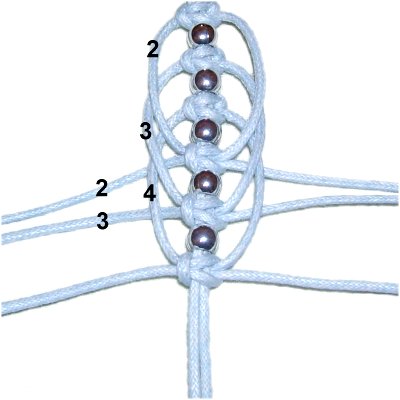
Step
7:Repeat
steps 4 - 6, adding more length
to the Fish Bone design. Measure it
as you progress, and stop when this
portion of the Picot Sandals is the right
size for your foot.
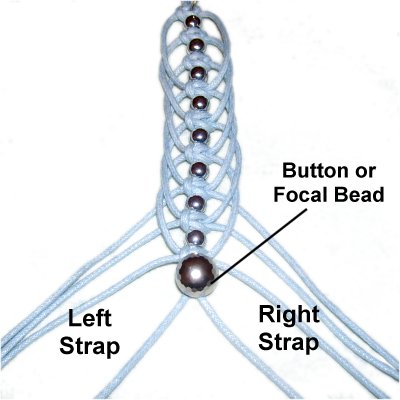
Optional:
Before you start the straps, you can place
a button or focal bead below the last SK
you tied.
Step 7,
continued: Separate the cords into
two groups, with four cords on the left and
right.
This means you will need to separate the two
halves of cord 1.
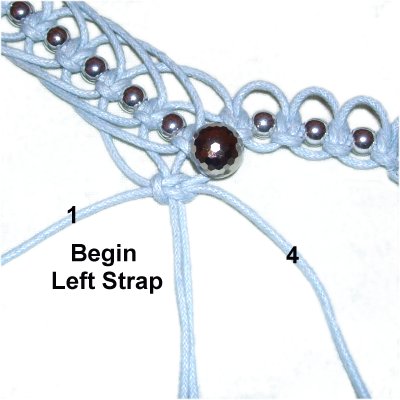
The Straps
Now it's time to make the straps for your Picot
Sandals. This is a good time to try it on
your foot, to be sure the middle section is long
enough.
You can go back to add or subtract knots in the
Fish Bone if adjustments are necessary.
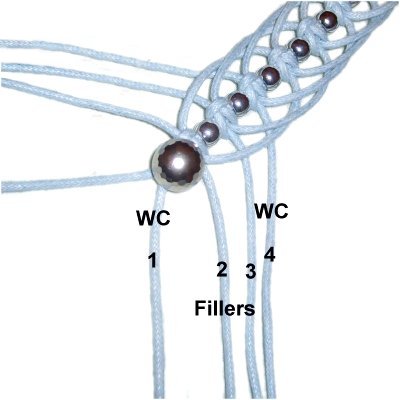
Turn the design so the four cords for the strap
are vertical. The Fish Bone will be diagonal
(see below).
Step
8: Mentally re-number the
four cords for the RIGHT strap as
shown.
The working cords are 1 and 4. The
fillers are 2 - 3.
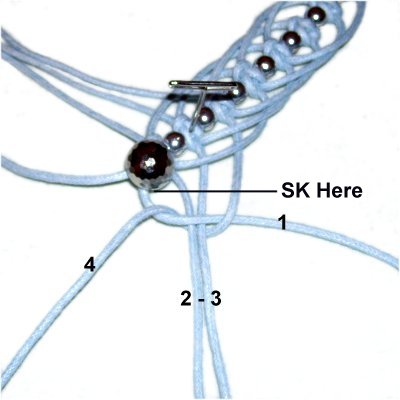
<<
Tie a Square knot with the four
cords. It should rest close to the
button and be horizontal.
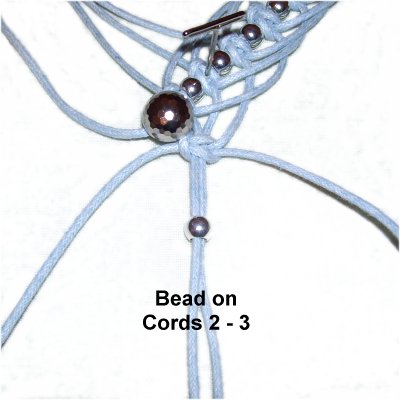
Put a bead on cords 2 - 3. >>
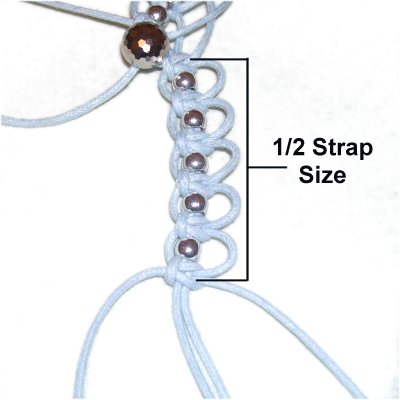
Step 9:
You now have a decision to make with regards to
the picots:
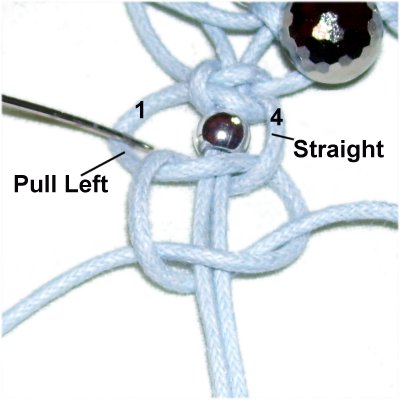
To create a picot on the right side of the strap
only, follow the steps below.
To make picots on both
sides, simply tie the next SK and tighten it
1/4-inch below the bead. Slide it up against
the bead to form the picots.
To make no picots at all, tie the next SK below
the bead.
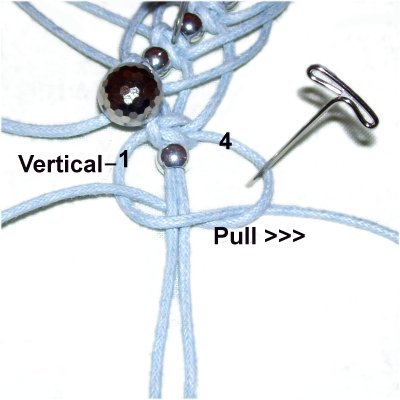
<<
For a right picot, tie the first half of
the SK, pulling cord 4 to the right.
Cord 1 should be vertical.
Secure it with a pin, then tie the second
half.
Slowly tighten and adjust the
knot until firm. >>
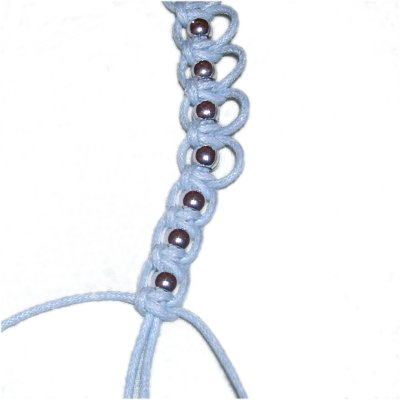
Step
10:Repeat
step 9 several times, until the
length of the strap is half
the size you need.
You can continue making picots if you
wish, but the Picot Sandals are more
comfortable if the strap is straight in
the back of the ankle (no picots).
For
the remainder of the right strap, place
beads between the SK, tightening the cords
around each one completely.
Stop when the strap is the size you need.
Step 11:
Begin the other strap by mentally
numbering the cords on the left (left to
right).
Tie the first SK, tightening it so it
rests next to the button or bead, as in step
8.
Step
12:Repeat
steps 9 - 10, but make these
important changes:
When making each picot, pull cord
1 to the left.
Cord 4 remains straight as you tighten the
SK.
Step
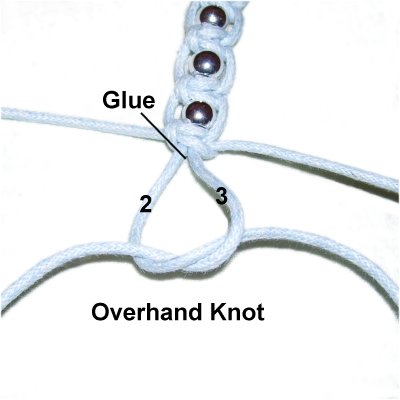
13: Tie a tight Overhand
knot with cords 2 and 3 (both straps).
Apply glue next to the last SK, so it's on
the inside
of the Overhand knot.
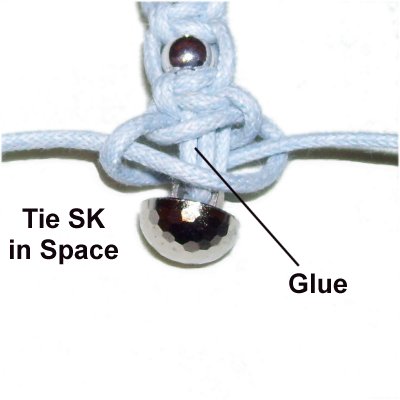
Loop and Button Clasp
Your Picot Sandals
need some type of clasp in the back of the
ankle. You can change this area if you
prefer a different type of closure than the one
used in the example.
The following instructions are for a loop at the
end of the right strap, with a button on the left
strap.
Important:
BEFORE you create the clasp, try the Picot Sandal
on your foot to make sure everything fits the way
you want it to. Once you start the
clasp, it's too late to make changes.
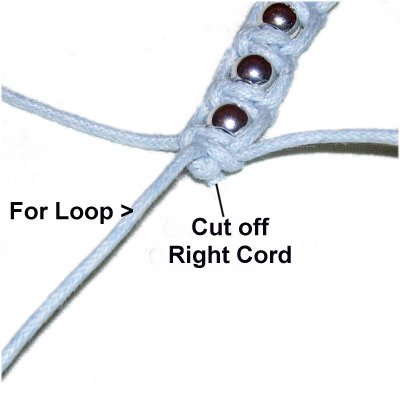
Step
14: Cut off the right
cord used to tie the Overhand
knot in step
13 (right strap).
The left cord will be used to make the
loop.
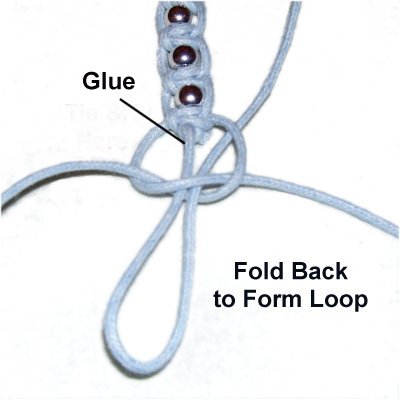
Step
15: Fold the left cord back
towards the strap, which will form the
loop.
Tie a Square Knot with cords 1 and 4, with
the folded cord as the fillers. Make
sure you pass around both parts.
Apply glue next to the previous SK, so it
will be inside
this new knot.
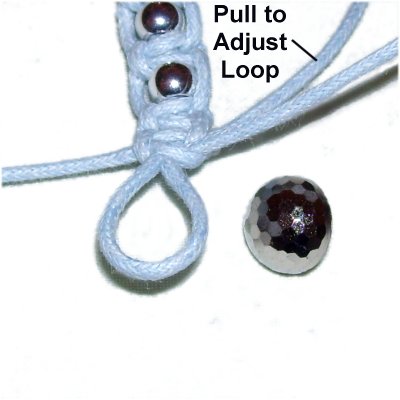
Adjust the
size of the loop to fit the button by
pulling on the end of the cord.
Don't make it too large, or the button
will slip out of it when you are wearing
the sandals. It should be only large
enough for the button to fit through.
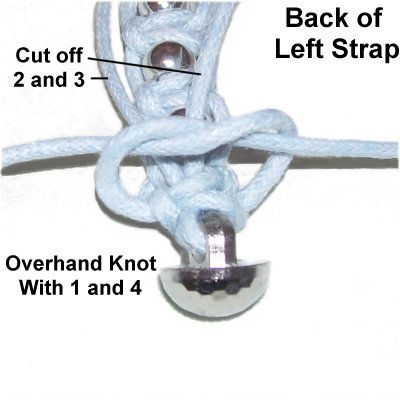
Step
16: Re-arrange the strap
(or turn it over) so you are working in
the back.
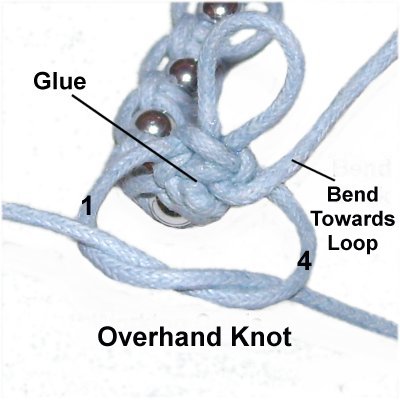
Bend the cord used to make the loop, so
it's heading towards
the loop.
Tie a very tight Overhand knot with cords
1 and 4. Apply glue so it's
under
the knot when it's tightened.
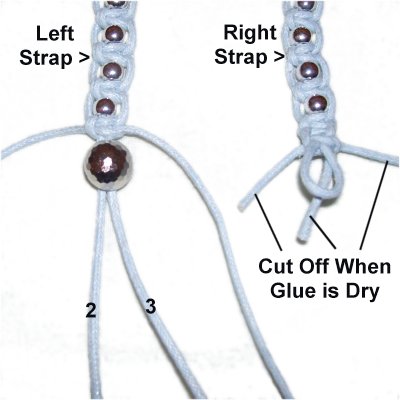
Step
17: When the glue is dry,
cut off the excess from all three cords in
the right strap.
Slide a button onto cords 2 and 3 on the left
strap.
Bend cords
2 and 3 back towards the strap,
passing them underneath it.
Adjust the button so there is a small
space between it and the last SK tied.
Step
18: Tie a Square Knot with
cords 1 and 4, arranging it in the space
you made in the previous step.
Make sure you go around both
parts of the fillers (cords 2 and
3), since you folded them.
Apply glue onto cords 2 and 3 as you
tighten, so it will be inside the knot.
Step
19: Turn over the left
strap so you work in the back.
Cut off cords 2 and 3.
Tie an Overhand knot with cords 1 and
4. Apply glue, and when it's dry,
cut off the excess material.
Step
20: Make another Picot
Sandal by repeating Preparation
and steps
1 - 19.
By
using any text or images on Free Macrame
Patterns, you are agreeing to ourTerms
of Use