Description:
Fish Bone Designs are vintage Square knot
patterns featuring wide picot loops. Three or more
working cords are used in an alternating pattern
to form the interlocked picots.
It's possible to make these decorative knots with
a single color when you use them in a Macrame
project. The details won't be as obvious as what
you see on this page. When practicing,
use three colors if possible.
On this page are the Standard Fish Bone and a
variation I call the Alternating Fish Bone.
The beaded Fish Bone is no longer on this
page.
Both designs are suitable for belts, bracelets,
plant hangers, purse straps, and similar projects.
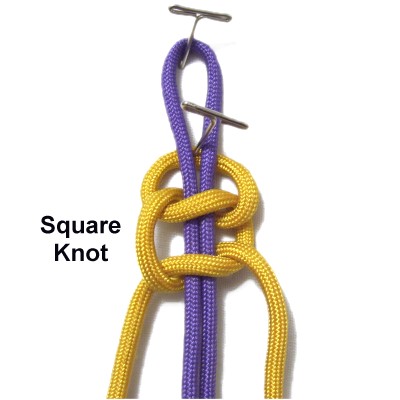
Make sure you
know how to tie Square
Knots before you get started.
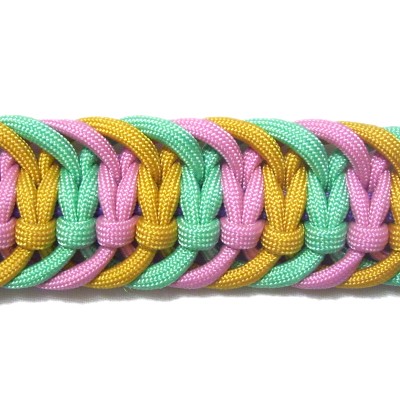
Standard Fish Bone
Preparation:
You need three 60-inch working cords and one
30-inch filler cord to practice
this technique.
The working cords need to be 9
x finished length you plan to make if you
are using this design in a Macrame project (Fish
bone only).
In other words, Fish Bone Designs require more
material. Take that into account when you
make your calculations, especially if there are
other knots being tied.
You can make Fish Bones without folding the cords,
which is often done if the cords are coming from
other knots, such as in a plant
hanger. In that case, you would need 6
working cords and either 1 or 2 fillers.
Step
1: Fold the filler cord in
half and secure it to your board
vertically.
Place one working cord underneath, and
match the ends to balance it. Secure
it at the center.
Tie a Square Knot with the working cord.
Step 1,
continued: Repeat the same process
with the other two working cords, attaching them
to the filler cord in the same manner.
Tighten all the knots firmly and move the knots so
the loop (fold) is the right size for your
project.
Mentally number the working cords in the order
they were attached to the filler cord.
Place pins on your project board so the unused
cords in each step can be draped over them.
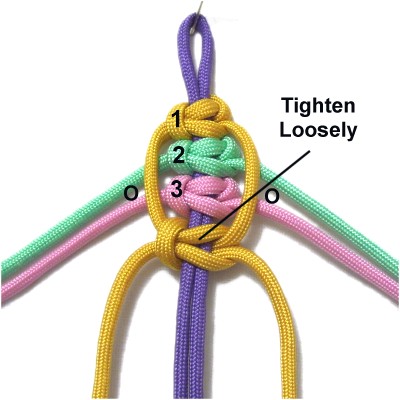
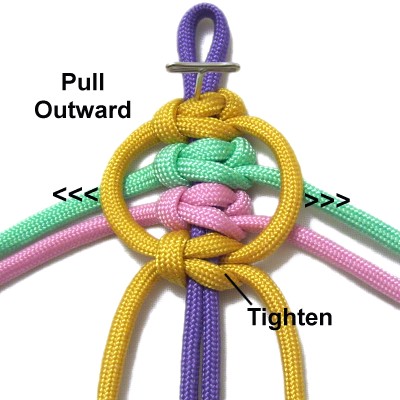
Step
2: Place cords 2 and
3 over the pins (both halves).
Pass both halves of cord
1over
them, then use it to tie the next Square
Knot onto the filler cord.
Tighten the knot loosely.
Form the picot
loop by pulling outward
on the segments between the two knots.
Try to make the total width more than
1-inch, unless the material is less than
4mm in size.
Tighten the SK firmly.
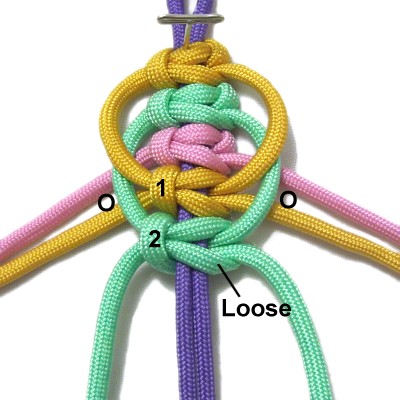
Step
3: Move each half of
cords 1 and 3 to the sides, draped over
the pins.
Pass both halves of cord
2over
them, then use it to tie the next SK onto
the filler cord. Tighten it loosely.
Pull outward
on the segment between the knots to form
the picot.
Try to match the width of the first picot
loop.
Tighten the Square knot firmly.
Important:
When making Fish Bone Designs, it's important to
keep the picots the same size, so the width will
be consistent.
Use tape or draw guide lines on either side of the
sennit, and pull the picots out to the marked
areas.
Make sure the knots are touching each other
without extra space between them, because the
picots can change size if the knots move.
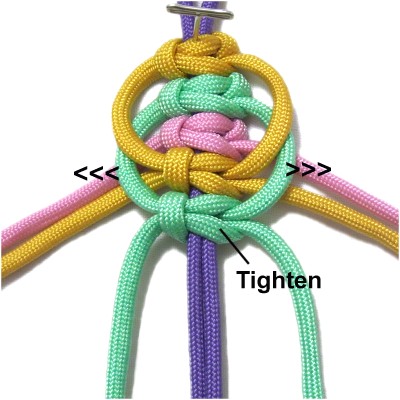
Step
4: Move each half of cords
1 and 2 to the sides.
Pass both halves of cord
3 over them, then use it to tie
the next SK (loosely tightened).
Pull outward
to form the picot, then tighten the knot
firmly.
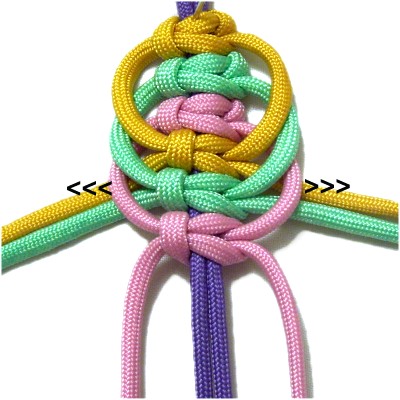
Step
5: Repeat
steps 2 - 4 at least two
more times if you are practicing.
Fish Bone designs look unbalanced if they
are too short, since they are wider than
other sennits. Keep that in mind
when using them in Macrame projects.
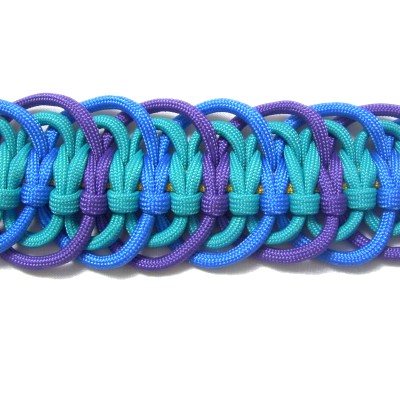
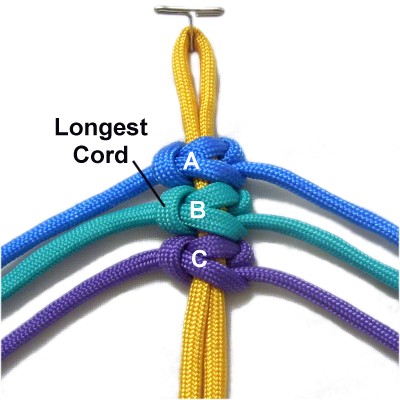
Alternating Fish Bone
Description:
Fish Bone designs can be made in unusual
ways. This is my own invention, but I'm sure
someone has tried the same approach. One
cord is used to make small picot loops. The
large loops surround the small ones, which are
made with the other two cords (colors alternate).
The small picots are made with the turquoise cord
in the images (cord B). It needs to be longer than
the others because it's used to tie more
knots. Take that into consideration if you
are using this design in a Macrame project.
Remember to place pins on your board so you can
drape unused cords over them for support.
Preparation:
You need one filler cord folded in half and
secured vertically on your board.
You also need three working cords.
Mentally label them A - C.When practicing, all three cords can be
the same length (60 inches), but it's better if
cord B is at least 70 inches.
Here are the best cord lengths if you are making a
project with this design (Fish Bone only):
Filler cord:
At least 2 x the finished length + 6 inches.
Working
cords A and C: At least 9 x the
finished length.
Working
cord B: At least 10 x the
finished length.
Step
1: Repeat step 1from the
instructions for the standard Fish
Bone (above).
Make sure the longestcord
(B) is placed between cords A
and C.
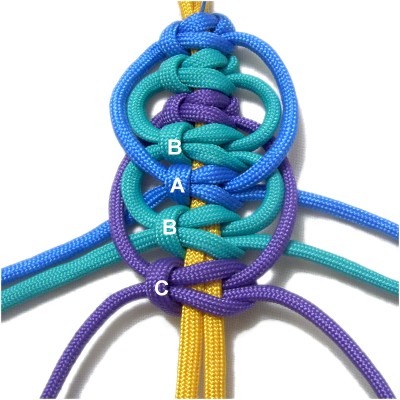
Step
2: Move cords
C and A over the pins.
Move both halves of cord
B toward you, passing overcord C.
Use it to tie a loose
Square Knot around the filler cord.
Form the picot by pulling outward,
then tighten the knot firmly.
Step
3: Move cords
C and B over the pins.
Move
cord
A around the picot and over cords
B and C on both sides.
Use it to tie the next SK, then form the
picot and tighten.
Designer's
Tip: Don't be surprised if the
first two picots look a little odd or
uneven.
Balance them the best you can as you adjust their
size.
Step
4: Move cords C
and A over the pins.
Use cord
B again, making the next picot as
you did in step 2(small).
Step
5: Place cords
B and A over the pins.
Move cord
C around the previous picot, then
over the other two working cords.
Use it to tie the Square knot, adjusting
the size to match the one from step 3.
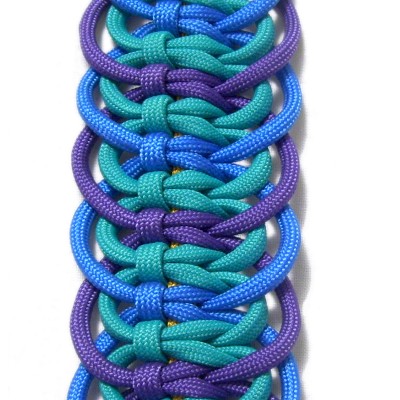
Step
6: Repeat steps 2
- 5 at least 2 more
times if you are practicing.
Fish Bone designs are usually longer than
other sennits, to balance the length with
the extra width.
By
using any text or images on Free Macrame
Patterns, you are agreeing to ourTerms
of Use.