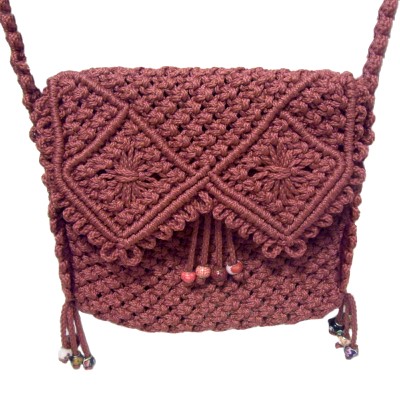
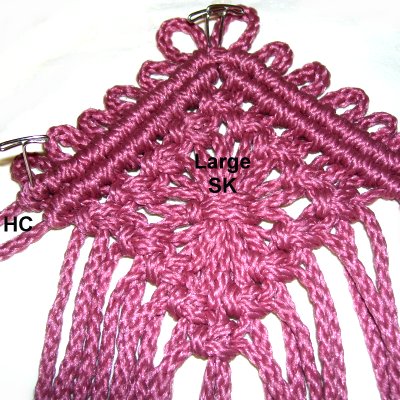
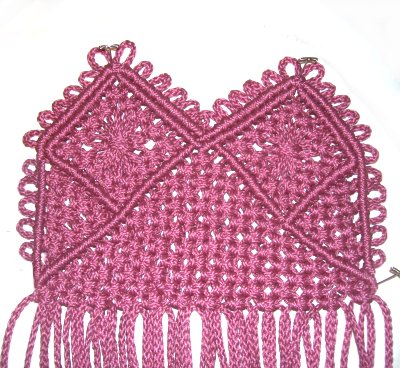
Description:
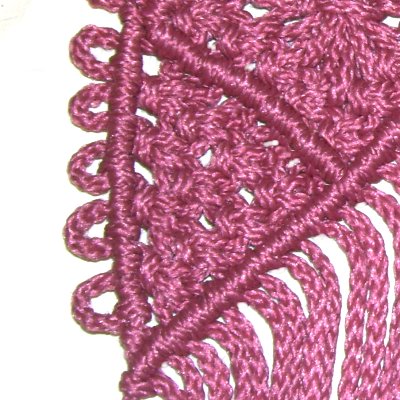
The Picot Purse features vintage knots
called picots
(small loops), along the edge of the flap. There
are diamond shaped designs on the flap as
well.
The strap also has picots, arranged
vertically.
This Macrame patternrequires
experience, which is why it's listed in
the Advanced section. You will need to tie
some knots without a board.
The width and length of the handbag is 9 inches.
The strap is 32 inches long, measuring from where
it attaches near the top the purse.
The flap folds over the front like a messenger
bag.
A beaded tassel-like design creates a simple
closure. The tassels at the bottom are
optional.
Prepare the ends with tape or glue to
prevent fraying while you work.
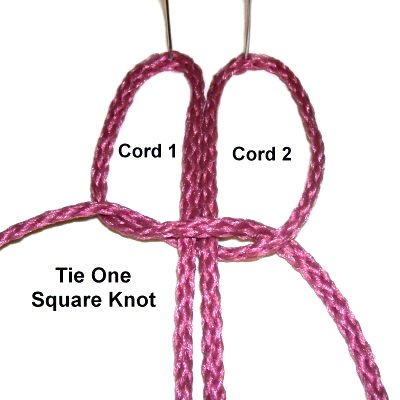
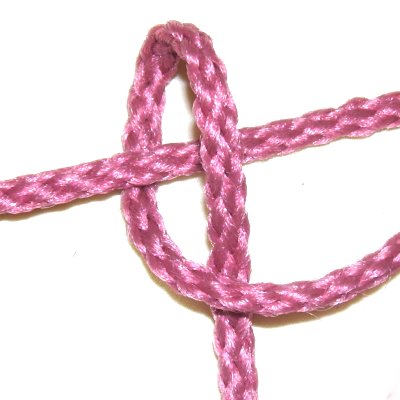
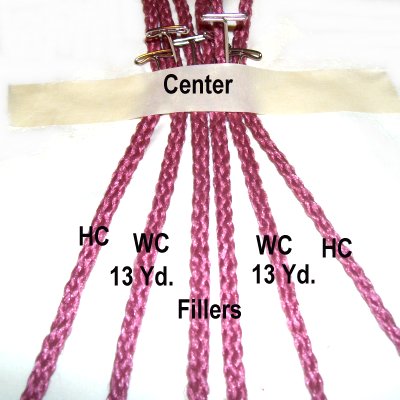
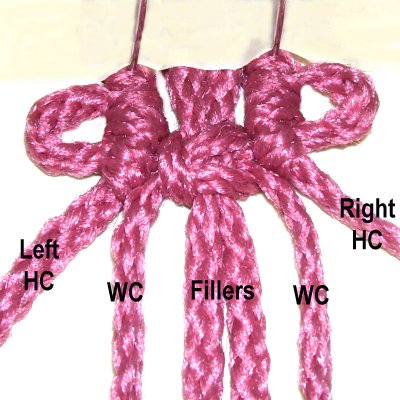
Fold two cords
in half and secure them side-by-side.
Mentally number the four segments.
Tie a Square Knot (SK) with segments 1 and
4, around 2 and 3. Tighten it as
much as possible.
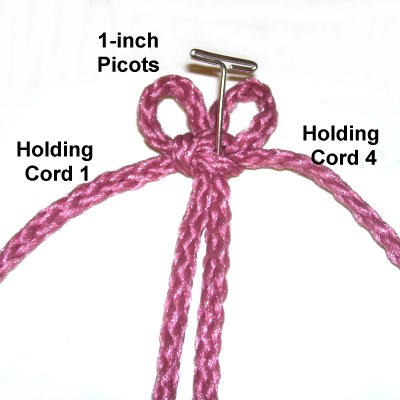
Adjust the picot loops above the knot to 1-inch.
Secure segments
1 and 4 diagonally, to the left
and right.
They both should have tension, since they
are holding
cords.
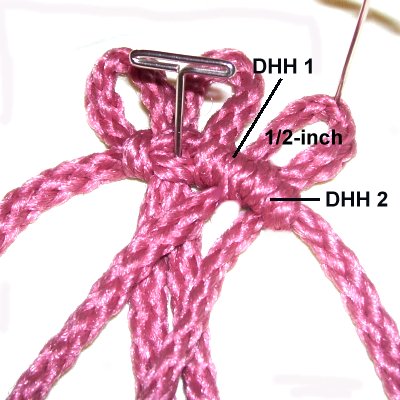
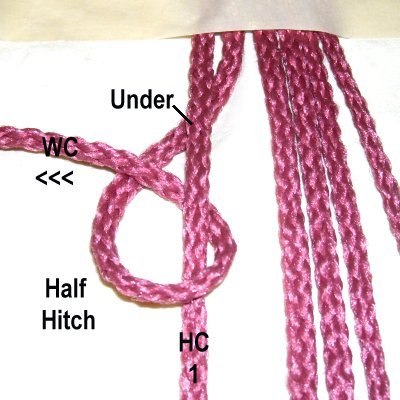
Mount a new
5-yard cord to holding
cord 4. Start by folding
the cord in half. Place it 1/2
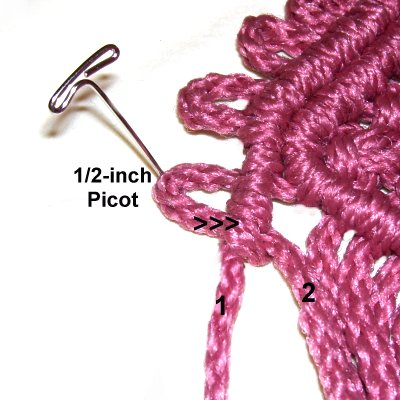
inch above the holding cord.
Attach both ends to holding cord 4 with a
Double Half Hitch (DHH). Measure
the picot, and adjust the size if
necessary (1/2-inch).
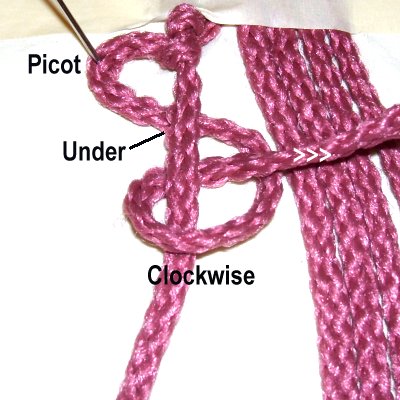
Important:
When making the Double Half Hitches for
the Picot Purse, you should work with
the wide profile of the material you are
using:
Avoid twisting the working cords, by
folding them around the holding cords so
they remain straight.
Arrange the knots so they do not
overlap.
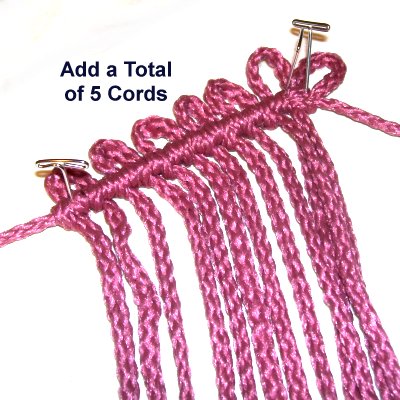
Mount 4 more
cords in the same manner (total of 5).
Mount 5 cords to holding
cord 1 in the same way, making
sure the picots are 1/2-inch in size.
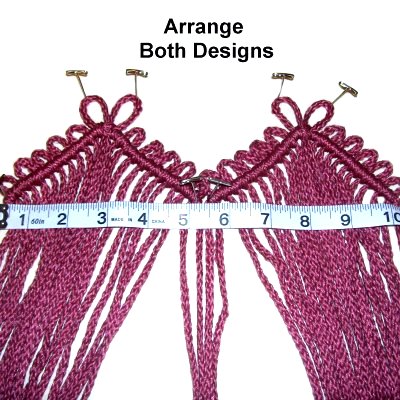
Step 2:Repeat
step 1 to create another V
shaped design for the flap of the Picot Purse.
Arrange both
designs on your board. Adjust the
angle of both V shapes so they are a total
of 10
inches wide, when measuring from
the left edge to the right.
Secure them when you have the correct
width.
Important:
Secure the first
picot loops you made, at the top
point of each V shape.
The Flap
Step
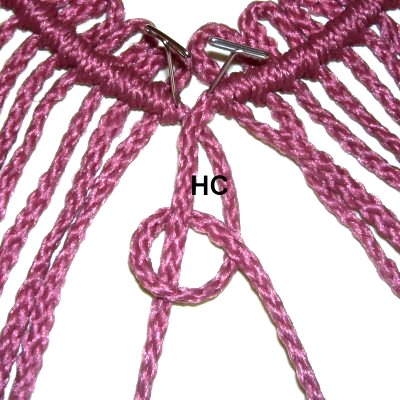
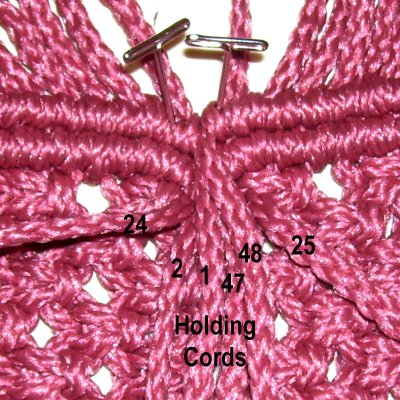
3: Mentally number the
cords 1 - 48. Attach cord
24 to cord 25 with a DHH.
These are the two holding
cords fromsteps 1 -
2.
Step
3, continued: The two bars
along the edge of the Picot Purse should be close
to each other, so tighten the following knots firmly.
Cords12 and 13
are the second set of holding cords for the left V
design. Move them to the right and left, on
the same angle as the first row of DHH.
Attach cords 11 - 2 to holding cord 12 with
DHH. Do
not attach cord 1.
Attach cords 14 - 24 to holding cord 13 with DHH.
For the right V
design, use cords
36 and 37 as the second set of holding
cords.
Attach cords 35 - 25 to holding cord 36 with
DHH.
Attach cords 38 - 47 to holding cord 37 with
DHH. Do
not attach cord 48.
Attach holding
cord 13 to holding cord 36.
This knot is in the center
of the Picot Purse, where the two V
designs are connected.
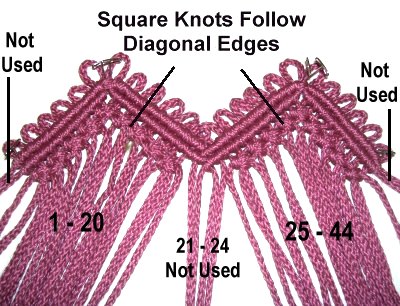
Step
4: Now you will tie
Alternating Square Knots that follow the
diagonal edges of the Double Half Hitches.
Tighten the knots firmly, so they are as
close to the DHH as possible.
Do
not use the first and last 2 cords at the
edges of the Picot Purse. These
were holding cords from the rows of DHH.
Mentally number the remaining cords 1 -
44. Cords
21 - 24 are not used in this section.
Tie ASK with the following groups (Left
V design):
Cords 9 - 12 (below top point).
Cords 7 - 10 and 11 - 14.
Cords 5 - 8 and 13 - 16.
Cords 3 - 6 and 15 - 18.
Cords 1 - 4 and 17 - 20.
Step 5:
Tie ASK with the following groups (Right V design):
Cords 33 - 36 (below top point).
Cords 31 - 34 and 35 - 38.
Cords 29 - 32 and 37 - 40.
Cords 27 - 30 and 39 - 42.
Cords 25 - 28 and 41 - 44.
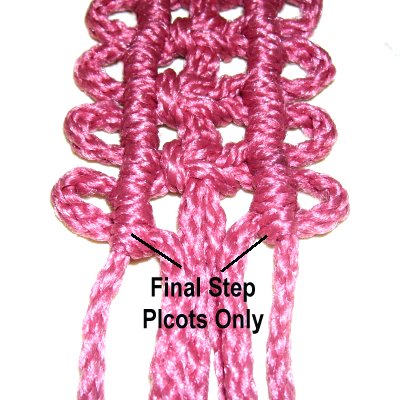
Step 6:
You will now tie large SK in the center of each V
shape, straight down from the top point.
Important:Keep the fillers organized by applying
small pieces of tape to each one. Write their
position numbers on the tape, before tying the
knots below.
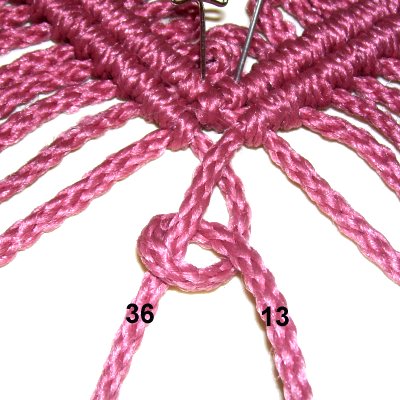
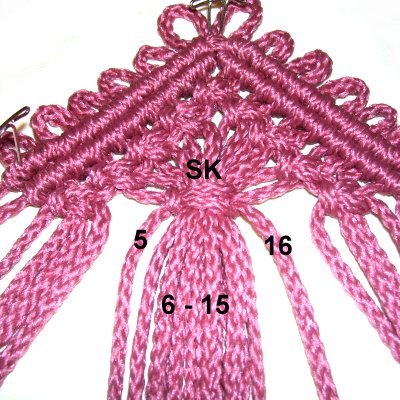
Left V
Design: Use cords
5 and 16 to tie the SK. The
fillers are cords 6 - 15.
This SK should line
up with the first and last SK in
that section (made with 1 - 4 and 17 -
20).
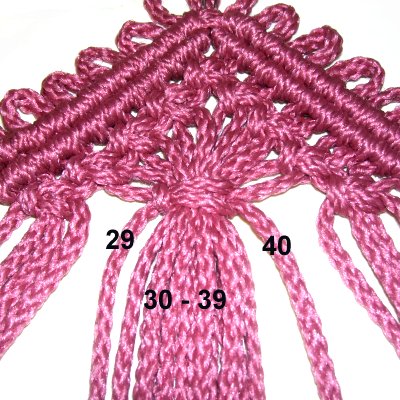
Right
V Design: Use cords
29 and 40 to tie the SK.
The fillers are cords 30 - 39.
This SK should line
up with the SK made by 25 - 28,
and 41 - 44.
Step
7: You now reverse the
process (steps 4 - 5), to tie the lower
rows of SK.
This turns the V shapes into diamonds.
Make sure you keep the cords organized,
and select the right ones.
Tie ASK with the following groups
(Left Diamond):
Cords 3 - 6 and 15 - 18.
Cords 5 - 8 and 13 - 16.
Cords 7 - 10 and 11 - 14.
Cords 9 - 12.
Tie ASK with the following groups
(Right Diamond):
Cords 27 - 30 and 39 - 42 to tie the ASK.
Cords 29 - 32 and 37 - 40.
Cords 31 - 34 and 35 - 38.
Cords 31 - 36.
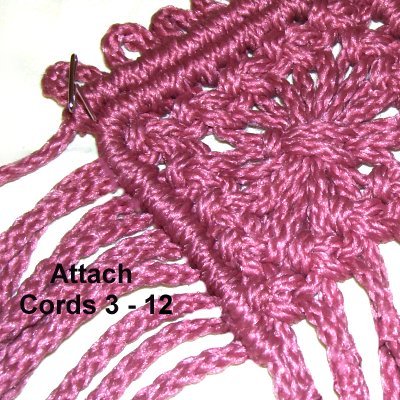
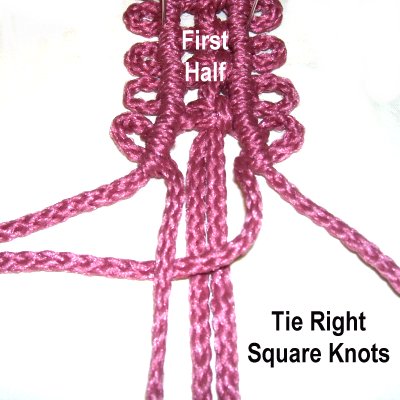
Step 8:
Mentally re-number all the cords 1 -
48. Remove
the tape.
Cords
1, 48, 24 and 25 are not used in this step.
Move cord
2 along the left
edge of the diamond on the left, to be
used as a holding cord.
Attach cords
3 - 12 to it with DHH.
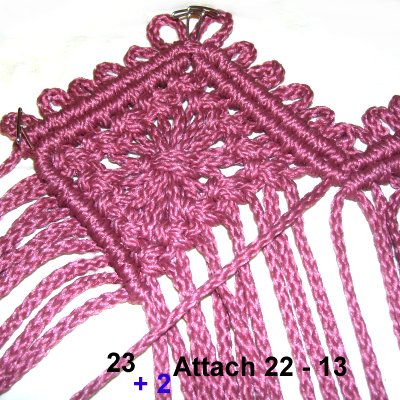
Move cord
23 along the
right edge of the same diamond.
Attach cords22 - 13
to it, and cord
2 (left holding cord).
For the diamond on the
right side
of the Picot Purse, use cord
26 as the holding cord for the left
edge.
Attach cords 27
- 36 to it with DHH.
For the right
edge, use cord
47 as the holding cord. Attach cords 46 - 37
to it with DHH.
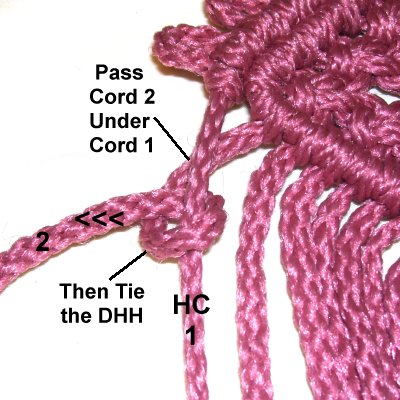
Step 9:
Now you will tie Vertical DHH with picots along
the left edge
of the Picot Purse, just below the diamonds.
Mentally
re-number the cords.
Move cord
2under
cord 1. Use it to tie a vertical
DHH onto cord 1.
The end should be heading towards the left,
and the knots tied counter-clockwise.
Important
Tip: See the photos for step
22 and 23 if the following direction
change
is confusing to you.
Bring the end
of cord
2under
cord 1, heading right.
Fold it to form a 1/2-inch
picot, and secure it at the fold.
Attach cord 2 to holding cord 1 with a
DHH, rotating clockwise.
Step
10: Now you will be making
a sideways V shaped design with
Alternating Square knots and picots.
You repeat
step 9 to make each picot.
Left Side of
Picot Purse:
Tie a SK with cords 2 - 5.
Make one picot (step 9).
Tie a SK with cords 4 - 7.
Tie the SK with cords 2 - 5 and with cords 6
- 9.
Make one picot.
Tie a SK with cords 4 - 7 and with cords 8
- 11.
Tie the SK with cords 2 - 5 and with cords 6
- 9.
Make one picot.
Tie a SK with cords 4 - 7.
Tie a SK with cords 2 - 5.
Make one picot.
Position cord
12 along the right
edge of the knots you just tied,
diagonally.
Attach cords
11 - 1 to it with DHH.
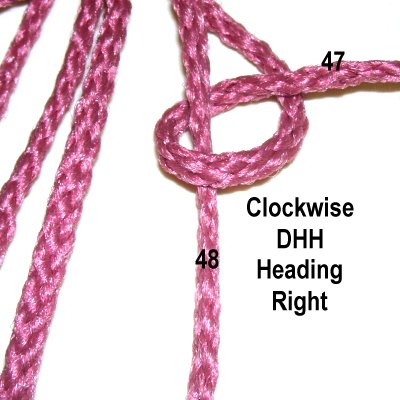
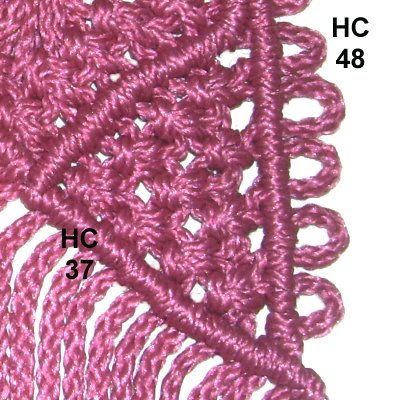
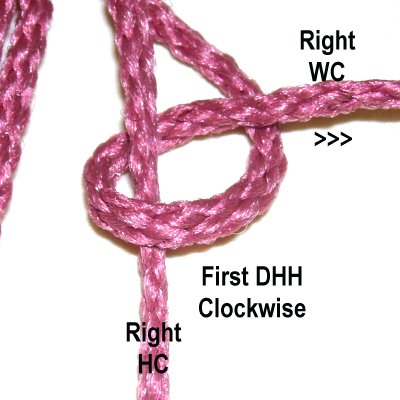
Step 11:
To make the same design on the right side of the
Picot Purse, you use the same instructions as step
9 to make the picots.
The only change is that you tie the knots in reverse
direction:
Clockwise
heading right
for the first DHH.
Counter-clockwise
heading left
for the second knot, after the picot is
made.
Use cord
47 to make the DHH with picots,
onto holding cord 48.
After the first picot is made, tie the SK as
described below:
Tie a SK with cords 44 - 47.
Make one picot.
Tie a SK with cords 42 - 45.
Tie a SK with cords 44 - 47 and with cords
40 - 43.
Make one picot.
Tie a SK with cords 42 - 45 and with cords
38 - 41.
Tie a SK with cords 44 - 47 and with cords
40 - 43.
Make one picot.
Tie a SK with cords 42 - 45.
Tie a SK with cords 44 - 47.
Make one picot.
Place cord
37 along the left
edge of the V design.
Attach cords
38 - 48 to it with Double Half
Hitches.
Front and
Back
Step
12: Now you will make the
back
of the Picot Purse, which starts in the
center area of the flap, between
the diamonds.
The cords used in each row are described
below. Mentally re-number the cords
1 - 48.
Row 1:
Tie one ASK with cords 23 - 26, which are at the
top point.
Row 2:
Usecords
21 - 24 and 25 - 28.
Row 3: Use
cords 19 - 22, 23 - 26, and 27 - 30.
Row 4:
Use cords 17 - 20, 21 - 24, 25 - 28, and 29 - 32.
Row 5:
Use cords 15 - 34 in groups of 4.
Row 6:
Use cords 13 - 36.
Row 7:
Use cords 11 - 38.
Row 8:
Use cords 9 - 40.
Row 9:
Use cords 7 - 42.
Row 10:
Use cords 5 - 44.
Row 11:
Use cords 3 - 46.
Row 12:
Use cords 1 - 48.
Row 13:
Use cords 3 - 46.
Step
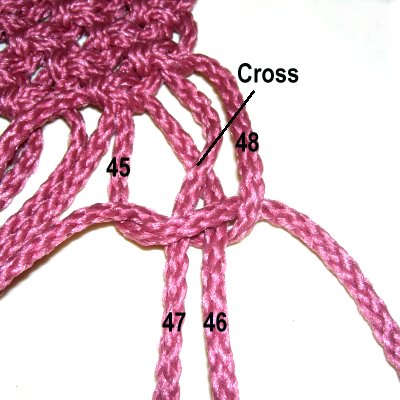
13: Asyou tie the next row using cords 1
- 48, cross
cords
2 and 3, as well as 46 and 47, so they
switch places.
These are fillers
for the first and last knots.
The
reason for the switch is because they
are shorter than the others.
Step 14:
Tie 49 rows of ASK to make the back, bottom, and
front of the Picot Purse, in one continuous
piece.
The next row is tied with 3 - 46, followed by 1 -
48, and so on.
Tighten all the knots firmly, so they all rest
close together. Double check to make sure
the last row is tied with cords
3 - 46.
Step 15:
Tie one more row, with cords
5 - 44.
Step
16: Move cord
2 along the front edge of the
Picot Purse (left holding cord). It
will curve
as you attach the others.
Attach cords
3 - 23 to it with DHH.
Move cord
1 into position, and attach cords
3 - 23 to it with DHH.
Step
17: Move cord
47 along the edge (right holding
cord).
Attach cords 46 - 26 to it with DHH.
Move cord
48 into position, and attach
cords 46 - 26 to it with DHH.
Step
18: In the center
front edge of the Picot Purse, locate the
four holding cords (1, 2, 47, 48).
Arrange them betweencords
24 and 25, which were not
attached in the previous steps.
Step 18,
continued: Use cords
24 and 25 to tie a tight Square knot
around the four holding cords.
Step
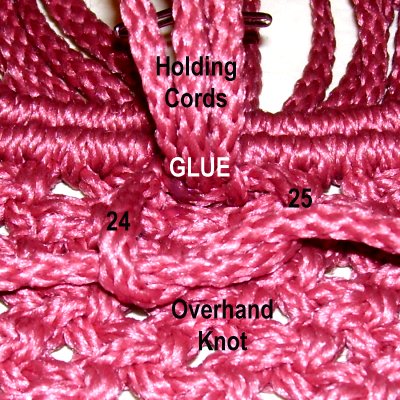
19: Flip the four holding
cords out of the way.
Use cords 24 - 25 to tie a tight Overhand
knot, so it rests under
the holding cords, near the SK.
Apply glue to hold the knot in
place.
Step 19,
continued: Pass the ends through
spaces to the
back (or inside) of the Picot Purse.
Finish off cords 24 - 25 by tying another Overhand
knot. Trim the ends to 2 inches and weave
them through the back of the knots in the area.
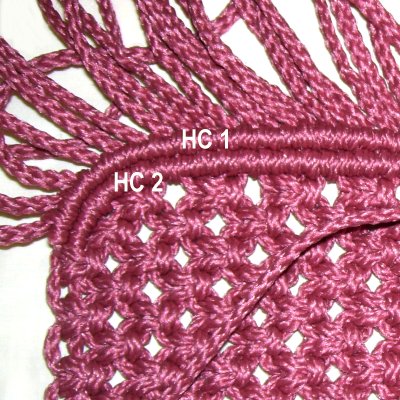
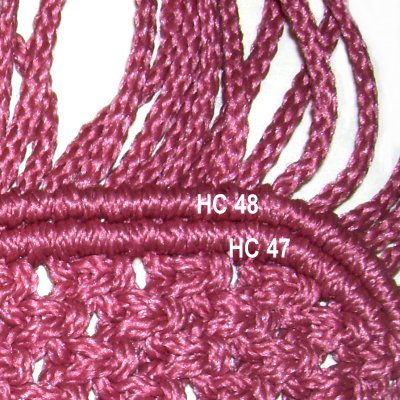
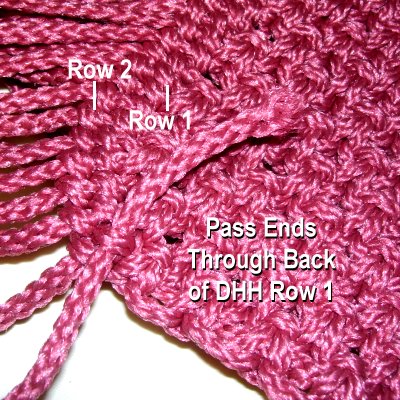
Step
20: To finish the edge,
pull each cord to the back (inside) of the
Picot Purse.
Trim them to 2 inches, and slide each one
under the back of the DHH from the first
row you tied, NOT the row that
forms the edge (2nd row).
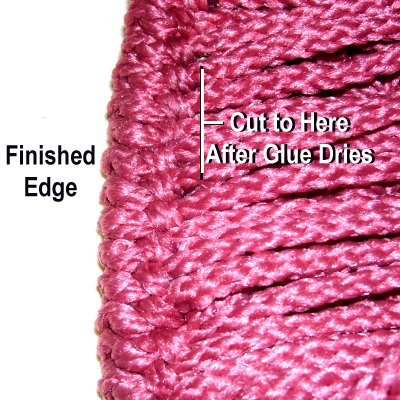
Apply glue to hold them in place.
This is what
the back will look like when you are
through.
After the glue dries, trim each cord to
1/4-inch beyond the DHH they rest
under.
You can then heat fuse the ends if the
material is nylon,
and is able to melt.
The Strap
Step 21:Cut
2 cords, each 13 yards long, as the working cords
for the strap of the Picot Purse.
To make the strap longer than 32 inches:
Multiply the
length you want by 14 and divide by
36. Round up to the nearest whole number.
Cut
2 holding cords and 2 fillers, each 2 yards
long.
Prepare the ends of all 6 cords to prevent
unraveling.
Arrange the
cords as follows, securing them at the
center. Place tape horizontally to
mark the center.
Important:
The 2-yard cords on the outside
are the holding cords for the DHH picots.
The 2-yard cords in the middle are fillers
for the Square Knots. Apply tape to the
fillers, so you can identify them easily.
Step
22: The picots for the strap are
made very similar to step 9.
First, move the left
working cord under
the left holding cord next to it.
Tie the DHH rotating counter-clockwise,
so the end is heading left. The knot
should rest against the tape.
Fold the
working cord to form a 1/2-inch
picot, and secure it at the fold.
Bring it underthe
holding cord from left
to right.
Tie a clockwise
DHH, so the end is heading
right when you are
finished. Measure the picot and make
adjustments if needed.
Step
23: The right side of the
strap is tied the same, but the direction
of the DHH is changed.
Pass the right
working cord under
the right holding cord.
Tie a clockwise
DHH, so the end is heading right.
Form the picot
with the working cord and secure it.
Bring the working cord under
the holding cord, heading right to left.
Tie a counter-clockwise
DHH.
Step
24: Use the two working
cords to tie a tight
Square Knot around the fillers.
Do
not use the holding cords for this step.
Step
25: Repeat
steps 22 - 24 until the first
half of the strap measures 16
inches.
Stop
on step23,
so you end with the picots (not the Square
knot).
Step
26: Turn the strap for the
Picot Purse, so you start the second half
at the center.
Tie rightSK
for this half, so the strap is the same
all the way down. The image shows
the first step of a SK.
Repeat steps
22 - 25,starting
with aSquare
knot,and
ending with the picots.
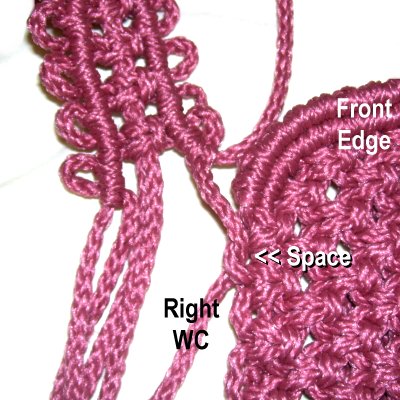
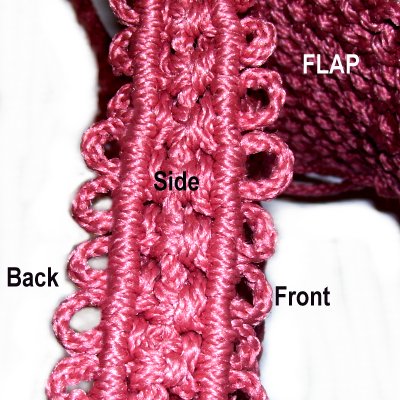
The Sides
Step 27:
Now it's time to make the sides
of the Picot Purse, where the strap is attached to
the front and back.
The front of the purse is the edge where you
finished with two rows of DHH (steps 16 -
17).
Locate the knots below
the sideways V shaped designs on the sides of the
flap. It's where you started the back of the
purse, in step 13.
Note the loops along the edges of the ASK.
That's where the cords for the strap pass through
to link the two halves.
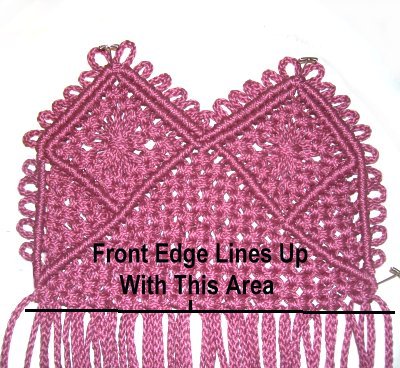
Start
by folding the Picot Purse, so the
finished edge of the front
lines up with the last SK in the flap.
This is
just below the DHH on the sides.
Step
28: Pass the right
working cord through the first space you
come to in the front,
directly below the curved edge.
Make sure you pass it through from
the top.
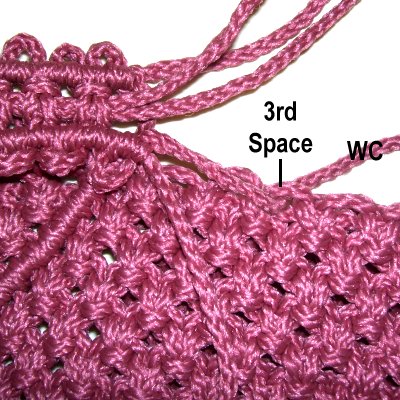
Step
29: Locate the row of DHH
at the edge of the flap.
Move down to the 3rd
space along the edge of the ASK,
and pass the left
working cord through (from the top).
Step
30: Place the Picot Purse
between your knees, so you can clearly see the
front and back, with the strap between them.
Tie a SK with the working cords around the
fillers, as you did when you created the
strap. The fillers are the ones with the
tape.
Step 31:
Go to the other side of the purse and repeat
steps 28 - 30.
Make
sure the strap is not twisted.
Step
32: Continue making picots
and Square Knots as in steps
22 - 24. Do
this on both sides.
After you make each picot, pass the
working cord through a new space (back or
front).
Important
Tip: This process is much easier if
you line up the spaces in the front and back
portions before tying the knots.
You can still use pins to support the picots as
you tie the DHH, but they won't be as
sturdy.
Attach the pins to the purse itself rather than
the project board, so you can keep it between your
knees.
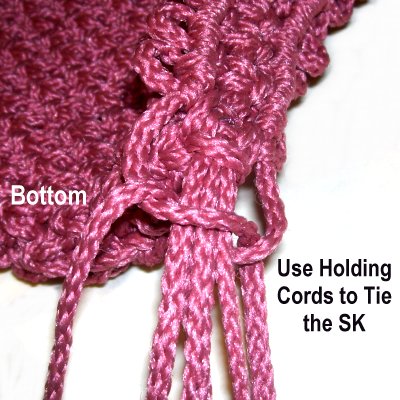
Step
33: When you reach the bottom
of the Picot Purse, pass the working
cords and fillers through one
space.
Use the holding
cords to tie the SK around the
other four.
Finishing Touches
Step 35:
You now need to decide if you want beaded tassels
at the bottom of the Picot Purse, to finish off
the strap cords.
No Tassels:
Trim the ends of all 6 cords to 3
inches, and pull them to the inside
of the purse. Weave them through the spaces
at the bottom and apply glue to hold them in
place.
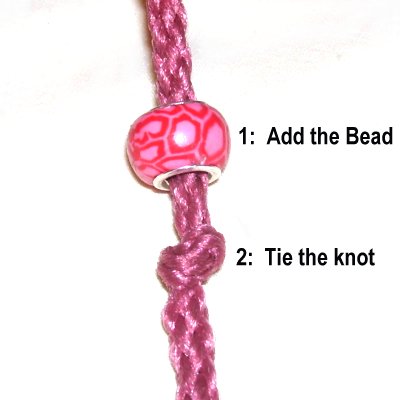
Beaded Tassels:
Trim the cords so they are of equal length.
Add glue to the tips (or use tape). After
it's dry, do the following:
1: Slide the bead onto the
cord.
2: Tie an Overhand knot
where you want the
bead to rest.
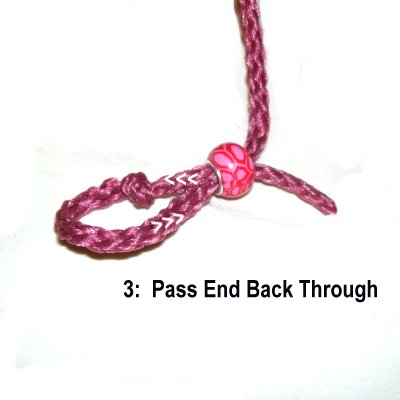
3: Pass the end back through the
hole in the bead.
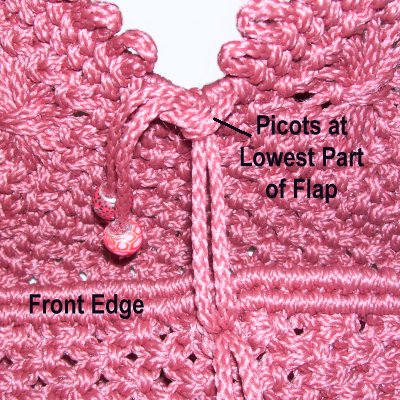
Step 36:
To make the closure for the Picot Purse,repeat
step 35with thefour cords in the center front area (see
step 18).
Pass two cords
through the picots in the center
of the flap, at the lowest part between
the two diamonds.
Pull the ends down and combine them with
the other two cords, tying a LOOSE
Overhand knot to form the closure.
By
using any text or images on Free Macrame
Patterns, you are agreeing to ourTerms
of Use