Description:
The Peekaboo Bracelet is named for the
fact that one color peeks out now and then to form
a Snake knot design. The material for those
areas is 2mm thick (pink in image above).
Larks Head knot sennits are made with 1mm size
cord, in the areas between the Snake knots.
Any type of small beads can be added to the cords
surrounding the Snake Knots.
You can use long skinny beads, as in the
Micro-Macrame bracelet shown above (left).
Another option is to use tiny round beads to form
a circular flower shape (right).
This Macrame pattern is rated Moderate due to the
thin size of the cords. But it's an easy
design to master.
Special Thanks goes to Gwen Peace for inspiring me
to create this bracelet.
Preparation:
Cut two cords ofColor B (2mm), each at
least 36 inches long.
Cut two cords of Color A (1mm), each at
least65
inches long.
For a Peekaboo Bracelet more
than 7.5 inches in size, increase the
length of all four cords.
Prepare the ends with glue
and allow it to dry completely. Twisting the
tips slightly to make them more narrow will help
with beading.
In the example Color
A is Turquoise, and Color
B is pink.
Step 1:
Find the center of the 4 cords. Secure them on
your board at the center, so that the 2mm Color
B cords are between
the other two. Mentally number the four
cords.
For a sliding clasp, you MUST start the design in
the center and work towards the ends. Use
masking tape to mark the center.
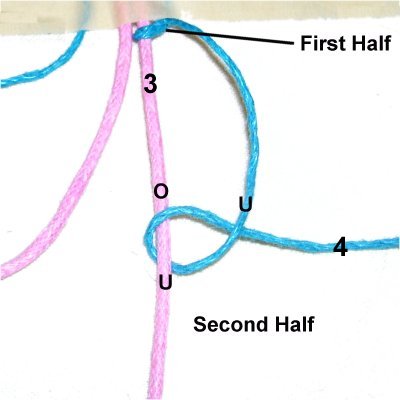
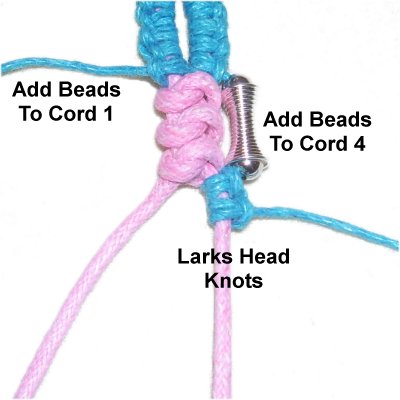
Use cord
4 to tie six (6) Vertical Larks Head
knots onto cord 3. The steps are below.
<<Cord
4 goes over
- under
cord 3, rotating clockwise.
Bring the end over
cord 4 on the right.
Cord 4 passes under
- over cord 3 and under
cord 4, to make the second half of the
knot. >>
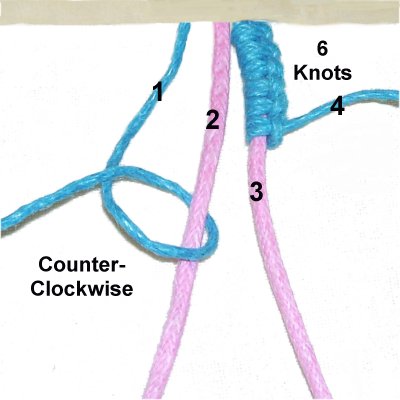
Step
2: Use cord
1 to tie six (6) vertical Larks
Head knots onto cord 2. The
knots are tied rotating counter-clockwise.
Push the knots upward to eliminate spaces
between them (both sennits).
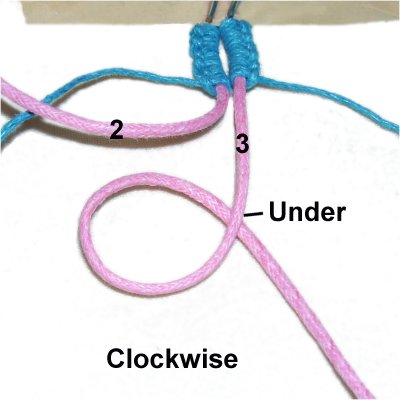
Step 3:
Secure both sennits at the center, against the
edge of the tape.
You will be using cords
2 and 3 (Color B) to make the next
section, so push cords 1 and 4 off to the sides
for now.
The next three images show you how to make the
modified Snake knot for the contrast area of the
Peekaboo Bracelet.
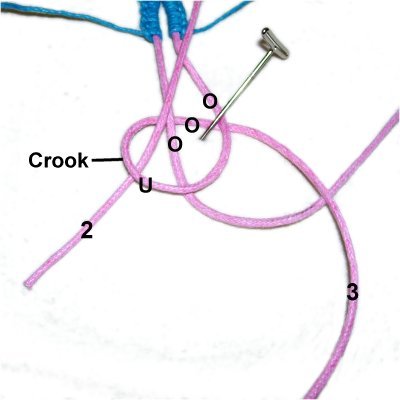
Make a clockwise
loop with cord
3, so that the end passes under
the upper portion to make the crossing
point.
You can secure the crossed area if you
wish.
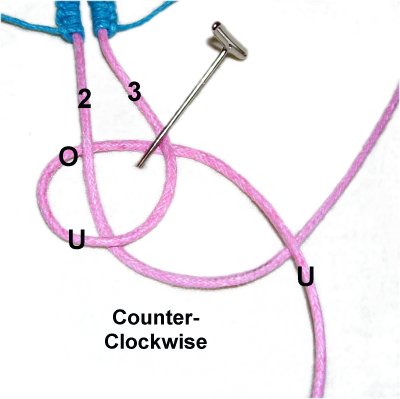
Step
4: Move cord 2through the loop made in the
previous step, over
the top and under
the bottom.
Move it to the right, beginning a counter-clockwise
loop. Pass it under
the free end of cord 3.
Step
5: Complete the second loop
by passing the end under
the crook
of the first loop, which is the curved
portion furthest to the left.
Pass over
all the other segments.
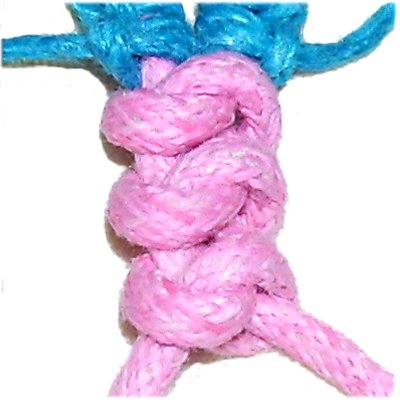
To tighten the first Snake knot, pull
outward on both loops, which causes the
two cords to cross. The loops should move
all the way up against the Larks Head knots.
Once you've removed all the slack, pull on the
ends to tighten the loops. Try to tighten
them both at the same time. You may
need to adjust the knots slightly so that they
look like the next image.
Step
6: Tie at least 2 more Snake
knots in the same manner, tightening them
so they rest close together.
This is the most challenging part of the
Peekaboo Bracelet, so take your time and
tighten carefully.
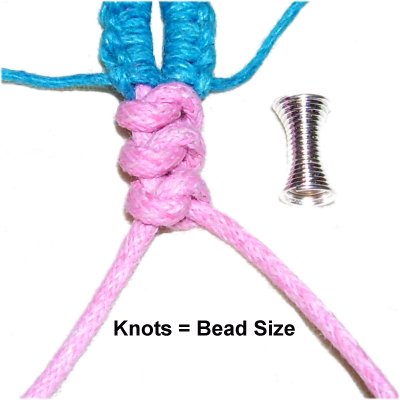
The
number of Snake knots you tie should be
the same length as the beads you plan to
use, especially if they are long.
For designs where you want the beads to
form a circle, tie only three (3) knots in
this area.
(Read the information below)
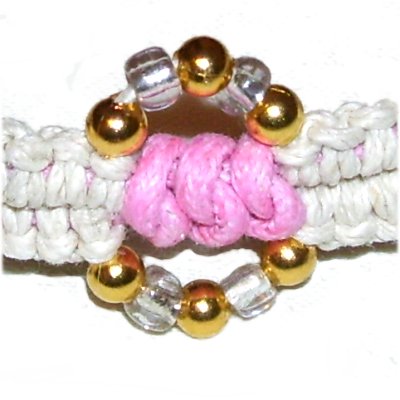
For a circular
design, the beads should extend beyond
the Snake Knots.
When you attach cords 4 and 1 in the next
step, the beads should bow
outward as shown in this image.
Add more beads if this doesn't happen.
Step
7: Add beads to cords
1 and 4, then start the next area
of Vertical Larks Head knots.
Repeat
steps 1 and 2, tying 6 Larks Head
knots on each side.
Step 7
continued:Repeat
steps 3 - 6, making another set of Snake
Knots.
Repeat
step 7 for the next set of Larks Head
knots.
Keep alternating between the steps until the
Peekaboo Bracelet is slightly
less thanHALF
the size you need.
You will be tying a few more small knots, so keep
that in mind when measuring.
Stop after you've tied the Larks
Head knots.
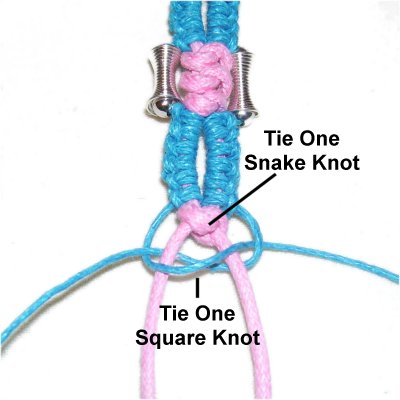
Step
8: Tie one final Snake knot
with cords
2 - 3. Apply glue as you
tighten it.
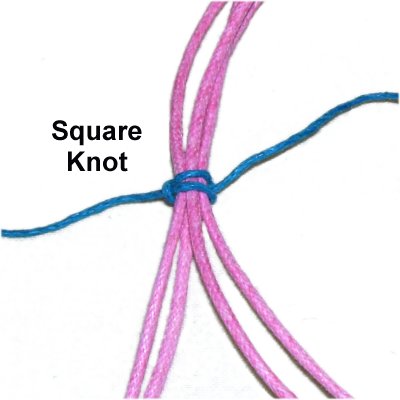
Tie a Square Knot just below, with cords
1 and 4. Apply glue here as well.
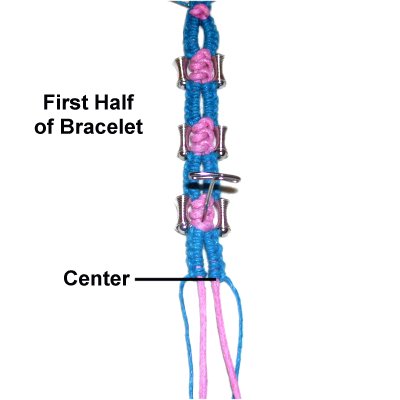
Place the
bracelet on your wrist to make sure it fits.
You can tie additional Square knots to bring the
first half of the Peekaboo bracelet to the size
you need.
After the Square Knots are tied, bring cords
1 and 4 to the back
of the bracelet.
Tie the two ends together with a tight Barrel
Knot. Tighten it firmly so it lies flat
against the back of the Square Knots. Add
glue while tightening.
When the glue is completely dry, cut off the
excess material (1mm cords only).
Step
9: Turn the first half of the
bracelet around and go back to the center.
Push the Larks Head knots close together,
since they may have moved.
Repeat
steps 3 - 8. You start with
the Snake knots.
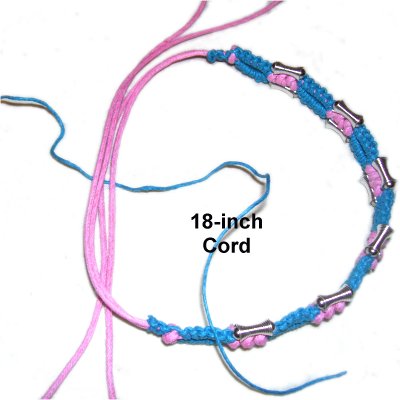
Sliding Clasp
Step
10: Turn the Peekaboo
Bracelet as shown, with the ends on the
left.
Arrange the ends so they lie next to each
other and are not twisted. You can
cross them if you wish.
Cut an 18-inch
cord and place it under the ends
horizontally. It will be used to
make the clasp.
Step
11: Match the ends so the
new cord is balanced. Tie a Square Knot
around the cords from the bracelet.
Make sure it's tightened
completely, but will still allow
the cords from the bracelet to move.
Step
12: Tie 5 - 10 Square Knots
below the first one, creating a short
sennit, which is the clasp for the
Peekaboo Bracelet.
Make sure the knots are tight, but are
loose enough so the ends of the cords
coming from the bracelet can still move
back and forth through the sennit.
Step 12,
continued: To finish off the new
cord, bring the two ends to the back of the sennit
and tie them together with a tight Barrel
knot.
Apply glue while tightening, and press the Barrel
knot against the back of the sennit, so it's as
flat as possible.
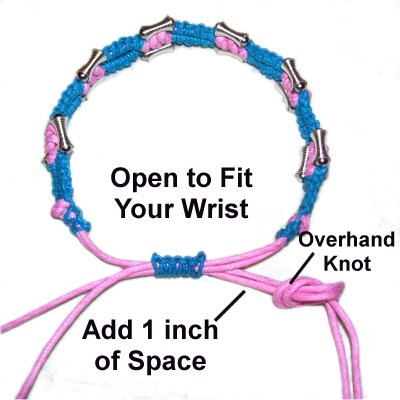
Step 13:
Adjust the Peekaboo Bracelet so it's open wide
enough to fit your hand through, and suitable for
your wrist size.
To finish off
the ends coming from the bracelet, add at
least 1-inch of space, and then tie an
Overhand knot with both cords
combined.
Apply glue while tightening.
Repeat with the other two ends.
By
using any text or images on Free Macrame
Patterns, you are agreeing to ourTerms
of Use