Row 4:
Slide cords
6 and 7 through a 20mm round bead for the
left eye.
Pass cords
18 and 19 through another one, for right
eye.
Tie the rest of
the knots using cords 1
- 4, 9 - 12,
13 - 16, 21 - 24.
They should line
up with the eyes.
Cords 5, 8, 17, 20 are not used in row
4.
Row 5:
Tie ASK with 3 - 6, 7 - 10, 15 - 18, 19 -
22. These knots should rest below
the eyes.
Slide the 32mm oval bead over cords
12 and 13, for the beak.
Cords 11 and
14 are not used in this row.
Row 6:
Tie ASK with 1 - 4, 5 - 8, 17 - 20 and 21 -
24.
Cords 9 - 12 and 13
- 16 are not used.
Row 7:
Tie the ASK with 3 - 6, 7 - 10, 15 - 18 and 19 -
22.
Cords 11- 14 are not used.
Row 8:
Tie ASK with 1 - 4, 5 - 8, 9 - 12, 13 - 16, 17 -
20 and 21 - 24.
ALL the
cords are used in this row, which should rest below the
beak.
Row 9:
Tie the ASK with cords 3 - 6, 7 - 10, 11 -
14, 15 - 18, and 19 - 22.
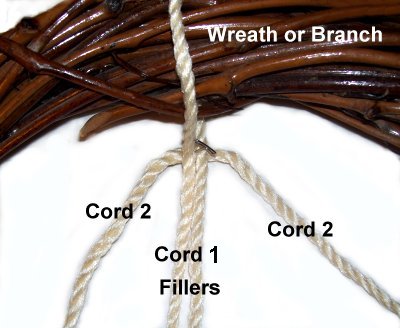
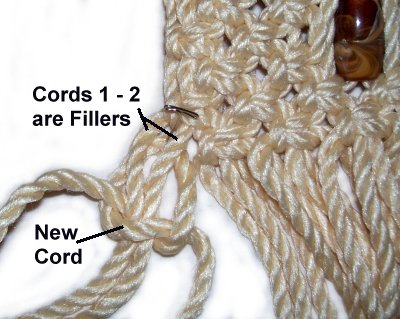
Step 5:
Cut two cords, each 7 yards long.
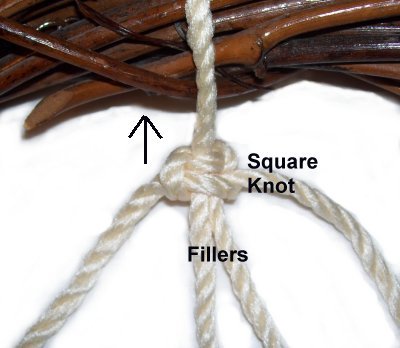
Slide one under cords 1 and 2 and secure
it. Tie a Square Knot with the new cord.
Cords 1 and 2 are the fillers.
Do the same on the opposite side of the
Owl Wreath, attaching the new cord to 23
and 24.
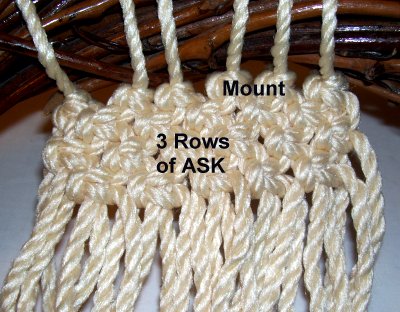
Body and Wings
Step 6:
To start the body for your Owl Wreath, mentally
re-number all the cords 1- 28.
Cords 1 - 4 and 25 - 28 are for the wings,
and are not used for the body. So push them
aside for now.
Row
1: Use 7 - 10, 11 - 14, 15
- 18, 19 - 22.
Row 2:
5 - 8, 9 - 12, 13- 16, 17 - 20 and 21 - 24
Repeat
rows 1 and 2 at
least 3 times, alternating back
and forth between the two steps.
The last row should be approximately 4
inches above the inside
lower portion of the wreath.
Step 7:
Before you can complete the body of the Owl
Wreath, you will need to make the wings, which are
small loops called "picots"
You will be tying Half Knotsso the wing design will spiral.
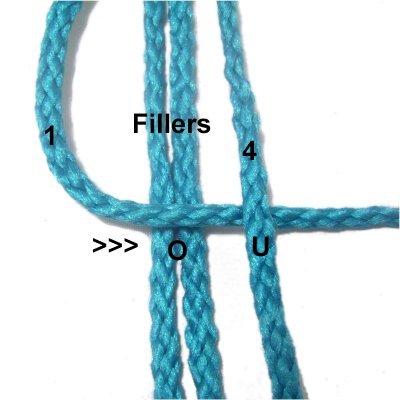
Half Knot Instructions
Mentally number the four cords.
Move cord
1over
the fillers (cords 2 and 3) and under
cord 4.
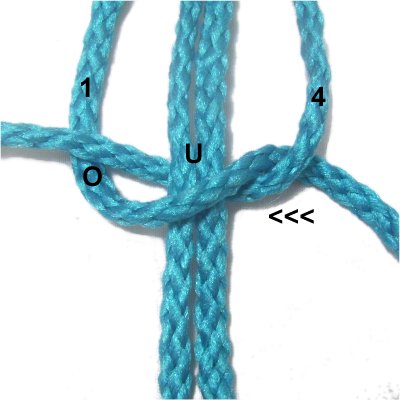
Pass cord
4under
the fillers and over
cord 1.
Pull both working cords to tighten the
Half Knot.
Left
Wing: Locate cords 1 - 4
(long). Cords 2 and 3 are the
fillers (short).
Move
down 2 inches and tie two
Half Knots with cords 1 and 4.
Tighten the knots firmly.
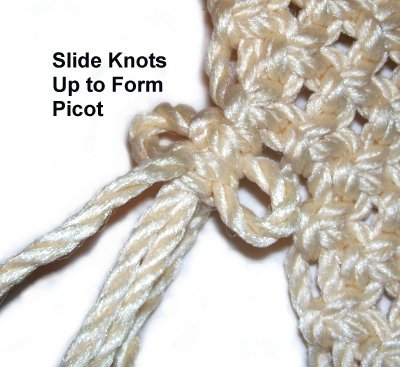
Slide the knots
up as high as possible, so they rest next
to the knot that connects the cords to the
body (see step 9).
You may need to adjust the picots (two
loops) slightly, so they are the same
size.
Repeat what you
just did several times, twisting the knots
slightly as you progress, so the loops
face different directions.
Make sure you tie 2 Half Knotseach time you repeat.
Tie enough knots to make the wing 8
inches long.
Right Wing:
Repeat the previous step using cords
25 and 28 to tie the Half knots.
The fillers are 26 and 27.
When the wings are the proper size, tie a final
knot, but make it a complete
Square Knot. Tighten it firmly.
Step
8: Mentally number ALL
the cords 1 - 28.
Tie a Square Knot with cords
3 - 6 (cords 3 - 4 are from
the left wing). This will connect
the wing to the body.
Do the same thing on the right side of the
Owl Wreath, using cords
23 - 26.
Tie the final four rows of ASK for the body,
using the following groups:
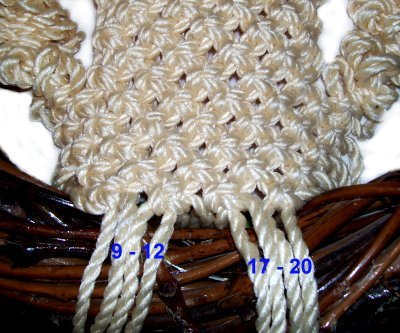
Step
9: Move cords
9 - 12 and 17
- 20 over the front
of the wreath, and then pull them to
the back.
Combine each cord with one of the others
in the back
of the wreath. Tie an Overhand Knot with
the two cords. Stretch
the body as needed to firmly secure the
bottom.
Step 10:
To make sure the knots don't loosen, tie an
Overhand knot with the remaining cords. Do not include the
ones used in step 9.
Try to place the knots close to the Square knots
as you tighten each one. You can add some
glue inside
each knot, prior to tightening.
Trim the ends to 2 inches and unravel each one
completely. Brush the cords until they are
fluffy, and arrange them so the are in the front of the
Owl Wreath. Save all the
scraps for the feathers.
Attaching the Feathers
Step
11: You will be making what I
call tufts,
which will be used for the feathers of the
Owl Wreath.
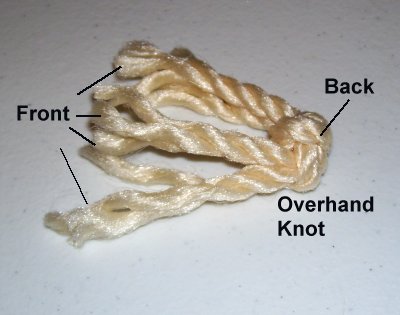
To make a tuft, cut 2 pieces of material,
6
inches long. Tie
an Overhand Knot using both cords combined,in
the center of the cords.
Click on the
link or image if you need instructions on
how to tie the Overhand
knot.
Position the
Overhand knots so they rest in the back
of the Owl Wreath.
Pull the cut ends to the front,
through spaces in the ASK design, using
tweezers or pliers.
It's best to start at the bottom
of the design and progress upward.
Apply fabric glue under each knot, and pull the
ends firmly so the knot rests againstthe back surface.
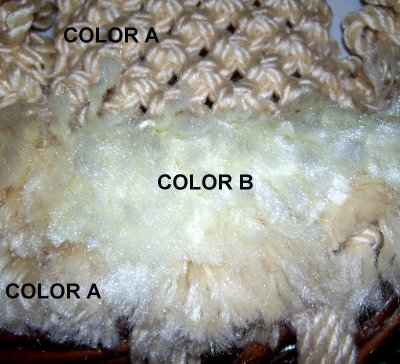
You can use the two colors in whatever pattern you
wish, so there is contrast.
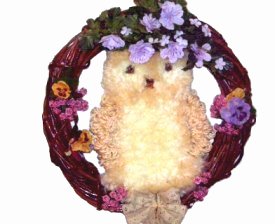
When I made the Owl Wreath shown, I arranged the
light color (B) around the eyes and in
the center of the body.
The primary color used to make the base (color
A) was placed along the bottom and sides,
as well as the head.
After you
bring the ends of the tuft through the
space, separate the fibers and brush them
until they are soft and fluffy.
Trim them to 1.5 inches or less. The ends
should stand
up rather than lie flat.
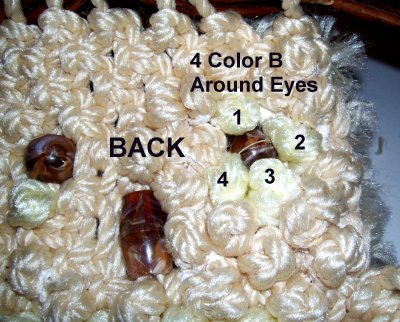
When you get to
the head of the Owl Wreath, position 4
tufts of color
B as close to the eyes as
possible.
This image shows the back
of the face.
Here's a close
view of the area around the eyes (front).
Brush and trim the fibers as needed over
the entire Owl Wreath, when all the tufts
are in place.
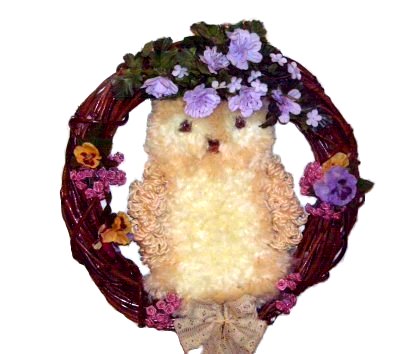
Add artificial
flowers, bows, garlands, or other
decorations to the wreath.
Secure a wire in back to hang it on your
wall.
By
using any text or images on Free Macrame
Patterns, you are agreeing to ourTerms
of Use