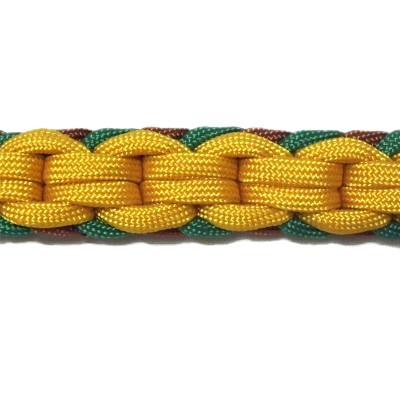
Description:
The Mystical Chain is a unique decorative
knot based on the Endless Falls
design.
It's easy to tie, and kids will enjoy using it to
make fun Macrame projects such as key chains and
bracelets.
Creating it with at least two colors is important,
or you won't see the chain link design as
clearly.
Use a light color for the primary working cord, as
in the images shown (yellow). The two
holding cords should be dark colors, to provide
the most contrast.
This
knot is on the Fusion
Knots website, under the
name
Mystical
Chained Endless Falls
Click on the image or link to visit the
site.
The video gallery contains a wide variety
of combination knots and techniques.
Preparation
To practice
the Mystical Chain, cut one cord of three
different colors, each at least 60 inches long.
To use this decorative knot in a Macrame project,
first determine the length of the item you wish to
make (finished length). Cut the cords as
follows:
Working
Cord -- Finished length x 10
Holding
Cords -- Finished length x 2,
then add 12 inches
Prepare the ends with tape or glue to prevent
unraveling.
You need to melt the cut ends with a flame to
seal the inner fibers, if using Parachute cord
(Paracord). See Cord Preparation
for more details.
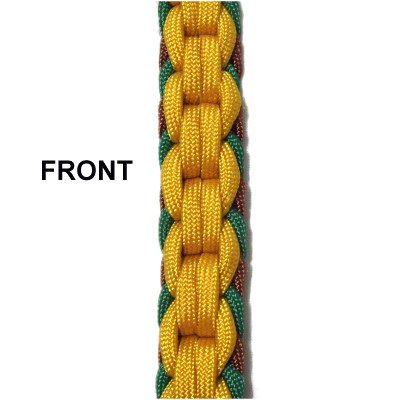
In the images shown, theworking cord is
gold. It forms the chain link design down
the center.
The
holding cords are dark
green and brown,
which are seen along the edges of the sennit.
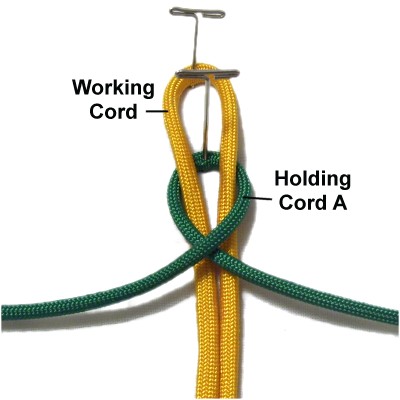
Step
1: Fold the working
cord in half
and secure it to your board.
Place holding
cord Aunder
it, and secure it so the centers line up.
Move both halves of the holding cord on
top of the working cord, and cross them
right over left.
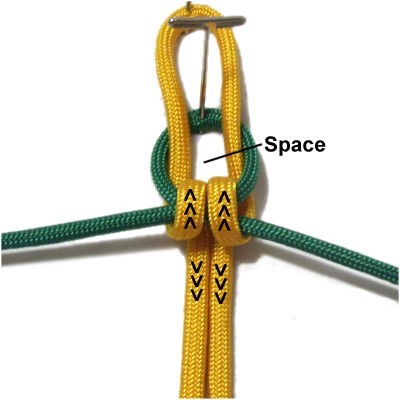
Fold both
halves of the working
cord backward, passing over
the crossed area of the holding cord.
Bring them down through the space, passing
under
the crossed area as you pull them toward
you.
Step 1,
continued: Tighten the holding cord
first, followed by the working cord.
Reduce the size of the loop at the top to
3/4-inches if you plan to make a button knot at
the other end (for a clasp).
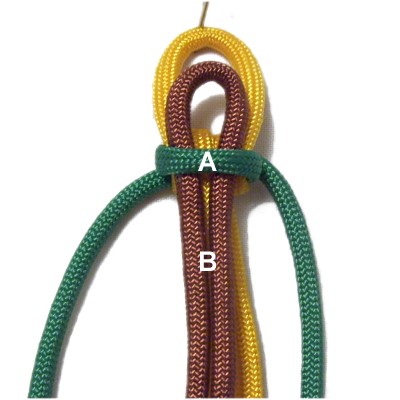
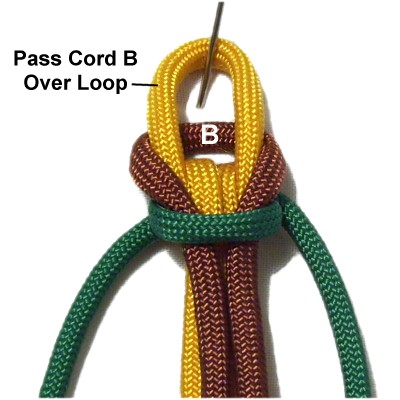
Step
2: Turn the knot over so
the FRONT is face up.
Fold holding
cord B in half and slide it
through the loop made by holding cord
A. It should rest on top of the
working cord.
Pass the
folded area of holding cord B over the
loop at the top, so it rests under
the working cord.
Tighten all three cords firmly, then turn
the knot over so the BACK is face up
again.
Mystical Chain Design
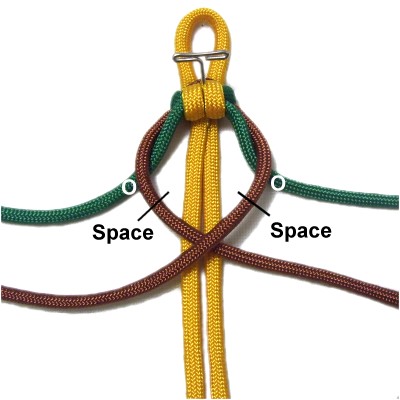
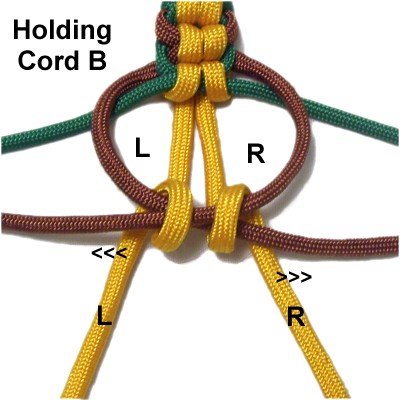
Step
3: Move holding
cord Bover
cord A on both sides.
Then cross the two halves of cord B right
over left, resting on top of the working
cord.
Identify the spaces on either side of the
working cord.
Fold the right
half of the working
cord backward, passing over the
crossing point of the holding cord.
Move it through the space on the right
(R), then under
the crossing point and toward
you.
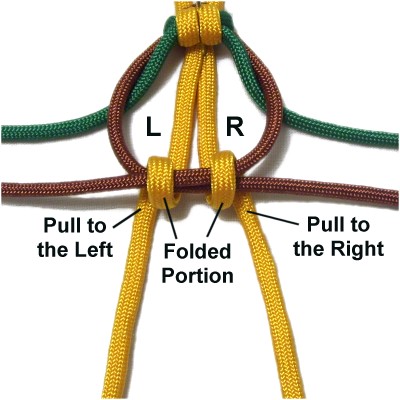
Important:
Pull it slightly to the right
so it rests to the right of the folded
portion.
Step 3,
continued: Fold the left
half of the working
cord in the same manner, moving through
the space on the left (L).
Important:
Pull it slightly to the left
so it rests to the left of the folded portion.
Tighten the knot firmly
by pulling on both halves of holding
cord B first, followed by each half of
the working cord.
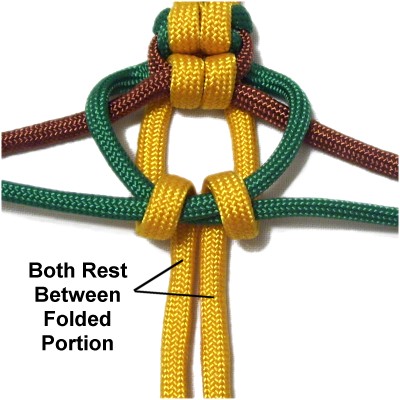
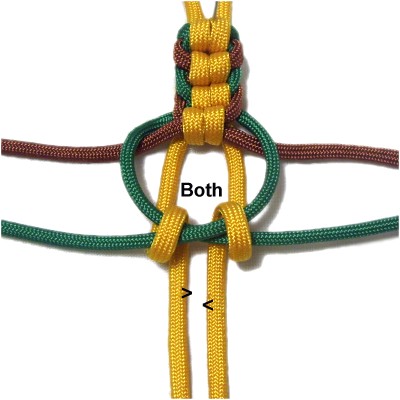
Step
4: Move holding
cord A
over cord B on both sides.
Cross the two halves of it right over
left, resting on top of the working cord.
Identify the space between
the two halves of the working cord.
Fold both
halves of the working
cord backward, passing over
the crossed area of the holding
cord.
Bring them through the space and under
the crossed area as you pull them toward
you.
They should both rest between
the folded portions when you are
finished. Tighten the knot firmly.
Step 5:
As you continue making the Mystical Chain, the key
to success is to understand the difference between
steps 3 and 4:
In step 3,
when you are folding the working cord
around holding
cord B, each half passes through
a different
space (L and R).
You pull the cord sideways so they rest
either to the right or left of the folded
portion. In other words, they are
heading away from each other (arrows).
In step 4,
when you are folding the working cord
around holding
cord A, both halves pass through
the same
space, so they end up close
together and resting between
the folded portions.
They are heading toward each other
(arrows).
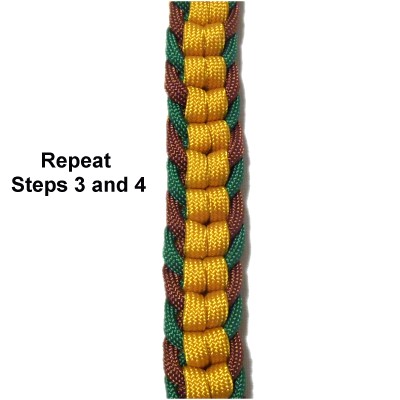
Repeat
steps 3 and 4 several times,
until the sennit is the length you need
for your project.
Take note of which holding cord you used
for the last knot. Use the other one
for the next step.
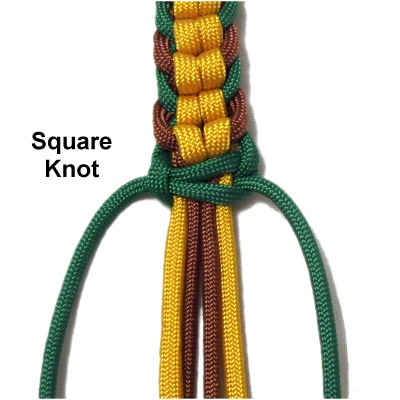
Step
6: Tie a Square Knot with the
holding cord, around the other two cords.
When using the Mystical Chain in a Macrame
project, other knots can be used to secure
the knots if you prefer something
else.
Step
7: Turn the sennit over so
you can see the design on the front.
Finish off the ends of the cords in the
manner most appropriate for your
project. The best cord to use if you
plan to make a button knot is the holding
cord you did not use to tie the
Square Knot.
By
using any text or images on Free Macrame
Patterns, you are agreeing to ourTerms
of Use