|
|
| |
|
|
|
|
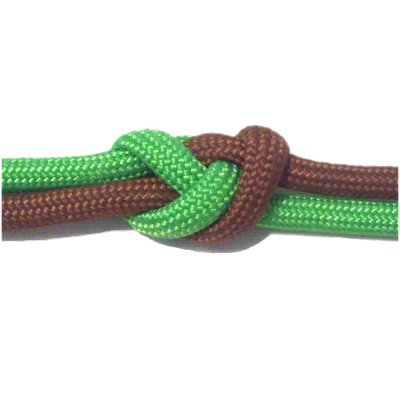
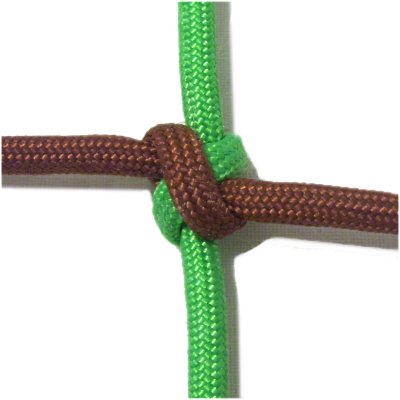
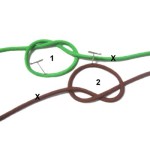
Description: The Linked
Overhand Knots described on this page are
sometimes called "connection knots". Their
primary purpose is to link two cords
together. They can be used as a base for
other knots, to attach new cords to a design, or
for decoration.
Most of these designs are historical knots that
date back to the early days of Macrame.
You may find them under different names than
what is shown here, since they can be used in
fishing, sailing and climbing.
These unique knots are very strong and sturdy,
and can be used to make nets, hammocks, and
other items that hold weight.
Any time you need to combine two cords in a
Macrame project, chances are you can use one of
the techniques described on this page, which are
all based on the Overhand knot:
|
|
| |
|
|
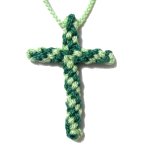
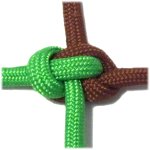
The Cross
Pendant is an easy project
where the Shamrock
Knot is used to connect two cords
prior to tying the other knots.
Click on the link or image if you wish to
view the pattern. |
|
| |
| |
|
|

|
|
Shake Hands Bend
|
|
|
When you shake hands, you make a connection,
which is why the Shake Hands Bend is perfectly
named.
There are several variations of this knot.
The instructions below are for the most basic
form.
This knot is probably the easiest of all the
Linked Overhand knots, and is the best technique
for making nets.
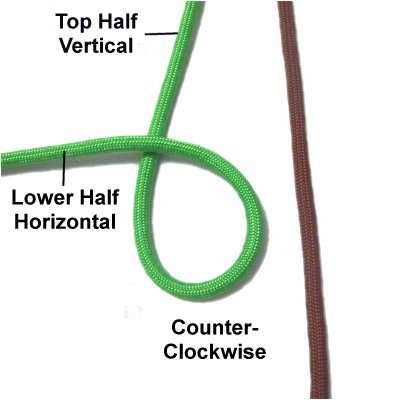
Step 1: You need two 18-inch
cords to practice, preferably different colors.
Secure both cords to your board, so they are vertical.
|
|
|
|
|
|
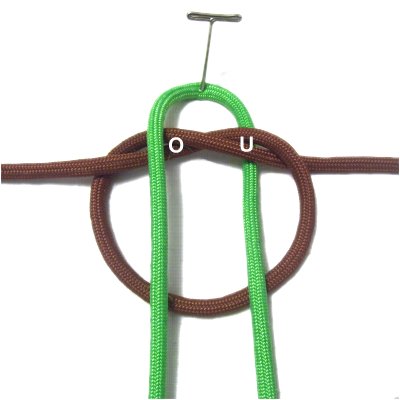
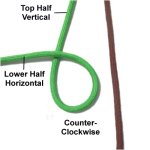
Use the left
cord to make a counter-clockwise
loop.
Arrange the knot so the top half of the
cord is vertical and the bottom half is
horizontal.
|
|
|
|
|
|
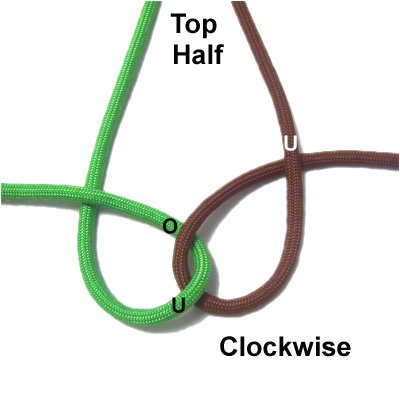
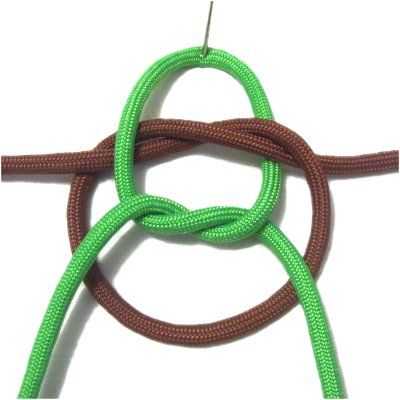
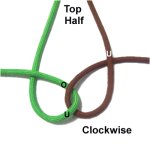
Step
2: Pass the lower half of
the right
cord through the first loop from
below, which is under
- over.
Complete the clockwise
loop by passing it under
the top half of the cord.
|
|
|
|
|
|
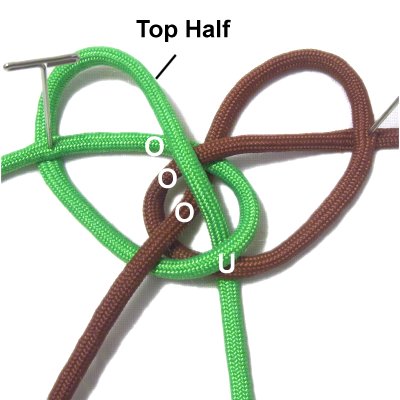
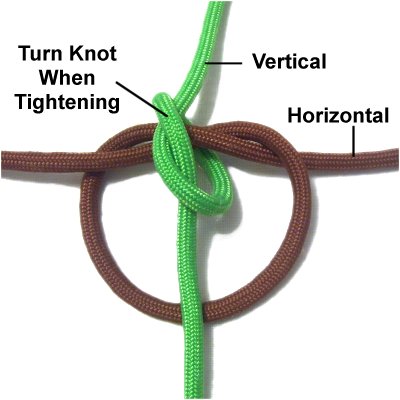
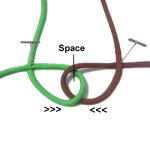
Step 3: Move the
loops toward each other slightly so
there is an extra space
between them.
Secure both loops at the crossing
points, if you have not done so already.
|
|
|
|
|
|
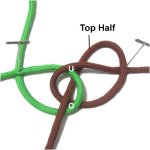
Step 4: Complete the right
Overhand knot by
moving the top
half through the space
from below.
It should pass under
two segments and over
two, since the cord is passing through
both loops.
|
|
|
|

|
|
Step
5: Complete the left
Overhand knot by moving the top
half through the space from the
top.
It will pass over
the lower half of the left cord, and over
two segments of the right cord. At
the bottom, it passes under
one segment from each cord.
|
|
| |
|
|
|
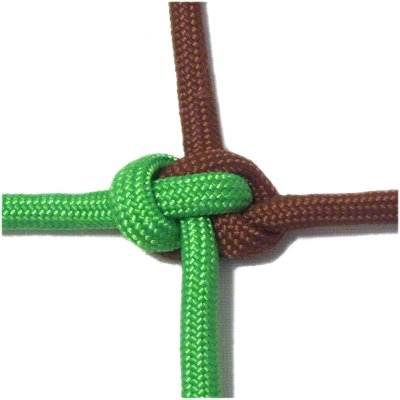
Step
6: Tighten the Linked
Overhand knots gradually, until all the
slack is removed and the knot is firm.
|
|
|
|
|
|
| |
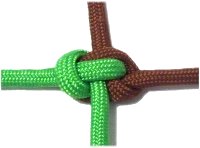
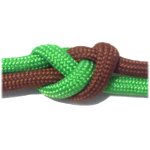
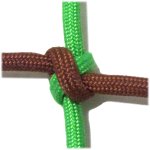
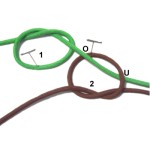
Shamrock Knot
|
|
 |
|
|
Linked Overhand knots sometimes have more than
one name. This one is called the Shamrock
Knot, the True Love Knot, or the Lover's
Knot.
This technique is useful when tying Crown
Knots, so after you connect the
cords, there is a sturdy base to start with.
|
|
| |
| |
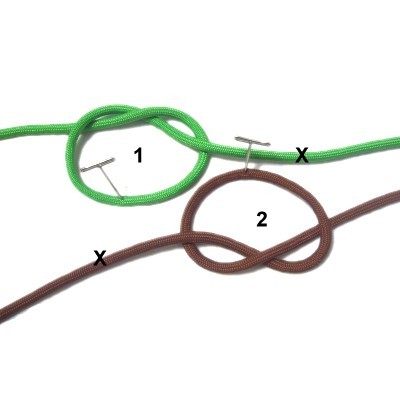
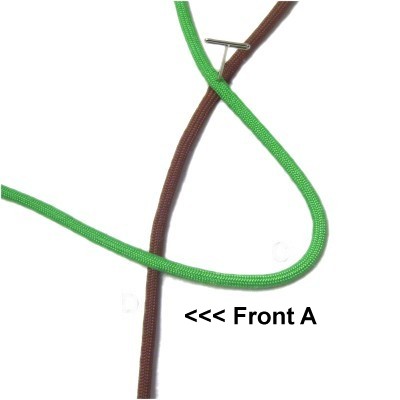
| Step 1:
You need two cords to practice, at least 18 inches
long. |
|
| |
| |
|
|
Make an
Overhand knot at the center of one cord.
Arrange it on your board with the crook
(curved area) closest to you (forward).
|
|
| |
|
|
|
|
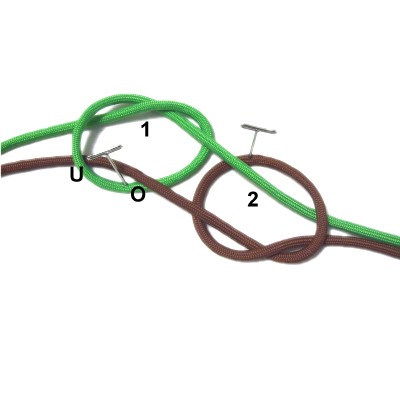
Step
2: Fold the second cord in
half and secure it near the crossing point
of the knot.
Pass the left half over
the crossed area, and the right half under
it, arranged vertically. |
|
|
|

|
|
Step
3: Complete the Overhand
knot with the second cord.
Make sure the crossed area is inside
the first knot. |
|
|
|

|
|
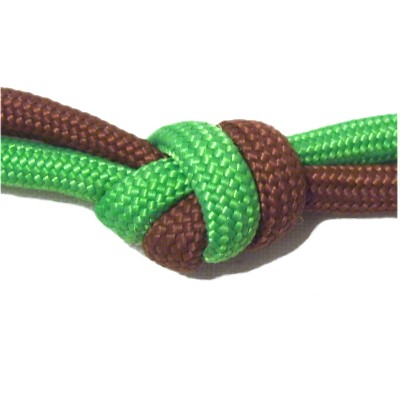
Step
4: Tighten the second knot,
turning it sideways
(upright) so the ends of the cord are vertical.
Then tighten the other knot, keeping it
flat so the ends of the cord are horizontal.
Turn the knot over so you can see the
crossed portion, which is the front of the
knot. |
|
|
|
|
|
|
Two of the
Linked Overhand knots have a unique
advantage over the others:
The ends of the cords head in 4 different
directions.
This applies to the Shamrock knot as well
as the Rosendahl's Bend, which you will
learn next. |
|
|
|
|
|
|
|
Rosendahl's Bend
|
|
|
|
|
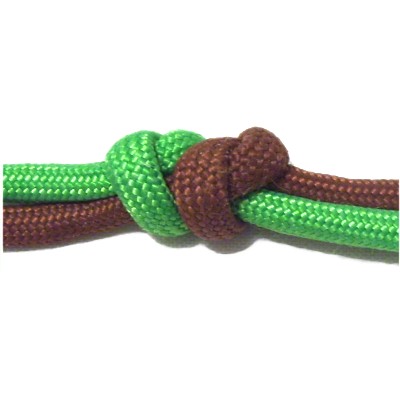
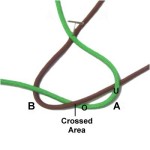
The Rosendahl's Bend, also called the Zeppelin
Bend, is a unique way of tying linked
Overhand Knots. Like the Shamrock
knot, the ends will head in four directions.
For this design, you need to pay close attention
to how the loops are arranged when you first
begin. |
|
|
|
| Step 1:
You need two cords to practice, at least 18 inches
in length. |
|
|
| |

|
|
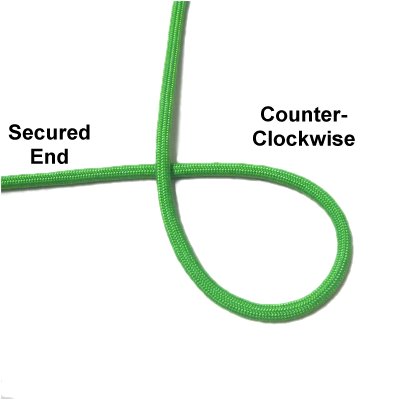
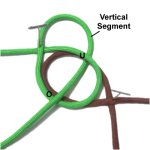
Secure one cord
on your left.
Make a counter-clockwise
loop in the center of the cord, arranging
this end vertically
when you are through.
|
|
| |
|
|

|
|
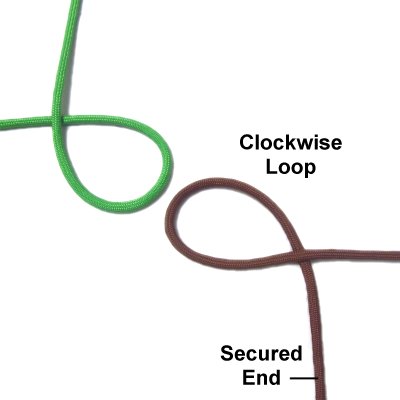
Step
2: Secure one end of
another cord close to the front of your
board.
Make a clockwise
loop in the center of the cord, and
arrange this end horizontally
to the right.
|
|
|
|
|
|
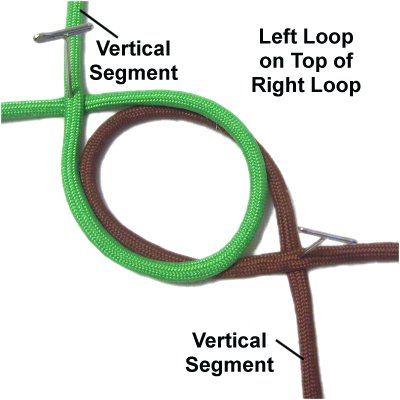
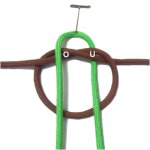
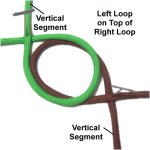
Step
3: Carefully move the left
loop on
top of the right loop. Secure
both loops at the crossing points.
Make sure you can clearly identify the
vertical segments of both loops.
|
|
|
|
|
|
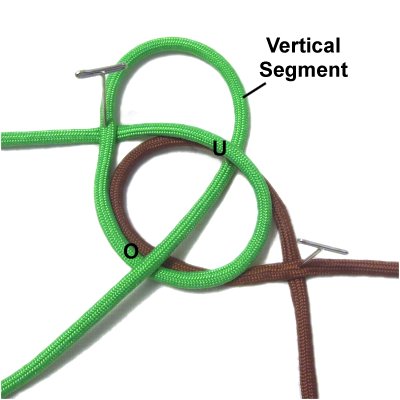
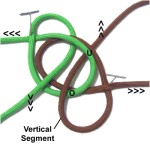
Step
4: Complete the Overhand
Knot with the left
cord by moving the vertical
segment clockwise.
Pass it through both loops under
- over (from below). |
|
|
|
|
|
|
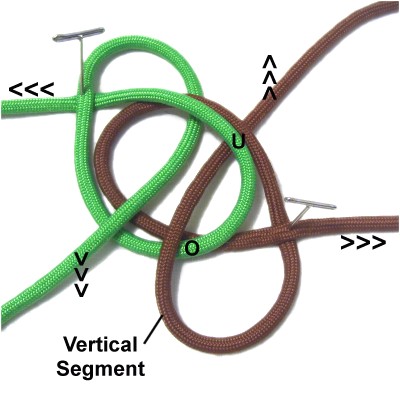
Step
5: Complete the OH knot
with the right cord by moving the vertical
segment counter-clockwise.
Pass it through both loops over
- under (from the top).
|
|
|
|
|
|
The arrows in
the image above indicate the direction of
the ends as you tighten each knot.
Tighten the entire knot firmly after
reducing the size of the linked Overhand
knots. |
|
|
|
|
|
|
|
Fisherman's Knot
|

|
|
Some of the Linked Overhand Knots are used in
fishing. This one is used to repair broken
lines. It's easy to make in hand (without a
board).
The Fisherman's knot can be used to add more
length if your cords become too short and you need
to add more material. It's easily disguised,
since it's smaller than the other knots on this
page. |
|
|
|
| Step 1:
To practice, you need two cords, each at least 18
inches long. |
|
|
| |
|
|
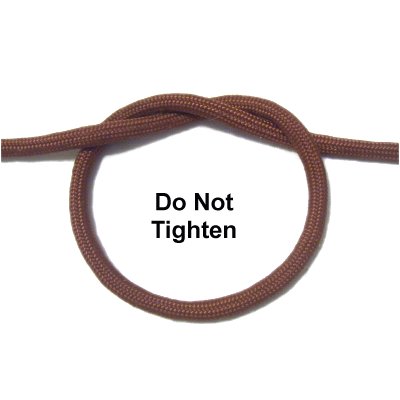
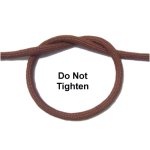
Make an Overhand knot in the center of
one cord, so the right half passes over
the left to make the crossing point.
The ends should exit the knot as shown,
under
on the left, and over
on the right.
Do not tighten it yet.
|
|
| |
|
|
|
|
Step
2: Use the second cord to
make an Overhand knot just like the first
one.
Position it to the right of the other
knot, inverted as shown.
The two segments marked with an X are the
left halves of the cord.
|
|
|
|
|
|
Step
3: Move the left half of
the first Overhand knot through the second
knot, passing over
- under the curved area (crook).
|
|
|
|

|
|
Step
4: Move the left half of
the second knot through the first one,
passing over
- under the curved area.
|
|
|
|
|
|
Step
5: Tighten the linked
Overhand knots gradually.
Make sure you don't twist or turn them.
|
|
|
|
|
|
|
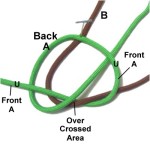
Overhand Bend
|

|
|
Linked Overhand knots like this one can get
confusing. You will be moving both halves of
each cord, so make sure you mentally label them as
described in the instructions below.
This knot is very thick and strong. It's
very similar on both sides, which is an
advantage. It will stand out more
visually than the others, which is why it's a good
choice for decorating two cords. |
|
|
|
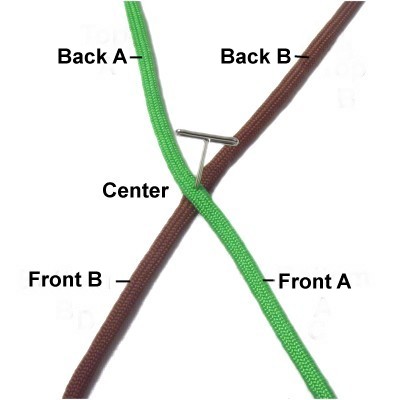
| Step 1:
To practice, you need two cords, each at least 18
inches long. |
|
|
|

|
|
Arrange the
cords in an X shape, secured at the
center.
Mentally label the cords A and B, front
and back half.
Front = Closer to front of board
Back = Closer to back of board
|
|
|
|

|
|
Step
2: Move the front
half of cord
A to the left, so it rests on top
of the front half of cord B.
|
|
|
|
|
|
Step
3: Move the front
half of cord
B to the right, passing over
- under the two parts where it
curves.
Mentally label the crossed area indicated.
|
|
|
|
|
|
Step
4: Move the back
half of cord A forward to the
left, passing under
the front half on the left.
Move it counter-clockwise,
passing it over
the crossed area of both cords.
Bring it under
the front half of cord A on the right.
|
|
| |
|
|

|
|
Step
5: Move the back
half of cord B forward to the
right, passing over
cord A, and over
the front half of cord B on the right.
Moving clockwise,
pass it under
the crossed area, and under
the back half of cord A.
On the left, pass it over
both cords.
|
|
|
| |
|
|
Tighten the
linked Overhand knots slowly, keeping the
center of the cords secured until the
knots are very small.
|
|
|
|
|
|
|
| By using any
text or images on Free Macrame Patterns, you are
agreeing to our Terms of Use |
|
|
|
| Have
any comments about the Linked Overhand Knots? Contact
Me. |
|
|
|
|
|
|
|