|
|
| |
|
|
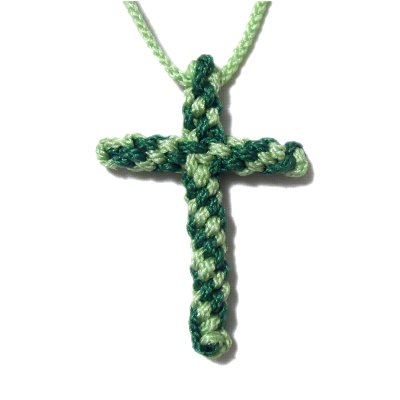
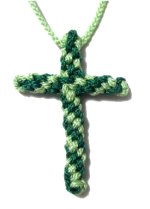
Description:
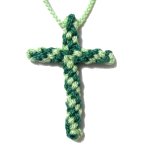
This Cross Pendant is easy to make and
is a suitable project for beginners.
This Macrame cross is made with only
two types of basic decorative knots.
You can make this Micro-Macrame
pendant with any type or size
material, but it looks better with
delicate material (1.5mm to
3mm).
The example was made with 2mm Amy
Braid (nylon).
|
|
|
| |
|
| |
| Supplies
Needed: |
| |
- Needle Nose Pliers or Tweezers
|
| |
| |
| Knots Used: |
| |
|
|
| |
| |
| |
| |
|
Preparation:
Cut 4 cords, each at least 36
inches long.
You can use one or two colors, but the spiral
pattern will be more obvious with two (light and
dark). Prepare the ends with tape or glue
to prevent unraveling.
|
| |
| |
| |
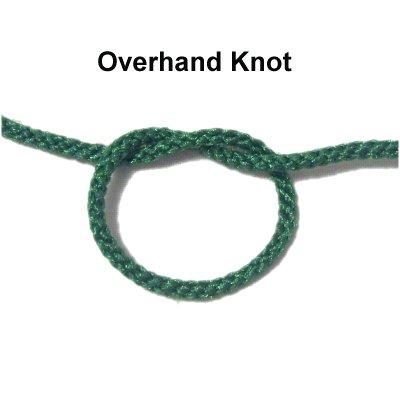
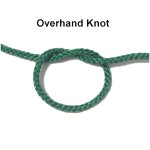
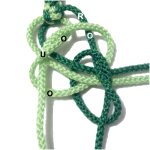
Shamrock Knot
|
| |
| |
|
To form a base for the Crown knots, you will be
tying a Linked Overhand
Knot.
The technique chosen for the Cross Pendant is
called the Shamrock knot, but
a Rosendahl's Bend works well
too.
The cords should head
in four
different directions, if you
prefer to start with a different knot.
|
| |
| |
|
|
Step 1: Make
an Overhand Knot in the center of one
cord.
The crossing point needs to be at the
top.
Don't tighten the knot just yet.
|
|
| |
|
| |
|
|
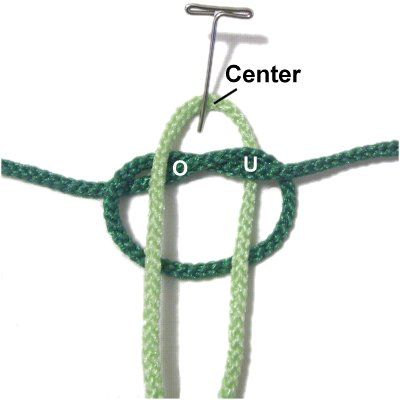
Fold another cord around a pin,
balancing it so the pin is at the
center. Tilt the pin backward to
secure it temporarily.
It should pass over
the Overhand knot on the left and under
it on the right.
|
|
| |
|
| |
|
|
Complete the
second
Overhand knot with the two halves of the
second cord.
The crossing point for this knot needs
to be at the bottom,
and rest inside
the first knot.
|
|
| |
|
| |
|
|
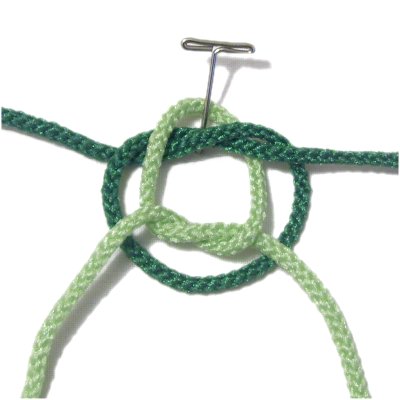
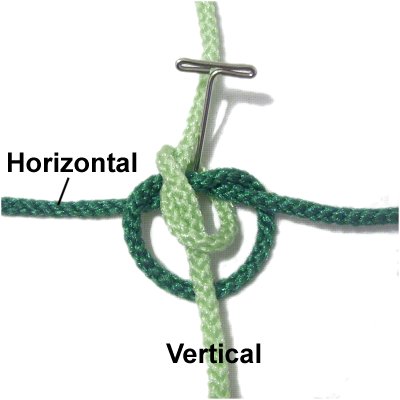
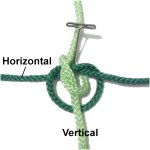
Turn the second
Overhand knot sideways, so the ends are
heading vertically.
The ends of the
first knot should be horizontal.
Tighten both knots firmly.
|
|
| |
|
|
|

|
|
Horizontal Portion
of Cross Pendant
|
| |
| |
|
|
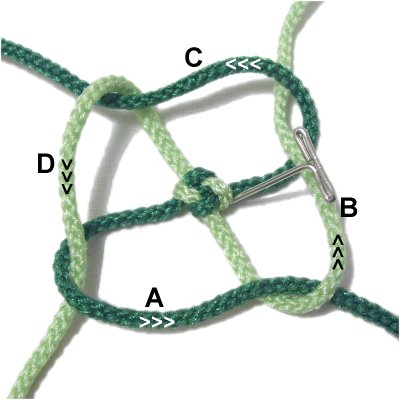
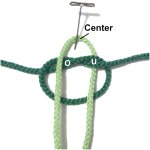
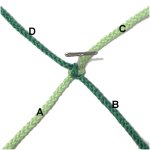
Step
2: Secure the Shamrock knot to
your board, with the cords arranged in
four directions.
Place the design so it forms an X
shape, and mentally label the four
segments as shown.
|
|
| |
|
|
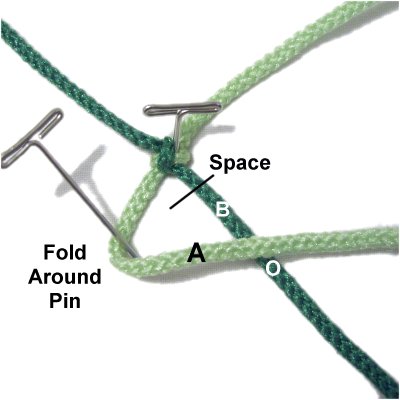
Designer's
Tip: Every time you make this type
of Crown knot, you start with the segment on the
lower left. So that segment should be
labeled "A".
The color of that cord will alternate each time
you tie a new knot, if you are using two colors. |
|
| |
| |
|
|
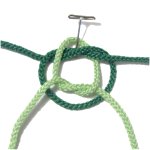
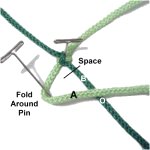
Place a pin to the right of segment
A.
Fold it around the pin toward the
right, so it passes over
segment
B.
Secure it to your board. The pin at the
corner should remain in place for now,
so there is a space.
|
|
| |
|
|
Designer's
Tip: When you FOLD a cord, you
don't just curve it. The cord will start out
with the top surface face up.
After you make the corner, the bottom surface that
was touching the board will be face up. You
can see this better in the images below. |
|
|
| |
|
|
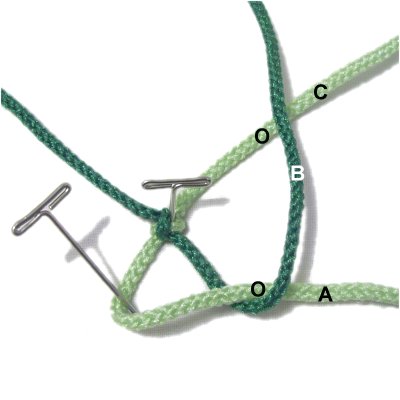
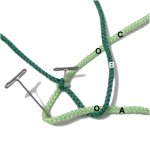
Fold segment
B vertically, towards the back
of your board.
It should pass over
segments
A and C. Secure it to your
board.
|
|
| |
|
| |
|
|
Fold segment
C to the left, passing over segments B
and D.
Secure it to your board.
|
|
| |
|
| |
|
|
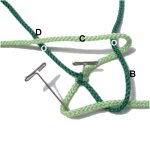
Fold segment
D forward (towards you),
passing over segment
C.
Bring it through the space at the
corner of segment A, passing over
- under the two parts.
|
|
| |
|
| |
|
|
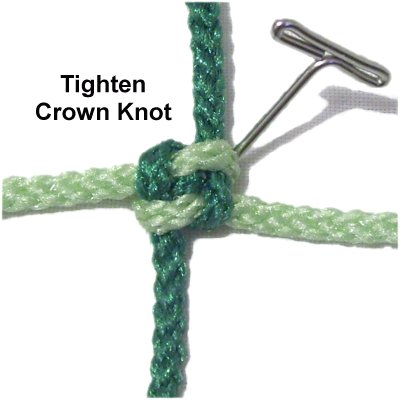
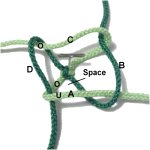
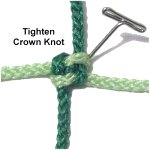
Step
3: Tighten the first Crown
Knot by pulling on all four segments
gradually.
The Cross Pendant looks best if the
knots are tight and small.
|
|
| |
|
|
|
|
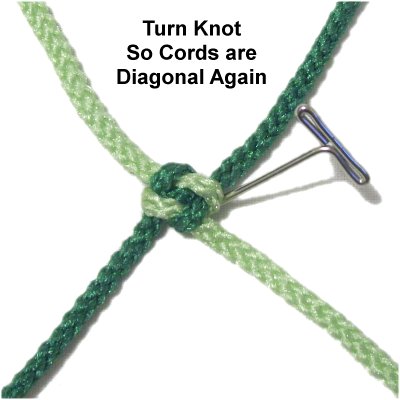
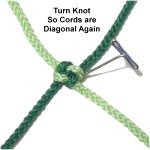
Turn the Crown
Knot so the four segments are diagonal
again, before you make the next one.
This is the best way to make sure you
start with the lower left segment each
time.
Securing the knot on the outside will keep
it more stable on your board.
|
|
|
|

|
|
Step
4: Mentally re-label the
four segments, starting with the lower
left (A).
Repeat
steps 1 - 3.
The color of segment A is the opposite of
the first knot, which is what you want. |
|
|
|
| |
|
|
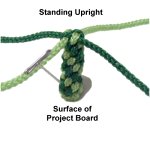
Repeat
steps 1 - 4 several more times,
until the sennit measures 1.5
to 1.75 inches.
The knots will be stacked on top of
one another as you tie them, and the
sennit be standing upright.
|
|
| |
|
|
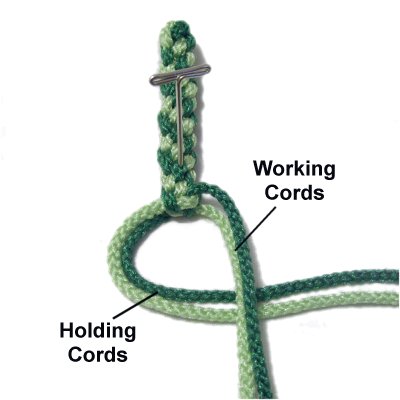
Step 5:
The horizontal piece for the Cross Pendant needs
to be similar at both ends. So you will now
tie another Shamrock Knot, but with changes.
This one is different because you have more than
two cords to work with. |
|
|
| |

|
|
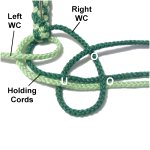
Curve the two cords on the left to the
right, and secure them. These are
the holding cords.
The other two cords should be
vertical. They are the working
cords for the Shamrock knot.
|
|
|
|
|
| |
|
|
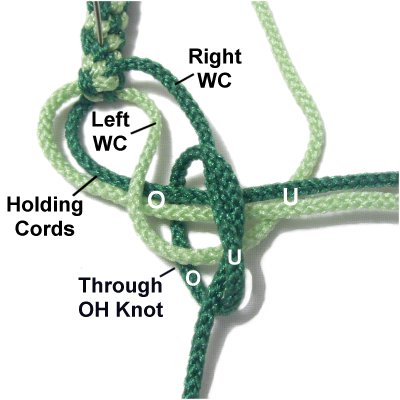
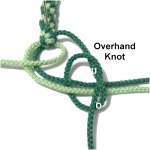
Step 6: Move the left
working cord to the left, so it's out of
the way.
Make a clockwise loop with the right
working cord (WC), passing over
- under the holding cord.
Pass over
the working cord as you pull it right.
|
|
| |
|
|
|
|
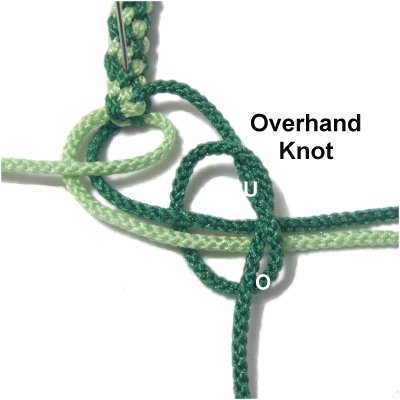
Complete the
Overhand knot with the right working cord,
by passing the end through the loop from
below (under
- over).
You can tighten it a little, but leave it
large enough for the next step. |
|
|
|
| |
|
|
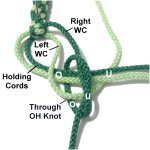
Bring the left
working cord over
the holding cords, to the left
of the Overhand knot.
Pass it through
the knot, going over
- under the two parts of it.
Bring it under
the holding cords, to the right
of the Overhand knot. |
|
| |
|
| |
|
|
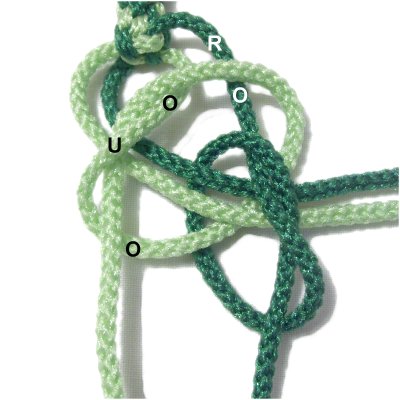
Move the left working cord over
the right one heading left. Then
bring it over
- under - over the left cord to
complete the Overhand knot.
Tighten both knots firmly,
making sure there is no gap between the
Overhand knot and the last Crown Knot.
As you tighten the right
knot,
apply fabric glue.
|
|
| |
|
| |
|
|
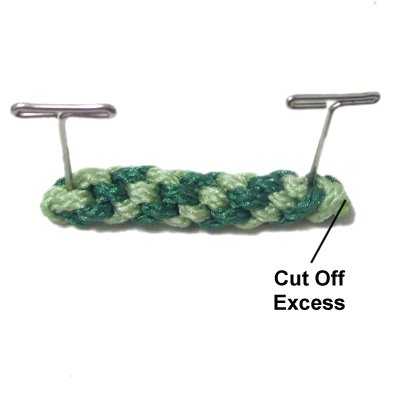
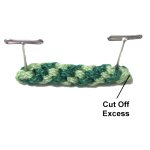
When the glue
is dry, cut off the excess material.
You can melt the tips with a flame if
using nylon or material that melts
(optional).
You should do a test with the scraps to
see whether they melt or burn. |
|
| |
| |
|
|
|
| |
Vertical Portion
of Cross Pendant
|
| |
| |
|
|
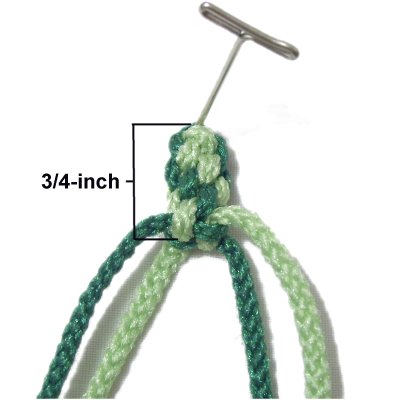
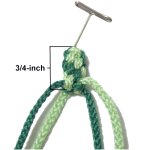
Step 7: Repeat
Step 1 - 4 to make a Shamrock
knot, followed by another Crown Knot
sennit.
Stop
when the sennit is 3/4-inches
long.
|
|
| |
|
|
|
|
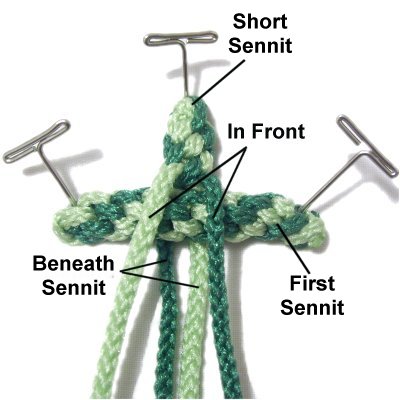
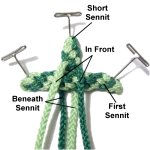
Step
8: Secure the first
sennit to your board
horizontally. Place the short sennit
you just made behind it, arranged
vertically.
Make sure it's in the center of the
horizontal piece.
Two cords should be in front, and the
other two beneath (under) the horizontal
piece, heading forward. |
|
|
|
Designer's
Tip: The terms "behind" or
"backward" mean that the cord or knot is heading
towards the back
of the board.
"Forward" means it's heading towards the front
of the board. |
|
|
| |
|
|
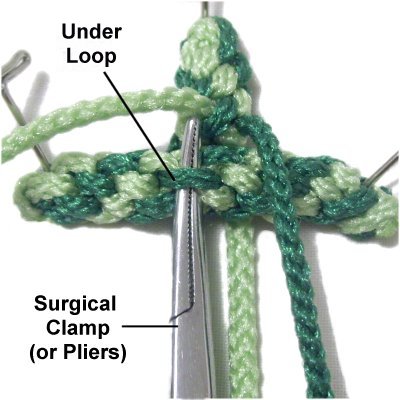
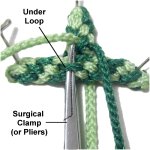
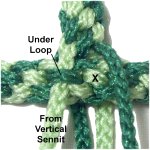
Locate one of the loops at the center
of the horizontal segment.
"Center" applies both horizontally and
vertically.
Place your surgical clamp (or pliers)
under the loop.
|
|
| |
|
| |
|
|
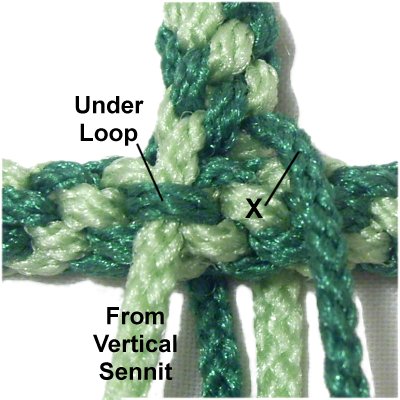
Pull the left cord coming from the
vertical sennit under the loop.
Use your tool again to pull the right
cord under the loop indicated with an
X. It is next to the left loop.
Repeat the same process in the back of
the Cross Pendant.
|
|
| |
|
|
Step 8,
continued: Pull all 4 cords so
there is no gap between the vertical and
horizontal sennits.
Measure the horizontal piece so there is equal
length on both sides of the vertical piece.
Make adjustments if needed. |
|
|
| |

|
|
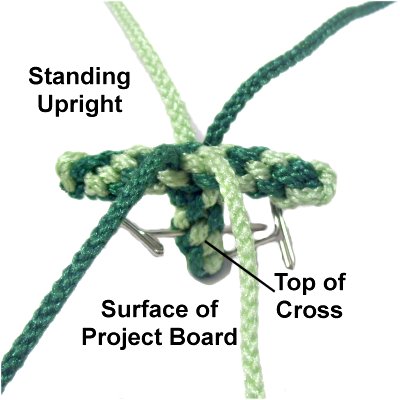
Step
9: Secure the top of the
Cross Pendant to your board, so it's
standing upright.
Repeat
steps 2 - 4, tying more Crown
Knots until the lower portion of the
vertical piece is 1.5
inches long.
|
|
| |
|
| |
|
Step 9, continued: Repeat
steps 5 and 6 to make a Shamrock knot
at the bottom of the vertical piece.
Make sure the ends are heading in the same
direction after you tighten both knots.
Apply glue when tightening.
This is optional, if you prefer to use a
different knot.
|
| |
|
| |
|
Step 10: You now have two
options for finishing off the ends of the cords:
- You can add beads to the four ends, and let
them dangle.
- You can cut off the excess material when the
glue is dry.
|
| |
|
|
|
|
Pass one or
more cords through spaces at the top of
the Cross Pendant, and use them to create
the necklace. |
|
| |
| |
| |
|
|
|
By
using any text or images on Free Macrame
Patterns, you are agreeing to our Terms
of Use
|
|
|
|
|
Have
any comments about the Cross Pendant? Contact Me.
|
|
|
|
|
|
|
| |