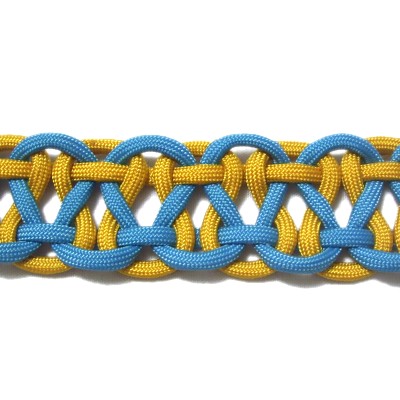
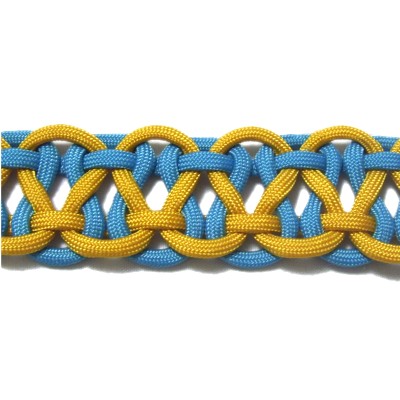
Description: The Link Weave
features curved segments that resemble links in
a chain. They are arranged so that one color
rests above another, which makes the design
reversible.
This interesting knot can be used to make
belts, dog collars, Paracord bracelets and
more. Use it any time you need a wide band
with open space. It can be tightened more
than what you see on this page, but it looks
better somewhat loose.
This decorative knot should be made with two
contrasting colors. One dark and
one light color looks especially nice.
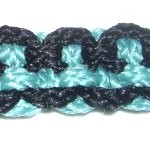
The Reversible
Belt is a Macrame project
based on this technique.
Click on the image or link the view the
instructions for making it, if you want to
give it a try.
I found this interesting knot on the Fusion
Knots website, under the
name KBK
Bar.
A tutorial for this decorative knot is
available in the video gallery, which
contains a wide variety of unique
decorative knots.
Preparation:
To practice, you need two cords, each at least
60 inches long. Try to use two different
colors.
To use the Link Weave in a project, cut the
cords 8
x the finished length you want to
make.
In the example shown, cord
A is gold and cord
B is blue.
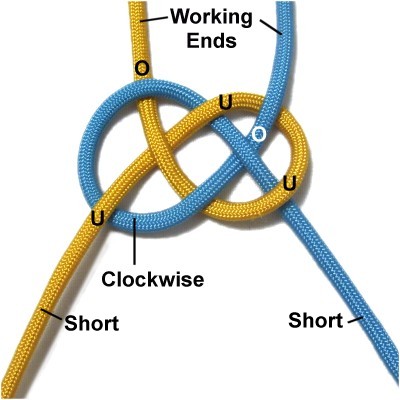
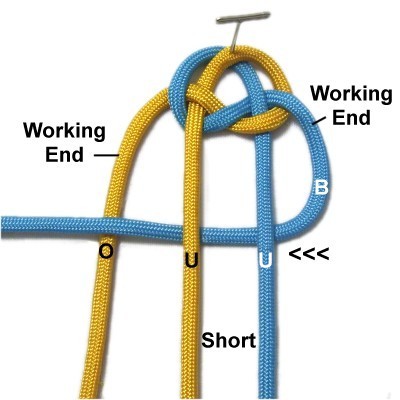
Sailors Knot
Step 1: You need to first make
a Sailors Knot to connect the
two cords and give you four segments to work
with. It also provides you with a loop
for a clasp.
When using the Link Weave in a project, you can
use two folded cords or four individual cords.
Measure from one end of each cord the finished
length + 8 inches. This gives you
enough material to make a button knot for a
clasp. You don't need to add the 8 inches if
it's not necessary for your project.
The measured portion is called the short
segment in the instructions. The
remainder of the material is called the working
end.
Secure both cords to your board vertically, with
cord A on the left.
Make a counter-clockwise
loop with the short segment of cord
A.
Place it at the measured area, passing under
to make the crossing point.
Slide the loop undercord
B at the measured area.
Start the left
loop with cord
B (short segment) by moving it clockwise,
passing under
the short segment of cord A, and over
the working end of cord A.
Complete the loop by passing it under
- over - under the three segments
associated with the right loop.
Tighten the
Sailors Knot, leaving a space for a button
knot if you need one for a clasp.
The entire band will be the same width
as this knot, so adjust it until you like
the size.
Continued
below
Step
1, continued: Measure the short
segments again and make adjustments as needed so
they are still the finished
length + 8 inches.
Secure the short segments so they have tension
and are vertical. The working ends of both
cords should be to the right and left of them,
arranged vertically.
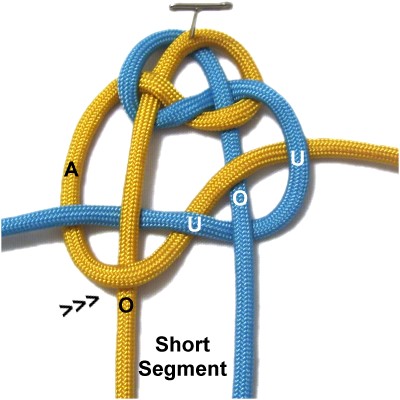
Link Weave
Step
2: Curve the working end of
cord
B to the left, passing under
the short portion of both cords, and over
the working end of cord A.
Curve
the working end of cord
A to the right, passing over
the short segment of cord A.
Move it diagonallyunder
the working end of cord B, over
the short segment of cord B, and under
cord B again on the right.
Tighten the
knot so it's the same width as the Sailors
knot.
The curved portion of cord B on the right
should be wide. The diagonal
segments on the left should be close
together.
For cord A it's the opposite.
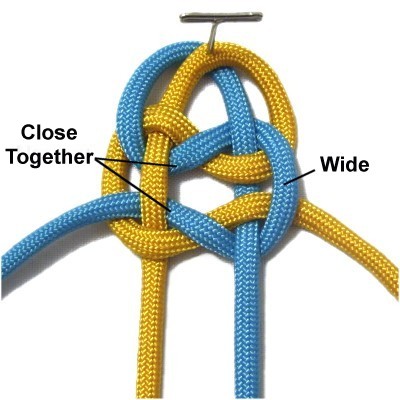
Step
3: Move the working end of cord
A to the left, passing over
the short segments of both cords, and under
the working end of cord B.
Designer's
Tip: For the second knot in the
Link Weave, you start with the working end on the
right, but the over
- under sequence is the opposite of the
first knot.
You will need to count the knots to keep track of
which instructions to use. All the even
numbered knots will be made as shown in step 3,
where you start with cord A.
The odd number knots are made like step 2, where
you start with cord
B.
Curve the
working end of cord
B to the right, passing under
the short segment of cord A.
Move it diagonallyover
the working end of cord A, under
the short segment of cord B, and over
cord A again on the right.
Tighten the
second knot so it's the same width as the
first.
The wide area of cord
B is on the left
this time. The diagonal segments
should be close together on the
right.
For cord A it's the opposite.
Step
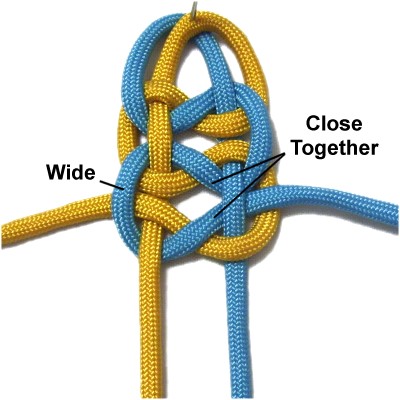
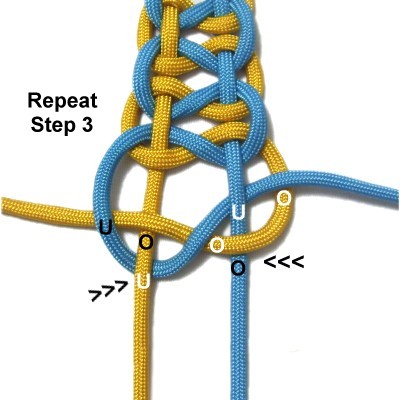
4:Repeat
step 2 to tie the third knot.
In this image, the path of cord
B is shown in black letters
(right to left).
The path of cord
A is in white letters (left to
right).
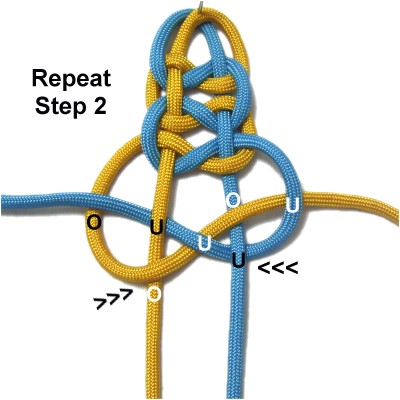
Step
5:Repeat
step 3 to tie the fourth knot.
In this image, the path of cord
A is shown in black letters
(right to left).
The path of cord
B is in white letters (left to
right).
Step
6:Repeat
steps 2 - 5 at least one more
time if you are practicing, or until the
sennit is the size you want.
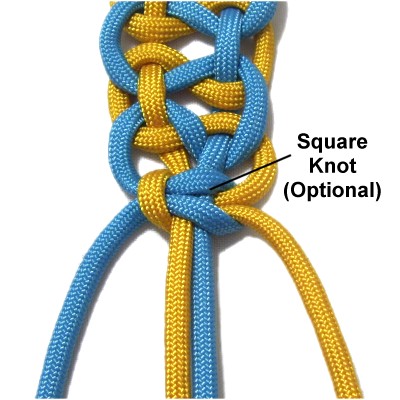
Step
7 (optional): Finish the
Link Weave by tying a Square
Knot with the working
ends. The short segments are the
fillers.
Turn the sennit to see which side you want
as the front.
Then finish off the working
ends by securing them to the BACK
of the sennit.
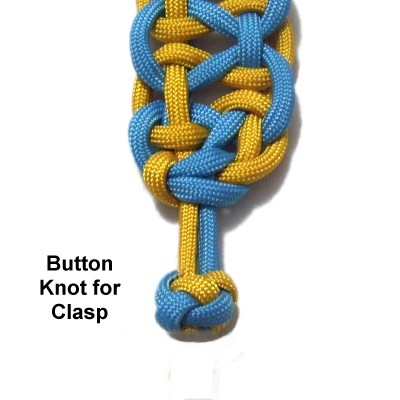
Step
8: You can now tie a button
knot with the short segments if you need a
clasp.
This image shows a Knife Knot,
also called the Diamond knot. It can
be made with two cords, which is why it's
a great option.
By using any text
or images on Free Macrame Patterns, you are
agreeing to ourTerms of Use