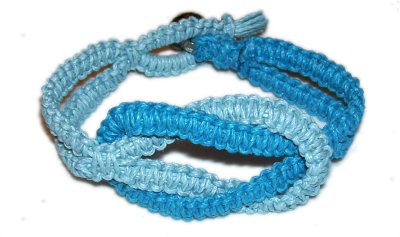
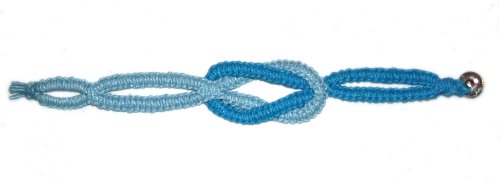
Description:
The Link Bracelet features several
sections made with the Square knot. The clasp in
one half is made with the Buttonhole Stitch.
The most interesting thing about this bracelet
design is that the two parts are linked in the
center. The technique is sometimes called an
infinity knot.
In the example shown, Hemp material was used so
the knots were more distinct. Cotton
material will make the bracelet smoother and more
flexible.
This Macrame project is easy, suitable for
beginners.
The Link Bracelet is made in two parts, so make
the calculations as follows:
For Part
1 (darker blue in images)
Cut 2 working cords, each 8
times the finished size you wish to
make.
Cut 4 cords, each 40 inches long (fillers).
For Part
2 (light blue in images)
Cut 2 working cords, each 8.5
times the finished size.
Cut 4 cords, each 40 inches long (fillers).
Prepare the tips of all the cords with glue or
tape.
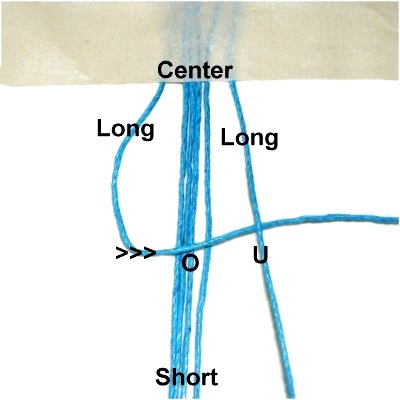
Link Bracelet - Part 1
Step
1: Secure one set of cords
on your board vertically, with tape across
the center.
The 40-inch filler cords should be between
the two working cords.
Move the left
working cord to the right, passing over
the fillers and under
the right working cord.
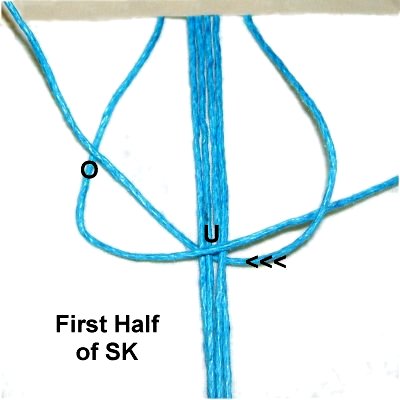
To complete
the first half of the Square Knot, pass
the right
working cord under
the fillers, heading left.
As you pull it out on the left, pass over
the left working cord.
Pull both working cords firmly, and
tighten the knot so it rests against the
tape.
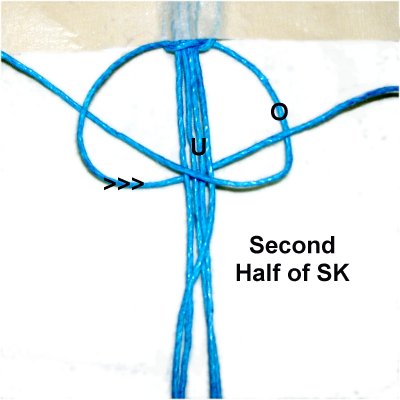
The two working
cords have switched
places.
Move the left
working cord (now on the right) over
the fillers and under
the other working cord.
To make the
second half of the SK, move the right
working cord (now on the left) under
the fillers.
As you pull it out on the right, pass over
the other working cord.
Tighten firmly.
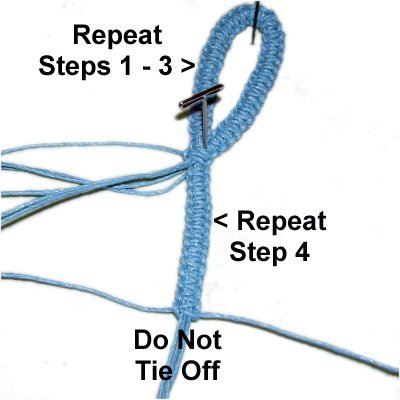
Step 2:
Tie a series of SK following the steps above,
until the sennit is 2 inches long.
Make sure they are all tightened firmly. Push the
knots closer to each other as you progress.
Step
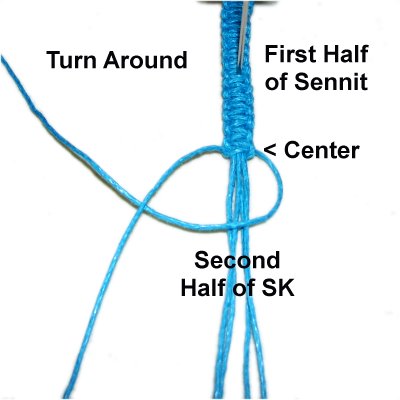
3: Turn the sennit around
and go back to the center.
Begin by tying the SECOND HALF of the SK,
which means you start with the working
cord resting on the right.
Then continue the sennit until it's 4
inches long.
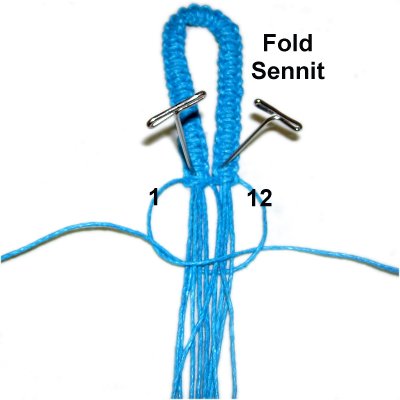
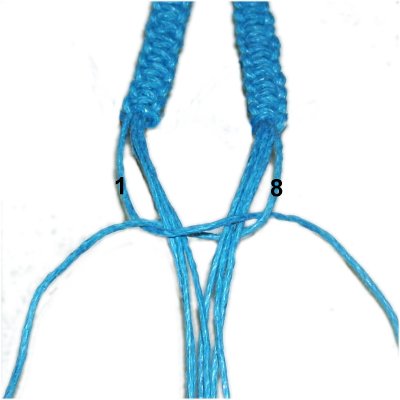
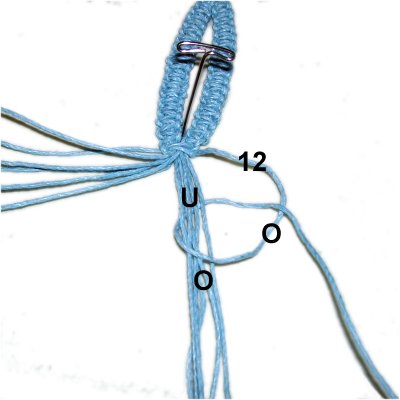
Fold the
sennit at the center, matching the last SK
at each end. Mentally number
the cords.
Use working cords
1 and 12 to tie a SK around allthe other
cords.
Try to keep the cords arrange neatly, so
they don't overlap. The SK will be large
and wide.
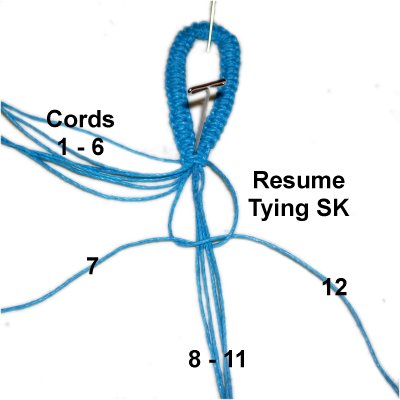
Tie a second SK below the first.
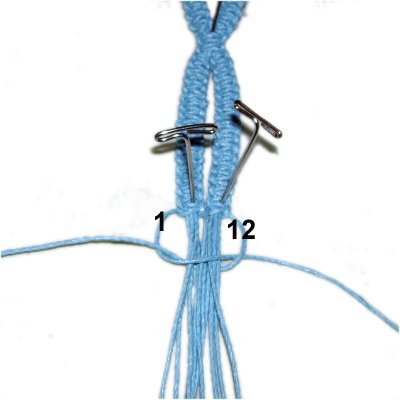
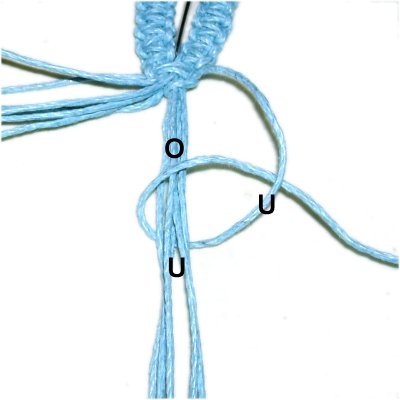
Step
4: Subtract
2 inches from the finished size
you are making, and tie a sennit of SK
measuring that size.
Do this with cords
7 - 12 (working cords 7 and 12).
Repeat with cords
1 - 6 (working cords 1 and 6)
By the time
you are finished, the working
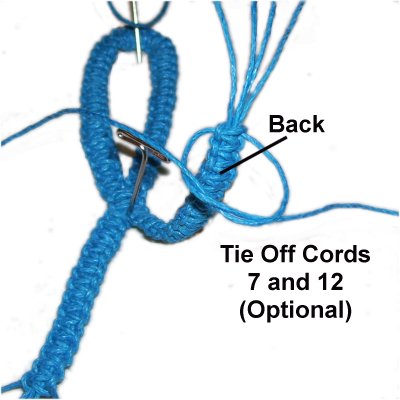
cords will be quite short.
You can tie them off with an Overhand
knot, placing it so it's in the back
of the sennit. (Optional)
You don't need to do this if the remainder
of the working cords is more than 8
inches.
Design Tip:
The image above shows the sennit lifted up and
bent backward for the optional finish.
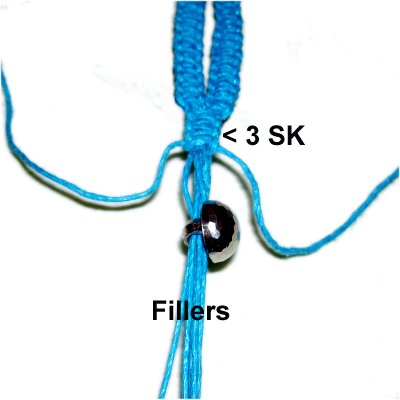
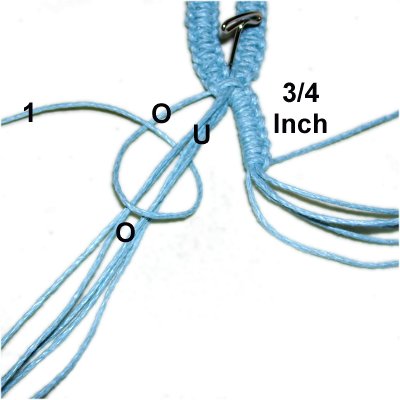
Step
5: Mentally number the
remaining cords (if you tied off in the
previous step).
Use the cords furthest to the left and
right to tie 3
SK around the remainder. In
this case, cords 1 and 8 were the working
cords. (see image below)
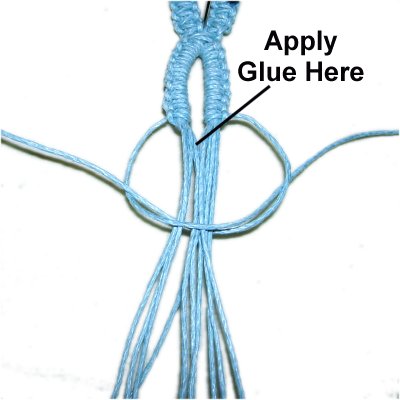
Move the
working cords aside. Slide the
button onto the FILLERS.
Tie atight
SK below
the button using the working
cords. Apply glue while
tightening.
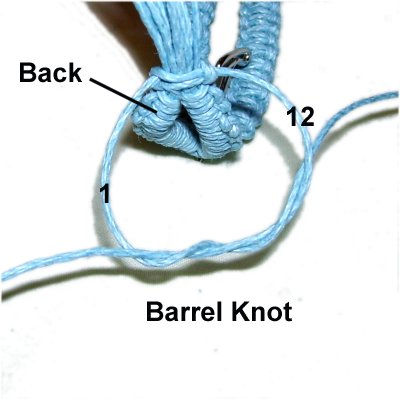
Step 5,
continued: Turn over the Link
Bracelet. Bend the fillers backward, towards
the Square Knots.
Tie a Barrel Knot with the working cords, so it
rests on top of the fillers. Tighten it as
much as you can and apply glue.
Apply glue under the fillers, adhering them to the
back of
the three Square knots.
When the glue is dry, cut off the excess material.
Link Bracelet - Part 2
Use the other set of cords to make the second
half of the Link Bracelet.
Step
6: Repeat steps 3 and 4.
DO
NOT tie off the working cords,
even if you did so in the first half.
Mentally
number the cords. Use cords 1 and 12
to tie one
Square Knot around all the others.
Divide the cords into two sets of 6.
Step
7: Use cord
12 to make right side of the
Double Buttonhole clasp for your Link
Bracelet, as follows:
Make a clockwise
loop, passing over
- under the other cords (7 -
11). As you pull it right, pass over
cord 12.
Make another
loop, passing cord 12 under
- over the other cords.
As you pull it right, pass under
cord 12.
Both
loops = one Vertical Larks Head knot.
Tie several
more knots, until the clasp is 3/4-inch
in size.
Repeat the same process on the left, using
cord
1. The loops are made counter-clockwise.
Complete the
clasp by tying a tight
Square Knot with cords 1 and 12, around
all the others.
Apply glue as you tighten, in the area
just below the Larks Head knots.
Step
8: Bend the clasp backward, or
turn over the Link Bracelet.
Tie a Barrel Knot with cords 1 and
12. Make sure it rests in the back
of the SK tied in the previous step.
Apply glue as you tighten.
When the glue is dry cut off the excess
material (cords 1 and 12).
Step 8,
continued: Trim the remaining cords
to 1/2-inch, and apply glue to the tips to prevent
unraveling.
The Link Bracelet is finished. The following
steps show you how to connect the two parts.
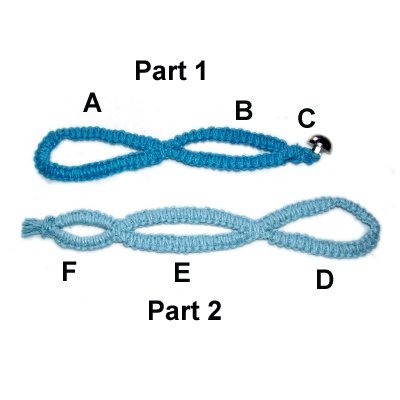
Place the two
designson
your work surface, so that Part
1 (with the button) is above Part
2 (with the buttonhole
clasp).
They should be heading in opposite
directions.
Mentally label the sections as shown.
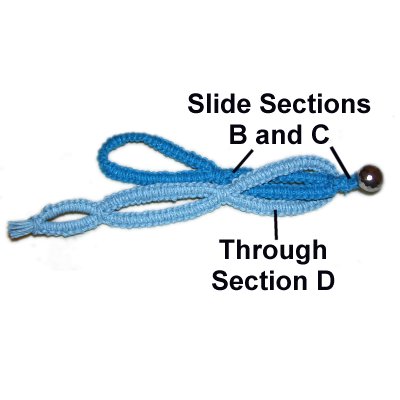
Sections
B and C (from part 1) go through
section
D (from part 2).
Make sure you pass into section D fromback
to front, as shown.
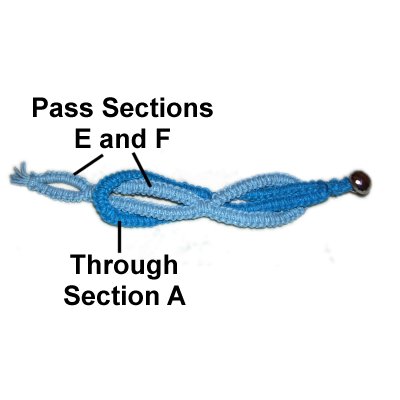
Sections
E and F (from part 2) go through
section
A (from part 1).
Make sure you pass into section A from front
to back.
Pull the two halves gently
in opposite directions, so the Link
Bracelet looks like the image below.
By
using any text or images on Free Macrame
Patterns, you are agreeing to ourTerms
of Use