Description:
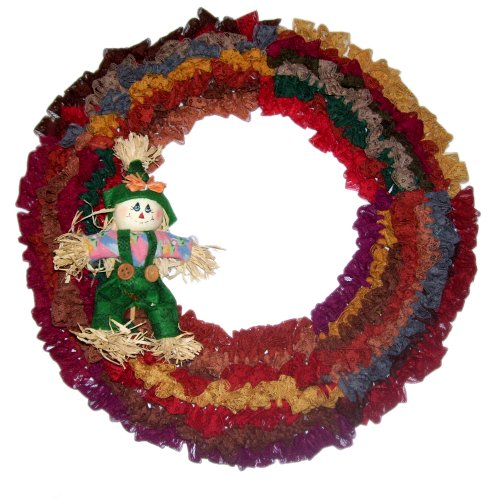
The Lace Wreath is a unique Macrame
project suitable for beginners. It features
the use of a Wreath Frame, and fabric lace rather
than cord material.
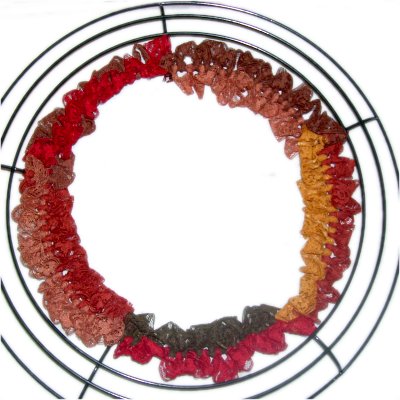
In the example shown, there is a random
arrangement of colors, which can be changed if you
prefer fewer colors. You can use cord
material instead of lace, if you prefer a
traditional Macrame design.
Since Wreath Frames come in many sizes, you will
need to make some calculations prior to
starting. Also, this design is time
consuming, and will take several hours to
complete.
Supplies
Needed:
Lace or Cord material (amount depends on
frame -- see preparation)
The calculations you must make for the Lace Wreath
are fairly easy, but you must first plan things
out in terms of colors. There are three
options:
One Color:
It's important to have some contrast, even if you
prefer the Lace Wreath be all one color. You
can use two shades of the same color, or even two
different types of lace.
Sectional Colors:
You can use the same color lace on all the rings
in one section. So if your frame has 5
sections, there can be 5 colors.
Random Colors:
You can use many different colors, but don't go
overboard. You use two pieces of lace per ring in
each section. So for a 4-ring wreath with 5
sections, that's 40 pieces of
material. It will be too "busy" unless
you limit the amount of colors.
A frame is
divided into 4 or more sections, separated
by cross bars. There are
usually 3 - 5 rings.
You will need to calculate the amount of
material needed for each
ring separately, since they are
slightly different in size.
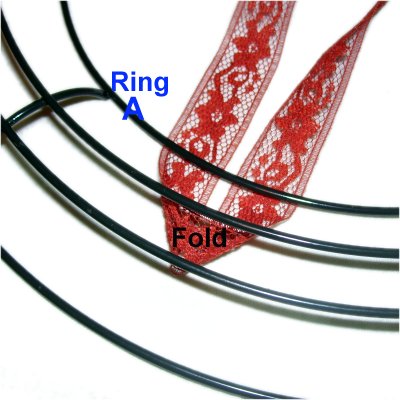
Complete the following calculations, after
mentally labeling the rings
as shown in the image above (inside to outside).
Measure ring
A between two cross bars (one
section).
Multiply that size by 12 = lace
length.
Repeat the same process for the other
rings. Write all the numbers on paper separately.
To determine the total amount of lace to
purchase, multiply the lace length for ring A by
the number of sections on the frame.
Then multiply that by two, since two pieces
are used to cover the ring.
Repeat with the remaining rings.
Add up all the lengths to get the total you
need to purchase.
Step
1: Cut one piece of lace
the size you determined is appropriate for
ring
A.
Fold it in half and place it under the
frame, with the fold heading towards the outside
of the frame.
Keep the lace flat and twisted as little
as possible.
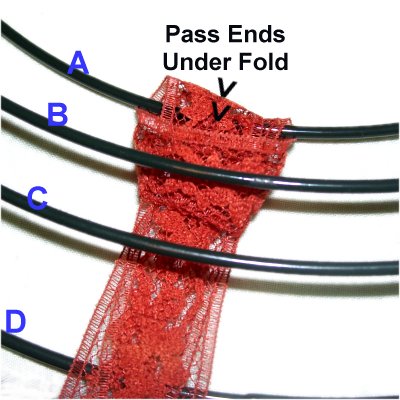
Step
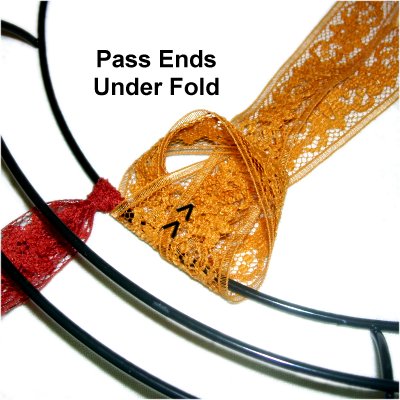
2: Complete the Larks Head
knot by passing the ends over
ring A and under
the folded area.
The ends should be heading towards the
outside of the frame.
Step
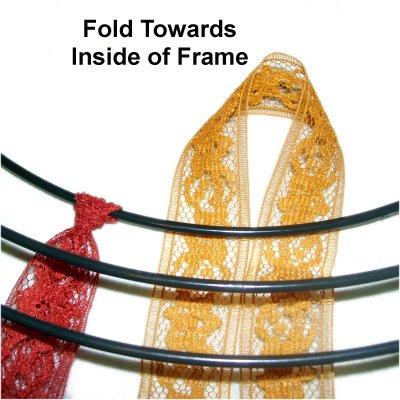
3: Cut another piece of
lace the same length as the first one
(ring A).
Fold it in half and place it under ring A,
but make sure the fold is the opposite
direction, heading towards the inside
of the frame.
Step
4: Pass the ends of cord 2
over
the ring and under
the folded area, to complete the Larks
Head knot.
Arrange the two cords near the center
of the ring.
The primary knot for the Lace Wreath is the
Vertical Larks Head knot, which is made in two
parts.
You start by arranging the frame on your work
surface, or held between your knees, so you make
the knots vertically.
Important:
Make sure the two pieces of lace are heading
opposite directions before and after tying the
knots described below.
Each piece of lace is used to cover half
the ring in
one section, which is why you start in
the center and work towards the cross
pieces.
The steps below show the next two knots:
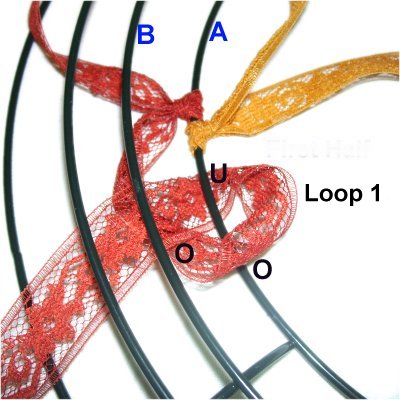
Step
5: The next knot is tied
with the first piece of lace you mounted,
and rests below the second piece.
Move it counter-clockwiseover
- under ring A, and over
the curved portion of the lace as you pull
it left.
Arrange the lace so it twists as little as
possible, but do
not tighten the loop.
Design
Tip: The picot loops for the Lace
Wreath are created by leaving loop 1 loose, and
tightening loop 2 completely.
But you will need to measure loop 1 first, so
don't tighten anything just yet.
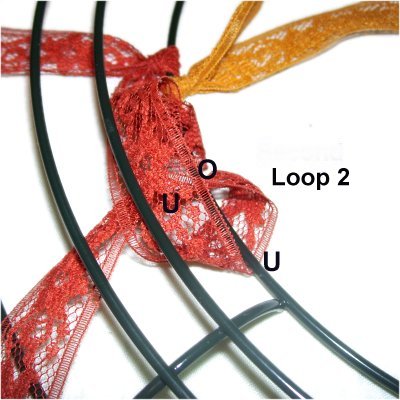
Step
6: Tie the second half of the
knot by moving the end of the lace counter-clockwise,
under
- over the frame and under
the lace, as you pull it left.
Do
not tighten this loop.
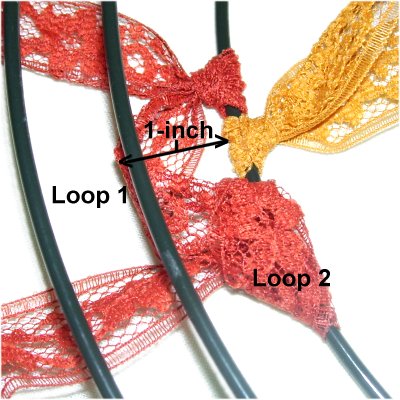
Step
7: Measure 1-inch from ring A to
the left, which will be close to ring
B. Adjust loop
1 out to that point.
Pull the end to tighten loop 2 while
holding the first loop steady. Measure the
picot again and make adjustments if
needed. The Lace Wreath looks better if
the picots are the same size.
Step
8: The next knot is tied
with the second cord you mounted, and
placed below the knot previously tied.
Repeat
steps 5 - 7 to make a Vertical
Larks Head knot, rotating clockwise.
Step 9:Repeat
steps 5 - 8 several times, until you
reach the cross bar. Push the knots close to
each other as you progress. Remember to cover only
half the
ring in the section you are working.
Alternate between the two colors, making sure the
ends are always heading opposite directions.
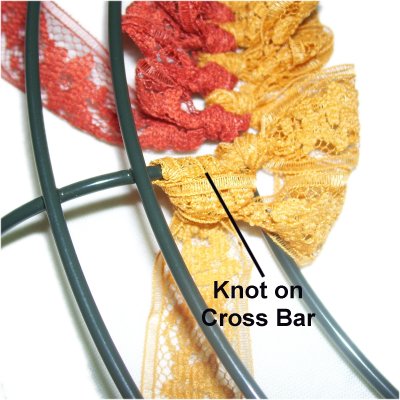
Tie
a Larks Head knot onto the cross bar, with
each piece of lace.
This image shows the cord on the right
attached first, but you can change that if
necessary. It helps to attach them
in opposite directions.
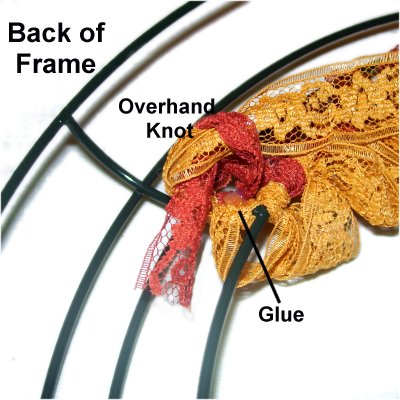
Turn over the
frame, so you are working in the
back.
Tie the two ends together with an Overhand
knot, placing glue so the knot rests on
top of it.
You can tie a second knot on top of the
first.
Step 10:
Turn the frame around and repeat
steps 5 - 9, using the other half of both
pieces of lace, to cover the remainder of ring A
(in the same section).
The colors will have changed places, but you
should follow the same instructions
(counter-clockwise for lace on left, clockwise on
the right).
Step 11:
Repeat steps 1 - 10 in each
section, until ring
A is completely covered.
Step
12:Repeat
steps 1 - 10 to cover each section of
ring B.
Repeat with ring C, followed by ring D.
One picot loop can be made larger than the others
(ring D), so you have a loop for hanging the Lace
Wreath to your wall.
Push all the picots to the front of the frame, and
it's ready for display.
By
using any text or images on Free Macrame
Patterns, you are agreeing to ourTerms
of Use