|
|
| |
 |
| |
| |
|
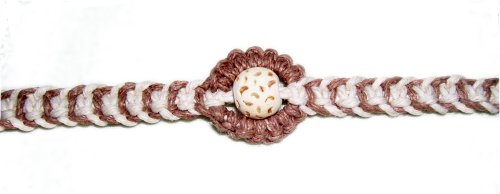
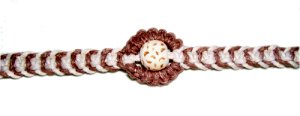
Description: This Hemp
Bracelet features a bead or button in the
center, surrounded by a Buttonhole
Stitch design.
The tire-tread pattern of this Micro-Macrame
bracelet is made by a vintage technique known as
nesting. Using two colors really brings
out the style of this technique, but you can use
one color if you wish.
This is an easy Micro-Macrame pattern, so is
suitable for beginners who have experience with
all the knots used in the design.
|
| |
| |
|
| |
| Supplies
Needed: |
- One 12mm focal bead or 1/2-inch shank
button (for center)
- 2 small beads for clasp (optional)
|
| |
|
| |
Choose your
Hemp Carefully! Inspect the material to
make sure it is not too dry, which will make it
feel coarse. Hemp is supposed to have a
slight sheen and feel comfortable against your
skin.
You can use other materials if you wish.
|
| |
|
|
|
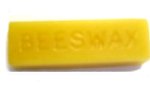
When using
Hemp cord, I recommend you get a stick of
Beeswax
to coat the material.
Make a small notch and pull the cut cords
through it, or rub it on the cords like a
crayon. |
|
|
|
| |
| Knots Used: |
|
|
| |
| |
| |
|
First Half
|
|
| |
|
Step 1: Cut 2 cords,
each 24 inches long (filler cords)
Cut 2 cords of each color, at least 8
times the finished length of the
bracelet. So for a 7-inch bracelet, the
cords should be 56 inches or longer.
For the clasp, cut 1 cord, 15 inches
long.
Prepare the ends with glue to prevent
unraveling, and apply beeswax (optional).
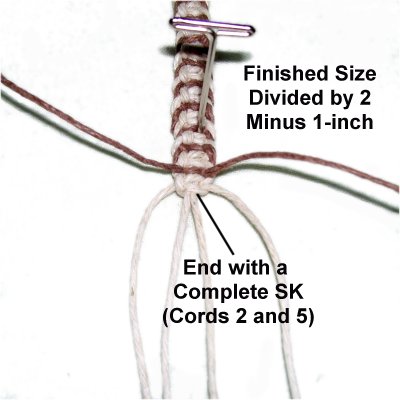
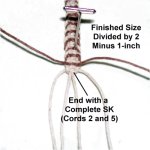
Do the following math before you get started
making the Hemp Bracelet:
Divide
the finished length by 2. Subtract
1 inch. The result is the length
you need for each half of the band.
|
| |
|
|
First Half of Band
|
|
|
|
|
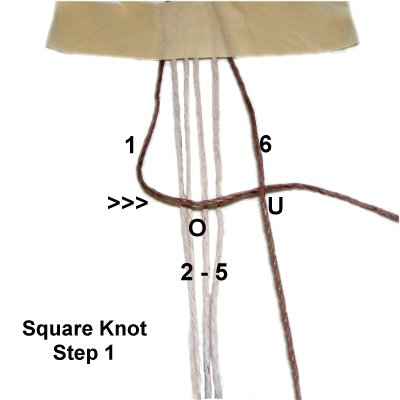
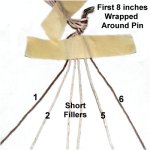
Step
2: Place the cords vertically on
your board, and place a piece of tape
horizontally 8
inches from one end.
The two short fillers should be in the
center, with the long working cords on
either side. When using two colors,
the darker cords should be in positions 1
and 6. |
|
|
|
|
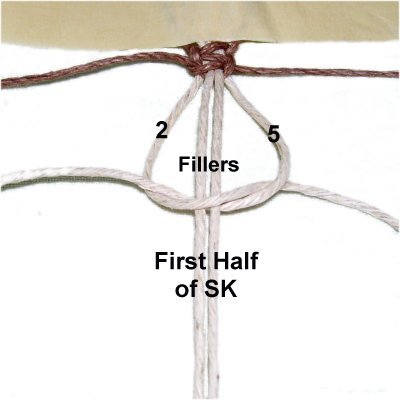
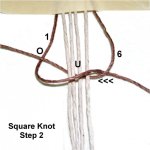
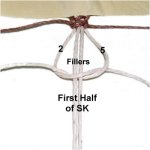
| Since you will be tying Square Knots for the
Hemp Bracelet, the four images below show the
steps. The first knot is tied with cords
1 and 6. The fillers are the other
four cords (2 - 5). |
|
|
|
|
First Half of SK
|

|
<<
Move cord
1 to the right, over
the fillers and under
cord 6.
Move cord
6 under
the fillers.
Pull it out on the left,
passing it over
cord 1. >> |
|
|
| |
|
|
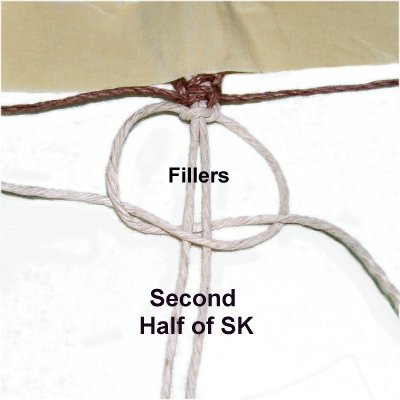
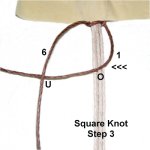
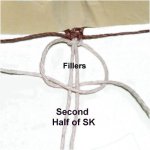
| Cords 1 and 6 have now switched places, so move
the opposite direction: |
|
|
|
Second Half of SK
|
|
<<
Move cord
1 to the left, over
the fillers and under
cord 6.
Move cord
6 under
the fillers.
Pull it out on the right,
passing it over
cord 1. >> |
|
|
|
|
|
| |
|
|
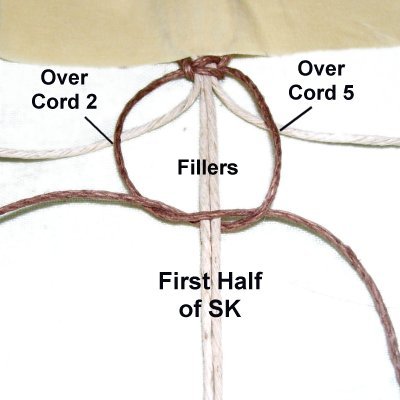
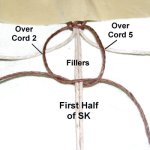
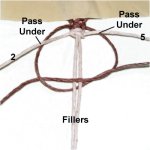
Step 3: Use
working cords 1 and 6 to tie the first half
of a Square knot, around the filler cords
only.
Make sure they pass over
working cords 2 and 5 as you bring them
down to tie the knot.
|
|
| |
|
| |
|
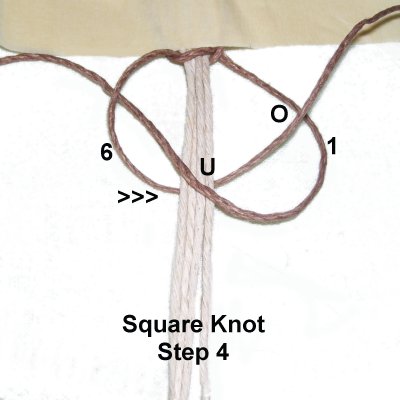
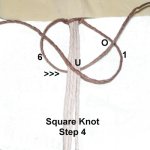
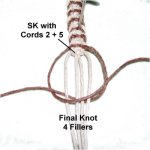
Step
4: Move cords 1 and 6
horizontally right and left.
<<
Tie the first
half of a SK
with cords 2 and 5,
around the holding cords.
Tie the second
half, too. >>
|
|
|
| |
|
|
Each time you use cords 2 and 5, you will ALWAYS
tie a complete Square knot.
When using cords 1 and 6, you will tie the first
half of a SK, and the next one will be the second
half.
Try to tighten all the knots with the same amount
of tension, so the loops along the edges of the
Hemp Bracelet are neat. |
|
|
|
|
|
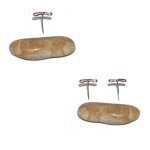
To keep track
of which half of the knot you tie, a
simple counter can be made.
Move a stone back and forth in front of
either one or two pins. This will tell you
if the first or second half of the knot is
to be tied. |
|
|
|
| |
|
|
Step
5: Move cords 2 and 5
horizontally to the right and left.
Bring cords 1 and 6 under
2 and 5, and then tie the second
half of the SK you began in step
3.
(See
information below) |
|
| |
|
|
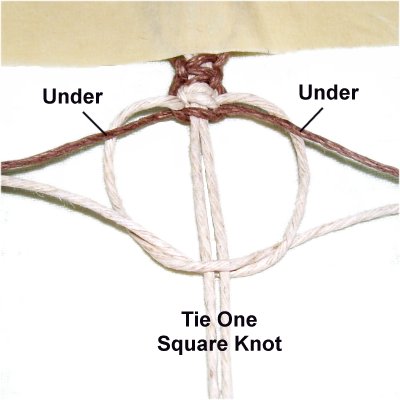
Important:
You began step 3
by moving cords 1 and 6 OVER
cords 2 and 5.
This
only applies to that one step.
For step 5 and the remainder of the Hemp Bracelet,
always start by bringing the working cords UNDER the ones
previously used. |
|
|
| |

|
|
Step 6: Move
cords 1 and 6 to the sides, and bring
cords 2 and 5 under them.
Tie a complete SK with cords 2 and 5,
as in step 4.
|
|
| |
|
|
Tie the first
half of the SK with cords 1 and 6.
Pass them under
cords 2 and 5 before you do so.
Repeat
step 4.
Repeat
step 5, tying the second
half of the SK.
|
|
|
|
|
|
Continue alternating between the two sets
of working cords, until the band is the
size you came up with when you did the
math in step 1.
Make sure you end with the complete SK
tied with cords 2 and 5 (step 6).
|
|
| |
|
| |
|

|
|
Center Area -- Buttonhole
|
|
| |
|
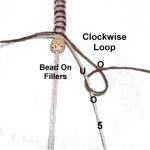
Step 7: Now it's time to
work on the center portion of the Hemp Bracelet.
Slide the bead onto cords 3 and 4 (fillers).
Use cords 5 and 6 to make the Double
Buttonhole Stitch:
|
| |
|
| |
|
|
Use cord 6 to tie the first half of a
Vertical Larks Head knot onto cord 5,
rotating clockwise.
Bring cord 6 over
and then under
cord 5.
As you pull the cord to the right,
pass over
cord 6.
|
|
| |
|
| |
|
|
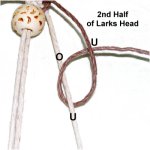
Tie the second half of the knot just
below, by passing cord 6 under
- over
cord 5.
Bring it under
cord 6 as you pull it to the
right.
Both
steps equal one Larks Head knot.
|
|
| |
|
| |

|
|
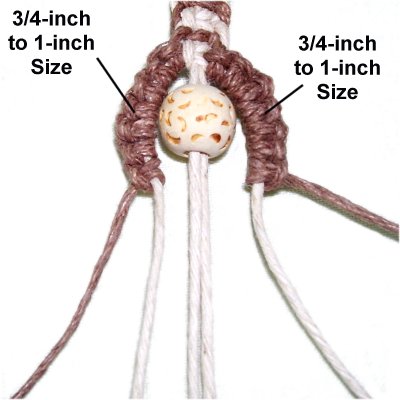
Step
8: Tie several more Larks head
knots, until the buttonhole design
reaches the bottom of the bead or
button.
Add extra knots until the sennit is
3/4-inch to 1-inch
long.
Repeat the process on the left
side. The knots are tied with cord
1, rotating counter-clockwise.
|
|
| |
|
|
|
|
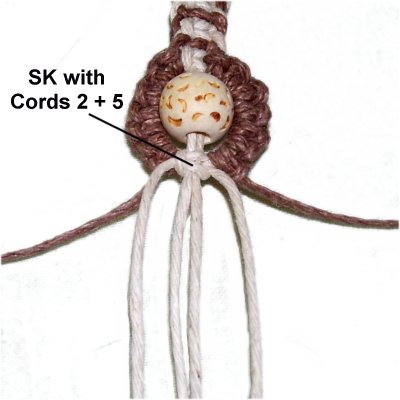
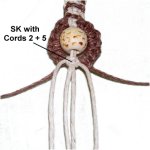
Tie a SK with
cords 2 and 5 to close the buttonhole
loop.
The knot should be tied around the holding
cords only.
Cords 1
and 6 are not used in this step. |
|
|
|
|
|
Second Half of Band
|
|
| |
|
|
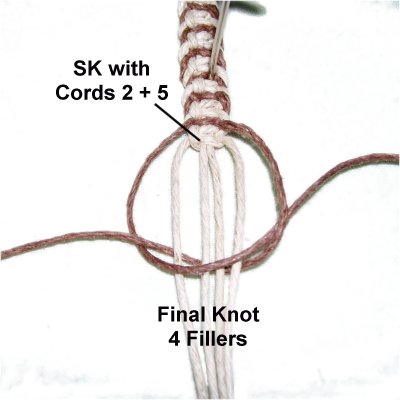
Step
9: Repeat steps 3 - 6 to
make the second half of the Hemp
Bracelet. So the next knot tied is
the first
half of the SK using cords 1 and
6 (step 3).
The band should end
with the complete SK made with cords 2 and
5 (step 6).
Tie the final knot with cords 1 and 6
around the other four cords, as in step 2. |
|
|
|
|
|
|
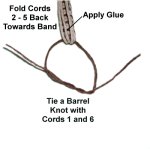
To finish off
the cords for the Hemp Bracelet, flip it
over so you are working in the back.
Fold cords 2 - 5 backward,
towards the band. Arrange the cords
neatly and apply glue under them.
Hold the cords with clips until the glue
dries, then cut off the excess material. |
|
|
|
|
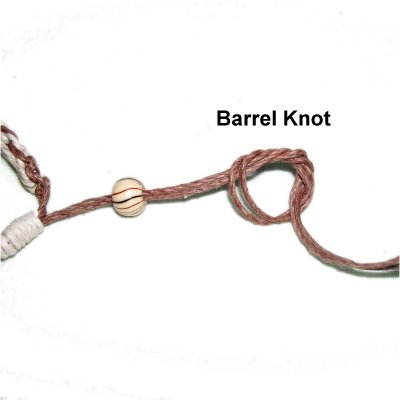
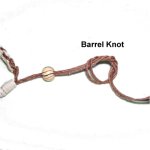
Tie a Barrel Knot with cords 1 and 6. Pull
the ends horizontally
when tightening, so it's as flat as
possible. You can apply glue if you wish.
Cords 1 and 6 will now be used as part of the
sliding clasp described below. |
|
|
|
|
Sliding Clasp
|
|
|
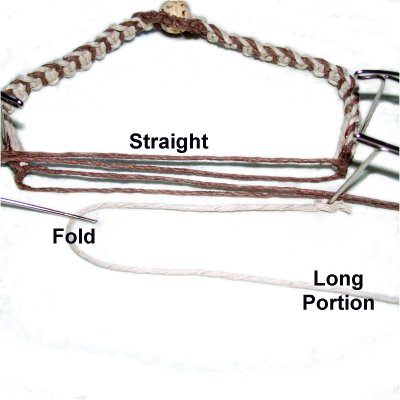
| Step 10:
Arrange the Hemp Bracelet so the remaining ends
(cords 1 and 6) are straight and resting next to
each other horizontally. |
|
|
| |
|
|
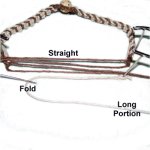
Tie an
Overhand knot at one end of the 15-inch
cord.
Secure the knot next to the straight ends,
on the right.
Move the cord left, fold it, and then
bring it back to the right. The long
portion is used to tie the
Wrapped knot. |
|
|
| |
|

|
|
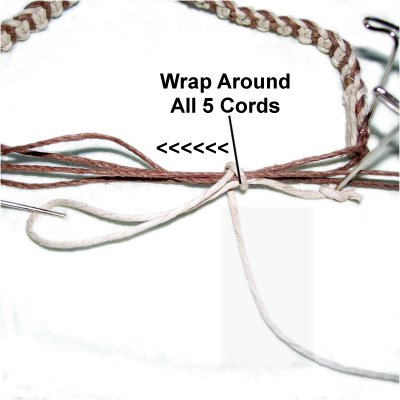
Wrap the long
end around the 4 cords from the bracelet,
as well as the secured end of the cord you
are using
Wrap firmly but not tightly, since the
ends need to slide through the knot.
Progress from right to left, wrapping for
at least 1/2-inch. |
|
|
|
|
|
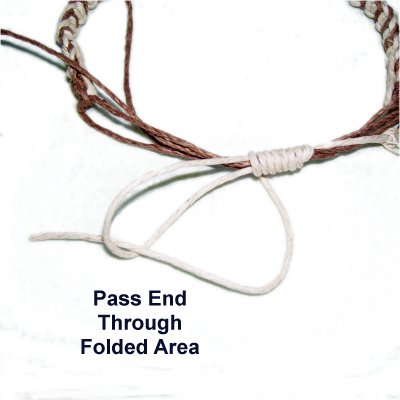
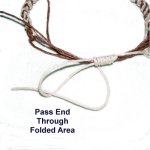
Pass the long
end through the folded area, which looks
like a loop. |
|
|
|
|
|
|
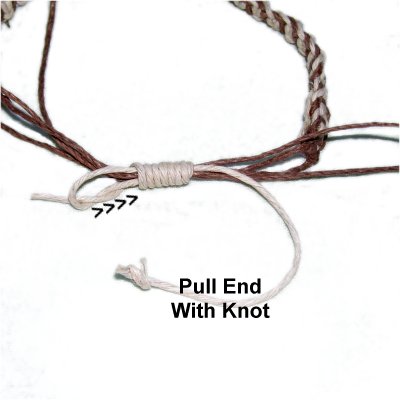
Pull the end
that was secured (with the knot).
The loop and other end will be pulled
inside the Wrapped Knot, securing
it. Make sure it's pulled about half
way through the knot.
Trim both ends of the clasp
cord flush with the edges of the
knot. Make sure you don't cut the other
four. |
|
|
|
|

|
|
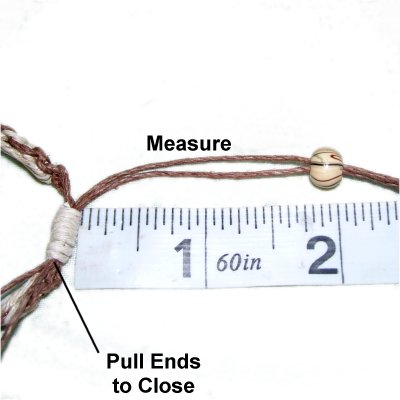
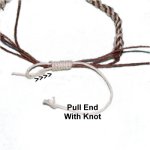
Pull the ends
to close the Hemp Bracelet. Apply
one bead to the two ends if you wish.
Measure 2 inches from the Wrapped
Knot. |
|
|
|
|
|
|
Tie a tight
Barrel knot with the two ends working
together, placing it at the spot measured.
Repeat with the cords on the other side of
the clasp.
|
|
|
| |
| |
|
|
By
using any text or images on Free Macrame
Patterns, you are agreeing to our Terms
of Use
|
|
|
|
|
Have
any comments about the Hemp Bracelet? Contact
Me.
|
|
|
|
|
|
|
| |